Thank you for choosing NIO ET5 smart electric vehicle (hereinafter referred to as "ET5" ). We
will provide you with considerate and thoughtful user services during your green journey with ET5.
Before embarking on a journey with ET5, it is recommended that you read the "User Manual" on the
central display to learn all the information required for the use of the vehicle.
Without legal and effective authorization, no one may make copies of or modify the contents
of this manual in whole or in part.
Without legal and valid authorization, no one may refit, adjust, or disassemble vehicle
parts, so as to prevent the occurrence of function failures or personal injury.
The labels, signs and pictures used in, as well as the contents of this Manual are for
illustration only.
The actual equipment, configuration, functions etc. of your vehicle may be different from the
description and illustration in this manual. They may be upgraded with the change of the vehicle software
version. Please refer to the actual equipment, configuration, functions etc. of your vehicle. For the
avoidance of doubt, NIO has the right to decide whether and when to upgrade your vehicle's equipment,
configuration, functions and related software for safety, compliance with laws and regulations and other
considerations.
Please strictly abide by the warning information referred to in this Manual. It will help you use
the vehicle more safely. Pay attention to any other warning information released to you by NIO. Please make
sure that you read the latest version of this manual carefully and familiarize yourself with the functions
of ET5 before using.
If ET5 is not operated correctly, it may cause injury to you or others or lead to
vehicle damage or property loss. NIO shall undertake no responsibility in such an event.
Warning: This content is closely related to personal safety. Please always comply with it!
Failure to comply may result in injury or a serious accident.
Caution: This is to advise you on how to avoid possible vehicle damage or property loss.
Notice: This is to suggest to you how to make better use of your vehicle.
If you have any questions about this Manual or need emergency assistance, please call the NIO
Hotline, or contact NIO via E-mail.
Region
Contact
Email
Denmark
+8000 999 6699
+45 898 81 422
contact.dk@nio.io
Sweden
+8000 999 6699
+46 844 689 619
contact.se@nio.io
Netherlands
+8000 999 6699
+31 202 595 509
contact.nl@nio.io
Germany
+8000 999 6699
+49 891 20 86 556
contact.de@nio.io
Norway
+47 239 67 861
contact.no@nio.io
We wish you a safe and enjoyable journey !
Unlocking/Locking with Smart Key
Before entering the vehicle, you can use the Smart Key to unlock the vehicle. Depending on the
state of the Smart Key and the surrounding environment of the vehicle, the furthest effective range of the
Smart Key is 30–70 meters outside the vehicle.
The Smart Key has the following buttons:
Unlock button
When the vehicle is in PARK (P), press this button to unlock the vehicle. After
unlocking, the turn signals on both sides of the vehicle will flash three times to indicate
successful unlocking. After successful unlocking, the outer door handles will automatically pop
up.
When all four doors are unlocked with Smart Key, the liftgate can be opened from the
outside without a key.
Press and hold the unlock button to open all the windows at the same time; release
the unlock button during the movement of the windows and the windows will stay at the current
position.
You can set the unlocking method of the smart key through the Center Display: enter
the Settings interface on the Center Display, and tap Doors & Windows
Locks > Doors > Vehicle Unlock Mode .
Select All Doors: you only need to press the unlock
button on the key once to unlock all the doors at the same time;
Select Driver Door: you can press the unlock button
on the key once to open only the driver's door and press it again to open the other three
doors.
Lock button
When the vehicle is in PARK (P) and all doors (including the hood and liftgate) are
closed, press this button to lock the whole vehicle. After the whole vehicle is locked, the turn
signals on both sides will flash once and the horn will sound once to indicate the successful
locking. At the same time, the outer door handles are retracted, and the side mirrors are
automatically folded (enter the Settings interface on the Center Display, and tap Position Adjustment > Side Mirror > Auto Fold on Lock to set the
automatic folding of side mirrors).
After locking, the liftgate can only be opened from the outside using the Smart Key.
You can set the on/off of the horn prompt sound through the Center Display by
entering the Settings interface on the Center Display, and tapping Sound
> Alerts & Notifications > Lock Confirmation Sound.
Press and hold the lock button to close all the windows at the same time; release the
lock button during the window movement and the windows will stay in the current position.
When the vehicle is not being driven and the valid Smart Key is within 70 meters of
the vehicle, press the button twice within 3 seconds to start the Find My Car feature. The
vehicle's horn will honk, and the turn signals will flash to indicate the vehicle's location.
Press the button again to disable the Find My Car feature, otherwise it will be automatically
turned off in 10 seconds.
When all the doors are closed, you can press the lock button of the smart key outside
the vehicle. At this time, the vehicle is locked. The turn signals will flash once and the horn
will sound once to indicate that the locking is successful. If any door is not closed, the
vehicle cannot be locked by pressing the lock button at this time, and you will receive a
reminder message from the NIO App, reminding you that the vehicle has not been successfully
locked.
Lifegate button
When the liftgate is closed, press and hold this button to open the liftgate; when the
liftgate is open, press and hold this button again to close the liftgate.
When leaving the vehicle with people or pets inside, be sure to take the Smart Key with you.
Leaving the Smart Key inside the vehicle may result in accidental injury.
CautionNT2智能钥匙
The Smart Key is an electronic device. Please avoid hitting it, disassembling it or
leaving it in a place with high temperatures, humidity and strong vibrations.
If passengers are still in the vehicle when you lock it, you can perform the smart key
lock operation and passengers can still open the door from inside the vehicle, but the anti-theft
alarm will be triggered.
If a smart key or mobile phone with Bluetooth lock/unlock function is still in your
vehicle after the vehicle has been locked, the smart key lock operation can still be performed for
your vehicle and the mobile app will inform you that there is a key in your vehicle.
If a passenger takes a smart key or mobile phone with Bluetooth unlock/lock function
more than 3 meters from your vehicle, your vehicle will inform you that a key has left your
vehicle.
If no door or tailgate is opened within 30 seconds of your vehicle being unlocked, all
doors and the tailgate are automatically relocked.
If a key is lost or damaged, please contact the NIO Service Centre immediately and take
all current keys with you for key binding operations and apply for a new key.
Caution智能钥匙亏电时可使用物理应急钥匙上锁驾驶侧车门,所有车门随之一同上锁。
When the Smart Key battery is low, you can use the physical emergency key to lock the driver
door, locking all other doors at the same time.
To facilitate the locking of the vehicle when the vehicle is parked, go to the Settings
interface on the Center Display, and tap Doors & Windows Locks > Windows >
Auto Close on Lock, so that when you use the external locking method (such as smart key, NFC
key, NIO App, Keyless Locking and Walk-Away Lock) to lock the vehicle, it can automatically close all the
windows of the vehicle, and has an anti-pinch feature during the closing process. The window movement will
stop if the Unlock/Lock button on the Smart Key or the NIO App is pressed.
Caution执行锁车自动关窗时请确保车辆已成功上锁。
Make sure the vehicle is locked before activating the automatic window closing
function.
For occupant safety, the windows will not close if a front seat is occupied when the
vehicle is locked. Do not leave passengers or pets in the locked vehicle.
If the car is locked while a window is being raised, the window will not be raised. In
this case, unlock the vehicle first, then lock the vehicle again and the windows will close
automatically.
Replacing the Smart Key Battery
The smart key uses a CR2477 button cell. To replace it, firmly pinch the side of the key, and
use your fingernail or a thin plastic piece to slide along the edge of the key from the bottom until you
can open the bottom cover for battery replacement.
Please dispose of used batteries according to the instructions and local regulations. For more
details, please refer to the NIO website.
Install the button cell with the positive side facing down. After installing the battery, make
sure to align the conductive spring and close the back cover properly to ensure the normal operation of
the battery.
When the Smart Key battery is low, it will affect the remote unlocking feature of the
vehicle. In this case, you can try to move closer to the vehicle to unlock it. If it fails to unlock,
please use other methods (such as the mobile App or a physical emergency key).
Radio waves can interfere with the Smart Key. Other electronic devices (such as phones,
computers and tablets) should be kept at least 30 centimeters away from the Smart Key.
Pairing a Smart Key with Your Vehicle
When activating the vehicle, the smart key is automatically paired with the vehicle. You can
add a smart key in the NIO App and pair it with your vehicle.
Turn on the Bluetooth feature on your phone, select Pair Smart
Key on the "My Car" interface of the NIO App, and press and hold the Unlock button on the smart
key for 3 seconds to enter the key pairing mode. Once the app detects your smart key, choose to pair it.
You can then view the status of the key on the app interface and also unpair the key if necessary on this
page.
Caution智能钥匙绑定车辆
A Smart Key can only be linked to one vehicle. If a key is tied to another vehicle
under your name, pressing and holding the Smart Key button will not initiate a search for the key
on the NIO App interface.
There is a limit on the number of Smart Keys that can be linked to a vehicle. To link a
new Smart Key, the existing key must be deleted on the NIO App's key management interface before
the new linking can be completed.
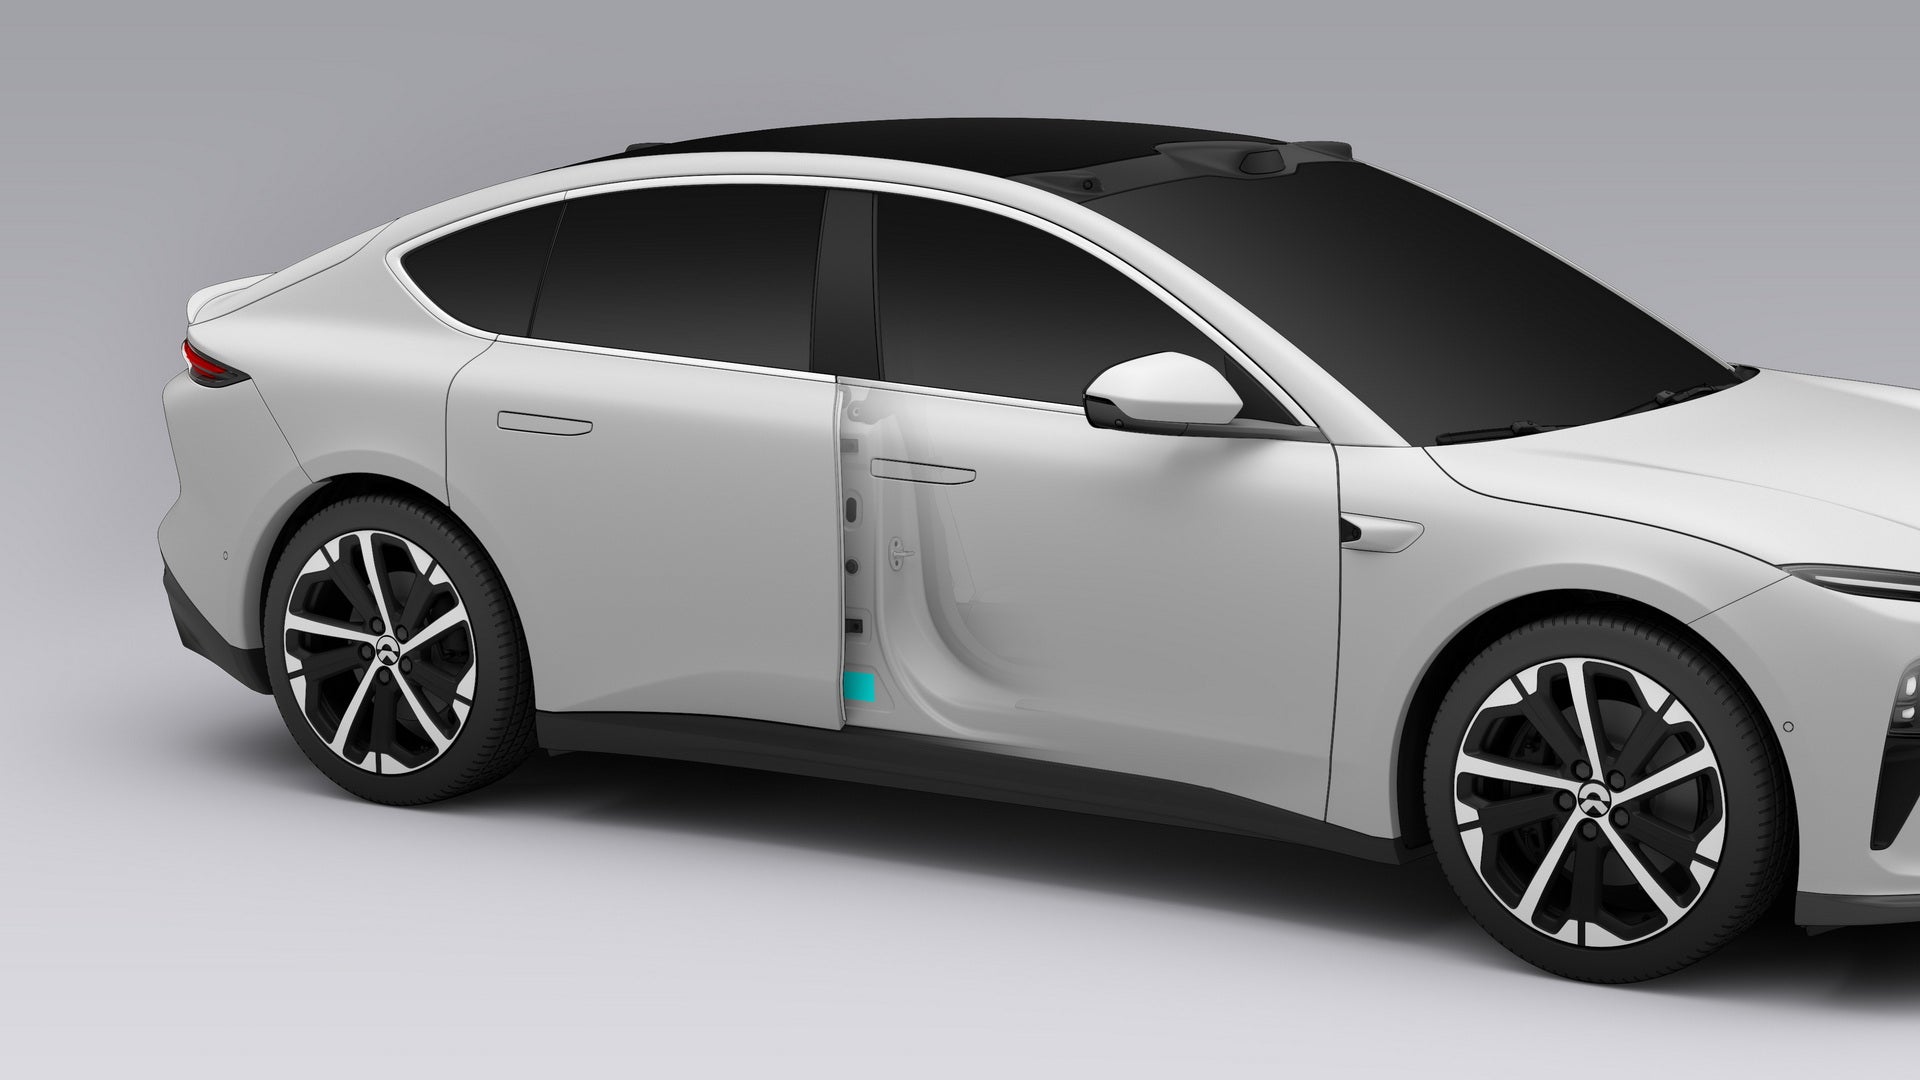
Unlocking/Locking with NFC Key
You or the authorized user can use an NFC-enabled mobile phone or NFC card to unlock or lock the
vehicle. You can easily manage the NFC key and perform deletion operations on the key management interface.
To unlock or lock the vehicle from your phone:
To get your NFC phone key, go to My Car> Settings > Keys
on the NIO App.
Turn on the NFC feature of the mobile phone, and set NIO as the default payment App.
Keep the phone screen unlocked, put the NFC sensing area of the phone close to the NFC
sensing area of the B-pillar on the driver side, then the NIO App will prompt "NFC key is being used".
Once the vehicle is unlocked, the door handle will pop up automatically, and will automatically retract
if the vehicle is locked along with a "click" locking sound.
You can also hold the NFC card close to the NFC sensing area of the B-pillar on the driver side
and hold it there for a while, then the vehicle will be automatically unlocked or locked. Once the vehicle
is unlocked, the door handle will pop up automatically, and will automatically retract if the vehicle is
locked along with a "click" locking sound.
CautionNT2 NFC 功能
The NFC detection range is less than 10 millimeters. It is recommended that you hold your
mobile phone or NFC card near the NFC detection area for a short time to unlock or lock the car.
After unlocking the car with NFC, you can still lock the car using other methods (such as
your smart key fob or emergency key). We recommend that you carry your smart key fob or phone with
you.
Please keep your NFC card in a safe place. Protect it from shock, bending, high
temperatures, strong vibrations, and damage from liquids.
You cannot use the NFC function during vehicle updates. Please carry the smart key fob
with you to unlock the vehicle.
When unlocking or locking the vehicle via NFC, please log in to the NIO app and
re-download the NFC key if you are unable to obtain an authenticated NFC key. If an authenticated
NFC key is not detected, please ensure that the vehicle matches the NFC account. Then reopen the NFC
application and unlock the phone screen to unlock or lock the vehicle again. If NFC still doesn't
work, please contact NIO.
Bluetooth Key
Once the Bluetooth Key is enabled on your phone, you no longer need to carry the Smart Key. You
can lock, unlock, and start the vehicle with your phone.
Go to My Car> Settings > Key interface and tap Access in the NIO App; once you access the key, enable the Bluetooth of your phone
and approach the unlocked vehicle. The Bluetooth signal of the vehicle will be paired with your phone and
activate the Bluetooth Key service.
Once activated, you can use the Bluetooth Key normally. The NIO App can replace the smart key to
unlock and lock the vehicle. When approaching the vehicle with a previously paired Bluetooth Key, the app
will automatically connect to the vehicle.
You can check whether the Bluetooth Key is connected to the vehicle on the My Car page, or manage
the Bluetooth Key on the key management interface.
When the vehicle is parked, the Bluetooth Key is enabled and within the vehicle's Bluetooth
connection range (typically around 30–70 meters, depending on the Bluetooth connection status), the
Bluetooth Key can perform the following functions:
Tap the Lock/Unlock button on the My Car interface in the NIO App to lock or unlock the
vehicle, in which case the door handle will automatically pop up or pop in.
Touch the designated area on the door handle with your phone to unlock or lock the vehicle.
After enabling Walk-Up Unlock in the Center Display, approach the vehicle within a certain
distance with the phone and the vehicle will be automatically unlocked.
After enabling Walk-Away Lock in the Center Display, leave the vehicle for a certain distance
with the phone and the vehicle will be automatically locked.
Open and close the trunk by pressing the trunk release button or through the My Car interface
on the NIO App.
Locate the vehicle, open/close windows, or summon the vehicle through the My Car interface on
the NIO App.
Start the vehicle by pressing the brake pedal after unlocking the vehicle using the Bluetooth
Key, entering the driver's seat, and closing the door.
Caution手机蓝牙钥匙
If a Bluetooth connection error prevents you from locking/unlocking the vehicle with the
Bluetooth key, rectify the error and try again.
If the Bluetooth connection error prevents you from starting the vehicle with the
Bluetooth key, please reconnect via Bluetooth and try again.
Both the car owner and authorized users can create a Bluetooth digital key, but the
number of Bluetooth digital keys that can be paired with the vehicle is limited.
Both the vehicle owner and authorized users can create a Bluetooth key, but the number of
Bluetooth keys that can be paired with the vehicle is limited.
You can still lock the vehicle with the Bluetooth key even if there are passengers in the
vehicle. The occupants can exit the vehicle, if necessary, but the alarm will be triggered.
If a smart key fob or phone with the Bluetooth digital key is left in the vehicle, you
can still lock the vehicle with the smart key fob and the NIO app will remind you that a key is left
in the vehicle.
If a smart key fob or phone with the Bluetooth digital key is left in the vehicle, you
can still lock the vehicle with the smart key fob and the NIO app will remind you that a key is left
in the vehicle.
Find My Car
Finding your vehicle when it is far away
You or your authorized user can check the parking location information of your vehicle in the
NIO App. When the vehicle is connected to the network, you can check the current location where the
vehicle is parked at the top of the “My Vehicle” interface in the NIO App. Tap this location information
to view the current location of the vehicle on the map interface.
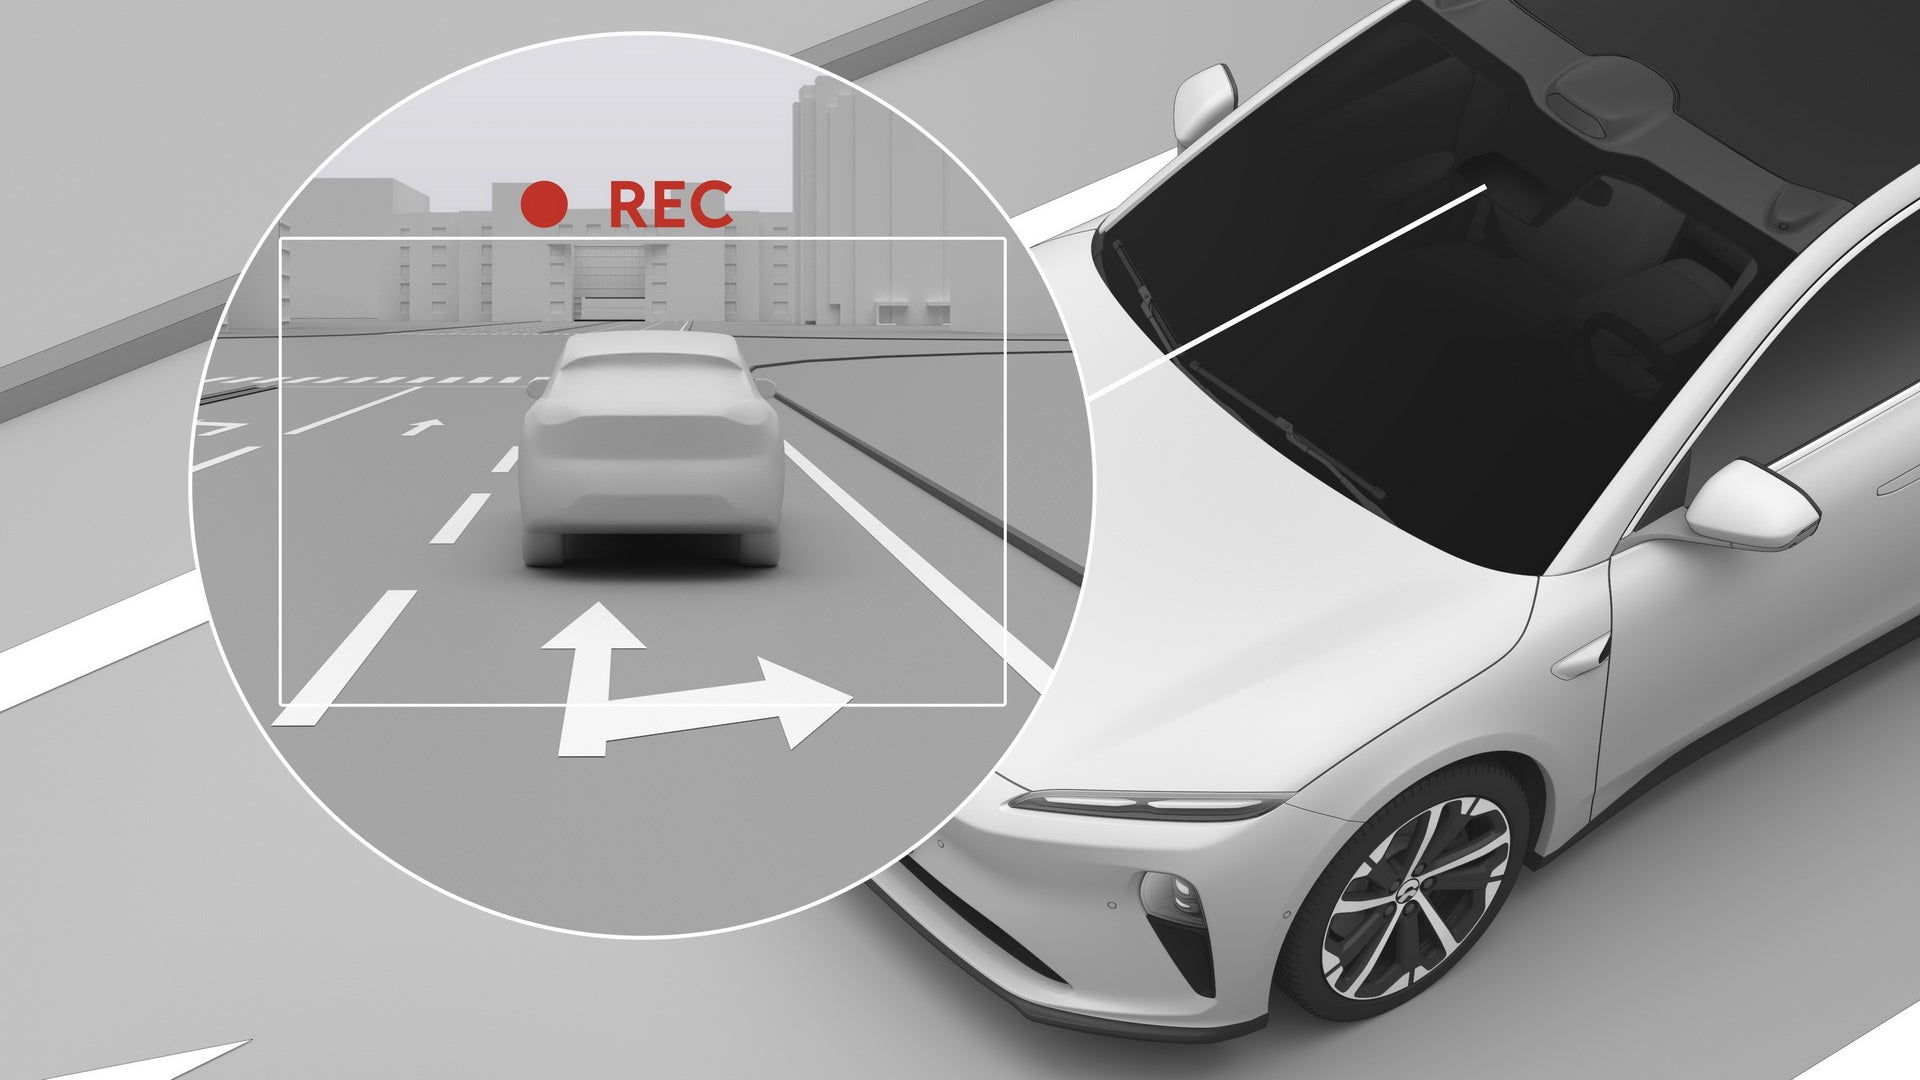
To enable or disable this feature, go to the Settings interface from the bottom of the Center
Display, and tap Driving and Parking > Car Location Photo.
When the feature is enabled and you have parked and left your vehicle, it will automatically
capture and process photos of the parking environment and the bottom of the vehicle and upload them to the
NIO App, where you can view parking area information by tapping the vehicle’s location on the “My Vehicle”
interface of the mobile app.
Note寻车照片功能采集的图片均会进行脱敏及加密处理,保护用户隐私。
Pictures captured by the Find My Car feature will undergo anonymization and encryption to
ensure the protection of user privacy.
Finding your vehicle when it is nearby
When the vehicle is not in driving state and the valid key is within 70 meters of the vehicle
(which varies depending on the status of the Smart Key and the surrounding environment of the vehicle),
press the lock button on the Smart Key twice within 3 seconds, and the vehicle horn will emit a sound and
the turn signal will flash to indicate the vehicle’s precise location. Press the button again to disable
Find My Car prompts, otherwise it will be automatically turned off in 10 seconds.
When the Bluetooth key feature is turned on or the vehicle is connected to the network, you can
also tap the “Find My Car” button on the “My Vehicle” interface in the NIO App to search for the vehicle,
which will trigger the vehicle’s horn to emit a sound and the turn signal to flash. Press this button
again to disable Find My Car prompts.
Unlocking/Locking with the NIO App
When you are far away from the vehicle, you can go to My Car interface on the NIO App, and tap
Door Locks to remotely unlock or lock the doors.
When you press Door Locks, you can also select Unlock. In this case, the vehicle will be unlocked, and the door handle will pop
out. Sit in the driver seat and step on the brake pedal within 2 minutes to start the vehicle.
To unlock or lock the vehicle on the NIO App, make sure that the following requirements are
met:
The user must be the vehicle's owner or authorized by the owner.
The vehicle is in PARK (P) with all doors closed.
The mobile phone and vehicle are connected to the network.
The phone's Unlocking/Locking via Bluetooth feature is disabled (otherwise this feature
will be preferred).
Note如果用户因故无法使用手机 APP 执行解锁操作,可以呼叫蔚来汽车服务中心寻求帮助。
If users are unable to unlock their vehicles via the mobile App, they can contact the NIO
Service Center for assistance.
Keyless Unlocking/Locking
When you carry a valid smart key with you, or have the Bluetooth key turned on from your mobile
phone, you can unlock or lock the vehicle by touching the corresponding part of any outer door handle.
If you leave the key in the vehicle, or when any door is open (including the hood and liftgate),
and when you press the lock button on any door to perform the keyless locking action outside the vehicle,
the vehicle will not be fully locked in such a situation, and the horn will sound to alert you to take the
key out of the vehicle or close the corresponding door.
Caution进行无钥匙解锁/上锁操作时,车辆需挂 P 挡且车门、前盖及尾门均关上。
To unlock/lock the vehicle without using a key, ensure that the vehicle is in PARK and that all
doors, hood and liftgate are closed.
Caution 进行无钥匙上锁操作时,请勿使用蛮力按压车外门把手。
When locking the vehicle without using the key, do not use excessive force to press the outer
door handles.
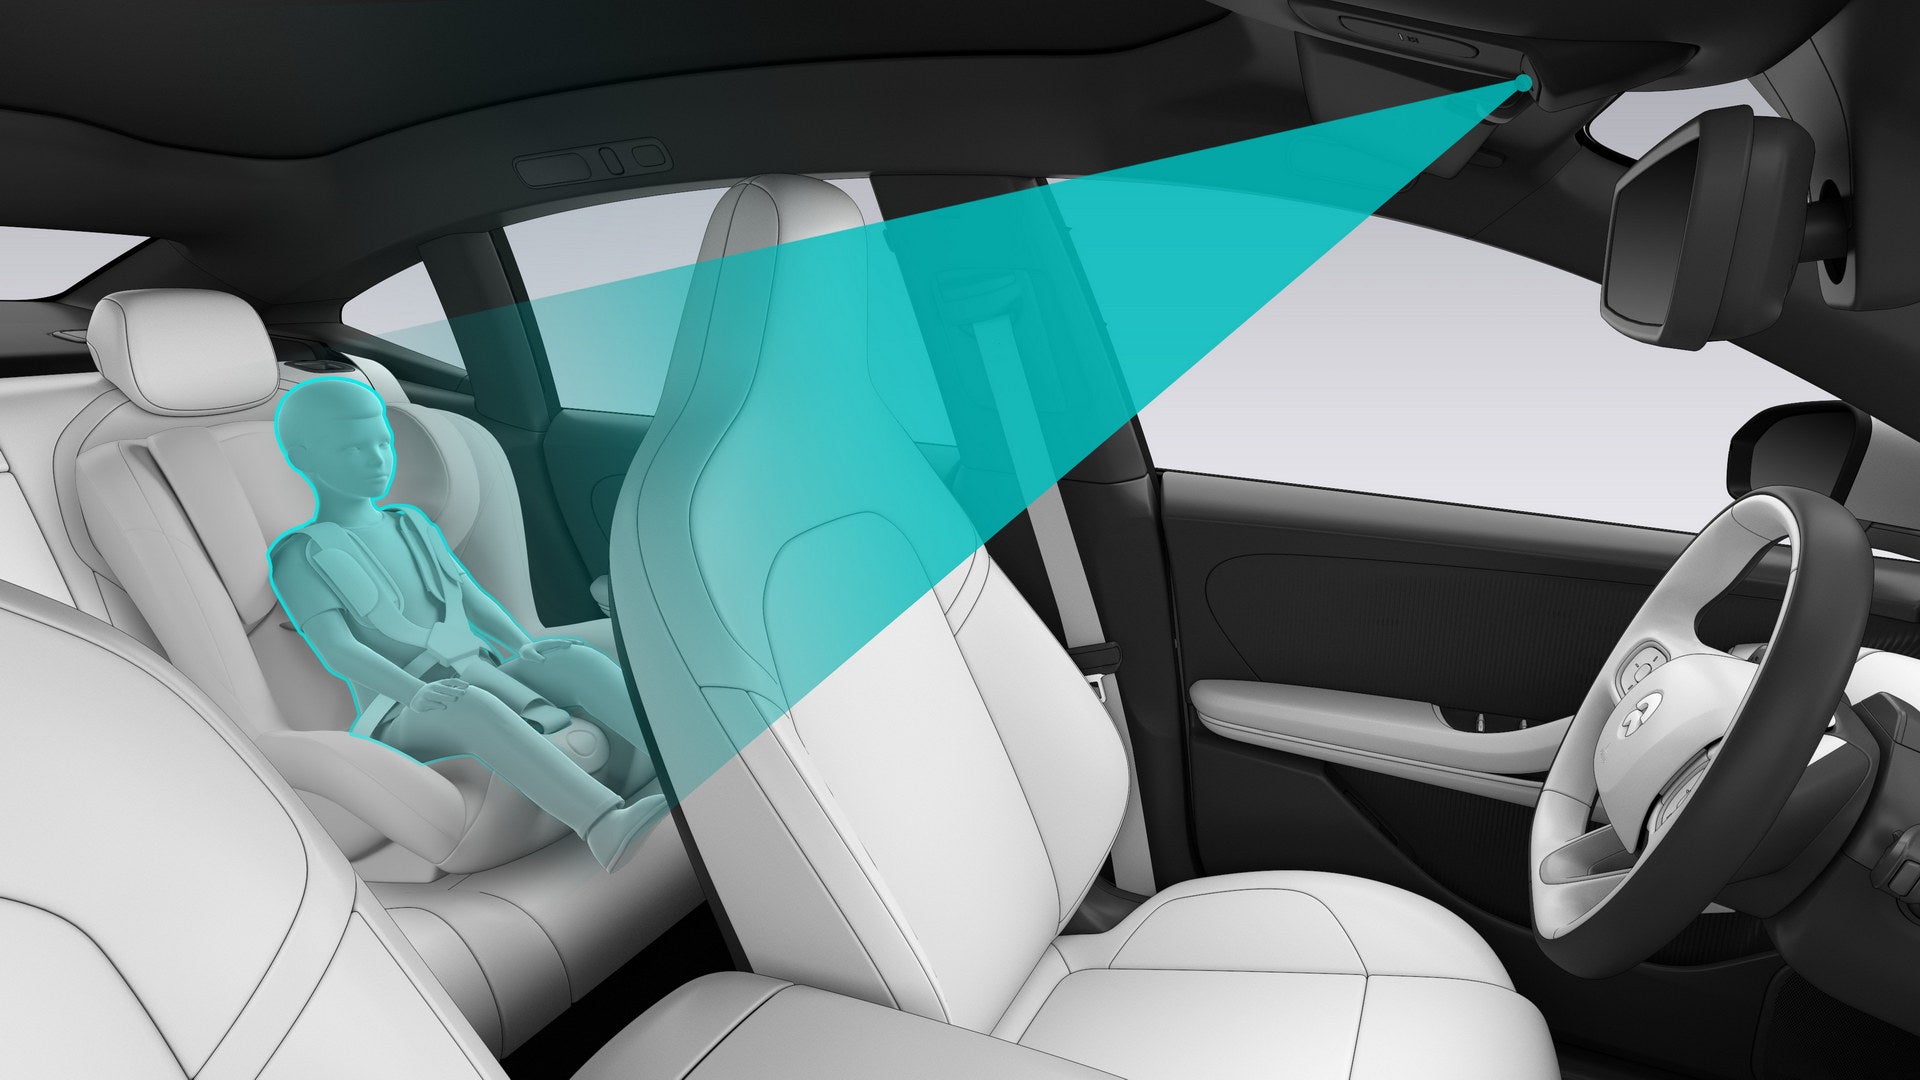
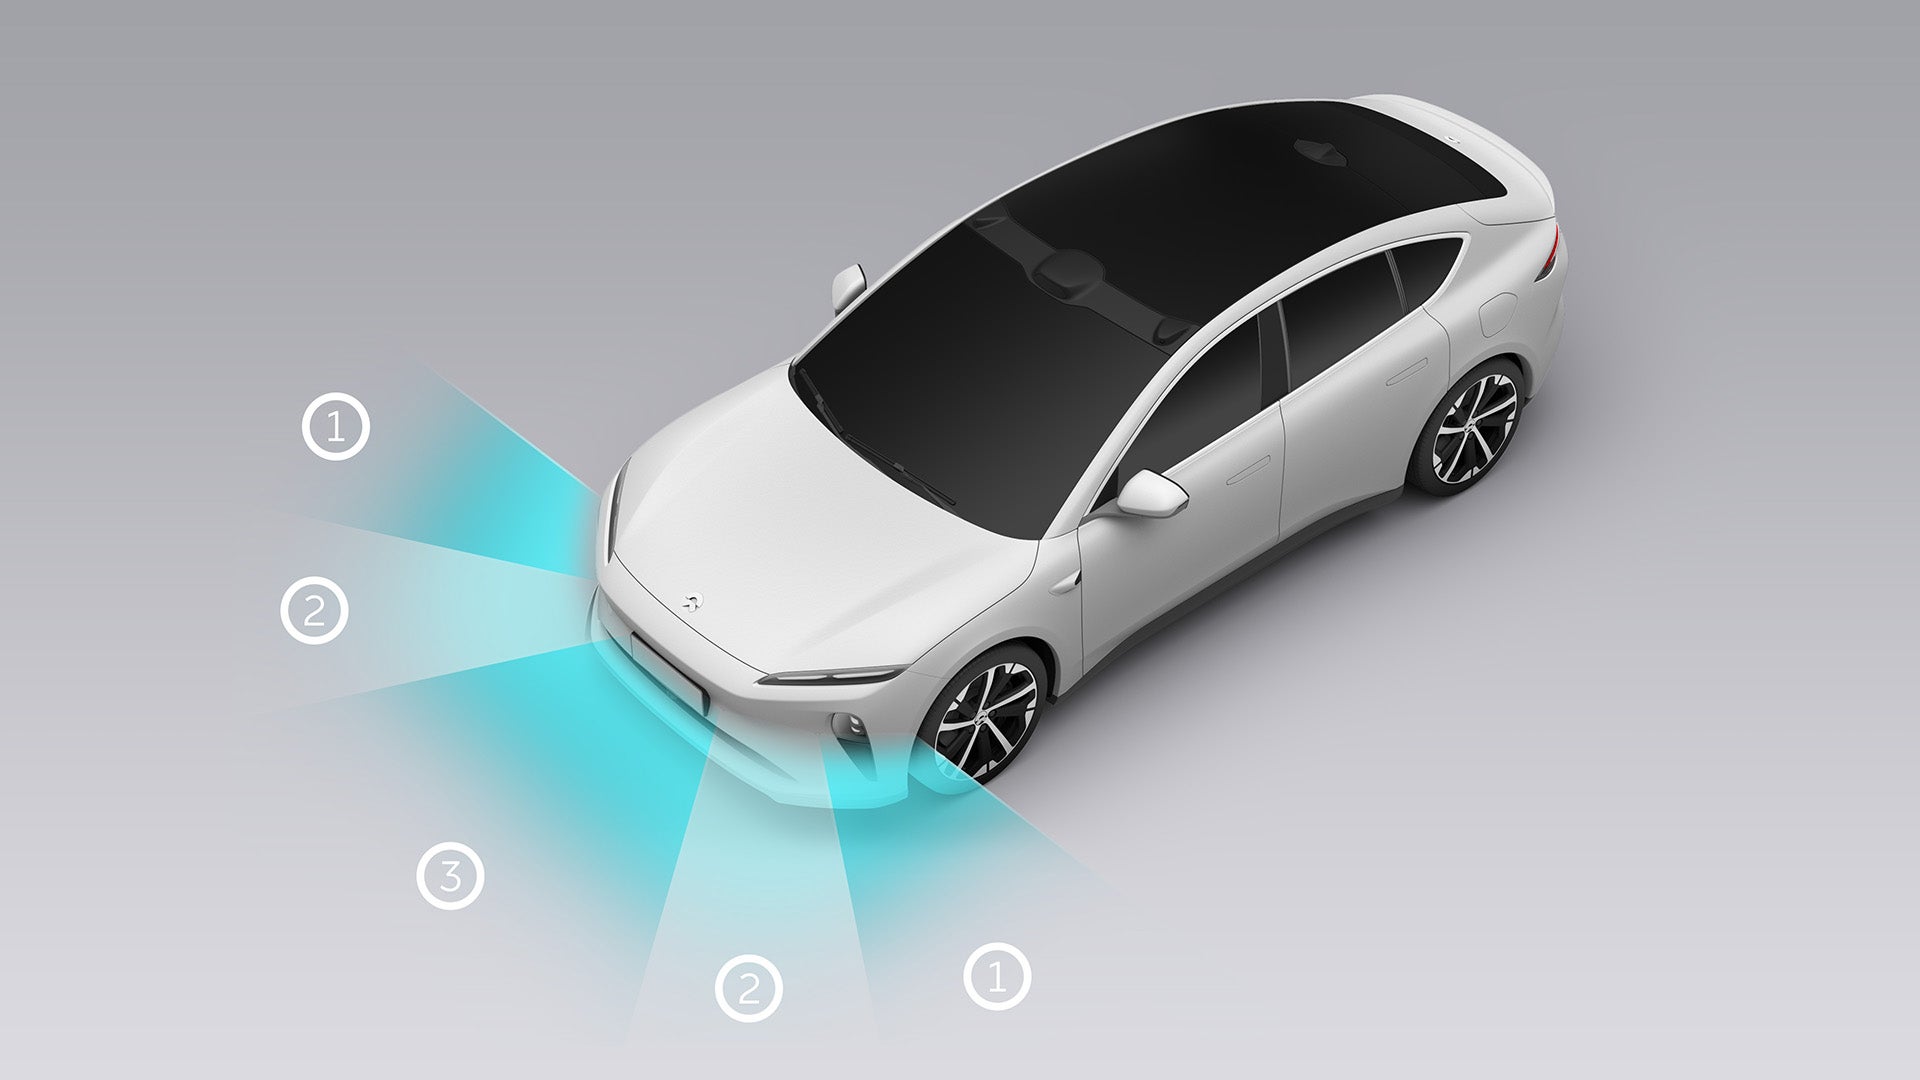
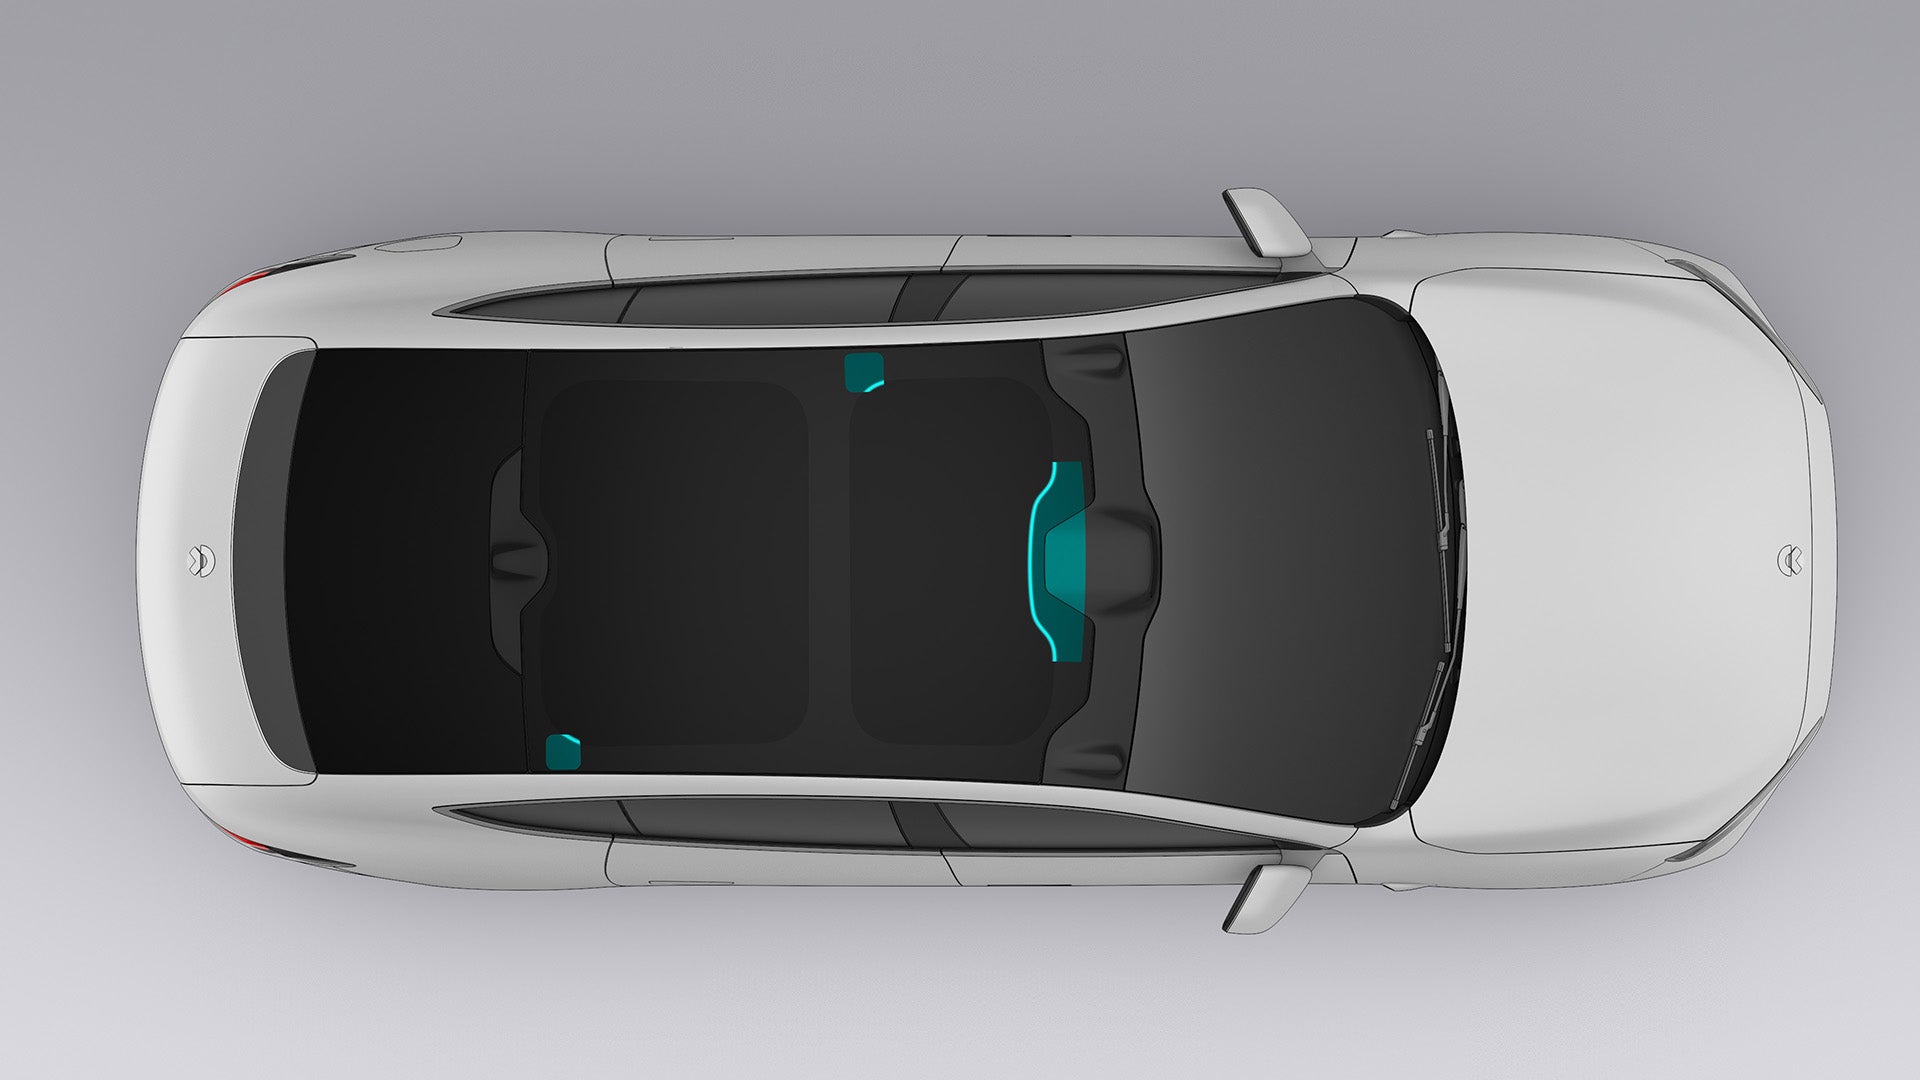
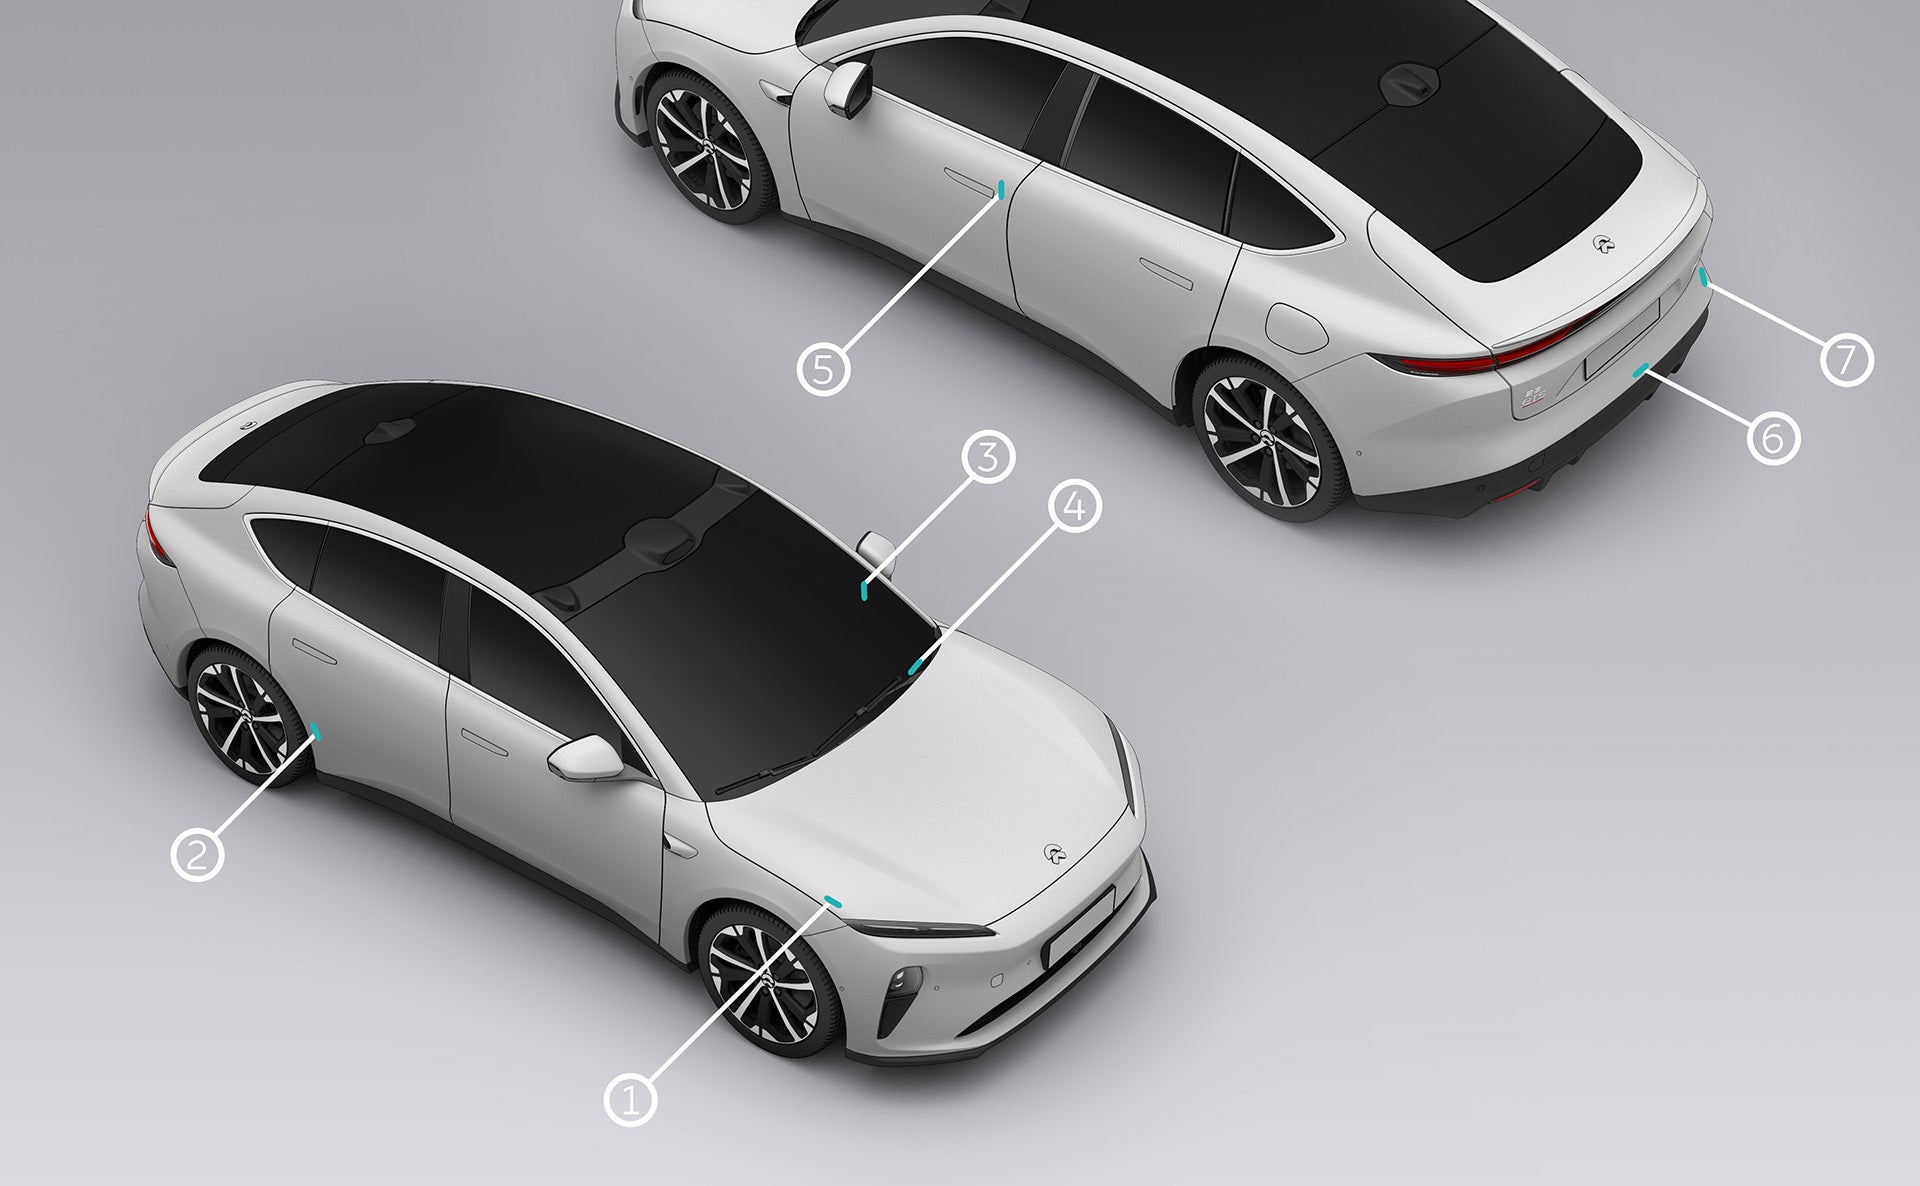
People with implanted pacemakers must remain at least 22 centimeters away from the antenna
inside the vehicle to avoid any interference between the keyless unlock system and their pacemaker's
functionality.
Location of the interior Bluetooth antenna:
Under the rearview mirror cover;
Above the B-pillar on the left side of the body;
Above the B-pillar on the right side of the body;
Rear roof;
Above rear bumper bracket.
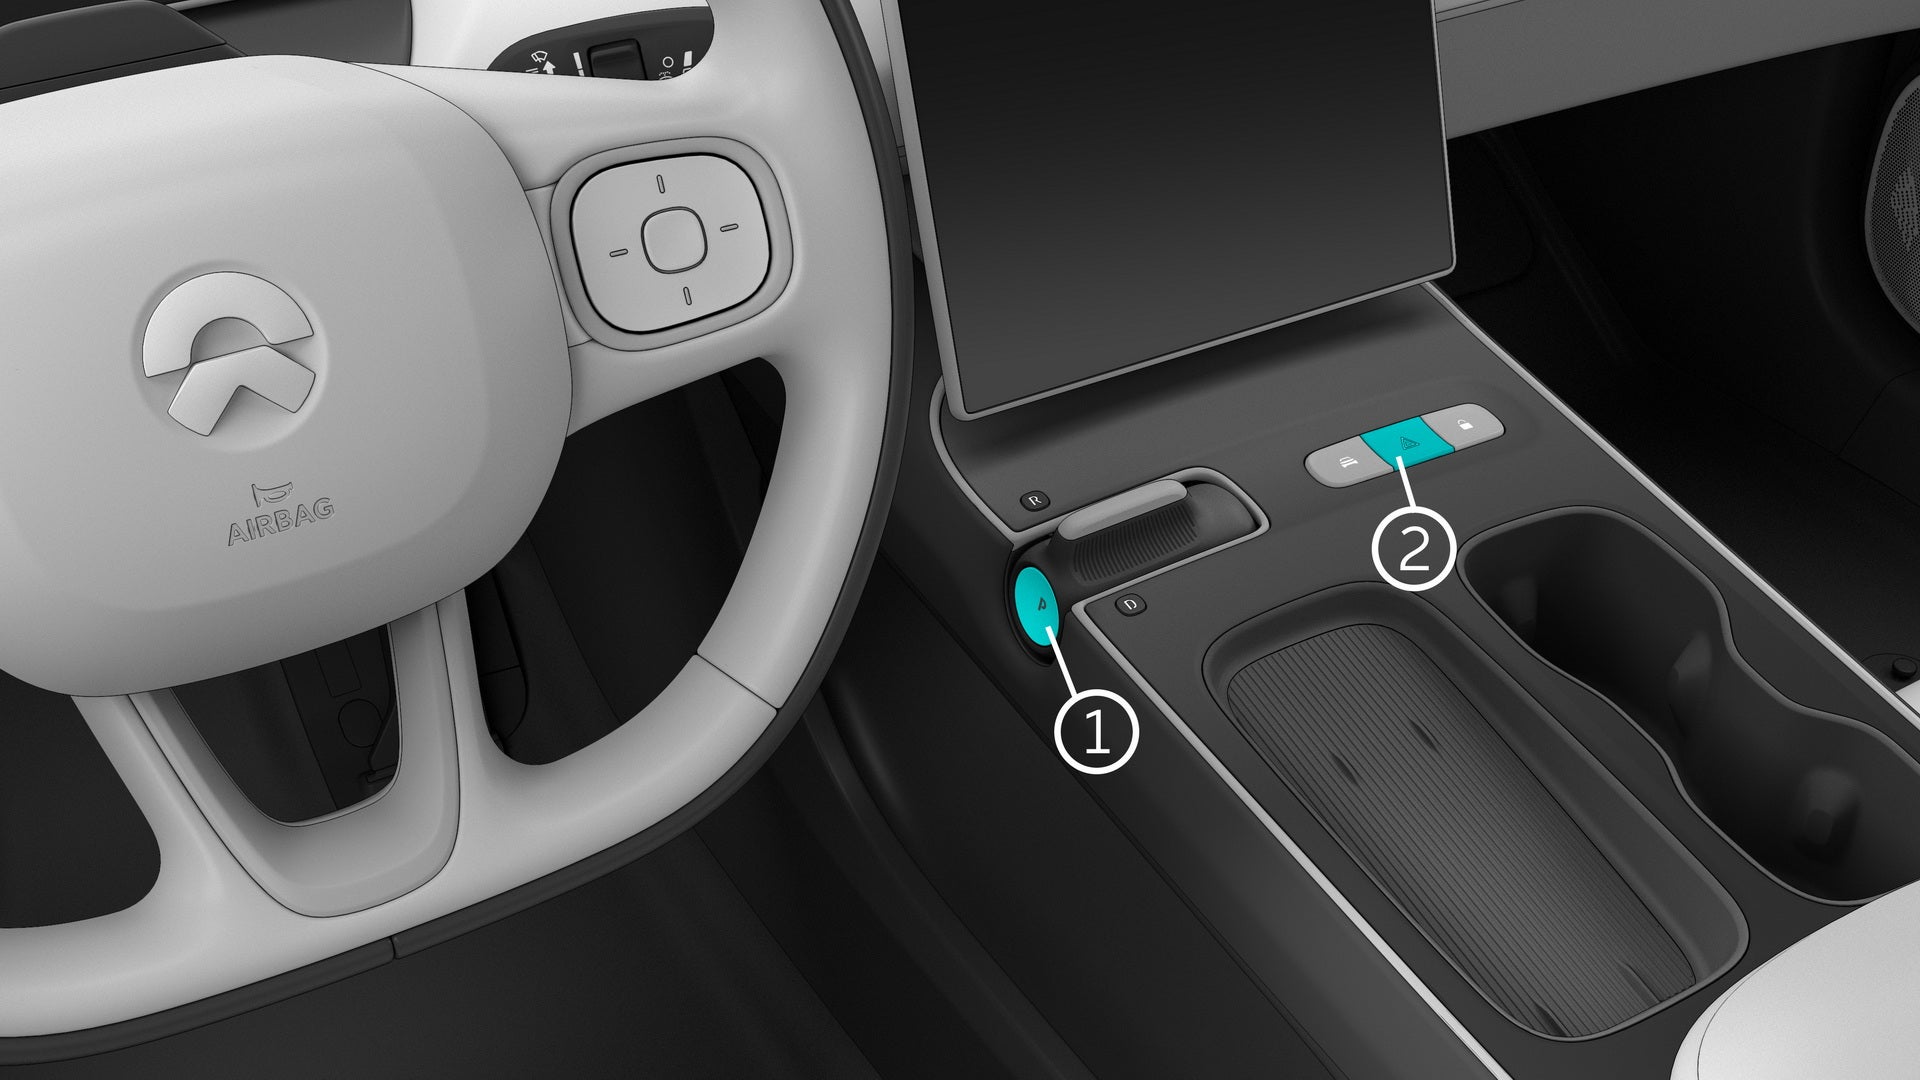
Unlocking/Locking on the Center Console
You can unlock or lock the vehicle with the lock button on the center console.
When the vehicle is fully unlocked and all doors are closed, press the lock button on the
center console to lock the vehicle. The Center Display will display the locked status of the vehicle, and
the LED on the button will light up green.
When the vehicle is fully locked (not from the outside) or only the driver's door is unlocked,
press the lock button on the center console to unlock the vehicle. The Center Display will display the
unlocked status of the vehicle, and the LED on the button will go off.
Emergency Unlocking and Locking
Unlocking/Locking the Vehicle from Outside in an Emergency
When the vehicle cannot be unlocked or locked using the above conventional methods from the
outside, you can use the physical emergency key to unlock or lock the driver's door.
Caution请将物理应急钥匙带出车外并妥善保管,以备紧急解锁或上锁时使用。
Do not leave the emergency key in your vehicle. Please keep it safe in case of emergency.
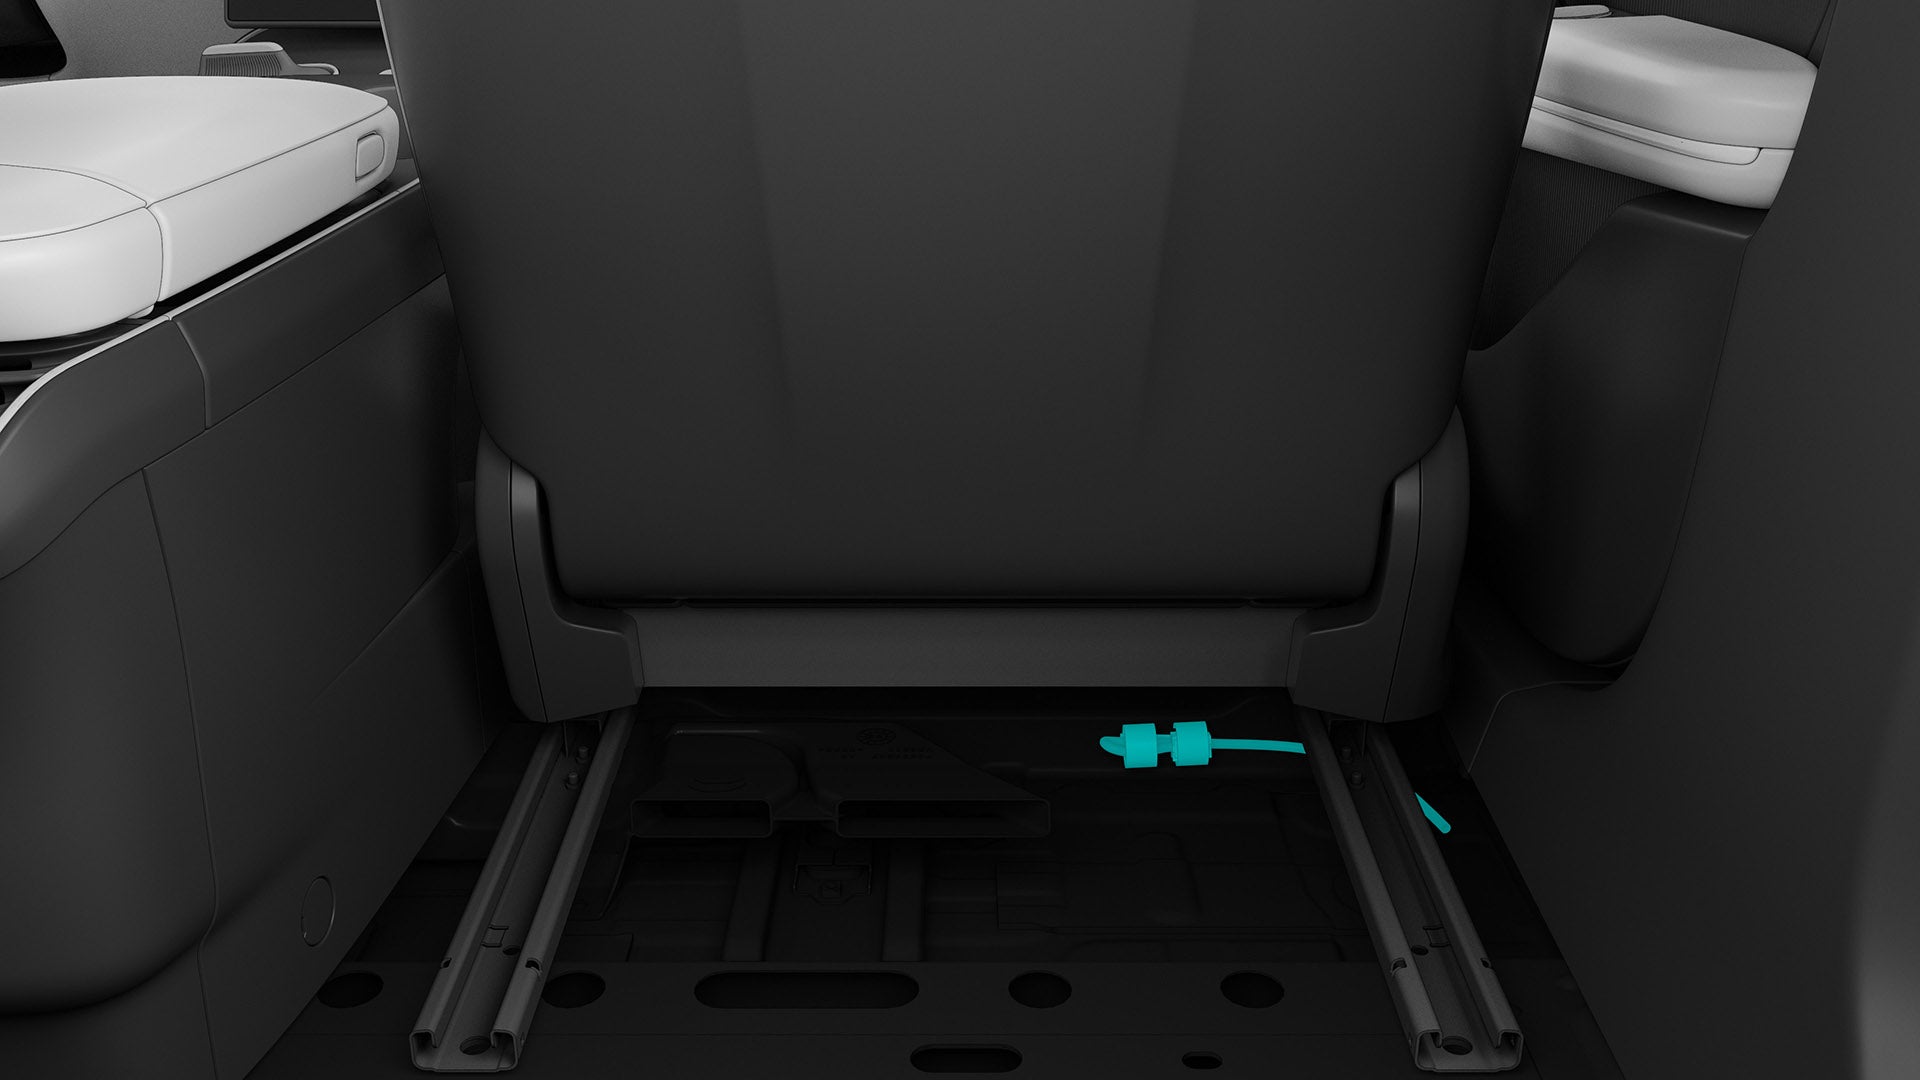
How to use the physical emergency key:
Toggle the slider on the physical emergency key, and pull out the metal key part of the
emergency key.
Press and hold the front part of the outer door handle of the driver's door to unfold the
outer door handle.
Hold the unfolded outer door handle with one hand while inserting the physical emergency
key into the keyhole in the outer door handle with the other hand, and turn the key counterclockwise
to unlock the driver's door.
When locking, press and hold the front part of the outer door handle, turn the physical
emergency key counterclockwise for one unlocking action, and then turn the key clockwise to lock the
driver's door.
After unlocking the driver side door using the physical emergency key, if you need to lock
the doors using the Smart Key, you must first toggle the driver door once to reset the door lock
cylinder. This will prevent the driver side door from remaining in an unlocked state.
When the battery of the vehicle is depleted, the physical emergency key can only lock the
driver's door. If you want to lock the other doors, toggle down the door lock hole, and simply close the
door to lock it. However, in such a situation, the door cannot be opened from the outside.
Emergency Unlocking from Inside
When the whole vehicle is locked, if you need to open the door in an emergency (such as when
the door handle electronic switch fails, or the vehicle is soaked in water), pull the mechanical switch of
the inner door handle once to open the corresponding side door.
CautionNT2 Opening the door from inside in an emergency
When the 12V battery of the vehicle is low on power, the physical emergency key can
only be used to unlock the door on the driver side. At such moments it cannot be used to unlock
the whole vehicle. The other doors can only be unlocked and opened by pulling the mechanical
switch for the inner door handle.
The windows cannot be lowered when the door is opened using the mechanical switch for
the inner door handle because doing so would risk damaging the window trim panel.
Neither rear door can be opened from inside when the child safety lock function is
enabled. They can only be opened from outside once the whole vehicle is unlocked.
In the event of an accident that is of sufficient gravity to trigger airbag deployment,
the child safety lock on the rear door will unlock automatically.
Walk-Up Unlocking
Walk-Up Unlock works when you carry a valid smart key or a mobile phone with the Unlocking and
Starting via Bluetooth feature enabled.
To enable or disable this feature, go to the Settings interface on the Center Display, and tap
Doors & Windows Locks > Doors > Walk-Up Unlock.
When this feature is enabled, the vehicle will be automatically unlocked when you are within 1.5
meters from its B-pillar without taking the key.
Auto Unlock in PARK
Your vehicle can be automatically unlocked when parked without using the center console lock
button.
If the vehicle was locked automatically by Drive Away Lock (at a speed over 8 km/h), after the
driver applies the brake to bring the vehicle to a halt and shifts into PARK (P), the vehicle will be
automatically unlocked. After the vehicle is unlocked, the liftgate can be opened from the outside without a
key.
To enable or disable this feature, go to the Settings interface on the Center Display, and tap
Doors & Windows Locks > Doors > Auto Unlock in PARK (P).
Walk-Away Locking
Walk-away lock works when you carry a valid smart key or a mobile phone with the Unlocking and
Starting via Bluetooth feature enabled.
Without taking out the key, the vehicle will be automatically locked when you are 3–7 meters away
from it. When the vehicle is locked by the walk-away lock, a lock confirmation sound will be produced, the
turn signals will flash, and if Auto Fold on Lock is enabled, the side mirrors will be folded automatically.
To enable or disable this feature, go to the Settings interface on the Center Display, and tap
Doors & Windows Locks > Doors > Walk-Away Lock.
Please only use Walk-Away Lock in familiar and safe parking areas. After Walk-Away Lock is
enabled, make sure to carry a valid smart key or enable the Unlocking and Starting via Bluetooth feature on
your mobile phone, and check that the vehicle is successfully locked as you walk away.
Warning离开车辆时请确认车辆已成功自动上锁,保障车内财产安全。
After Walk Away Lock is enabled, make sure that no children or pets are left in the
vehicle before you leave to prevent accidents.
When leaving the vehicle, you can confirm that the vehicle has been automatically locked
and your property is protected through the lock confirmation sound or by visually checking the
vehicle's status (by the headlights, side mirrors or mobile App).
When there is another valid Smart Key inside the vehicle or other locking conditions are
not met (such as open doors, hood or liftgate, or when Walk Away Lock is not selected on the center
display), Walk Away Lock will be disabled.
Do not place the Smart Key together with communication devices such as phones and
Bluetooth headphones to avoid accidental locking of the vehicle due to signal interference.
DC charging piles, high-voltage substations and other devices with strong magnetic fields
produce strong interference that affects the Smart Key signal. In some cases, this may cause
unexpected locking or locking failure. We recommend that you carry the Smart Key with you to avoid
any inconvenience.
Drive Away Locking
Your vehicle can automatically lock while driving.
When the vehicle is unlocked and all doors, the front hood, and the tailgate are closed, the
vehicle automatically locks all doors when the driving speed exceeds 8 km/h.
Note车辆由静止到行驶的过程中,只能触发一次自动上锁功能。
Drive Away Locking will only be activated once the vehicle transitions from being stationary to
moving.
Anti-Theft Alarm System
Once the vehicle is locked from the outside (including the hood and liftgate) with the smart key,
NIO App, NFC feature or physical emergency key, the anti-theft alarm system will be automatically activated.
If someone tries to open the door in the absence of a valid smart key (or without valid
authorization), the anti-theft alarm will be activated, and the turn signals and horn will both emit an
alarm. You can unlock the vehicle from outside through the smart key, NIO App, and NFC feature to turn off
the anti-theft alarm.
Door Handle Control
The door handle will automatically pop out when the vehicle is unlocked, and pop in when the
vehicle is locked or when the speed exceeds 8 km/h.
When a door is automatically sucked into the closed position or an exterior door handle
retracts automatically, please prevent passengers, especially children, from placing their hands inside
to avoid personal injuries.
Recessed Door Handle Extension
To enable or disable this feature, go to the Settings interface on the Center Display, and tap
Doors & Windows Locks > Doors > Recessed Door Handle Extension.
When this feature is enabled, you can touch the inner side of the door handle to extend the
door handle, then the door pops and the window lowers slightly, allowing you to open the door easily. When
closing the door, just give it a push and the door will be magnetically closed from a half-closed
position.
NoteES7若佩戴绝缘手套导致门把手轻触功能失效,可手动轻拉门把手,即可实现开门操作。
If the door handle does not extend because you are wearing insulated gloves, you can pull
it slightly to open the door.
Recessed Door Handle Retraction
To enable or disable this feature, go to the Settings interface on the Center Display, and tap
Doors & Windows Locks > Doors > Recessed Door Handle Retraction.
After enabling the feature, the door handles will automatically retract in 20 seconds after
the vehicle is unlocked to prevent the handles from scratching pedestrians or the doors being opened by
strangers.
After the door handles retract, they can pop out again by touching the sensing region on the
handles.
If the outer door handle cannot be extended, please hold the front part of the corresponding
outer door handle to manually extend it.
Electronic Switch for the Inner Door Handles
You can open the door from inside by pressing the electronic switch on the corresponding inner
door handle. Press once if the door is unlocked, or press twice if the door is locked, then the
corresponding door will pop open and the window glass will lower slightly.
Caution内把手电子开关
While driving, the electronic switch for the inner door handles will be automatically
disabled. Pay attention to driving safety.
The electronic switch for the inner door handles should only be turned on when the
vehicle is in PARK (P) or the user's seat belt is unfastened.
Liftgate Control
Warning车辆行驶中,请确保尾门处于关闭状态。
Please ensure that the liftgate is closed while your vehicle is in motion.
Warning 在打开或关闭尾门前,请确认无人在尾门的开/闭行程附近,以防人员受伤。
Before opening or closing the liftgate, make sure there are no obstacles (people or objects)
near the opening or closing path of the liftgate to avoid personal injury or property damage.
Caution 打开尾门前需清除尾门上的附着物(如雪和冰),否则可能导致尾门打开后突然关闭。
Before opening the liftgate, remove any materials stuck to it, such as snow and ice.
Otherwise, it may cause the liftgate to open and then suddenly close.
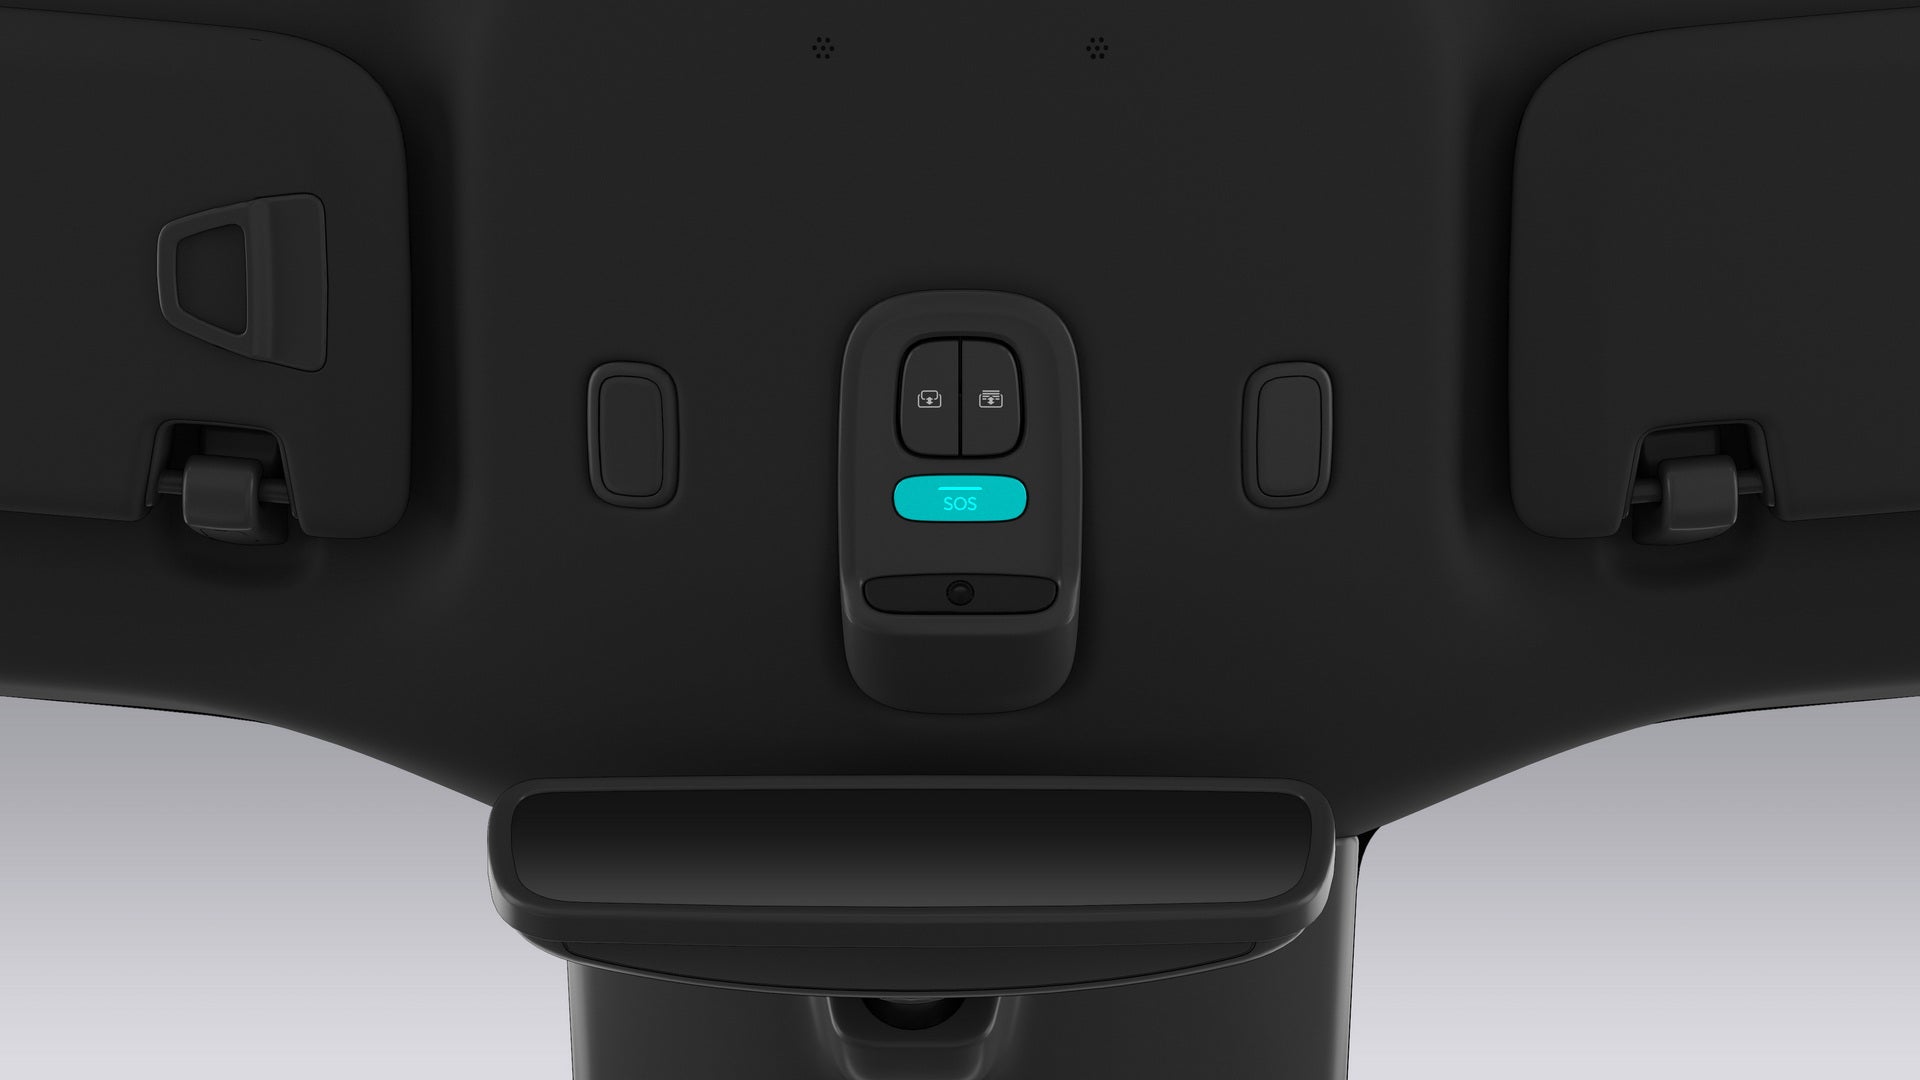
Opening and Closing the Liftgate by Pressing the Button
When you carry the smart key, lightly press the button on the handle of the liftgate to open
the liftgate.
During the opening of the liftgate, press and hold the liftgate button for a few seconds, and
the height of the liftgate at that moment can be automatically memorized.
Your vehicle is equipped with a one-click liftgate closing feature.
Press the button on the liftgate to automatically close and lock the liftgate, and you will
hear a "click" to confirm the closure.
Opening and Closing the Liftgate with the Center Display
To open the liftgate, go to the Settings interface on the Center Display, and tap Doors & Windows Locks > Doors > Liftgate.
Opening the liftgate: Press and hold the Liftgate icon, and the
liftgate will open automatically.
Closing the liftgate: Press and hold the Liftgate icon, and the
liftgate will close automatically.
During the motion of opening or closing the liftgate, you can pause the process by tapping the
Liftgate icon.
Go to the Settings interface on the Center Display, and tap Doors &
Windows Locks > Doors > High Memory, to set the maximum opening height of the liftgate
through real-time animation display.
Opening and Closing the Liftgate with the Smart Key
To open or close the liftgate, press and hold the liftgate button on the Smart Key for 2
seconds.
During the motion of opening or closing the liftgate, you can pause the process by pressing the
liftgate button.
Caution如果智能钥匙电量不足,则无法执行该操作,需及时更换电池。
If the Smart Key battery is low, it must be promptly replaced. Otherwise, it will soon stop
functioning.
Opening and Closing the Liftgate in the NIO App
When the vehicle is put in PARK (P) and the doors are closed, you can open the My Car interface
in the NIO App, and tap the Liftgate icon to open the liftgate. Tap the
Liftgate icon again to close the liftgate. If the liftgate is blocked during
the closing process, it will prompt you.
Caution只有车辆处于联网状态下,才能执行该操作。
This operation can be performed only when the vehicle is connected to the network.
Opening and Closing the Liftgate by a Kick Sensing
When your hands are occupied or it is inconvenient for you to take out the key, you can open
the liftgate by kick sensing under the rear bumper.
In the middle of the rear bumper, lift a foot up close to the rear bumper and kick the forefoot
into the rear bumper at least 10 centimeters deep, then retract quickly to open the liftgate; or sweep
your forefoot sideways from one side to the other at least 10 centimeters below the rear bumper to open
the liftgate.
You must have your Bluetooth key or smart key with you to open the liftgate with a kick
sensing.
Caution 车辆需处于静止状态。脚尖横扫的运动的范围建议约为于车尾中部。
The vehicle must be stationary.
The kick sensor area is around the middle of the rear bumper.
To avoid accidental opening caused by someone near the liftgate, you can enter the Settings
interface on futhe Center Display, tap Doors & Windows Locks > Liftgate Kick
Sensor, and turn off this feature.
When using kick sensing to open the liftgate, do not move your forefoot back and forth
frequently.
Do not park your foot under the bumper for a long period. Otherwise, the liftgate will
not open.
Do not touch the liftgate before it stops opening.
This feature may be temporarily disabled in situations that include but are not limited to the
following:
Frequent opening and closing;
A lingering leg;
When the kicking is not within the valid sensing range.
If the liftgate does not respond, wait a few seconds and try again, or use other methods to
open or close the liftgate.
Opening and Closing the Liftgate Manually
If the tailgate fails to open or close properly, you can manually open or close it slowly and
smoothly.
Warning避免大力快速开闭电动尾门,否则可能会导致组件损坏。
Avoid opening and closing the liftgate vigorously and quickly, as this may result in
component damage.
Anti-pinch Protection of the Liftgate
Your vehicle is equipped with liftgate anti-pinch protection.
If an obstacle restricts the movement of the liftgate during automatic opening or closing, the
opening or closing motion will stop and the anti-pinch feature will be activated.
The opening process is interrupted, the liftgate stops and you will hear a long warning
tone.
The closing process is interrupted, the liftgate stops, a long warning tone sounds, and the
liftgate rises again for a certain distance.
Window Control
The driver door panel is equipped with buttons to control all four windows, allowing for
convenient window operation.
Driver window
Front passenger window
Rear right window
Rear left window
There are also corresponding window buttons on the interior armrests of the other three doors,
which are placed there to make it convenient for passengers to operate the windows.
Toggle the window button forward to control the opening position of the window; quickly
toggle this button forward all the way to the end and release it to fully open the window (one-touch
window down).
Toggle the window button backward to control the closing position of the window; quickly
toggle this button backward all the way to the end and release it to fully close the window (one-touch
window up).
In addition, you can also control all windows by going to the Settings interface on the Center
Display, tapping Doors & Windows Locks > Windows, and selecting the
Close, Ajar, Open, Favorite mode.
Close: when this feature is turned on, all windows will be
closed.
Ajar: when this feature is turned on, all windows will be
opened for about 25 millimeters.
Open: when this feature is turned on, all windows will be
opened.
Favorite: press and hold it to remember the current positions
of all windows, and once it is turned on, the windows will move to the memorized positions.
When the vehicle is put in PARK (P) and no one is in the driver seat, you can control the windows
using the Smart Key:
Press and hold the unlock button on the Smart Key to lower all the windows;
Press and hold the lock button to lift all the windows;
During the lifting or lowering of the windows, release the unlock or lock button to stop the
windows at the current position.
The window is allowed to drop to 20 millimeters above the lowest point when the rear door is
opened; it is allowed to drop to the lowest point when the rear door is closed.
The four windows have anti-pinch protection. When there is a foreign object blocking the movement
of the window, the closing motion will stop and the window will be lowered down again for a certain
distance.
The area subject to anti-pinch protection is shown in the figure below:
When closing the windows, ensure that children and other passengers keep their hands and heads
away. The windows have an anti-pinch feature. Closing the window without attention or control will result
in accidental injuries. Please do not test it because it may malfunction and cause injury due to
unexpected factors.
When the following situations occur, the anti-pinch protection of the corresponding window will
be temporarily disabled, and the autodown feature will also be disabled (these two features will be
automatically restored after 10 seconds):
When the window ices up and the closing motion is interrupted.
When the anti-pinch protection is triggered three times in 15 seconds, causing the
interruption of the closing motion.
If the autodown and anti-pinch protection features fail (such as after a low battery or power
interruption), you can re-initialize it as follows:
Toggle the corresponding window button to raise the window to the top;
Toggle the button to slightly lower the window;
Toggle the window button again to raise the window to the top;
Toggle the window button to lower the window to the bottom.
Stone Guard Film
The stone guard film is located on both sides of the wheels at the rear of the body, which can
effectively prevent the body paint from being scratched by hard granular objects such as gravel during fast
driving, so as to maintain the integrity and aesthetics of the paint.
Note切勿在不采用任何额外保护的情况下部分或全部去除该薄膜,防止破坏车身油漆。
Never remove the film partially or completely without any additional protection, otherwise the
body paint may be damaged.
Charging Instructions
To keep your vehicle in a sound working condition, please charge it promptly when the battery is
low.
The vehicle can only be charged when parked. Charging is not available when the vehicle is in
the driving state (in R or D gear) or during a software update.
The charge port is located on the left side of the vehicle and supports both direct current
(DC) and alternating current (AC) charging.
To prevent accidents, please refrain from conducting charging operations in areas with
flammable gases or liquids. Please charge in a well-ventilated area.
It is advised to maintain a specific distance from the charging pile while charging due to
the risk associated with high voltage. To prevent personal injury, do not touch the metal terminals
inside the charger or charging port.
Minors are not allowed to use charging equipment, and they should be kept away from the
charging area during charging operations.
Do not charge when the charging equipment is damaged, rusty, damp or contains foreign
objects.
It is strictly prohibited to modify or disassemble the charging connector and charging
equipment on your own.
Please use charging equipment that complies with local standards for charging the vehicle.
Failure to do so may result in the inability to charge the vehicle and could lead to damage to the
vehicle or charging equipment, resulting in personal injury.
Do not charge in open areas during heavy rain or extreme weather, as it may prevent
charging and could lead to damage to the vehicle or charging equipment.
Before charging, please inspect the charger and vehicle charging port for any deformation,
discoloration or burn marks. If any abnormalities are found, do not proceed with the charging
operation to prevent damage to the vehicle or charging equipment. In severe cases, it could result in
personal injury. If needed, please contact the NIO Service Center.
Before charging, please check the charger and the vehicle charging port for any dirt or
foreign objects. Keep the interfaces clean to prevent charging failures or damage to the charging
port.
If there is a malfunction with the charging equipment, please contact the charging
equipment manufacturer and refrain from attempting to resolve it yourself.
After being exposed to rain, please check if water has entered the charging port before
charging. Do not charge if there are obvious water stains in the charging port, as it may result in
the inability to charge and could cause damage to the vehicle or charging equipment.
During charging, do not use high-pressure washing devices to clean the charging port area,
as it may interrupt the charging process and potentially cause damage to the vehicle or charging
equipment.
For users with implanted pacemakers, please stay away from vehicles undergoing fast
charging operations to avoid electromagnetic interference that may affect the normal functioning of
medical devices.
If you notice any unusual odor or smoke coming from the vehicle during the charging
process, please stop charging immediately and contact the NIO Service Center.
Before stopping the charging process, please do not forcefully disconnect the charger to
avoid generating an arc at the charging port, which could harm the vehicle or the charging equipment
and, in extreme situations, result in bodily injury.
Caution环境温度过高或过低时都将影响充电时间,车辆长时间处于低温下将影响电池容量。
Ambient temperatures that are too high or low can affect charging times, and the vehicle's long
exposure to low temperatures can affect battery capacity.
Charging Operations
You can charge the vehicle on both Power Home and Power Charger.
Charging Process
Put the vehicle in PARK (P), press the charge port cover to open it, or swipe right on the
Home interface of the Center Display to enter Quick Access and tap
Charge Port, and the charge port cover will automatically open. The
indicator of the charge port will light up white steadily.
When the charge port cover is rotating and after rotation is completed, do not forcefully
toggle the cover to avoid damaging it.
Check whether the charging connector and charging equipment are in good condition, align
the charger to the charge port of the vehicle, then the charger and the charge port will start
matching: if the indicator of the charge port flashes and then lights up blue, the charge port is
working properly; if the matching fails or times out, the indicator of the charge port will flash blue
and then go out, and you will need to connect the charger again.
To enable the feature, go to the Settings interface on the Center Display and
You can tap Battery on the Settings interface of the Center Display or
use the NIO App to check the current charging status. The indicator of the charge port should be blue
during charging to indicate that it is charging.
When the charging is completed, press the unlock button of the charger before unplugging
the charger.
If you are to manually stop charging midway, tap
Battery on the Settings interface of the Center Display after the
vehicle is fully unlocked to stop charging, and wait for the indicator of the charge port to light up
green steadily to unplug the charger.
Caution进行直流快充过程中,可先将车辆解锁,再长按充电口关闭按钮,即可手动停止充电。
To manually stop charging during a DC fast charge, you can unlock the vehicle first
then press and hold the OFF button at the charge port.
When inserting and removing the charger, please face the charging socket. If the
charger is stuck, try to lift it slightly. Do not forcibly shake the charger while inserting
or removing it to prevent damaging the charger or charging socket.
During the charging process, do not forcefully pull out the charger directly, as
this cause may cause sparks and smoke on the charging socket, endangering personal safety.
After charging is complete, please wait 3 seconds before disconnecting the charger,
to avoid pulling it out too quickly which may cause an arc and result in personal injury.
While charging, it is recommended that the charger be fully plugged in and then
released after being handheld for 2 seconds. If the charging indicator flashes red, try
charging 1-2 more times with the charger according to the above steps. If charging still
fails, try replacing the charger.
If the indicator of the charge port flashes red during charging, switch to another charging
pile and try again. If the indicator is still flashing red, stop charging immediately and contact the
NIO Service Center.
After unplugging and putting away the charger, press down on the charge port cover, press
the charge port close button, or tap
Charge Port on the Center Display, and the charge port cover will be
automatically closed.
When you charge your vehicle using NIO Power Home, the charge port cover will
automatically open if you remove the charger from the port and will automatically close if you
remove the charger from your vehicle. If the charge port cover is stuck on
the charger while rotating to close automatically, press+hold the close button for 5 seconds,
and the charge port cover will open automatically.
Unable to Unplug the Charger after Charging
If you are unable to unplug the charger after the vehicle is fully unlocked, try the
following steps:
Re-plug in the charger to ensure that the unlock button of the charger pops up.
Re-lock and unlock the whole vehicle.
Press and hold the unlock button of the charger for 1 to 2 seconds, wait until the
indicator of the charge port lights up green steadily and then unplug the charger.
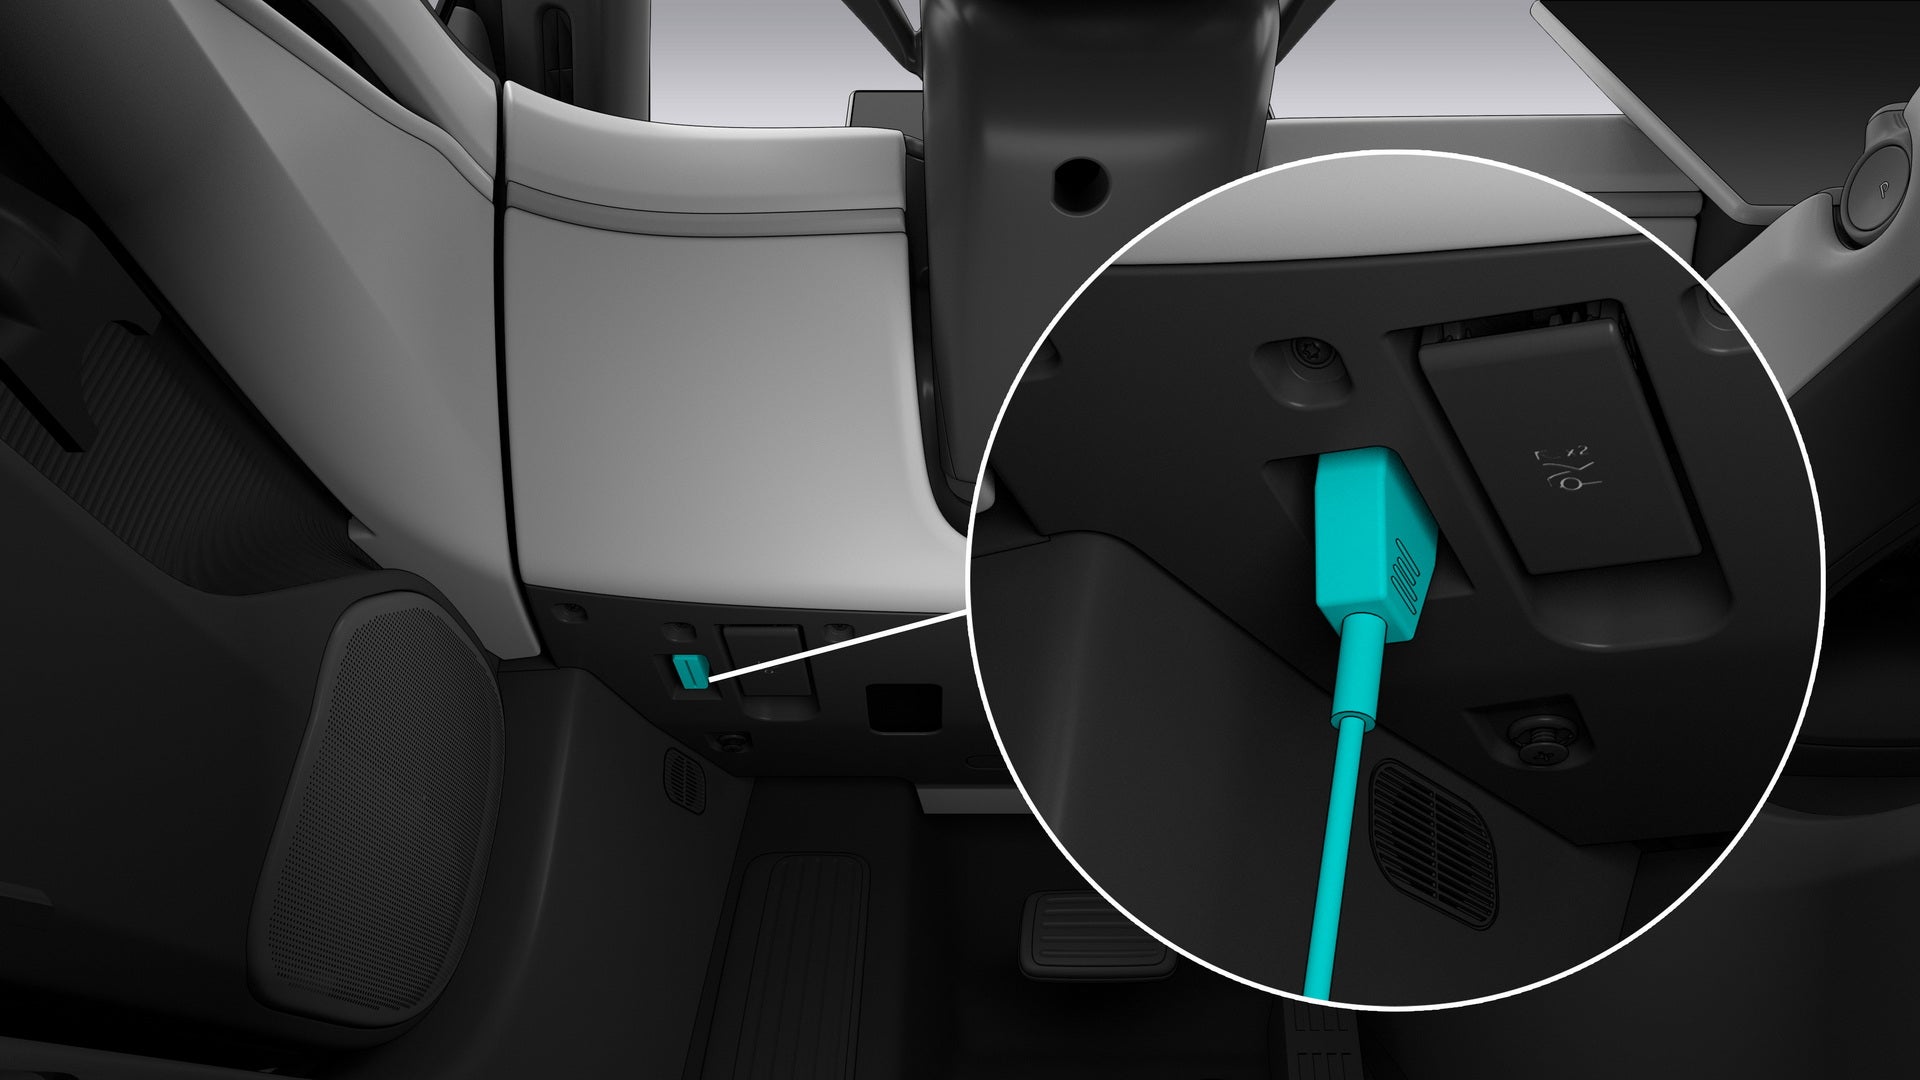
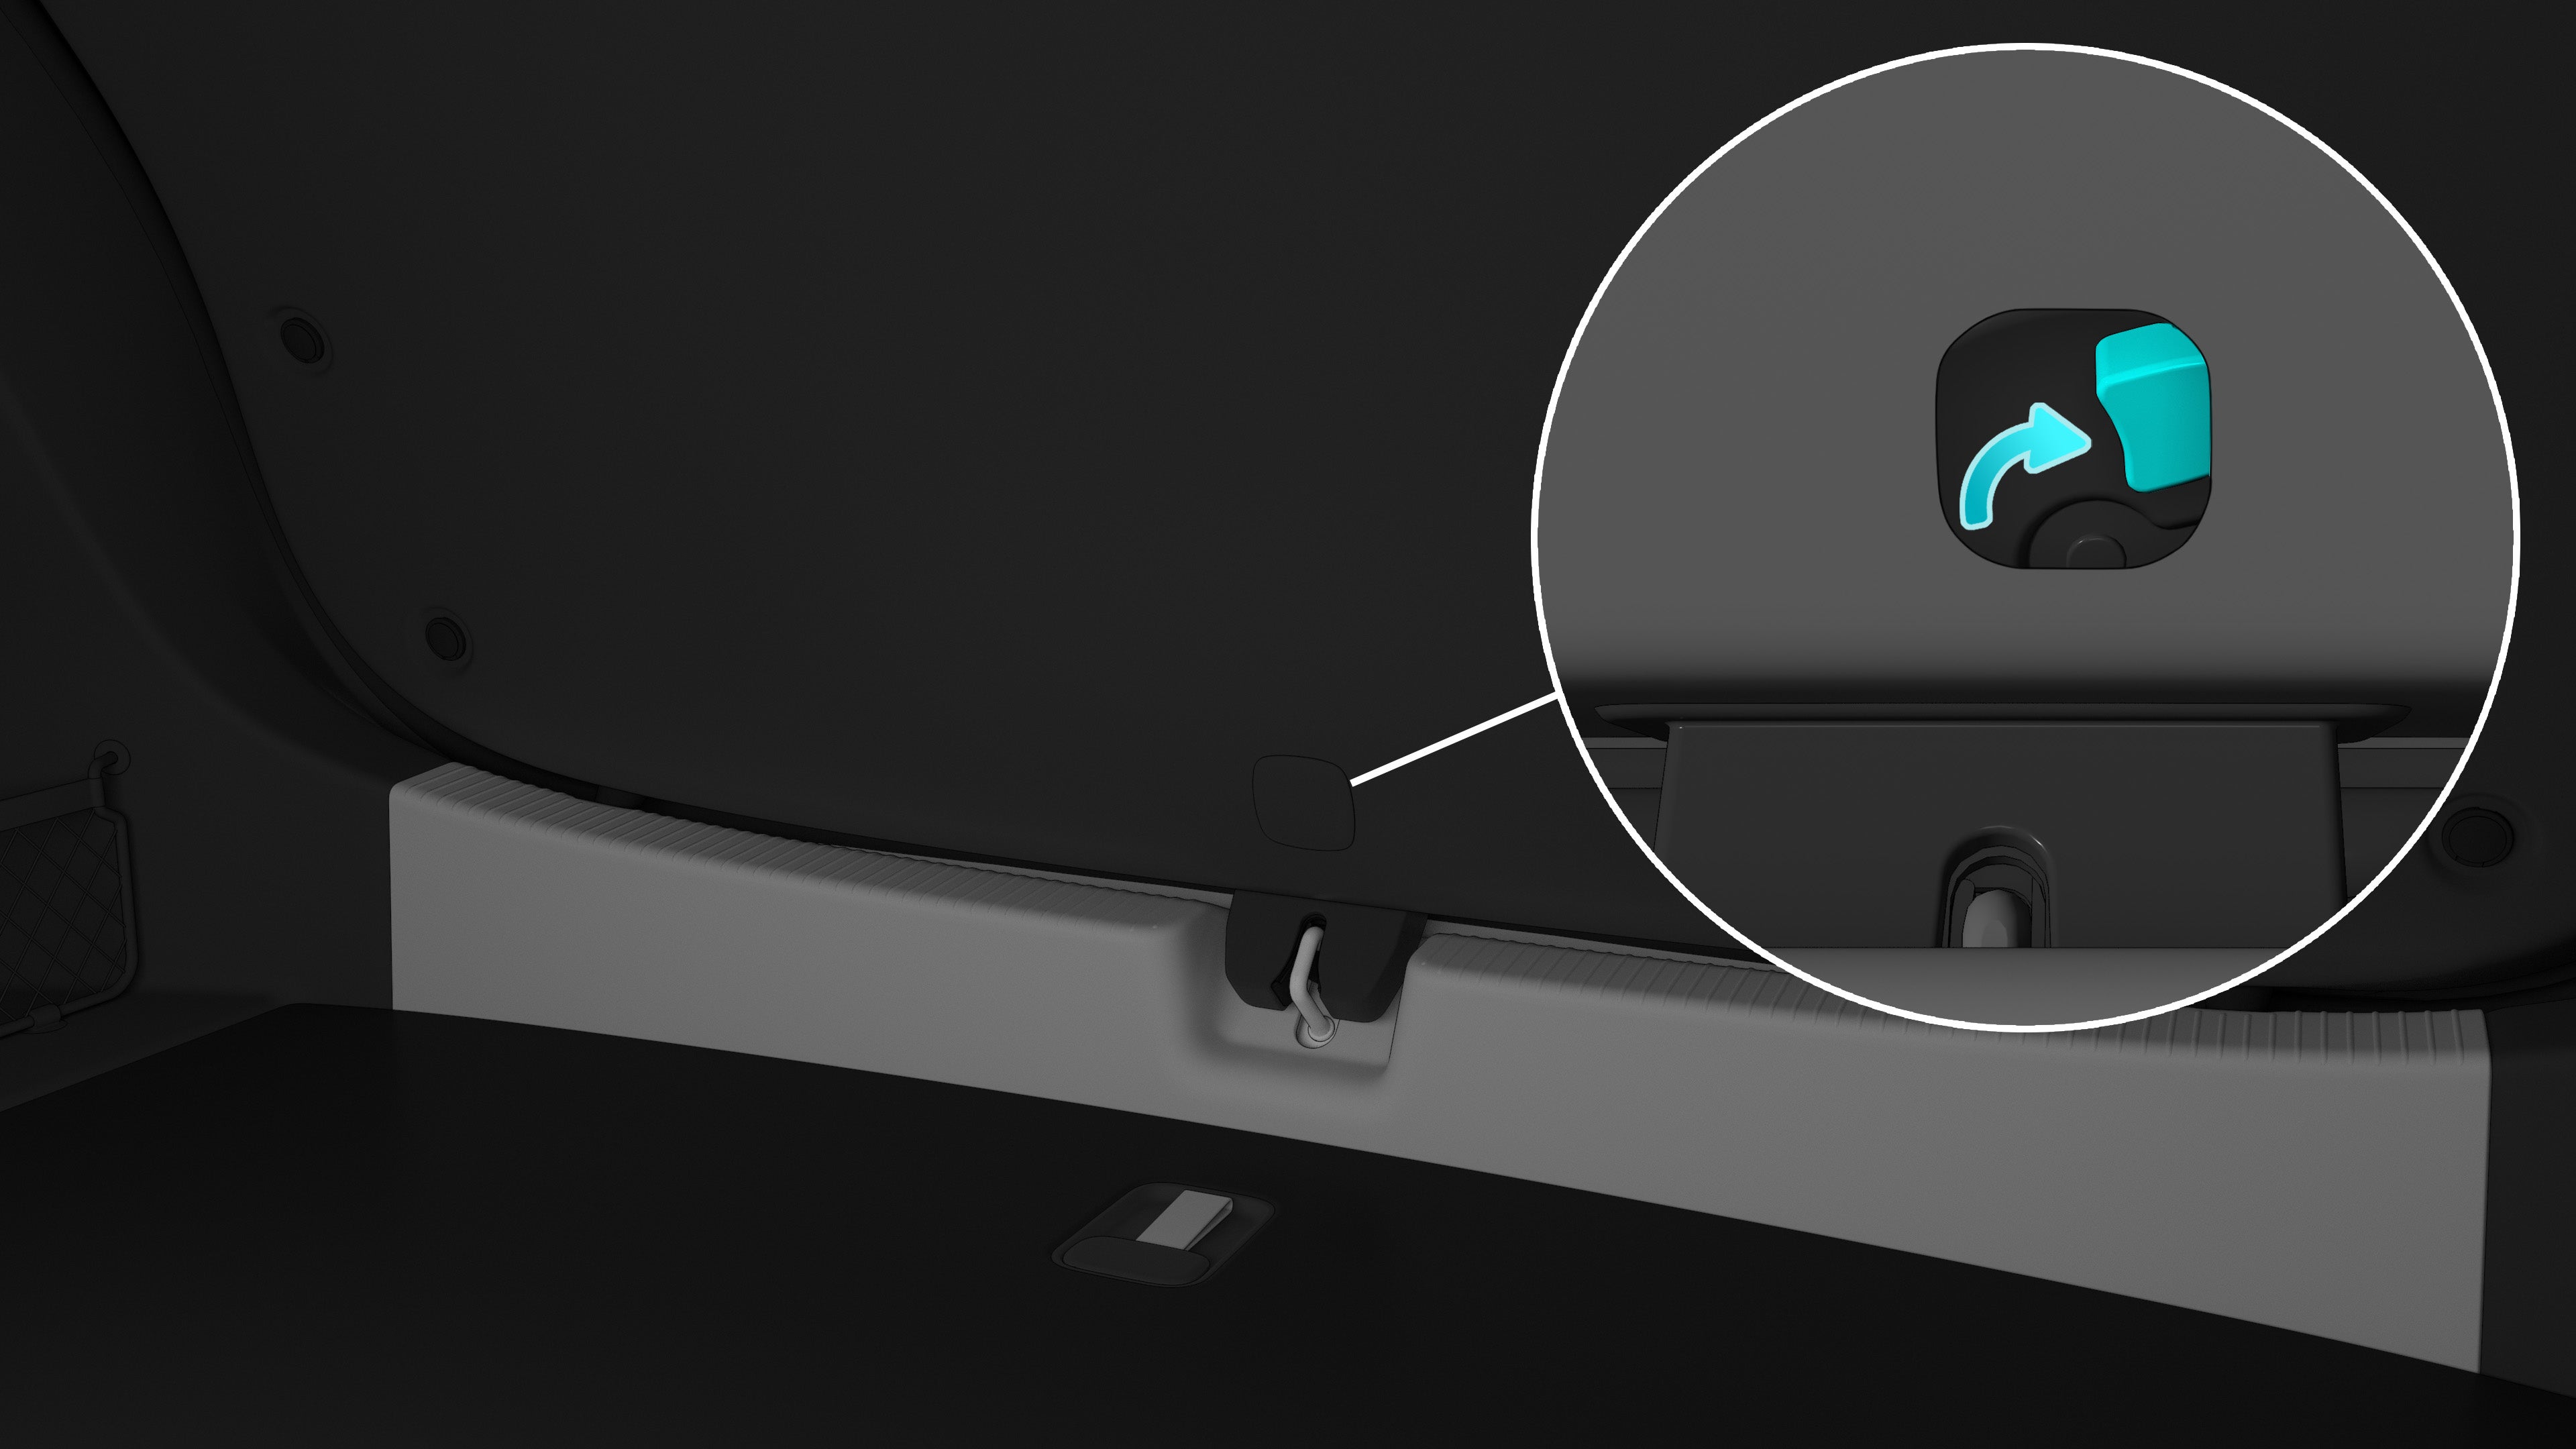
Open the rear trunk cover, pull the emergency unlocking cable of the e-lock of the charge
port, and then try to unplug the charger.
If you still cannot unplug the charger, stop charging immediately and contact the NIO
Service Center.
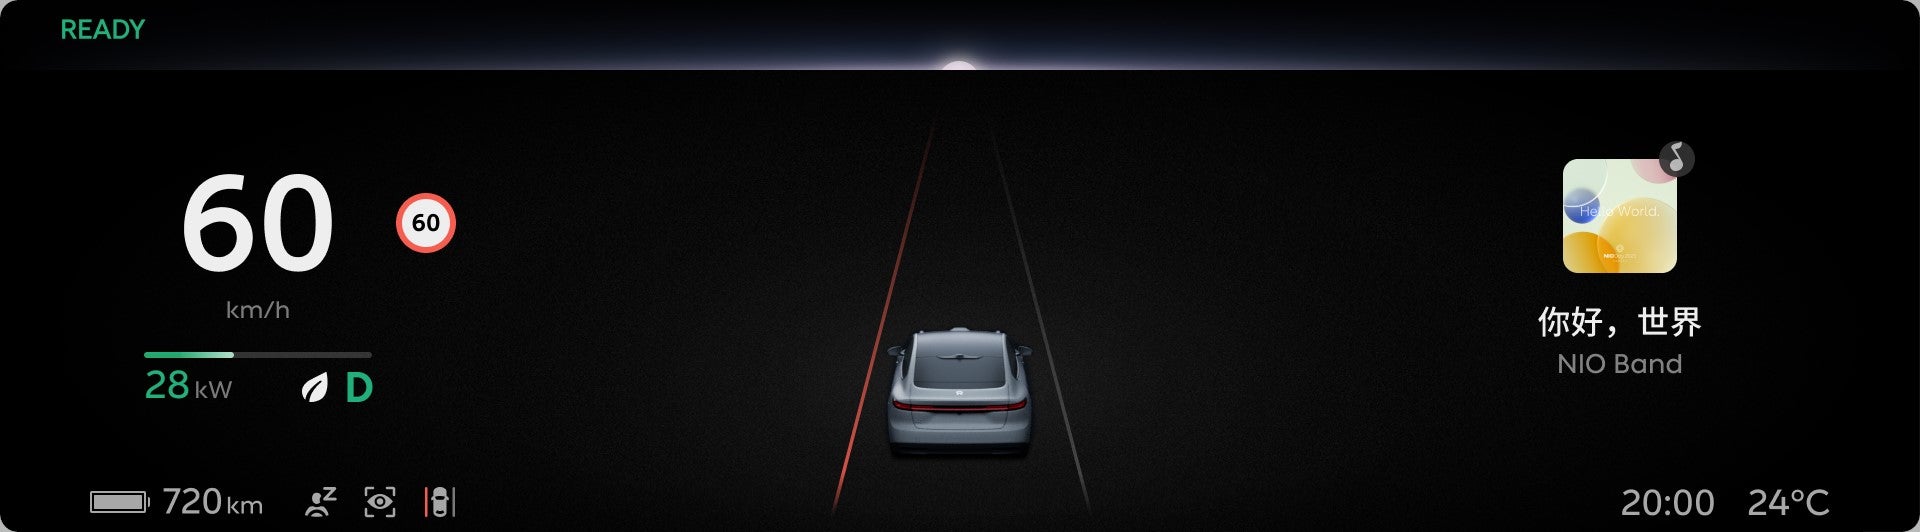
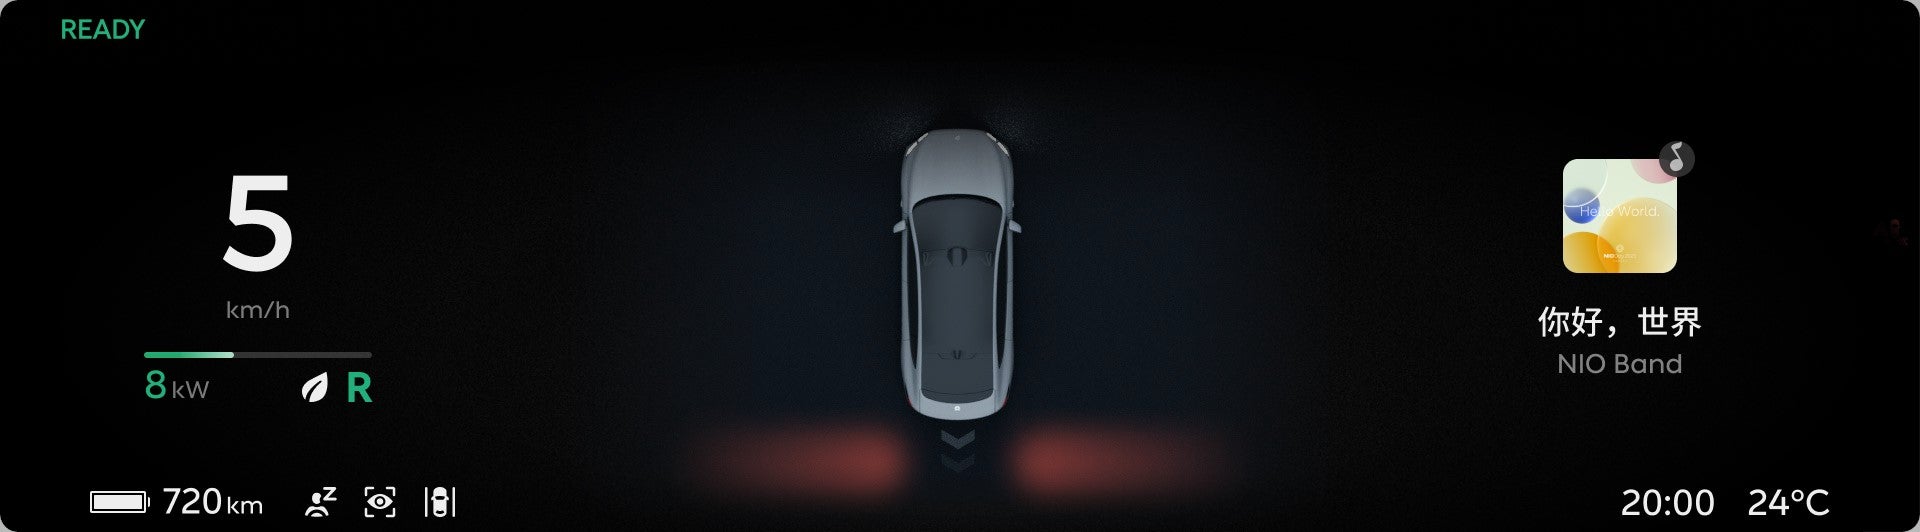
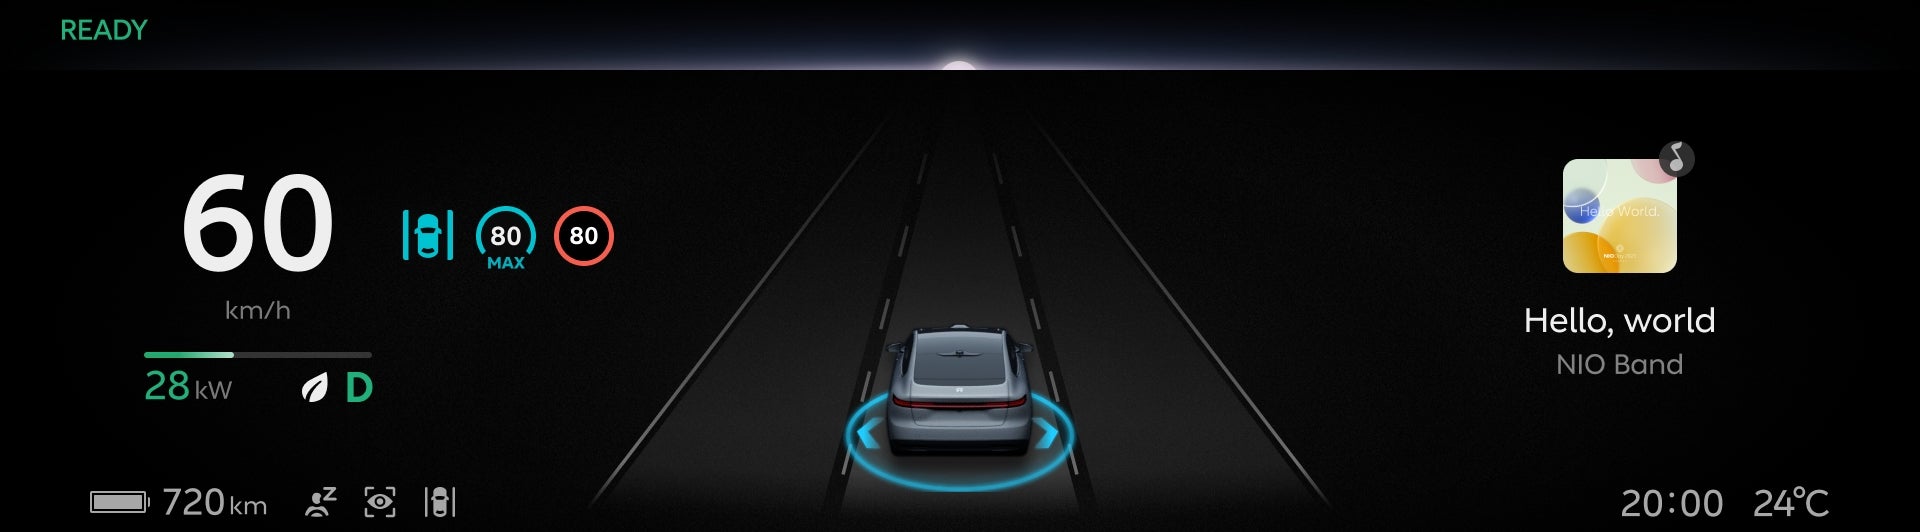
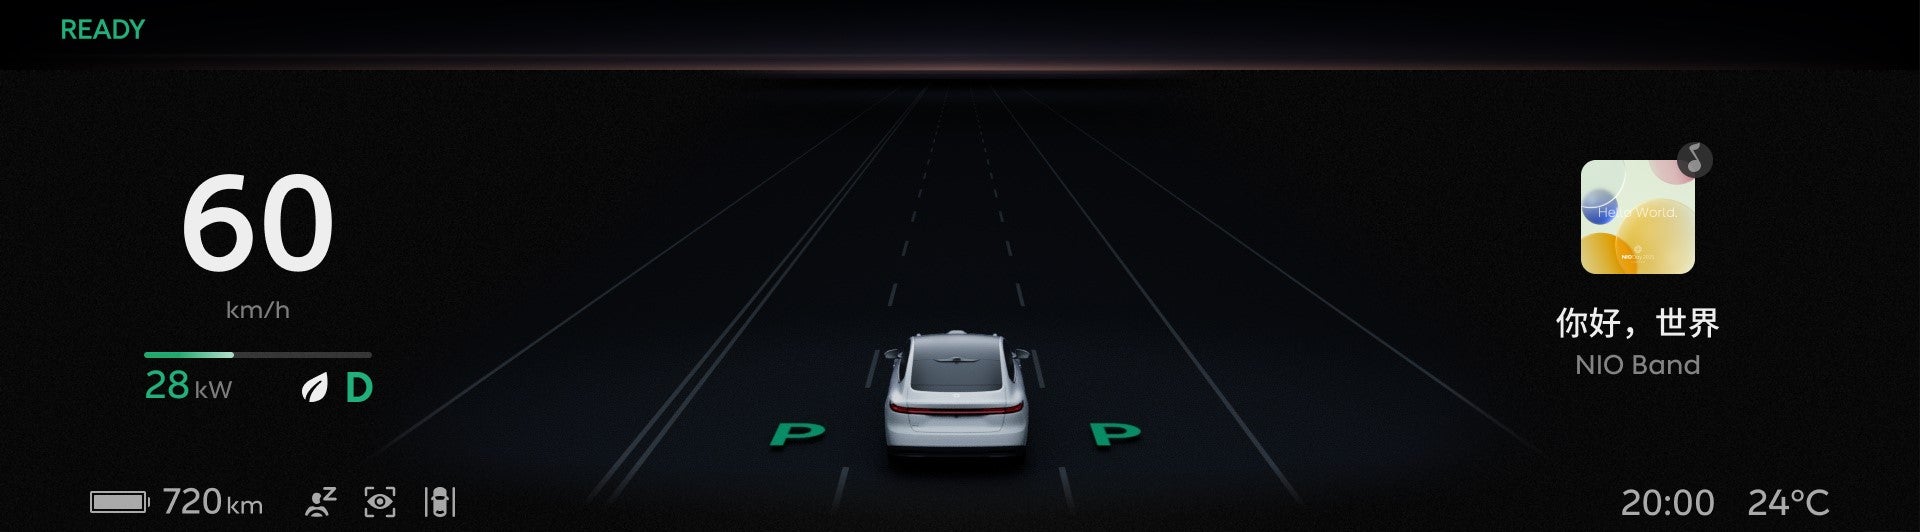
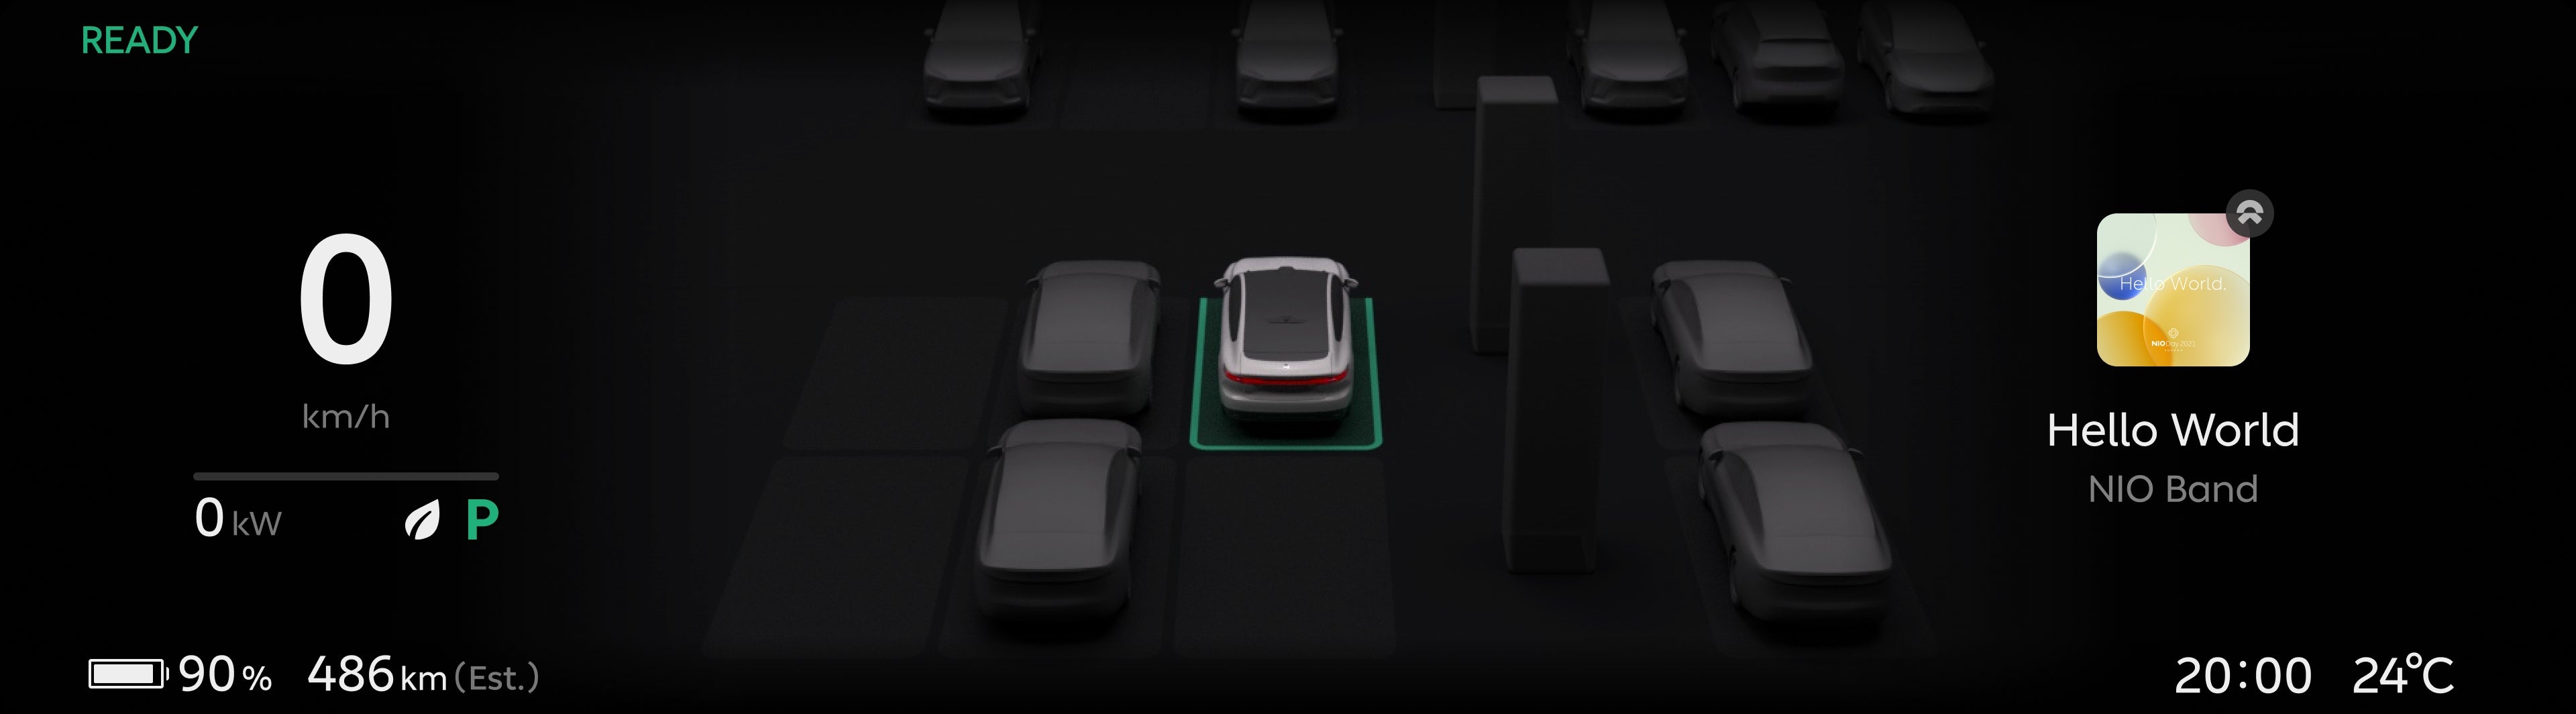
Battery Level and Charging Display
The status of the current high-voltage battery and some warning information related to the
battery can be displayed on the digital instrument cluster.
Current Power Display
It indicates the current power value of the high-voltage battery when it provides power or
recovers energy from regenerative braking.
High-voltage Battery Energy Bar
This energy bar indicates the power provided by the high-voltage battery. A green energy bar
indicates the power during regenerative braking.
Range
It indicates the range supported by the high-voltage battery in the current state.
When the range is less than 60 km (the value is configurable), the icon turns yellow; when it
is less than 10 km, the icon turns red.
Before charging or after stopping the vehicle, you can configure the desired charging settings on
the Center Display. When the predetermined charge limit is reached, the charging will be automatically
stopped and a reminder will be displayed on the instrument cluster. The charging upper limit of this feature
is set to 90% by default. However, you may access the Settings interface on the Center Display, and tap
Battery to slide the battery in the vehicle model for adjustment. The
adjustment range is 50%–100%.
You can access the Vehicle Information option through the menu button on the right side of the
steering wheel, and view the current and voltage values of the current high-voltage battery.
The indicators related to the battery level on the digital instrument cluster are as follows:
Displayed Icon on Instrument Cluster
Instrument Cluster Indicators
Description
Normal indicator of high-voltage battery
This indicator indicates that the current high-voltage battery is operating normally.
Low battery indicator of high-voltage battery
This indicator indicates that the current high-voltage battery is low on power. Please
charge it in time. Please contact the NIO Service Center if necessary.
High-voltage battery cut-off warning light
At this time, your vehicle is not energized by the high-voltage battery. Please contact
the NIO Service Center if necessary.
Low voltage battery charging fault warning light
If this warning light illuminates, please contact the NIO Service Center immediately.
High-voltage battery fault warning light
If this warning light illuminates, please stop the vehicle immediately and contact the
NIO Service Center.
If this warning light illuminates, please stop the vehicle immediately and contact the
NIO Service Center.
Ice- and snow-covered road indicator
This indicator lights up to indicate that the current ambient temperature is too low,
which may affect the performance of the high-voltage battery.
Charging cable connected indicator
This indicator lights up to indicate that the charging cable is currently connected.
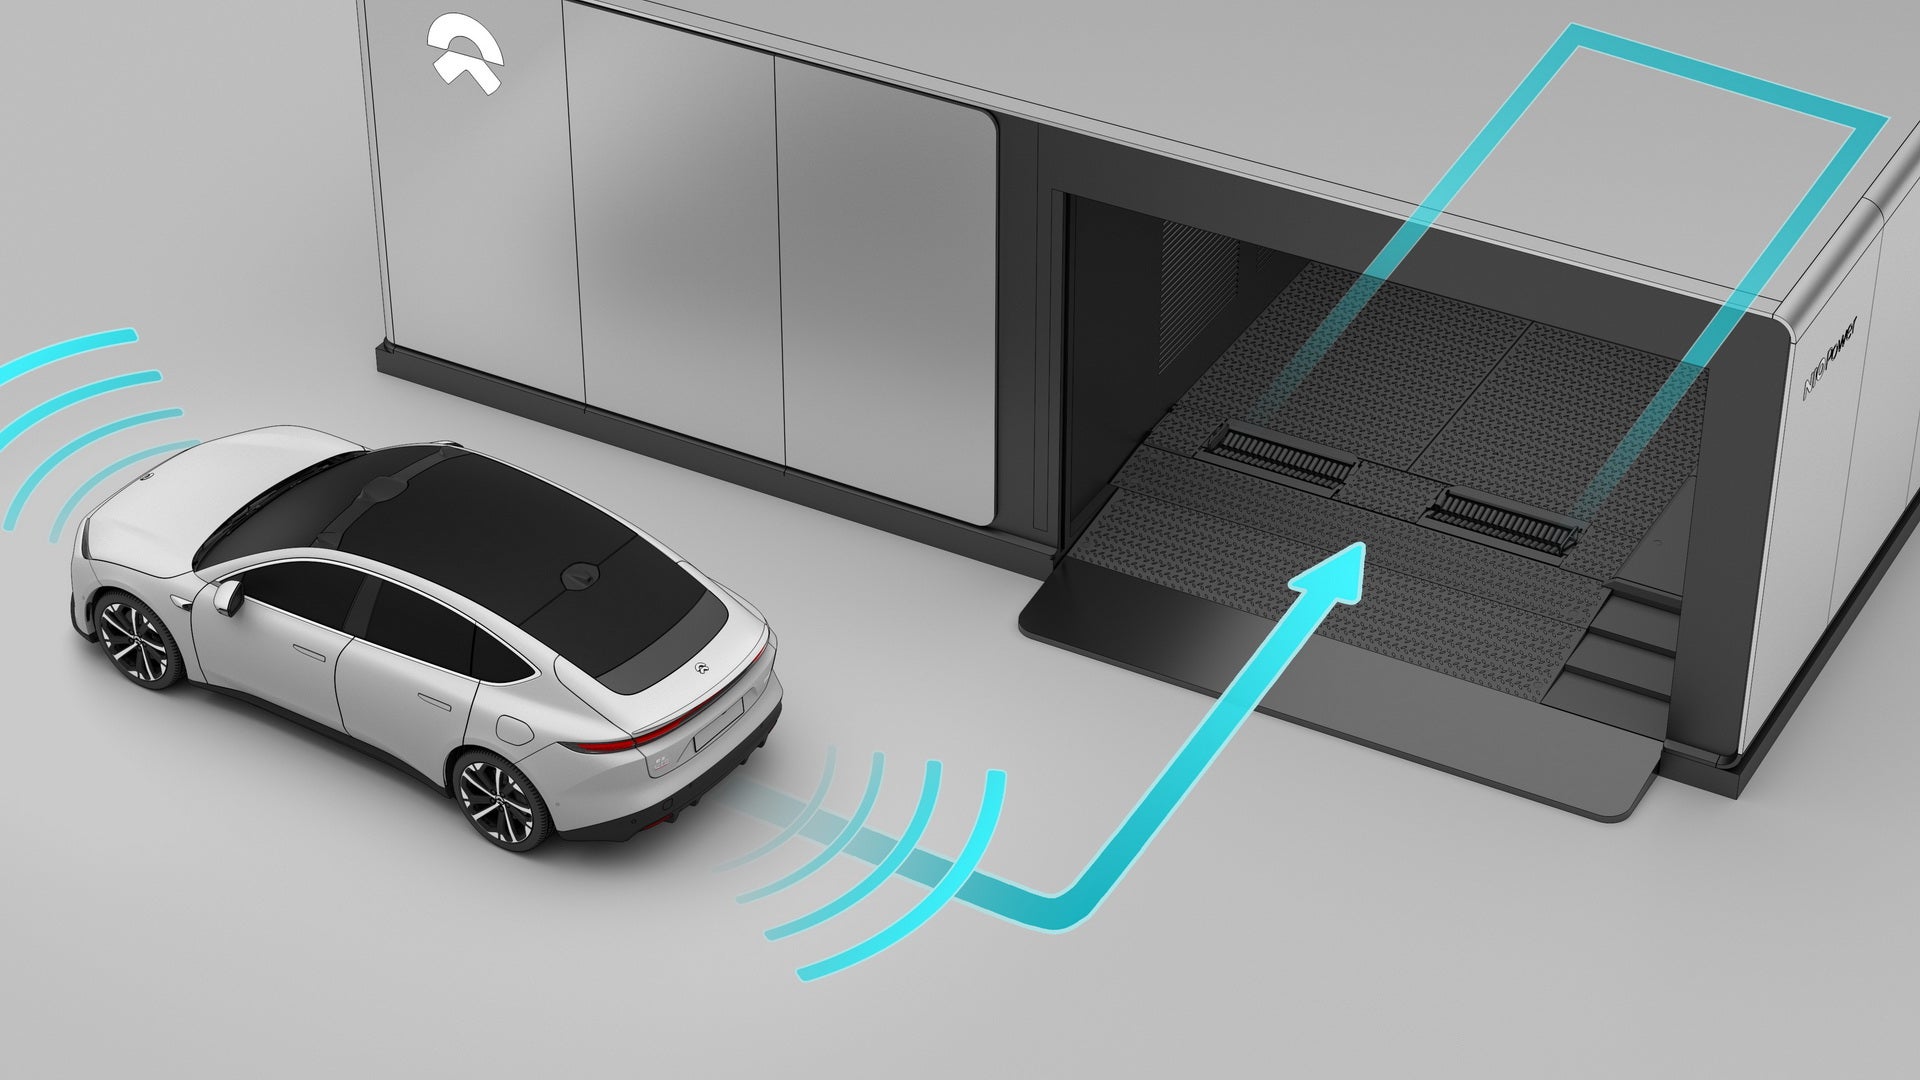
Battery Preconditioning
The charging speed of high-voltage batteries slows down in cold conditions. When the Battery
Preconditioning feature is enabled, the high-voltage battery can be warmed up to a certain extent in advance
before the vehicle reaches the energy replenishment point (a charger ) to speed up vehicle charging.
On-Route Battery Preheating
The On-Route Battery Preheating feature is enabled by default. You can go to the Settings
interface from the control bar at the bottom of the center display, and select to enter the Battery interface to disable the feature. After this feature is enabled, when the
destination or waypoint in the navigation state is a charging station , the vehicle will automatically
start the high-voltage battery preconditioning provided that it can ensure arrival at the destination, so
as to improve the charging efficiency. On-Route Battery Preheating only brings the battery warming step
forward and does not consume additional energy.
In the navigation state, the On-Route Battery Preheating feature will be automatically
activated under the following conditions. The current preconditioning status will be displayed on the
status bar at the top of the Center Display:
The navigation destination or waypoint is a Charging Station , or a service area with a
Charging Station .
The driver is seated.
The current remaining range is more than 120 km.
The vehicle is not in ECO+ mode.
You can manually disable the On-Route Battery Warmup feature by selecting Disable This Time (enabled by default next time) or Keep
Disabled.
This feature will automatically deactivate the preconditioning process (the switch remains on)
in one of the following conditions:
The vehicle is connected to a charger.
Navigation to a Charging Station is disabled or stopped.
If preconditioned with the current remaining range, less than 20 km will remain when the
vehicle reaches the destination.
The vehicle is in ECO+ mode.
Manual Battery Preheating
The Manual Battery Preheating feature is disabled by default. If you are familiar with the
charging route and do not need to follow the navigation guide to the charging point, it is recommended to
enter the Battery interface on the Center Display in a low temperature
environment and enable Manual Battery Preheating. The vehicle will enable high-voltage battery
preconditioning to improve charging efficiency. When starting Manual Battery Preheating, it is necessary
to ensure that the ambient temperature is below 20 °C and the vehicle’s remaining range is greater than 10
km.
You can enable or disable the Manual Battery Preheating feature on the Center Display or NIO
App. The status bar at the top of the Center Display will show the current preconditioning status.
This feature will automatically deactivate the preconditioning process (the switch is off at
this time) in one of the following conditions:
The vehicle is connected to a charger.
The On-Route Battery Preheating feature is enabled.
The battery has been warmed up to the set temperature and maintained that way for 1 hour.
The vehicle is in ECO+ mode.
Caution低温充电预热功能激活后,手动充电预热功能不可用。
Activating the battery preconditioning feature will increase power consumption to a
certain extent. Please plan your trip in a reasonable manner or use this feature appropriately.
After the On-Route Battery Warmup feature is activated, the Manual Battery Warmup feature
will not be available.
The Manual Battery Warmup feature cannot determine the impact of preconditioning on the
range to the destination on its own. Please pay attention closely to whether the current range
supports reaching the destination before activating this feature.
High and Low Beams
You can adjust the state of the high and low beams through the light control lever on the left
side of the steering wheel.
Push the light control lever forward to turn on the Auto High Beams (AHB); push it forward
again to turn on the high beams.
Pull the light control lever backward to turn off the high beams; push the lever back and
forth to control the flashing.
Note只有在打开自动大灯或大灯开启时才能使用。
Auto High Beams are only available when the headlights are set to the Auto mode or the
feature is turned on.
The headlights and taillights of your vehicle may produce fog, frost, etc., in low
temperature or high humidity environments, which are normal physical phenomena. After your vehicle is
parked at room temperature for a period of time, the fog or frost will disappear.
To make manual adjustments, use the light control lever on the left side of the steering wheel.
To enable Auto High Beams (AHB), push the light control lever forward, and the instrument
cluster displays the Auto High Beams (AHB) icon ; pushing the lever forward again activates the high beam headlights and
displays its icon on
the instrument cluster.
If the Auto High Beams (AHB) feature is turned off, moving the light control lever forward
will switch only between the high and low beams.
To turn off the high beams and Auto High Beams (AHB), move the light control lever backward and
release it.
Note只有在打开自动大灯或大灯开启时才能使用。
Auto High Beams are only available when the headlights are set to the Auto mode or the
feature is turned on.
After the light control lever is moved backward and released, the high beams will flash once.
The headlights and taillights of your vehicle may produce fog, frost, etc., in low
temperature or high humidity environments, which are normal physical phenomena. After your vehicle is
parked at room temperature for a period of time, the fog or frost will disappear.
Turn Signals
Turn left: move the light control lever down
Turn right: move the light control lever up
When the turn signal is on, the corresponding turn indicator on the instrument cluster will
light up as well, accompanied by a "tick-tock" sound.
The turn signal lights go out when the steering wheel returns, or when you move the light
control lever back to the middle.
Turn left: move the light control lever down
Turn right: move the light control lever up
When the turn signal is on, the corresponding turn indicator on the instrument cluster will
light up as well, accompanied by a "tick-tock" sound.
Flick the light control lever: the turn signal automatically goes out after three
flashes;
Re-flick the light control lever: the turn signal continues to flash until manually
turned off or the steering wheel is returned to center;
While the turn signal is flashing, flick the light control lever in the opposite direction or
in the same direction again to immediately turn off the turn signal.
Fog Lights
You can turn on the front and rear fog lights by pressing the button on the top of the light
control lever. When the fog lights are on, the position lights will be automatically turned on as well.
The sequence by which the lights turn on is:
Press the first time: turn on front fog lights.
Press the second time: turn on rear fog lights.
Press the third time: turn off rear fog lights.
Press the fourth time: turn off front fog lights.
If pressed again, the above sequence will be repeated.
When the fog lights light up, the corresponding indicator light on the instrument cluster will
light up as well, indicating the status of the feature being turned on.
Go to the Settings interface on the Center Display, and tap Lights >
Exterior Lighting. Press Front Fog Lights and Rear Fog Lights to turn on/off the front/rear fog lights.
Alternatively, swipe right from the left of the Center Display to enter the Quick Access
interface, and press Front Fog Lights and Rear Fog
Lights to turn on/off the front/rear fog lights.
Position Lights
Go to the Settings interface on the Center Display,
Tap Lights > Exterior Lights > Headlights, select
to turn on the Automatic
Headlights. During daytime, the front position lights are illuminated as daytime running lights, and the
rear position lights are automatically turned on; during nighttime, both the front and rear position lights
are automatically illuminated.
You can also manually adjust the ride height by going to the Settings interface on the Center
Display
Tap Lights > Exterior Lights > Headlights, select
Manually turn on the
position lights, and both the front and rear position lights will be lit continuously.
Outer Door Handle Courtesy Lights
Each outer door handle is equipped with a door handle courtesy light.
The outer door handles will automatically pop out when the entire vehicle is unlocked, and the
outer door handles courtesy lights will be turned on to illuminate the area around the door for you. The
outer door handle courtesy lights will be turned off when the outer door handles are retracted.
Puddle Lights
Each door of the vehicle is equipped with a puddle light for easy access at night. The liftgate
is equipped with two puddle lights to illuminate the ground when the liftgate is opened.
The puddle light automatically turns on when you open the door, and turns off 10 minutes after
the door is opened or immediately after the door is closed.
Reading Lights
Auto Reading Light
To enable the feature, go to the Settings interface on the Center Display and tap Lights > Interior Lighting > Auto Reading Light.
When the feature is on, the Reading Light automatically illuminates when you unlock the vehicle
or open any door . The Reading Light automatically turns off when one of the following occurs:
Driving;
Locking the vehicle from the outside;
10 minutes after the door is opened;
15 seconds after all doors are closed.
Manual Control of Reading Lights
There is a touch switch for each reading light on the vehicle roof, which allows you to
individually control each reading light.
You can also turn on or off the reading light with NOMI.
The Center Display also provides a main switch to control all reading lights. To turn on or off
all reading lights at the same time, go to the Settings interface on the Center Display and tap Lights > Interior Lighting > Reading Lights.
When you lock the vehicle from the outside (using the smart key or NIO App), all reading lights
will be turned off at the same time.
When your vehicle is not locked externally, if the front reading lights are turned on
manually through the touch switch at the roof area, they will not be turned off automatically and
need to be turned off manually.
Reading Light Brightness Adjustment
The default brightness of the reading light is 60% each time the reading light is turned on.
When the reading light is turned on, you can adjust its brightness by pressing and holding the
corresponding touch switch or via NOMI.
When you adjust the brightness of the reading light with the touch switch, the brightness
will gradually change in real time until it reaches extreme values (brightest or darkest). Once it
reaches the desired brightness, release the touch switch, and the reading light will maintain the
current brightness level.
When you adjust the brightness of the reading light with NOMI, the Center Display will show
the control window for brightness adjustment, which allows you to manually adjust the brightness of
the reading light on this interface.
Ambient Lighting
General
The vehicle has adjustable ambient lights on door panels, storage, and floorboards.
Once you are seated, you can turn on the ambient lighting on the Center Display, and the
vehicle will show the default ambient light effect in the current driving mode.
The ambient lights are available in 256 colors. To select different themes and colors (main
colors, auxiliary colors) of ambient lights, go to the Settings interface on the Center Display and tap
Lights > Ambient Lighting. This setting will be saved for you. You can
also set the brightness of ambient lights and choose different ambient lighting modes, such as Breathing,
Rhythmic, etc. This setting will be saved on the Center Display.
Ambient lighting is integrated with the door open warning. When any door is about to be opened
and triggers the warning, the corresponding side door's ambient lighting on the door panel illuminates in
red and flash.
Vanity Mirror Lighting
There are two sun visors on the vehicle's roof, each equipped with a vanity mirror.
When you unfold the cover of the vanity mirror, the vanity mirror light will automatically turn
on. Close the cover and the light will automatically turn off.
Trunk Lighting
The trunk light will automatically illuminate when the liftgate is open.
The trunk light will automatically go out after being on for 10 minutes or when the liftgate is
closed.
Linking Key to Account
When the vehicle is first activated and passes the verification process, the key is
automatically bound to the owner's account. Subsequently, when using the key to unlock the vehicle, it
will automatically load the owner's account data.
The owner can use the NIO App's key management interface to bind the key with authorized
accounts. As a result, when authorized users use their corresponding keys to unlock the vehicle, the bound
authorized account's content will be automatically loaded. Both the owner and user of the bound account
will receive SMS and NIO App notifications upon successful binding or unbinding.
Note钥匙与账户绑定
The Key's binding to the account can only be modified by the vehicle's owner. Before
being bound to the Key, additional NIO accounts need to be authorized first.
The bond between the authorized user and the key is automatically lifted synchronously
if the owner ceases authorizing.
Guest Mode is only available for Smart Key that is bound to the owner's account. When a
Smart Key bound to the authorized user's account is used to unlock the vehicle, the authorized
user's information will be automatically loaded.
Switching Accounts
You or the authorized user can switch between different accounts on the Center Display to load
corresponding personal settings, such as seat position, steering wheel.
You, the co-user, or the authorized user can switch between different accounts in two ways to
load the corresponding personal settings:
When the vehicle is connected to the network or has been previously logged in but is
currently offline, go to the Settings interface by tapping the personal avatar on the Center Display
or from the control bar below the Center Display, and tap Account > Switch
Account, you can see the list of active accounts, including the accounts of the owner, the
co-users, and the authorized users. Simply tap the corresponding avatar or nickname to switch
accounts. An account needs to be verified (via scanning a QR code on the NIO App or entering a
verification code) before being logged in. You can also set up a password-free login in Account > Face and Password for quick and easy account switching.
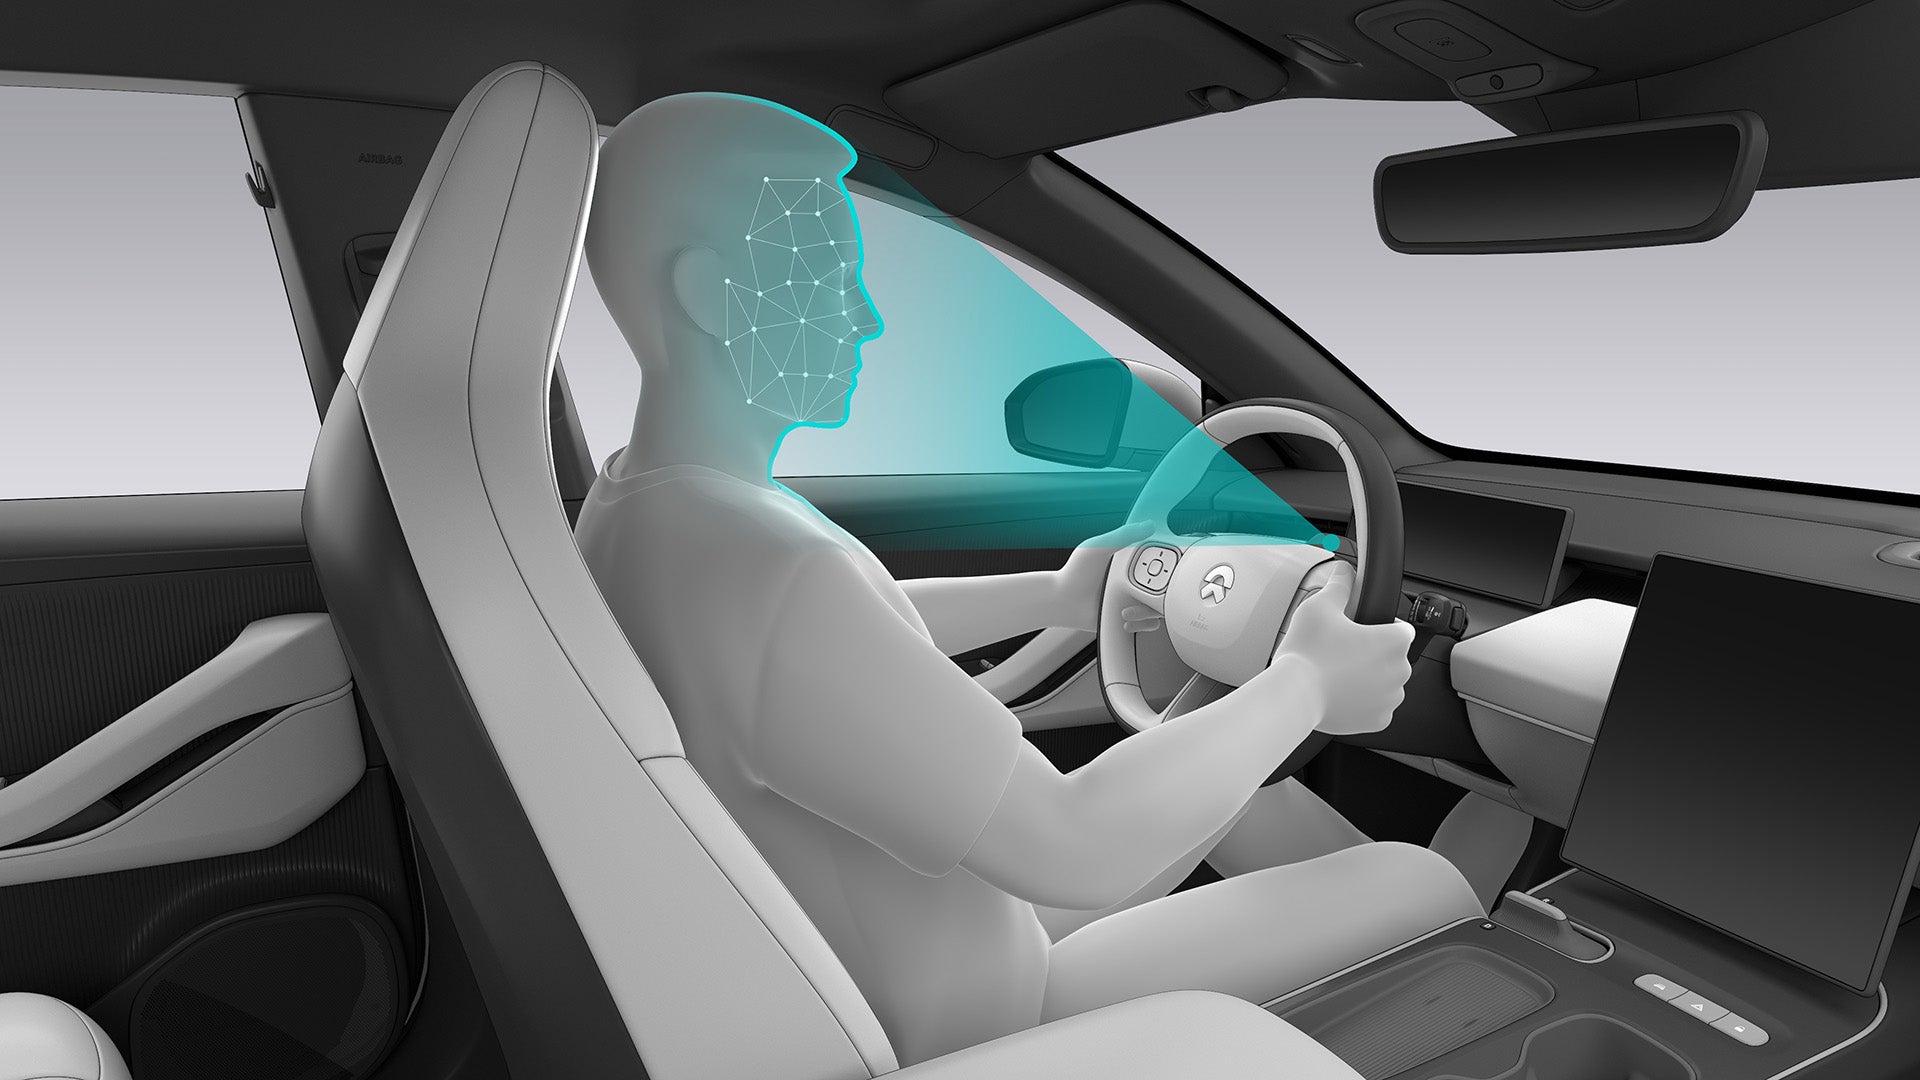
To switch between accounts through facial recognition, you can go to the Settings interface
by tapping the personal avatar on the Center Display or from the control bar below the Center Display,
tap Account > Face and Password, and enter the facial recognition
data. Once you unlock the vehicle and take the driver seat, look straight ahead, and the vehicle will
automatically recognize the account information and load the corresponding personalized settings. If
the current user is not matched with the logged-in account but can be linked to another account in the
vehicle (for example, you give the key to a family member), the vehicle will automatically switch to
the correct account.
Caution只有在非驾驶状态可以进行切换账户的操作
Switching between accounts can only be performed in the non-driving state.
The vehicle does not save the set custom options (e.g., driver seat position, etc.) in
Guest Mode.
Authorized Unlocking
If you want to lend your vehicle to others, you can authorize users registered on the NIO App to
use your vehicle. An authorized user can access authorized features by using their NFC key or verified NIO
App.
Authorization by Owner
You can tap Profile Avatar > Account Settings in the Settings
interface of the NIO App or in the upper left corner of the Center Display, and then enter the gesture
password of your vehicle to go to the authorization management interface.
You can authorize a user and set related authorized features by entering their NIO App user
name. Up to nine users can be authorized. After setting the user's authorization, you can tap the profile
photo or user name of the authorized user to view the user's detailed information and authorized features
(such as media, video, and safe box). If the current authorization is active, you can also edit the range
of authorized access or disable the user's authorization. An authorized user can only access authorized
features, and cannot manage authorization or set the Guest Mode.
After the vehicle is locked, if you unlock the vehicle using your smart key, the vehicle will
automatically log in to the owner's account.
If authorization is no longer required, please promptly cancel the authorization.
Otherwise, the functions of the authorized accounts will remain active.
For safety reasons, if the authorized user is driving, the authorization will only be
canceled after the user has parked and locked the vehicle.
If the added authorized user is a NIO user, the authorization takes effect immediately after
the authorization process is completed. If the added authorized user is not a NIO user, the
authorization will only take effect after this user has successfully registered a NIO account.
Unlocking by an Authorized User
An authorized user can unlock the vehicle using their NFC key or NIO App. To view the account
information and authorized features of an authorized user, tap their profile avatar on the Center Display.
NFC unlocking: Open the NFC key App on the mobile phone and place it close to the center
area of vehicle body on the left side.
Remote unlocking by NIO App: Tap Door Locks on the My Car interface in NIO App.
Guest Mode
If you need to lend your vehicle to someone using a smart key, you can set the Guest Mode by
tapping your profile avatar on the Center Display to protect your privacy (such as navigation history,
contacts, videos, photos, etc.).
In the Guest Mode, only default vehicle features such as air conditioning, weather, navigation
(no personal information such as history records or favorites) can be used.
To exit the Guest Mode, you need to enter the gesture password on the Center Display.
The Smart Key is bound to the owner's account. If you have not set Guest mode and a user
uses this key to enter the vehicle, the vehicle automatically logs in to the owner's account, and the
user has owner-level permissions.
Service Authorization
You or the authorized user can initiate service requests to the NIO Service Center through the
NIO App. The service center will temporarily authorize the service personnel to provide the necessary
services (such as One-Click-for-Power services). After the service is completed, the NIO Service Center will
revoke the corresponding service permissions.
Once the service personnel are authorized, they can unlock the vehicle using NFC within the
specified authorization time and scope of functions. Upon entering the vehicle, the Center Display will show
the account to receive authorized services and available operations.
Authorized service personnel are not allowed to manage authorizations, set the Guest Mode, bind
keys, or switch accounts.
After the service is completed, all doors and the liftgate should be locked. If one or more
doors are left unlocked, the mobile App will prompt you to lock them.
Driver Seat Adjustment
Adjusting the seat position via buttons
The buttons under the seat allow you to adjust the position of the driver seat.
Length of seat cushion
Toggle the button back and forth to adjust the length of the seat cushion.
Front inclination angle of seat cushion
To adjust the seat cushion's front inclination angle, turn this button.
Lateral position of the seat
Toggle this button back and forth to move the seat forward or backward.
Height of seat
To raise or lower the seat, toggle the center portion of this button up or down.
Reclining of the backrest
Toggle the upper end of this button back and forth to adjust the reclining of the seat
backrest.
Lumbar support adjustment
Press and hold the up, down, left, or right button to adjust the lumbar support.
Adjusting the seat position via buttons
The buttons under the seat allow you to adjust the position of the driver seat.
Front inclination angle of seat cushion
To adjust the seat cushion's front inclination angle, turn this button.
Lateral position of the seat
Toggle this button back and forth to move the seat forward or backward.
Height of seat
To raise or lower the seat, toggle the center portion of this button up or down.
Reclining of the backrest
Toggle the upper end of this button back and forth to adjust the reclining of the seat
backrest.
Lumbar support adjustment
Press and hold the up, down, left, or right button to adjust the lumbar support.
Warning驾驶员座椅调节Note
Before starting your vehicle, please ensure that your seat is adjusted to its recommended
position (refer to the recommended sitting postures and seat positions in the User Manual).
Adjust the driver's seat position, headrest, etc., while your vehicle is parked.
Adjustments to the seat or other parts of the vehicle while in motion can pose safety risks.
Make sure there is safe space around the seat for any rear children, passengers, pets,
etc., before you make any adjustments to the seat (such as moving the seat forward or backward,
adjusting the seat's height or back, etc.), to avoid causing risk of compression to the passengers.
Before adjusting your seat (forward and backward, height, back, legrest, etc.), please
ensure that there is sufficient safe space in the surrounding environment to avoid deformation and
fracture risks caused by compression with surrounding components (footrest, legrest, seat cup
holder, armrest, etc.) during the seat adjustment process.
During the seat adjustment process (moving it forward or backward, adjusting the seat's
height or back, etc.), avoid putting hands or other body parts in the seat's range of motion to
prevent potential pinching or collision.
After seat position adjustment, please ensure the seat is locked.
Do not allow children to make any adjustments to the seats, as doing so may result in a
risk of being pinched.
With Easy Entry & Exit on, make sure there is safe space around the seat for any rear
children, passengers, pets, etc., to avoid causing risk of compression to the passengers.
Please wait until Easy Entry & Exit has been completed before starting the vehicle.
Performing any operation at this time may lead to loss of vehicle control.
It is recommended to turn off Easy Entry & Exit if children frequently occupy the
rear row.
If the seats are equipped with rear tray tables, be sure to stow them before turning on
the Day Dream feature, otherwise the tables and seats may be damaged.
Controlling the movement of the seat on the center display
You can control the movement of the driver's seat on the center display.
On the driver's seat control interface of the center display, tap the "Position", "Backrest"
and "Cushion" control arrows to adjust the position of the driver's seat, the reclining of the backrest
and the position of the seat cushion respectively.
The center display provides five position options: driving position, rest position, exit
position, other position, alternate position and reclining position. Every position needs to be set up by
you, with the exception of the reclining position.
How to set up a memory position:
Enter the Settings interface from the control bar at the bottom of the center display, tap
Position Adjustment > Seat > Driver to set up the position of the
driver's seat on this interface.
You can adjust the seat position through the seat buttons or on the center display to set up
personalized positions in different scenes by pressing the Drive/Alternate/Rest/Exit button on the interface, and the settings will be saved
under the corresponding user account. When you need to update a set position, adjust the seat and re-save.
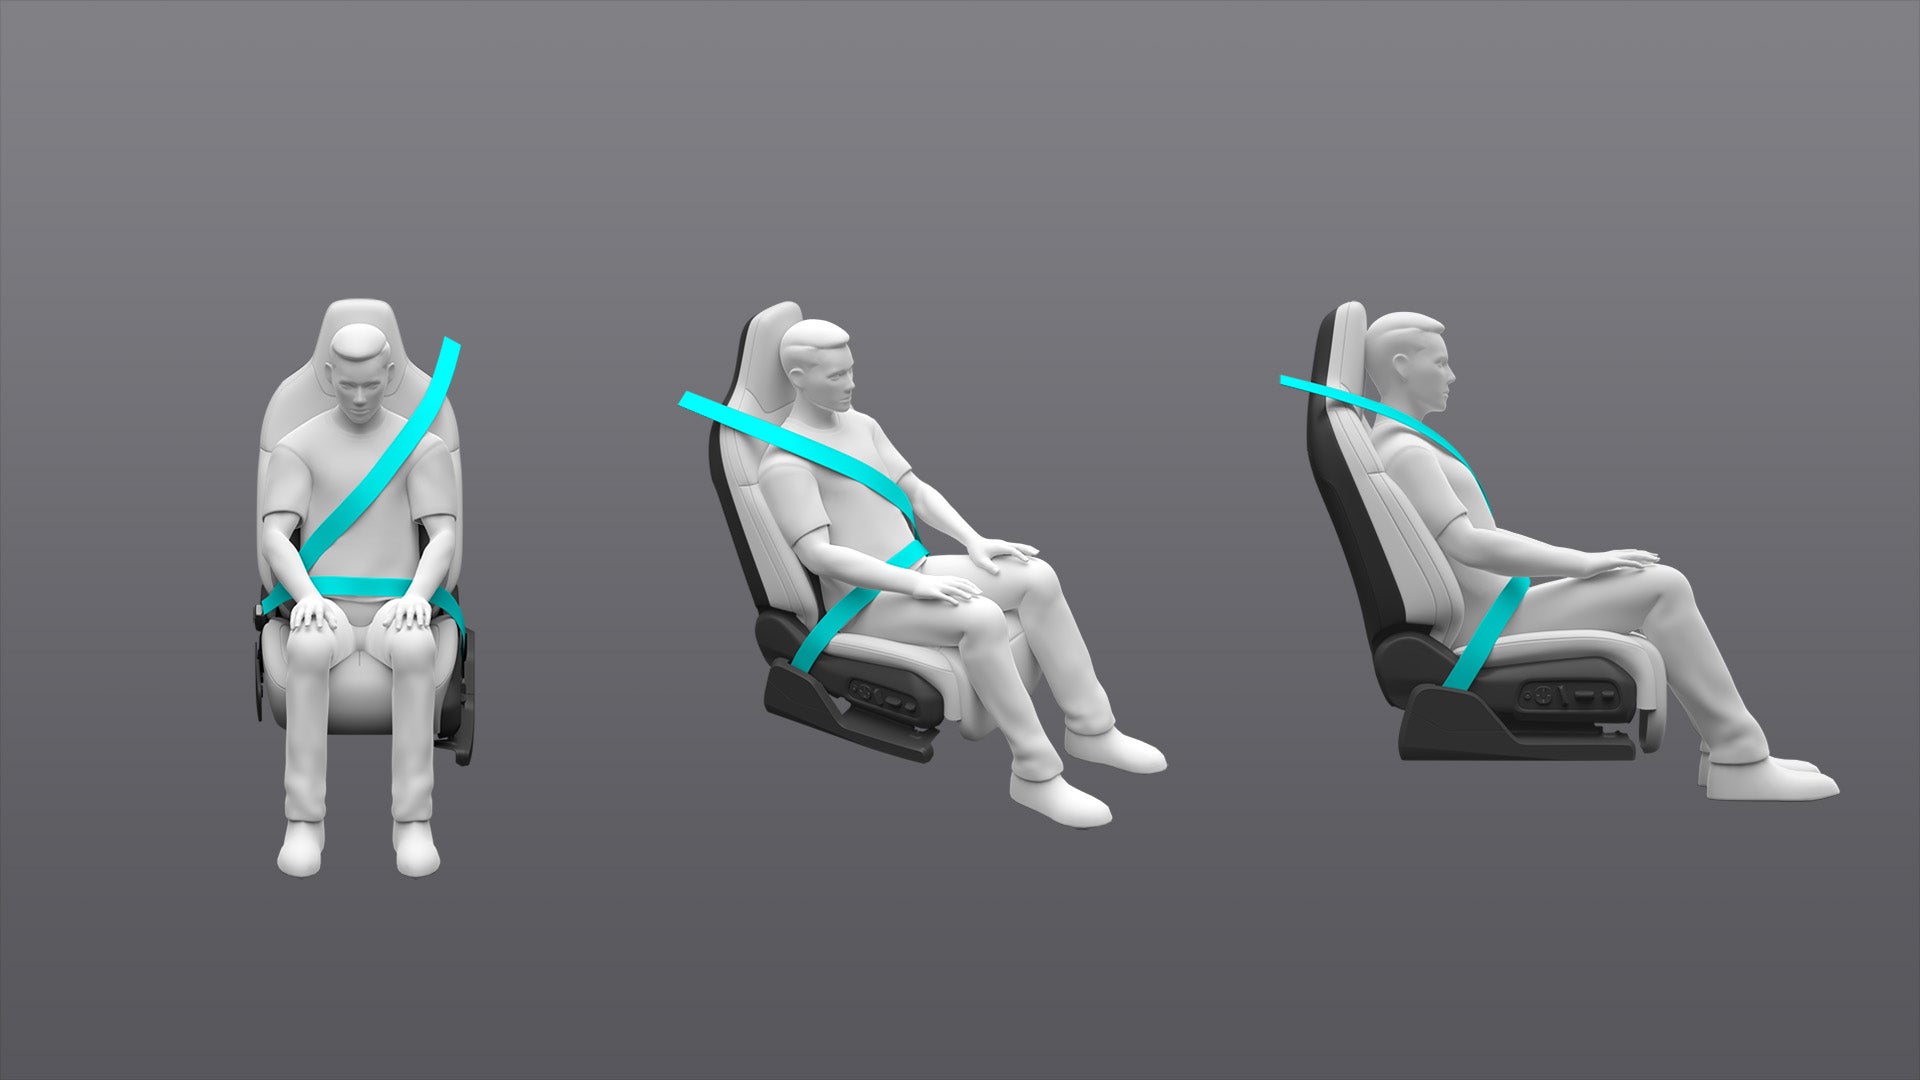
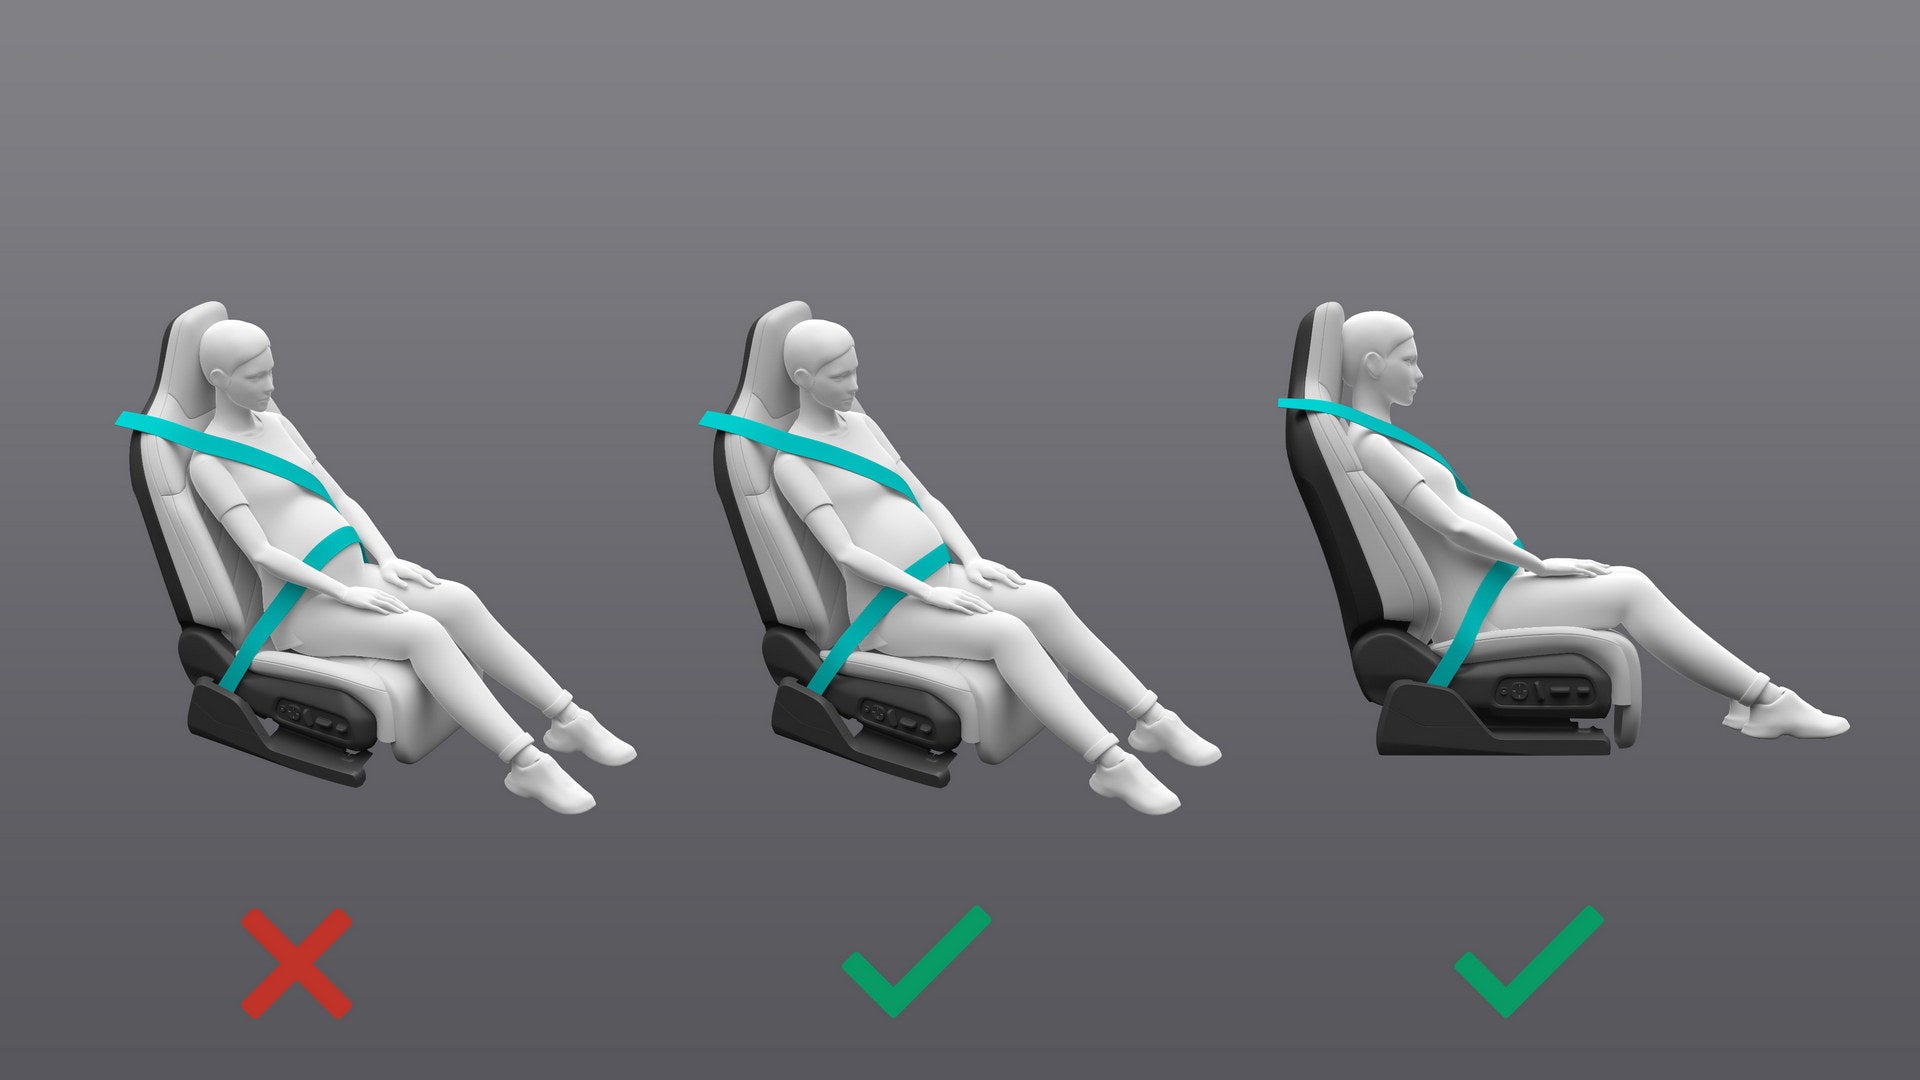
Correcting sitting posture of the driver
To minimize potential risks and protect your safety, please adjust the seat as follows:
Move the seat back and forth into a position where you can easily floor the accelerator and
brake pedals.
Adjust the seat backrest to a suitable straight-back sitting posture where your back
completely fits the backrest, and the backrest does not recline too much.
Adjust the height of the seat to an appropriate position where you can comfortably put both
hands on the steering wheel.
Adjust the steering wheel so that there is at least 25cm of distance between your chest and
the steering wheel.
Lay the middle part of the seat belt between your neck and shoulder. Fit the lap section of
the seat belt tightly across your hip joints, not across your abdomen.
WarningDo not use various types of seat covers on the seats or modify the upholstery by
yourself. In the event of a collision, the seat covers or the modified upholstery can seriously limit
the deployment of seat side airbags. The protection of occupants will be greatly reduced and the risk of
injury will be increased.
Do not use various types of seat covers on the seats or modify the upholstery by
yourself. In the event of a collision, the seat covers or the modified upholstery can seriously
limit the deployment of seat side airbags. The protection of occupants will be greatly reduced and
the risk of injury will be increased.
Do not place objects under seats. Otherwise, safety risks may occur during the seat
adjustment process or in the event of a collision, rapid acceleration and deceleration.
Do not hang other objects (such as clothes hangers) on seats or headrests. Otherwise, the
risk of injury may be increased in the event of a vehicle collision or sudden acceleration and
deceleration.
Only one person can ride in one seat position while the vehicle is being driven. Please
do not let an infant or a child share the same seat and seat belt with an adult. Please do not let
an infant or a child sit on an adult's lap. Otherwise, safety risks can occur in the event of
collision, rapid acceleration and deceleration, resulting in injuries to passengers, infants,
children, etc.
If the seat backrest is excessively tilted during driving, serious injury may occur in
the event of a collision accident. Please refer to the recommended correct seat positions.
People with limited pain perception due to disease or age shall use the temperature
control system and seat heating function with caution to prevent potential low-temperature burns
caused by long-term use.
Front Passenger Seat Adjustment
Adjusting the seat position via buttons
The buttons under the seat allow passengers to adjust the position of the front passenger seat.
Length of seat cushion
Toggle the button back and forth to adjust the length of the seat cushion.
Front inclination angle of seat cushion
To adjust the seat cushion's front inclination angle, turn this button.
Lateral position of the seat
Toggle this button back and forth to move the seat forward or backward.
Height of seat
To raise or lower the seat, toggle the center portion of this button up or down.
Reclining of the backrest
Toggle the upper end of this button back and forth to adjust the reclining of the seat
backrest.
Lumbar support adjustment
Press and hold the up, down, left, or right button to adjust the lumbar support.
Adjusting the seat position via buttons
The buttons under the seat allow passengers to adjust the position of the front passenger seat.
Front inclination angle of seat cushion
To adjust the seat cushion's front inclination angle, turn this button.
Lateral position of the seat
Toggle this button back and forth to move the seat forward or backward.
Height of seat
Toggle the middle part of this button up or down to move the seat upward or downward.
Reclining of the backrest
Toggle the upper end of this button back and forth to adjust the reclining of the seat
backrest.
Lumbar support adjustment
Press and hold the up, down, left, or right button to adjust the lumbar support.
Before seat adjustment (forward and backward, height, backrest, etc.), make sure that
there is sufficient safe space for the seat and children, occupants, and pets in the rear row to
avoid squeezing or smacking into children, occupants, and pets in the rear row.
Adjust the passenger seat position and headrest when the vehicle is in PARK. Seat
position and other adjustments while driving may cause safety risks.
During seat adjustment (forward and backward, height, backrest, etc.), avoid putting your
hands or other parts of the body on the seat movement path to prevent pinching and colliding.
Ensure that the seat is locked after position adjustment.
Children should not adjust the seat for there is a risk of being caught.
When Easy Entry is turned on, make sure that there is enough safe space for children,
occupants, and pets in the front and rear rows to prevent the seat from squeezing or smacking into
them when moving.
Do not start the vehicle until the Easy Entry feature is finished safely. Any operation
before that may cause the vehicle to lose control and cause accidents.
It is recommended to turn off Easy Entry if there are often children passengers in the
rear row.
Controlling the movement of the seat on the center display
You can control the movement of the front passenger seat on the center display.
On the front passenger seat control interface of the center display, tap the "Position",
"Backrest" and "Cushion" control arrows to adjust the position of the front passenger seat, the reclining
of the backrest and the position of the seat cushion respectively.
The center display provides four position options: the default position, regular position, rest
position and alternate position. Among which the default position cannot be changed, and the regular
position, rest position and alternate position need to be set up by you.
How to set up a memory position:
Enter the Settings interface from the control bar at the bottom of the center display, tap
Position Adjustment > Seat > Front Passenger to set up the position of
the front passenger seat on this interface.
You can adjust the seat position through the seat buttons or on the center display to set up
personalized positions in different scenes by pressing the Regular/Rest/Alternate button on the interface, and the settings will be saved
under the corresponding user account. When you need to update a set position, adjust the seat and re-save.
Correcting sitting posture of front passenger
To minimize potential risks and protect your safety, please adjust the seat as follows:
Move the seat back and forth into a position where you can place both feet in the footwell
in front of the seat.
Adjust the seat backrest to a suitable straight-back sitting posture where your back
completely fits the backrest, and the backrest does not recline too much.
Lay the middle part of the seat belt between your neck and shoulder. Fit the lap section of
the seat belt tightly across your hip joints, not across your abdomen.
WarningDo not use various types of seat covers on the seats or modify the upholstery by
yourself. In the event of a collision, the seat covers or the modified upholstery can seriously limit
the deployment of seat side airbags. The protection of occupants will be greatly reduced and the risk of
injury will be increased.
Do not use various types of seat covers on the seats or modify the upholstery by
yourself. In the event of a collision, the seat covers or the modified upholstery can seriously
limit the deployment of seat side airbags. The protection of occupants will be greatly reduced and
the risk of injury will be increased.
Do not place objects under seats. Otherwise, safety risks may occur during the seat
adjustment process or in the event of a collision, rapid acceleration and deceleration.
Do not hang other objects (such as clothes hangers) on seats or headrests. Otherwise, the
risk of injury may be increased in the event of a vehicle collision or sudden acceleration and
deceleration.
Only one person can ride in one seat position while the vehicle is being driven. Please
do not let an infant or a child share the same seat and seat belt with an adult. Please do not let
an infant or a child sit on an adult's lap. Otherwise, safety risks can occur in the event of
collision, rapid acceleration and deceleration, resulting in injuries to passengers, infants,
children, etc.
If the seat backrest is excessively tilted during driving, serious injury may occur in
the event of a collision accident. Please refer to the recommended correct seat positions.
People with limited pain perception due to disease or age shall use the temperature
control system and seat heating function with caution to prevent potential low-temperature burns
caused by long-term use.
Warning副驾座椅请勿让儿童单独乘坐或怀抱儿童乘坐等以下图示行为:
The behaviors shown in the following figure are not allowed, such as letting a child ride
alone or holding a child in the front passenger seat:
Rear Seat Adjustment
Pull the mechanical handle of the seat backrest to unlock the backrest and then push the backrest
forward to recline the seat backrest.
Warning后排座椅调节Note
When folding the seat back, ensure that there are no items on the rear seat and that the
seat belts are not connected. Otherwise, it may damage the rear seats.
When adjusting the rear seat back, ensure that the seat belt is not twisted or caught in
the seat back, as it may damage the seat belt and affect safety.
Before starting the vehicle, confirm that the seats are in the locked position
(forward/backward, height, back, etc.). Failure to lock the seats may pose a risk of injury (for
example, if the rear seat back is folded back but not fully locked into place, it may pose safety
issues and cause secondary injury in the event of a vehicle collision or sudden acceleration or
deceleration.)
When the seat is in a folded position (such as the rear seat back folded down), do not
sit in that position while the vehicle is in motion. A lack of correct protection increases the risk
of injury or death in the event of a vehicle collision or sudden acceleration or deceleration.
Correct Sitting Posture of Rear Row Passengers
To minimize potential risks and protect your safety, please adjust the seat as follows:
Adjust the headrest so that the center of the headrest is flush with your eyes.
Place your feet in the footstep space in front of the rear seats.
Place the middle part of the seat belt between your neck and shoulder, and tightly wrap the
lap part of the seat belt around your hip joint (not your abdomen).
When driving with children in your vehicle, use appropriate child safety seats to protect
children. See the chapter on child safety seats for details.
If the vehicle is equipped with tray tables, make sure they are properly stowed while
driving to prevent risk of injury to passengers from impact caused by accidents.
Rear passengers must wear seat belts correctly to avoid risk of injury from impact with
accessories (tray tables, entertainment screen, etc.) caused by vehicle collision or sudden
acceleration/deceleration.
Do not hang other objects (such as clothes hangers) on the seat or headrest. In case of
collision or sudden acceleration/deceleration, such objects may add to the risk of injury.
Only one person can ride in each seat while the vehicle is in motion. Infants or
children should not share a seat and seat belt with an adult or sit on the lap of an adult. In
case of collision or sudden acceleration/deceleration, such postures may pose a safety risk and
cause injury to passengers, infants, and children.
Individuals with limited pain perception due to illness, ages, or other conditions
should use the temperature control system and seat heating carefully to avoid potential
low-temperature burns due to prolonged use.
Warning后排乘员请勿有以下乘坐行为:
Passengers in the rear seats are prohibited from engaging in the following behaviors:
Seat Headrest Adjustment
Press the right button under the headrest to move the headrest up and down. Move the headrest to
a set position when you hear click. This indicates the headrest is fixed in this position.
Warning头枕请根据身高正确进行调节,以便获得最佳的保护效果。
To provide the best protection, make sure the headrest is set to an appropriate height
according to the passenger's height.
Adjust the seat headrest, and make sure that the headrest center and the passenger's
eyes are on the same level.
Do not use the headrest when it is at its lowest position. To use it, pull the headrest
upwards and ensure it is locked into place.
After the headrest is removed, do not drive the vehicle. In case of collision, sudden
acceleration or deceleration, seats without headrests may not provide sufficient protection to the
head, potentially leading to serious injury.
Seat Massage Mode
The front seats have a lower back massage feature, which is turned off by default. Enter the
Comfort Panel interface from the control bar at the bottom of the center display, tap the Seats > Massage and select the desired massage mode (mode 1, mode 2, mode 3,
mode 4, mode 5) and massage intensity (level 1, level 2).
Mode 1: Gentle
Mode 2: Rolling
Mode 3: Dynamic
Mode 4: Lower Back
Mode 5: Upper Back
Level 1: Weak
Level 2: Strong
The massage will automatically turn off if the massage mode is not switched within 20 minutes.
Caution若功能进行中乘客离开座位超过 30 秒,功能关闭。
If a passenger leaves their seat for more than 30 seconds during the operation of this
feature, the feature will be deactivated.
Seat Heating Mode
The front and rear seats have a heating feature, which is turned off by default. Enter the
Comfort Panel interface from the control bar at the bottom of the center display, tap Seats > Heat to turn on the heating feature for the corresponding seat and select
the level. There are three levels of heating, which will heat the seat up to the preset level within 10
minutes and remain at this temperature.
The front seats have a heating feature, which is turned off by default. Enter the Comfort Panel
interface from the control bar at the bottom of the center display, tap Seats >
Heat to turn on the heating feature for the corresponding seat and select the level. There are
three levels of heating, which will heat the seat up to the preset level within 10 minutes and remain at
this temperature.
Smart Seat Heating: This feature is turned off by default. After
the feature is turned on, when the ambient temperature is below 12℃ and the interior temperature is below
10℃, the heating feature will be automatically turned on; the lower the ambient temperature, the longer the
heating time.
If a passenger leaves the seat for more than 30 seconds during the operation of this
feature, this feature will be turned off, and the center display will save the feature's current
mode.
If someone takes the seat within 15 minutes after the passenger leaves, the feature will
be restored to the saved mode. If no one takes the seat within 15 minutes, the feature will remain
in the deactivated state.
Individuals with limited pain perception due to illness, ages, or other conditions should
use the temperature control system and seat heating carefully to avoid potential low-temperature
burns due to prolonged use.
Seat Ventilation Mode
The front seats have a ventilate feature, which is turned off by default. Enter the Comfort Panel
interface from the control bar of the center display, tap Seats > Ventilate
to turn on the Ventilate feature for the corresponding seat. There are three levels of ventilation
available.
Note若功能进行中乘客离开座位超过 30 秒,功能关闭,此时中控屏会保存当前功能的挡位
With this feature on, the current level will be saved and the feature will turn off when
the passenger leaves the seat for over 30 seconds;
If someone is seated within 15 minutes after the passenger leaves, the feature will
resume the previously saved level; If no one is seated within 15 minutes, the feature will stay off.
Seat Relief Mode
The front seats have lower back relax feature. You can go to the Comfort Panel interface from the
control bar at the bottom of the center display, tap Seats > Relax, and
select your desired relax mode.
Mode 1: Upper back relax
Mode 2: Middle back relax
Mode 3: Lower back relax
Mode 4: Circular relax from upper to lower back
After each mode is enabled, it will run 20 minutes as a cycle, and automatically stop after 20
minutes.
Caution若功能进行中乘客离开座位超过 30 秒,功能关闭。
If a passenger leaves their seat for more than 30 seconds during the operation of this
feature, the feature will be deactivated.
Easy Entry
Easy Entry offers the driver and passengers multiple options and settings to make entering and
exiting the vehicle more convenient.
Driver Easy Entry
After initializing the driver’s seat on the center display, you can set the most convenient
exit position for you to get out of the vehicle. With the vehicle stopped and in PARK, the driver’s seat
will move to the preset exit position (including the cushion position and backrest inclination) when you
open the driver’s door, and the steering wheel will move to the uppermost position. This will provide you
with a larger space to get in and out of the vehicle conveniently.
You can enter Settings from the bottom of the center display, and tap Position Adjustment > Driver Seat > Driver Easy Entry to enable or disable
this feature. You or an authorized user can personalize the exit position for the corresponding account.
After manually adjusting the driver’s seat to your desired exit position, tap Position Adjustment > Driver Seat > Position Memory and choose Exit Position to save the current settings. Every time you open the driver’s door
or unfasten the seat belt (which can be selected from the center display) to get out of the vehicle, the
driver’s seat will move to the corresponding exit position.
Caution设置离车位置时,请勿将座椅调节至最后、靠背调节过低,避免影响后排乘客使用。
When setting the exit position, do not move the seat to the rearmost position or recline the
backrest to the lowest position. Doing so may adversely affect the rear passengers. You can set the
recommended optimal exit position on the center display.
After turning on Driver Seat Easy Entry, when you sit in the driver’s seat and close the door
(or press the brake pedal), the driver’s seat, steering wheel, side mirrors and HUD height will
automatically adjust to the settings saved in the system.
Front Passenger Easy Entry
If a passenger opens the front passenger door when the vehicle is stopped and in PARK, the
front passenger seat will move to the preset exit position (the position of the cushion and inclination of
the backrest will move to the rear, and the leg support will automatically move to its lowest position) to
make entering and exiting the vehicle more convenient.
You can enter Settings from the bottom of the center display, and tap Position Adjustment > Front Passenger Seat > Front Passenger Easy Entry to
enable or disable this feature. Front Passenger Easy Entry has two setting options:
Exit: When the passenger unfastens the seat belt and opens the passenger door (which can be
selected from the center display), the seat will move to the default position; when the passenger gets
into the vehicle and closes the passenger door, the seat will remain unchanged from the default exit
position.
Exit + Entry: When the passenger unfastens the seat belt or opens the passenger door, the
seat will move to the default position; when the passenger gets into the vehicle and closes the
passenger door, the seat will automatically move to the default position saved in the corresponding
account (which can be edited from the center display).
Caution开启副驾驶轻松进出功能后,请注意周围环境及后排乘客的安全。
When using Front Passenger Easy Entry, it is recommended that you set the default position
appropriately, and pay attention to the surrounding environment and the safety of any passengers in the
second row.
Front Storage
The vehicle provides you with a number of convenient storage spaces that can be used to store
daily necessities.
Warning储物空间内禁止放置易燃、易爆、易飞溅的物品,储物时请盖紧盒盖。
Do not place flammable, explosive, or splatter-prone items in the storage space. Close the
lid tightly when storing items.
Door Storage
Each door has a storage compartment located at the lower part, equipped with door storage
lighting.
Caution在门板下方储物时,请勿放置过大尺寸或尖锐的物品,以免门板结构和表面受到损伤。
Do not place oversized or sharp items in the lower storage space of the door panel to
prevent damage to the structure and surface of the door panel.
Cup Holder
There are two cup holders on the central armrest for placing drinks.
To avoid the risk of burns, do not place unsealed hot drinks in the cup holder.
To avoid injury, do not place fragile items here.
Center Console Open Storage
The open storage space under the center console can be used for temporary storage of
non-important items, while a 12V power supply at the rear can be used to charge passengers’ electronic
devices.
Rear Storage
Rear Doors
There are convenient storage spaces beside the rear seats. There is a storage space on both
rear doors, which can be used for drinks or items, and is equipped with door storage lighting for
illumination at night, when the light is dim or when the position lights are turned on.
Caution在门板下方的储物时,请勿放置尺寸过大的物品,以免门板结构和表面受到损坏。
Do not place over-sized or sharp items in the lower storage place of the door panel to
prevent damage to the structure and surface of the door panel.
Due to the special texture of the door panel design, please wipe the surface of the
door panel regularly.
There are also coat hooks beside both rear doors, which can be used to neatly store clothes.
Warning 请勿在门边衣帽钩处悬挂任何硬物(如衣架、水果、玻璃瓶等),以免造成意外伤害。
Please do not hang any hard objects (such as hangers, fruits, glass bottles) on the
hat-and-coat hook near the door to prevent accidental injury.
Rear Central Armrest
When the rear middle seat is not occupied, you can flip open the central armrest on the
backrest to expose the cup holders.
Do not place flammable, explosive, or splatter-prone items in the storage space. Close
the lid tightly when storing items.
Avoid placing heavy, sharp, or fragile objects on the armrest during vehicle operation.
In the event of a collision or sudden acceleration or deceleration, objects flying out can
increase the risk of injury to occupants.
Safety Storage Box
Storage Box Mode
The safety storage box is in the Storage Box Mode by default. In this mode, the safety storage
box is not locked, and its flip cover can be opened through the buttons on the left and right sides of the
central armrest:
Storage box buttons
Press the button to open the flip cover. It can be used to store mobile phones, tissues and
other items (one button on each side).
Storage box USB Type C port (60W)
High-speed transmission port for charging mobile devices, not supporting data transmission.
Storage box USB Type A port (2.5W)
Ordinary transmission port for data transmission such as USB media audio source, Digital
Video Recorder (DVR) video export, microphone access, etc.
Safe Box Mode
Swipe right on the main interface of the center display to enter the Quick Access interface,
and tap Safe Box. When the Safe Mode is turned on for the first time, a
pop-up window for setting the password will pop up on the center display, and you need to set a password
to finish setting up Safe Box Mode.
Once set, you need to enter the password on the center display to unlock the safety storage
box, then you can open the flip cover through the buttons on both sides of the central armrest.
Mode Switch
To switch between the two modes of the safety storage box: enter the Settings interface from
the control bar at the bottom of the center display, and tap Security > ARMREST
BOX to switch between Storage Box Mode and Safe Box Mode.
When the liftgate is opened, you can load items in the storage space of the rear trunk.
The rear trunk’s storage space is divided into two layers: above and under the trunk floor. If
you need more storage space, the rear seats can be folded down.
Caution存放液体物品时需注意密封保管,以免液体渗漏对车辆造成损坏。若发生渗漏,请及时清理。
When storing liquids in the vehicle, ensure that the container is sealed. Spills or leakages
may damage the vehicle. If a spill or leakage occurs, please clean up the liquid as soon as possible.
Load Retaining Ring
The Load Retaining Ring is used to tie nets or ropes to secure items. There are two on each
side of the trunk.
Note载荷固定扣环的承重大约为 450 千克。
The load retaining ring can hold approximately 450 kilograms.
If items are not secured or not properly secured, they may slide, tip over, or be
thrown upwards, potentially striking the driver or passengers. Unsecured items are injury risks,
especially during braking or sudden turns.
Be sure to store items properly to prevent them from being thrown about. Secure all
items before driving to prevent them from sliding or tipping over. Large and heavy items must be
secured with seat belts or fastening straps.
Trunk 12V Power Supply
The 12V power supply is located on the left side of the trunk and can supply power to external
devices as needed.
Hitched Trailer
Towing Accessory
The vehicle towing kit is a spherical coupling with the national standard ECR R55, which can
support towing accessories (such as trailer, caravan, bicycle).
The spherical coupling is designed to support a vertical load of up to 75 kg. When carrying
bicycles or other items in the towing device, always check to ensure that the maximum weight is not
exceeded. When calculating the weight, please remember to include the weight of the accessory bracket. For
example, if the weight of the carrier is 14 kg, it is sufficient to carry two bicycles with a weight of
about 20 kg each or four bicycles with a weight of about 10 kg each for the weight threshold.
CautionThe vehicle towing device is designed to bear a maximum weight of 100 kg.
Exceeding this maximum weight may cause serious damage to the device.
The vehicle towing device is designed to bear a maximum weight of 75 kg. Exceeding
this maximum weight may cause serious damage to the device.
Do not attempt to install an accessory carrier on the vehicle without a towing kit.
Otherwise, significant damage may be incurred.
Towing a trailer and carrying accessories will increase the weight and resistance of the
vehicle, so the driving range may be significantly reduced with a trailer. Although the vehicle range
calculator tries to adjust the range estimate according to the Trailer Mode, the actual energy consumption
may vary. You need to plan your travel distance and destination reasonably.
To install and use the accessory bracket, the towing device must be connected. Then follow the
instructions provided with the accessory bracket. You need to comply with all regulations and legal
requirements applicable to carrying accessories. The vehicle towing kit includes the wiring of the lights
required for the accessory bracket.
When towing accessories, verify regularly that the accessory bracket and its goods are always
in a safe state, and also verify that the lights on the accessories work properly (if any).
It is recommended to purchase vehicle accessories on the NIO website. NIO recommends and
supports NIO-approved products. If purchases from third parties are necessary, please purchase those
that meet national standards. Before attempting to install a non-NIO accessory, review the product
information to ensure compatibility.
Caution拖挂装置可能会遮挡内外后视镜、后摄像头和/或后超声波传感器的视野。此外,某些 PILOT 功能可能无法正常工作。
Towing devices may obstruct vision from the rearview mirror, side mirrors, and rear camera,
and affect the perception of the rear ultrasonic sensor. In addition, some Driver Assist features may
not function properly.
Towing Capacity
The total weight of the trailer (including all goods and additional equipment) and the carrying
capacity of the tow hitch shall not exceed the following values:
Tire
Maximum towing capacity
Maximum tow hitch carrying capacity
19", 20"
1,400 kg
75 kg
The tow hitch carrying weight is the downward force exerted by the trailer weight on the tow
hitch. It shall not be less than 4% of the trailer load. Loading a large number of equipment, passengers
or goods in the trailer can reduce the towing weight that it can bear, which will also reduce the maximum
towing capacity. Assuming that the trailer load does not exceed the Gross Vehicle Weight Rating (GVWR),
the maximum towing capacity can be calculated. GVWR is printed on the vehicle nameplate.
If you drive a tractor with a corresponding driver's license, you must ensure that the total
mass, including the mass of the tractor and trailer, is less than (not including) 4,500 kg.
Tire Pressure During Towing
The tire pressure must be adjusted to adapt to the additional load for towing. Keep the tire
inflated to 290 kPa. The maximum permitted uphill slope is 12% for towing.
NoteWhen towing, the technically permissible maximum mass on the rear axle shall not
exceed 15%, and the technically permissible laden mass of the vehicle shall not exceed 100 kg. In
these situations, the vehicle speed shall not exceed 100 km/h, and the rear tire pressure must be at
least 20 kPa higher than the normally recommended tire pressure.
When towing, the technically permissible maximum mass on the rear axle shall not exceed
15%, and the technically permissible laden mass of the vehicle shall not exceed 75 kg. In these
situations, the vehicle speed shall not exceed 100 km/h, and the rear tire pressure must be at least
20 kPa higher than the normally recommended tire pressure.
Never attempt to tow a vehicle when it has a faulty tire. Temporarily repaired tires cannot
withstand the towing load. Towing with faulty or temporarily repaired tires may result in tire fault and
vehicle unstability.
Operations Before Towing
Before towing, the following operations must be performed:
Inflate the tire to the specified cold tire inflation pressure for towing.
Make sure you understand and comply with all local regulations and legal requirements for
towing.
Adjust the rearview mirror to provide a clear view behind you that avoids obvious blind
spots.
Enable Trailer Mode in the center display.
Confirm the following:
The tractor driver must hold a corresponding driver's license.
The vehicle needs to be level when connecting to the towing device. If the front of the
vehicle is tilted upward and the rear is tilted downwards, please confirm that the maximum towing
capacity and tow hitch carrying weight provided in the "Towing Capacity" table are not exceeded.
All towing device components, accessories, and electrical connectors (if any) are in good
condition, and are connected correctly. Do not tow if there are any obvious problems.
The trailer lights (brake lights, turn signal lights and marker lights) work properly.
The towing tongue is firmly connected to the towing ball.
All items inside the vehicle are secure in place.
You may use wheel chocks.
The towing load is evenly distributed so that the weight on the towing tongue is about 4%
of the total towing weight and does not exceed the maximum bearing weight of the towing tongue
provided in the "Towing Capacity" table.
The tow hitch carrying weight must be about 4% of the total towing weight and not
exceed the maximum tow hitch carrying capacity provided in the "Towing Capacity" table. Unbalanced
or heavy rear loads on the trailer can cause it to swing and the vehicle to lose control.
Always ensure that the load is secured in place and does not move on the trailer.
Unsecured cargo may shift while the vehicle is moving, causing the vehicle to lose control and, in
severe cases, injury and death.
Trailer Mode
Before towing, please shift to the P gear, go to the Settings interface from the control bar at
the bottom of the center display, and tap Driving and Parking > Tow
Hitch. This will extend the tow hitch. When a trailer is towed, Trailer Mode must always be
active. When you connect the trailer's electrical harness, the vehicle will enable Trailer Mode after you
confirm. Trailer Mode is deactivated when the trailer's electrical harness is disconnected. To manually
enable or exit Trailer Mode, go to the Settings interface from the control bar at the bottom of the center
display and tap Driving and Parking > Trailer Mode. One of the following
indicators is displayed on the instrument cluster at this time:
ICON
Description
The vehicle has detected the connection of the trailer lights, but Trailer Mode is not
activated. The vehicle may already have an accessory connected.
The vehicle has detected an electrical connection fault with the trailer lights. Some
or all of the trailer lights may be faulty. To ensure your safety, pull over as soon as possible
and check the wiring or connection of the trailer lights for faults. If the problem has been
resolved but the red icon is still on, please try turning off Trailer Mode and then turning it on
again.
Warning拖车前,务必检查拖车模式是否已启用。
Before towing, always check if Trailer Mode is enabled.
Under no circumstances should Trailer Mode be exited during towing. Doing so may result
in serious injury or death.
Do not use the suspension adjustment setting on the Center Display to match the tow
hitch height with the trailer height.
Note启用拖车模式时,某些 PILOT 功能(转向、召唤、车道辅助等)以及脚踢传感器、便利进出、超声波传感器功能可能不可用。
When Trailer Mode is enabled, some Driver Assist features (SteeringAssist, Lane Keeping
Assist, etc.) and the kick sensor, Easy Entry & Exit, and ultrasonic sensor may not be
available.
Please complete the trailer connection with the ride height set to the Normal mode. If
the Trailer Mode is engaged while the ride height is in a non-Normal mode, the ride height will
automatically adjust to the Normal mode.
When installing the tow hitch equipment, the rear tow hook cannot be used.
Instructions for Towing
Your vehicle is mainly designed as a passenger vehicle. Towing a trailer puts an additional
load on the vehicle's motor, transmission, brakes, tires and suspension and significantly reduces its
range. If you decide to tow a trailer, please drive carefully and follow the following guidelines:
Reduce your driving speed and avoid sudden maneuvers. When a trailer is towed, the
steering, stability, turning radius, stopping distance and braking performance are different from
those without a trailer.
Keep at least twice the distance from the vehicle in front of you as when you are not
pulling a trailer. This helps to avoid situations requiring emergency braking. Sudden braking may
cause skidding or bottoming out and loss of control.
Avoid sharp turns, which may cause the trailer to contact the vehicle and cause damage.
Since the wheels of the trailer are closer to the inside of the turn than the wheels of the vehicle,
the turn radius must be larger to prevent the trailer from hitting the curb, road signs, trees or
other objects.
Check the trailer lights and turn lights regularly to verify that they continue to work
properly.
Verify regularly that any items inside the vehicle are safe.
Verify regularly that the trailer brake works properly.
Avoid parking on a slope.
Verify regularly that all towing parts have been firmly tightened.
When a trailer is hitched, the LED taillight of the trailer may flash very slightly, which
is normal.
People are not allowed to ride in the trailer during towing.
Place weight in the trailer near the axle as much as possible to reduce interference to the
train set when swinging.
Trailer Parking
It is recommended not to park your vehicle on slopes with gradients exceeding 12%. If you have
to park the vehicle on a slope, please place wheel chocks under the trailer wheels:
One person depresses and holds the brake pedal;
Another person places wheel chocks under the wheels on the downhill side;
When the chocks are in place, release the brake pedal and ensure that the chocks can bear
the weight of the vehicle and trailer (do not activate Autohold).
Put the vehicle into the P gear and engage the parking brake.
If it is necessary to park on a slope, please always ensure that all trailer wheels are
securely fastened with wedges, as failure to do so may result in serious damage, injury or death.
Electrical Connection
All trailers are equipped with taillights, brake lights, side indicators and turn lights. In
order to provide power for the trailer lighting, the towing device is equipped with a built-in 13-pin
electrical connector. Inserting the trailer plug into the vehicle electrical connector will enable Trailer
Mode after you confirm.
Left turn light (yellow)
Right fog light (blue)
Pin 1-8 grounding (white)
Right turn light (green)
Right taillight (brown)
Brake light (red)
Left taillight (black)
Reverse light (pink)
No output for now (orange)
12V power output when the vehicle is awakened (gray)
Please use only the electrical plugs designed by NIO. Do not attempt to directly splice the
cables or connect the trailer’s cable by any other method, as this could damage the vehicle’s electrical
system and cause fault.
CautionBefore and during towing, you need to manually check and ensure that all electrical
connections are working properly and all trailer lights are working correctly.
Before and during towing, you need to manually check and ensure that all electrical
connections are working properly and all trailer lights are working correctly.
Trailer light failure during towing may be the result of a blown fuse. If the fuse is
blown, there will be no warning from your vehicle. Please contact the NIO Service Center.
Make sure that the trailer cable does not touch or drag on the ground during towing,
and that the cable has enough slack to allow for turns.
Steering Wheel Position Adjustment
Enter the Settings interface on the Center Display, tap Position Adjustment
> Steering Wheel > Start Adjustment, and then adjust the position through the buttons on
the right side of the steering wheel, and tap End Adjustment after the
adjustment is completed; or swipe right on the Home interface of the Center Display to enter the Quick
Access interface, and tap the Steering Wheel Adjustment icon to adjust the
position of the steering wheel.
Adjusting the position of the steering wheel using the buttons on the right
side of the steering wheel:
Up: move the steering wheel upward;
Down: move the steering wheel downward;
Left: move the steering wheel further from the driver;
Right: move the steering wheel closer to the driver;
Shortpress: move once;
Longpress: move continuously.
Warning方向盘位置调节不当或坐姿不当会带来人身伤害,建议方向盘与胸部之间距离不小于25厘米。
To prevent accidents, it is forbidden to adjust the position of your steering wheel while
the vehicle is in motion.
Improper adjustment of the steering wheel position or an improper sitting posture can
cause injury. It is recommended that the distance between the steering wheel and your chest be no
less than 25 centimeters.
Control via Right Steering Wheel Buttons
The buttons on the right side of the steering wheel can be used to adjust steering wheel
position, right side mirror, sound volume, etc.
Steering Wheel Position Adjustment
Enter the Settings interface on the Center Display, and tap Position
Adjustment > Steering Wheel > Start Adjusting to adjust the position with the buttons on
the right side of the steering wheel. See Start Adjustment.
Adjusting the Right Side Mirror
Enter the Settings interface on the Center Display, and tap Position
Adjustment > Side Mirrors > Start Adjusting to adjust the position of the right side
mirror with the buttons on the right side of the steering wheel. See Side Mirrors
Position Adjustment.
Volume Adjustment
In scenarios such as answering calls, talking with NOMI, and playing multimedia, press the Up
or Down button to adjust the volume, and press and hold the Down button to mute the sound.
In other scenarios where there is no need for volume adjusting, holding the Up button gives no
response, and press and hold the Down button to mute the sound.
In the mute state, press the Up button to unmute.
Triggering the Custom Feature
Press and hold the Middle button on the right side of the steering wheel to trigger the custom
feature. The default triggered feature is NOMI. To change the custom feature, you can go to Settings
interface on the Center Display and tap Position Adjustment > Steering Wheel >
Custom.
Control within an Immediate Task
When the incoming call reminder is displayed, you can answer or reject the call with the Left
and Right buttons, and the Middle button is for confirming the selection.
Switching the Normal Menu
Press and hold the Left or Right button to enter the Switching Mode, in which you can press the
Left or Right button to switch the order of the dashboard menus.
After pressing the Middle button, or after 3 seconds with no operation on the Left or Right
button, the current menu will be selected automatically and the Switching Mode will be exited.
Controls within the Menu
When the instrument cluster shows the Media/Third-party Software, Estimated Range, Mileage, and
Power Consumption menus, press the Left, Middle and Right buttons on the right side of the steering wheel
to switch the media/third-party software type.
When the Media/Third-party Software menu is for Media: Left - previous track; Right - next
track; Middle - play/pause;
When the instrument cluster shows Team menu: Middle - sound record/send.
Control via Left Steering Wheel Buttons
The buttons on the left side of the steering wheel can be used to adjust the Left Side Mirror and
control the Assisted Driving feature.
Adjusting the Left Side Mirror
Enter the Settings interface on the Center Display, and tap Position
Adjustment > Side Mirrors > Start Adjusting to adjust the position of the left side
mirror with the buttons on the left side of the steering wheel. See Side Mirrors
Position Adjustment.
Adjusting the Assisted Driving
Middle button: activate or exit Assisted Driving.
Up button: increase the cruising speed.
Down button: decrease the cruising speed.
Right button: increase the following distance.
Left button: decrease the following distance.
Press the Up or Down button: increase/decrease the cruise speed
by 5 km/h (default); Press and hold the Up or Down button: increase/decrease
the cruise speed by 1 km/h continuously (default).
Press the Left or Right button: increase/decrease the following
distance by 1 level; where Level 1 is the closest, and Level 5 is the farthest.
Steering Wheel Heating
In cold weather, you can turn on the steering wheel heating feature by going to the Comfort Panel
interface on the Center Display and tapping Seats > Heating > Steering Wheel
Heating. The steering wheel will be gradually heated to a comfortable temperature within about 10
minutes and will maintain this temperature.
Smart Steering Wheel Heating: this feature is set to be turned off
by default, and you can enable it in the Settings menu on the Comfort interface under Seats > Heat. When the feature is enabled, the steering wheel heating will be
activated automatically when the outside temperature falls below 12 °C and the inside temperature falls
below 10 °C; the lower the temperature, the longer the heating period will last.
Restarting with Steering Wheel Double-button
If the Center Display shows some abnormalities, such as screen stuttering or unresponsive screen,
try resolving by quickly restarting the vehicle system.
Instructions for Double-button Restart:
Turn on the hazard warning lights;
Park your vehicle in a safe area and put into PARK (P);
Press and hold the Right button on the left side of the steering wheel and the Down button
on the right side at the same time for about 8 seconds;
After about 30 seconds, all screens will light up and the system can resume operation.
If the system has not returned to normal, please contact the NIO Service Center as soon as
possible.
Caution车辆双键重启必须在驻车状态,请确保车辆停靠在安全区域;
The vehicle must be in PARK to use Dual-Button Restart. Please ensure that the vehicle is
parked in a safe area;
It is strictly forbidden to perform Dual-Button Restart while the vehicle is moving;
Keep the hazard warning light on while the vehicle is in the system restart process;
Do not perform Dual-Button Restart when the vehicle software is being upgraded;
During the restart process, the vehicle status display, safety warning, surround view
image, map interface, and other information cannot be seen;
If the screen fails to resume normal operation after Dual-Button Restart, you can try to
lock the vehicle and put the vehicle to sleep. If the problem persists, please contact NIO.
USB Port
Three USB ports are provided in your vehicle, including one Type A port and two Type C ports.
Location:
Safety Storage Box
Type A (2.5W) port: Used for exporting videos from the DVR and connecting a microphone or
a USB speaker;
Type C (60W) port: Used for charging mobile devices;
Under the Rear Row Air Conditioning Vents
Type C (60W) port: Used for charging mobile devices;
12V Power Supply
Your vehicle is equipped with two 12 V power supplies.
Center console open storage space: located in the rear;
Rear trunk: on the left.
Wireless Charging
You can place your wireless charging equipment on the wireless charging pad next to the cup
holder on the central console for wireless charging.
The wireless charging feature is enabled by default. You can enter the Wireless Charging from the
status bar at the top right of the Center Display to turn it off. This Settings is saved under the account
of the owner or the authorized user. The Center Display displays the current charging status.
When the NFC one-key pairing feature of interior Bluetooth is being used by the wireless charging
pad, wireless charging will be temporarily stopped.
Wireless charging will stop in the following situations, and the Center Display will prompt the
relevant status:
The charging is completed.
Errors in the charging process, including vehicle power supply over-voltage or
under-voltage.
You can choose to disable NFC Detection, in which case the wireless
charging board won't recognize NFC cards and the card recognition prompt won't appear when the phone is
placed.
When wireless charging is enabled, any metal object (such as a key, coin or NFC card)
placed on the wireless charging board may affect its charging efficiency or even lead to a burn.
When using wireless charging, do not place any metal objects between the phone and the
charging board, such as coins and cards with chips/battery. Do not use phone cases with metal
materials, such as those that support magnetic charging (MagSafe).
It is normal for the phone to become hot after being charged for a long period of time.
Do not place a fully charged device on the charging board. Doing so can cause overheating.
Do not charge two or more devices wirelessly at the same time.
Please keep tiny items and liquids out of the cooling air vent, which is at the bottom
of the wireless charging board.
Front Windshield Wiper
The windshield wipers are used to clean the windshield. The different settings of the
windshield wipers can be set with the stalk on the right side of the steering wheel.
Icon
Name
Feature
Operation Method
Single Wipe
The front wipers enter the Single Wipe mode
Move the wiper stalk down quickly
Wipe Off
The front wipers enter the Wipe Off mode
Move the wiper stalk to this position
Intermittent Wipe
The front wipers enter the Intermittent Wipe mode
Move the wiper stalk up to this position
Continuous Wipe
The front wipers enter the Low Speed Wipe mode
Move the wiper stalk up to this position
The front wipers enter the High Speed Wipe mode
Continue to move the wiper stalk up to this position
When the wipers are in intermittent mode, adjust the speed of the windshield wipers with the
speed switch. Scroll up to increase the wipe frequency, and scroll down to reduce the wipe frequency.
Warning冬季启动刮水器前,确保刮水器刮片未结冻,且已刮落挡风玻璃上的冰雪。
In winter, ensure that the wiper blades are not frozen and the ice or snow in front of the
windshield has been cleared before turning on the wipers.
Warning 当刮水器清洁挡风玻璃时,要使用足够的清洗液,挡风玻璃必须保持湿润。
Be sure to use sufficient washer fluid to keep the windshield wet when wiping the
windshield.
Automatic Wipe
After the automatic front wiper feature is enabled, when the rain sensor detects rain, the
wipers start to move; when the rain stops, the wipers stop moving.
The wiper speed changes automatically in response to vehicle speed and rainfall.
Press the automatic wipe button at the end of the right stalk to activate the automatic wipe feature. Press the button
again or move the stalk up or down to disable the automatic wipe feature.
Warning在自动洗车房中,请确保停用自动雨刮功能,否则可能会由于无意间刮水导致雨刮器损坏。
In an automatic car wash station, make sure to disable the automatic wiper feature, otherwise
the wipers may be activated accidentally causing damage to them.
Clean Front Windshield with Wipers
Pulling the wiper stalk on the right side of the steering wheel towards the driver's face and
selecting causes the wiper blades
on the wiper arms to spray water and the wipers to wipe at low speed. Release the wiper stalk to stop the
water spray.
Go to the Settings interface from the control bar at the bottom of the center display and tap
Doors and Windows Lock > Wipers > Clean Plus. After this feature is
turned on, the wipers will wipe once more after the water spray. It is recommended to turn off this
feature in winter in colder regions.
Caution洗涤液不足时不要使用清洗装置,否则会损坏洗涤液泵。
To avoid damaging the washer pump, do not use the washer if the washer fluid is
insufficient.
Warning在恶劣天气条件下,确保雨刮片未被冻结或粘附在挡风玻璃上。
In bad weather conditions, ensure that the wiper blades are not frozen or attached to the
windshield.
Manual Wipe
Toggle the wiper control lever upwards to activate the wiper. The speed of the wiper increases
with each level, reaching its maximum at level four.
Warning冬季启动刮水器前,确保刮水器刮片未结冻,且已刮落挡风玻璃上的冰雪。
In winter, ensure that the wiper blades are not frozen and the ice or snow in front of the
windshield has been cleared before turning on the wipers.
Warning 当刮水器清洁挡风玻璃时,要使用足够的清洗液,挡风玻璃必须保持湿润。
Be sure to use sufficient washer fluid to keep the windshield wet when wiping the
windshield.
Automatic Wipe
After the automatic front wiper feature is enabled, when the rain sensor detects rain, the
wipers start to move; when the rain stops, the wipers stop moving.
The wiper speed changes automatically in response to vehicle speed and rainfall.
Toggle the wiper control lever downwards to activate automatic front wiper, and the instrument
cluster indicates that Automatic front wiper is on. Toggle the lever
downwards again to turn it off, and the instrument cluster indicates that Automatic
front wiper is off.
Automatic Front Wiper Sensitivity Adjustment: Go to the Settings
interface from the control bar at the bottom of the center display, tap Doors and
Windows Lock > Wipers > Automatic Front Wiper Sensitivity, and then select a level. The
level of sensitivity increases with each level.
Warning在自动洗车房中,请确保停用自动雨刮功能,否则可能会由于无意间刮水导致雨刮器损坏。
In an automatic car wash station, make sure to disable the automatic wiper feature,
otherwise the wipers may be activated accidentally causing damage to them.
Clean Front Windshield with Wipers
Single wipe: Toggle the wiper control lever backward once to
activate the front wipers to wipe once.
Spray and wipe: Toggle and hold the wiper control lever backward,
and the nozzles on the wiper arms spray water, while the wipers wipe three times slowly. Release the wiper
control lever to stop the water spray.
Clean Plus: Go to the Settings interface from the control bar at
the bottom of the center display, and tap Doors and Windows Lock > Wipers >
Clean Plus. After this feature is enabled, the wipers will wipe once more after spraying water.
We recommend you turn off this feature in winter in northern regions.
Caution洗涤液不足时不要使用清洗装置,否则会损坏洗涤液泵。
To avoid damaging the washer pump, do not use the washer if the washer fluid is
insufficient.
Warning在恶劣天气条件下,确保雨刮片未被冻结或粘附在挡风玻璃上。
In bad weather conditions, ensure that the wiper blades are not frozen or attached to the
windshield.
Front Windshield Wiper Rest Area Heating
The front windshield wiper rest area has a heating feature.
Controls on Center Display
When the ambient temperature is 5°C or below, turn on the Auto
Defogging from the Air Conditioning interface on the center display, and the wiper rest
area starts to heat up. When you turn off the Auto Defogging, the
wiper rest area stops heating.
When the ambient temperature is above 5°C, the wiper rest area will stop heating.
App Control
When the ambient temperature is 5℃ or below, tap the One Touch
Snow Removal on the App, then the wiper rest area will start to heat up. When you turn
off the One Touch Snow Removal, the wiper rest area will stop
heating.
When the ambient temperature is above 5°C, the wiper rest area will stop heating.
Automatic Heating of Side Mirrors and Rear Windshield
Go to the Settings interface from the control bar at the bottom of the center display, tap
Position Adjustment > Side Mirrors, and enable the automatic heating
feature for the side mirrors and rear windshield. When the front windshield wipers are activated while
driving on rainy days, the heating feature will be automatically enabled to remove fog on the side mirrors
and rear windshield.
Side Mirrors Position Adjustment
Go to Settings from the bottom of the Center Display, and tap
Position Adjustment > Side Mirrors > Start Adjustment, and then adjust
the position of the side mirrors through the steering wheel buttons. Once you have finished adjusting, you
can either tap End Adjustment or refrain from pressing any directional buttons
on the steering wheel for about 5 seconds, and the system will exit the adjustment mode.
Alternatively, you can swipe right from the left side of the Center Display’s main interface to
access the Quick Access page, and tap
the Side Mirrors icon to adjust their position.
The left buttons on the steering wheel are used to adjust the left side mirror, and the right
buttons are used to adjust the right side mirror.
Adjustment Method:
Up and down buttons: Control the up and down rotation of the side
mirrors
Left and right buttons: Control the left and right rotation of the
side mirrors
Press: Rotate one level;
Press and Hold: Continuously rotate
Warning车辆行驶中禁止调节外后视镜,防止发生意外事故
To prevent accidents, it is forbidden to adjust the side mirrors while the vehicle is in
motion.
Side Mirrors Folding
Go to the Settings interface on the Center Display,
Set auto side mirrors folding by going to Position Adjustment > Side Mirrors >
Auto Fold on Lock. After the setup is complete, the side mirrors will automatically fold when the
vehicle is locked.
When you unlock the vehicle and close the driver door or press the brake pedal, the side mirrors
will automatically unfold.
Go to the Settings interface on the Center Display,
To manually fold/unfold the side mirrors, go to Position Adjustment > Side Mirrors
> Fold Side Mirrors.
You can also manually fold/unfold the side mirrors by swiping right from the left of the Center
Display’s main interface to access the Quick Access page, and tapping the Fold Side
Mirrors icon.
If your vehicle travels on narrow roads at a low speed (less than 40 km/h) and you have folded
the side mirrors manually due to the road conditions, the side mirrors will automatically unfold when your
vehicle speed exceeds 40 km/h.
To see the road better when reversing, you can turn on
the Auto-Tilt When Reversing feature.
Side Mirrors Heating
The side mirrors are equipped with a heating feature, which is used to heat the left and right
side mirrors to quickly remove water or snow on rainy and snowy days.
Go to the Settings interface from the control bar at the bottom of the Center Display, and tap
Position Adjustment > Side Mirrors > Side Mirrors Heating to manually
turn on or off this feature.
The Side Mirrors Heating feature will be automatically turned off
60 minutes after it is turned on, or it can be manually turned off on the Center Display.
Auto Heating of Side Mirrors and Rear Windshield
Go to the Settings from the bottom of the Center Display, tap Position
Adjustment > Side Mirrors, and enable the Auto Heat Side Mirrors and
Rear Windshield feature. When the front wipers are activated while driving on rainy days, the
heating feature will be automatically enabled to remove fog on the side mirrors and rear windshield.
Rearview Mirror and Side Mirrors Auto-Dimming
Go to the Settings interface on the Center Display,
Tap Position Adjustment > Side Mirrors > Rearview Mirror and Side Mirrors
Auto-Dimming to turn the feature on or off.
The Rearview Mirror and Side Mirrors Auto-Dimming feature helps reduce glare in the rearview
mirror from any vehicle behind, improving driving safety.
Note车辆为 R挡或前阅读灯开启时防眩目功能不可用。
The auto-dimming feature is not available when your vehicle is in REVERSE (R) or the front
reading lights are turned on.
Climate Control
Control Bar
You can control the temperature and airflow distribution through the control bar at the bottom
of the center display.
Home
Tap to return to the home interface.
Settings
Tap to go to the list of settings.
Switching Between Recirculating Air and Outside Air
The current air flow mode is displayed. You can tap to select the following three modes in
sequence: recirculation , automatic recirculation or outside air , and outside air .
With automatic recirculation or outside air mode, if air pollution is serious, outside air
will be turned off automatically and switched to recirculation to realize automatic control of air
quality in the vehicle.
Driver Side Temperature Display
The target temperature on the driver side is displayed. You may tap on it to enter the
temperature control panel.
Swiping left or right adjusts the target temperature. The adjustment range on the driver
side is 15–31 ℃.
You can also press the arrow to adjust the target temperature. Each time you press the
arrow, the temperature can be adjusted by 0.5 ℃.
Select "SYNC" to adjust the air conditioning temperature for the front and rear passengers
together with the driver side. Manually adjusting the temperature on the front passenger side or in
the rear row will exit SYNC mode.
Air Conditioning Inlet and Air Volume Regulation
The ON/OFF status of the air conditioning is displayed. Tap to expand or collapse the
Climate Control Panel.
Press+hold and slide to adjust the level of the front fan speed. There are eight levels,
0–8, where 0 turns off the air conditioning for the whole vehicle.h
Front Passenger Side Temperature Display
The target temperature on the front passenger side is displayed. You may tap on it to enter
the temperature control panel.
Swiping left or right adjusts the target temperature. The adjustment range on the front
passenger side is 15–31 ℃.
You can also press the arrow to adjust the target temperature. Each time you press the
arrow, the temperature can be adjusted by 0.5 ℃.
Front Windshield Defrosting/Defogging
When the front windshield defrosting/defogging feature is turned on, the manual air
conditioning (A/C) mode is turned on at the same time, the air distribution mode is defrosting mode,
and the air circulation is switched to the automatic recirculation/outside air mode.
If the outside of the front windshield is foggy, it is recommended to turn on the wipers
and automatic climate control; if the inside of the front windshield is foggy, it is recommended to
turn on defogging for the front windshield. After the fog is cleared, switch to automatic climate
control and turn on auto defogging for the air conditioning.
Go to the Air Conditioning interface in the control bar of the center display, tap , and turn on Auto Defogging. Front windshield defogging will be turned on automatically
when the inside of the front windshield is about to become foggy or slightly foggy.
Application Center
Applications in the center display of the vehicle.
Volume Adjustment
The default volume is 50%. Tap and then slide left or right to adjust the volume.
Press+hold to mute, and press+hold again to unmute, and return to the volume before the
mute state.
Climate Control bar
To access the Climate Control Panel, tap the air conditioning button on the control bar at the bottom of the center
display. You can set the air conditioning's air volume, temperature, airflow direction and other features
through the climate control panel.
The air modes will be displayed while modifying the airflow direction of the air vents:
Free: The air vent angles can be adjusted separately.
Balanced: The air vent angles are symmetrical.
Sweep: The air vent angles are set to sweep up and down, left and right.
Icon
Name
Feature
Air Conditioning Main Switch
It controls the ON/OFF of the air conditioning throughout
the vehicle;
Steering Wheel Heating
It controls the heating of the steering wheel;
Cooling, Heating and Ventilation Switch
Turn on the A/C, and the whole vehicle's air conditioning cools or heats;
Turn off the A/C, and the whole vehicle's air conditioning enters ventilation mode;
Strong Cooling
When activated, the whole vehicle's air conditioning
enters maximum cooling mode;
Strong Heating
When activated, the whole vehicle's air conditioning
enters maximum heating mode;
Front Windshield Defrosting and Defogging
When activated, it removes fog from the interior of the
front windshield;
Rear Windshield Heating
When activated, the rear windshield begins to heat up,
and the feature will be turned off automatically after 15 minutes;
Air Conditioning Temperature Adjustment
It adjusts the air conditioning temperature within the
range of 15~31℃;
Air Conditioning Air Volume Adjustment
It adjusts the air conditioning air volume within the
range of level 0~8;
Window Blowing Mode
The air conditioning vents direct air to the front
windshield;
Face Blowing Mode
The air conditioning vents direct air to the upper body
of the passenger;
Foot Blowing Mode
The air conditioning vents direct air to the lower body
of the passenger;
Air Conditioning Comfort Setting
Tap to access the Settings interface for Ionizer, Auto
Defogging, AC Deodorization and other features.
Auto
Automatic Mode
In this mode, the temperature, air volume, airflow
direction of the front and rear rows' air conditioning, and the recirculation/outside air mode will
be adjusted automatically according to the temperature preset.
SYNC
Sync Mode
In SYNC mode, the cabin temperature will be the same as
that of the driver's.
Front Row Air Vents and Their Adjustment
The air vents in the front row of the vehicle are located at the front windshield, the
instrument panel and the leg space under the instrument panel.
Defrosting air vent at front windshield
Face blowing air vent at instrument panel
Foot blowing air vent under instrument panel
To adjust the air vent at the front row instrument panel, do as follows:
Press and hold the blowing area on the center display and then slide up or down to control the
vertical angle, and slide left and right to control the horizontal angle.
In the free mode, double-click the air vent position in the center display to close the
corresponding air vent. However, at least one air vent must be left open.
Rear Air Conditioning Vents and Adjustment
The rear row air vents are located behind the center armrest and at the bottom of the driver
and front passenger seats.
Rear row face blowing air vents
Rear row foot blowing air vents
To adjust the rear row face blowing air vents, do as follows:
The air conditioning on the left and right sides is managed by two knobs on the rear row face
blowing air vents.
Turn the knob up and down, left and right to adjust the airflow direction; turn the knobs to
the bottom on the left and right sides respectively to close the air vents.
Tips for Using Air Conditioning
Make sure that the vent grille of the air conditioning is not blocked by foreign objects
(leaves, snow, etc.).
If the vehicle has been parked in the hot sun, opening the windows while running the air
conditioning can create convection, which helps the vehicle to cool down faster.
Air Purification
PM2.5 Air Purification
You can view the current air quality in your vehicle at the upper right corner of the Center
Display, and tap to switch to the corresponding air purification mode.
OFF: Turns off air purification;
AUTO: Adjusts the purification airflow speed automatically
according to the concentration of PM 2.5 in the passenger compartment;
QUIET: Purifies the air in the passenger compartment at a
low airflow speed and in silent state.
Ionizer
Go to the Comfort interface from the bottom of the Center Display, tap
, turn on
Ionizer to generate negative ions while purifying the air, improving the air
comfort in the vehicle.
A/C Deodorization
Go to the A/C comfort adjustment interface from the control bar at the bottom of the Center
Display, tap
, turn on
A/C Deodorization, and the fan will run for a period of time after you have
locked and left the vehicle, to keep the evaporator and air pipe dry and reduce bacterial growth.
You can select one of two levels of deodorization:
Standard (the fan continues to run for about 3 minutes) and
Deep Clean (the fan continues to run for about 20 minutes).
This feature increases energy consumption in certain circumstances, so make sure that you plan
your trip properly or turn the feature off if necessary.
Air Filter Indicator
After replacing the air filter, you can access the Comfort interface in the control bar at the
bottom of the Center Display, tap
, then go to
Air Filter Indicator and tap
Reset to reset the Air Filter Indicator timer.
Note该寿命计时为预估时间,实际使用寿命受环境等因素影响,必要时更换。
This reminder is the estimated service life, and the actual service life may vary due to
the environment and other factors. Please replace the air filter if necessary.
Intelligent Fragrance System
The vehicle provides you with a variety of scents. You can choose your favorite fragrance and
install it in the fragrance container above the open storage area of the center console, and change the
fragrance vial according to your preferences.
The following are the installation and replacement procedures for the fragrance vial:
Open the cap of the fragrance vial, insert the thin end of the fragrance vial upward into the
hole in the fragrance container above the open storage area of the center console, and gently press the
bottom of the vial upward to ensure that it is properly installed.
Caution安装香氛瓶过程中请勿旋转香氛瓶。
During the installation of the fragrance vial, please refrain from rotating the vial.
The fragrance vial will be secured by the magnet in the fragrance container once it is
inserted into the hole.
The Center Display will prompt that the fragrance vial has been installed successfully and
display information about the fragrance inserted into the corresponding receptacle.
When replacing the fragrance vial, pinch the bottom of the fragrance vial with your fingers,
and slowly remove the fragrance vial from the fragrance container.
After the fragrance is successfully installed, enter the Climate Control Settings interface on
the Center Display, tap Fragrance, and on this interface, you can control the
activation of the fragrance system, adjust the concentration of the corresponding fragrance, and select
different scents.
Warning香氛警告
Store the fragrance vial in a place where children cannot reach to prevent them from
accidentally ingesting it, which can be harmful to their health.
Do not allow children to insert their fingers into the fragrance mechanism above the open
storage compartment on the center console to avoid accidents.
Please pay attention to driving safety and do not install or replace the fragrance vial
while the vehicle is in motion.
If you experience any discomfort during the use of the fragrance, please stop using it
immediately.
Caution香氛注意
Please pay attention to the shelf life of the fragrance before installing the fragrance
vial. The shelf life of the fragrance is 1 year if the packaging is unopened; once the packaging is
opened, the shelf life is 3 months. Please use the fragrance within its shelf life and replace any
fragrances that have expired.
Some fragrances, such as "Wild", have an invigorating effect. Please use them when
necessary.
When replacing the fragrance vial, please ensure that your hands are clean to ensure the
proper functioning of the fragrance system.
There is a magnet below the fragrance mechanism, so please avoid placing electronic
devices such as phones or tablets near the fragrance vent above the central control open storage
area to prevent any interference with the electronic devices and fragrance module functionality.
Fragrances may undergo chemical reactions with organic substances, so please avoid direct
contact between the ceramic fragrance core inside the fragrance vial and plastic components.
Note香氛说明
The fragrance experience may vary depending on the temperature inside the vehicle, air
conditioning airflow, and individual physiological state.
Please purchase ceramic fragrance cores for the fragrance vial through official channels
to avoid damaging the vial and ensure fragrance quality.
If the fragrance is not detected successfully after installing the fragrance vial, please
reinstall it.
NOMI Smart Assistant
The vehicle smart voice assistant, NOMI, is placed on the dashboard. You and your passengers can
easily control different features by talking to NOMI, your thoughtful helper during the journey.
After you've entered the car, NOMI will greet you warmly. Whenever you need NOMI, say "Hi, NOMI"
or press the voice button on the right side of the steering wheel. After NOMI responds, just say what you
have to say (see some examples below ). When the conversation ends or the designated request has been
completed, NOMI will automatically enter standby mode. Whenever necessary, you can always wake up NOMI
again.
Tell NOMI your opinion about the different features of the car by saying "I want to give
feedback." NOMI will record your feedback for up to 60 seconds and send it to our product expert team,
together with the necessary information, including your vehicle ID, account ID, and time stamp. The
recording will be sent after the countdown.
Please find some examples of NOMI commands here, including but not limited to the listed
function:
Topic
Voice Command Examples
Climate
"Climate control on"
"Turn off the fan"
"Defrost mode on"
Lights
"Change ambient light to green"
"Turn on the resding lights"
"Turn off all lights"
Comfort
"Fold the mirrors"
"I want seat heating"
"Open my window by 10%"
"Close all windows"
"Pet mode on"
"Turn on parking camera"
Media
"Play music"
"Play favorites"
"Play 'Blinding lights' on Tidal"
"Next song"
"Repeat"
"Pause"
"Play radio"
"Increase volume"
Navigation
"Mute navigation"
"Go to [address]"
"Drive me to a hospital"
"find me a coffee shop"
"End navigation"
"Find a charging station"
"I need a power swap station"
"Mute navigation"
Phone
"Accep the call"
"Decline the call"
"Call [contact name]"
"Call back"
Others
"Mute system"
"Mute yourself"
"Unmute"
"Turn on Bluetooth"
"Take a picture"
"Increase the cenrtal screen brightnes"
WarningPrecautions for NOMI
Do not allow NOMI and its base to come into contact with liquids, acidic or alkaline
solutions, dust, fibers, magnetic substances, or other similar materials.
Do not attempt to dismantle or repair NOMI and its base on your own.
Do not apply excessive force to push, pull, or twist NOMI. Refrain from impeding the
movement of NOMI with external pressure.
Do not attempt to remove NOMI and its base by yourself.
To prevent damaging NOMI hardware, do not install hard helmets or caps on it. In the
event of an accident, it will help you avoid personal injury.
Smart Action Application
You can tap Smart Action in the application launcher on the center
display to freely combine apps for customized scenarios, or enter the Square interface to enjoy a
personalized and automated intelligent experience using the recommended Smart Action templates.
Actions that support custom shortcuts include: time, media, weather, cabin comfort, driving,
charge, doors, windows, seats, lighting, system settings and applications, and other common settings. You
can also share custom scenarios with friends.
Navigation
You can select your navigation route on the Navigation interface from the Home page of the
Center Display. If you have previously sent a navigation route through your NIO App, the selected
navigation route will be displayed automatically when the Center Display is turned on.
Tap to set Navigation
options, such as route preference, navigation voice broadcast, and map display mode.
Music and Radio
You can go to the Media interface from the main interface of the center display to select the
program for listening to music:
Select "Tidal" to discover and listen to your favorite music. You can also use it to build
a library of your preferred songs or albums.
Select "Sportify" to listen to and collect your favorite radio programs.
Insert a USB flash disk into the USB port in your vehicle to play the music in the USB
flash disk.
After a mobile device is connected to your vehicle's Bluetooth, you can select "Bluetooth
Music" to play the music in the mobile device.
You can go to Settings interface on the Center Display, and tap Sound to set the volume for media music. Select "Sound Mode" to set the sound
field effect in the passenger compartment. If necessary (for example, when a child is sleeping in the rear
row), the rear mute feature can be turned on.
NOMI can capture your selfies inside the car upon request. The Center Display's Photos application is where videos or photos are stored. To transfer them, use a
USB cable.
Photos
You can access Photos in the application center on the center
display and see all the photos in it. You can select the ones to be exported or deleted. There are various
categories of photos: All/Digital Video Recorder (DVR)/Smart Guardian/Quick Video
Recording/Selfie/Screenshot, and more.
Phone
Pairing a Bluetooth Phone
When your mobile phone's Bluetooth is successfully paired with your vehicle's Bluetooth, the
on-board Bluetooth phone feature can be used after your vehicle is authorized on your mobile phone to
synchronize your mobile phone contacts and recent calls. You can see the Phone interface on the main
interface or on the application center in the center display.
Making a Phone Call
When your contacts and recent calls in your mobile phone are synchronized to your vehicle, you
can choose a specific contact or recent call or enter a phone number directly to make a call. You can switch
between private mode and hands-free mode during a call.
You can browse your recent calls, or switch to other Bluetooth phone devices or hide your recent
calls in the dialing interface.
Connect to Mobile Device
You can connect mobile devices (such as mobile phones, tablets) to the vehicle through interior
Bluetooth or Wireless hotspots, and the center display can synchronize the entertainment features (such as
phone contacts, music) in the mobile device with your confirmation, which is convenient for you to better
experience the entertainment features inside the vehicle. When you connect the same mobile device to the
vehicle the next time, it can be automatically synchronized to the center display without reconfirmation.
Tap the Bluetooth/Wireless hotspot icon at the top of the center display to select the
Bluetooth or Wireless hotspot you want to connect to:
Turn on the Bluetooth or Wi-Fi feature on your mobile device (mobile phone or tablet).
Turn on the Bluetooth or Wireless hotspot feature on the center display.
Select the mobile device you want to connect to on the current interface of the center
display, and manually pair it with the vehicle to connect.
You can also quickly connect to Bluetooth and Wireless hotspot with one tap on the central
control wireless charging board (only for some mobile phone models):
Turn on the NFC and Bluetooth/Wi-Fi features on the phone.
Place your phone on the wireless charging board of the center console.
Open the Bluetooth or Hotspot interface on the center display, and select "One-tap quick
connection through the mobile NFC feature".
Note进行蓝牙或热点连接过程中请勿移开手机。
Do not remove your phone from the charging pad when it is connected to the vehicle via
Bluetooth or Hotspot.
Tide Mode
Tide is a physical and psychological health app that helps you sleep, meditate, relax, and stay
focused. Inspired by travels, nature and meditation, Tide provides a wealth of audio resources such as
sounds of nature and meditation exercises to help you escape from the fast-paced world for a quiet space of
peace, where you can meditate for a while to relax your mind and sleep better with less anxiety and stress
while staying focused and calm.
Tide offers three modes, namely Nap, Meditation, and Breathing.
Nap Mode
You and your family can fall asleep to the sounds of nature in the vehicle and wake up to a
soft alarm to embrace a beautiful world.
You or your authorized users can enter the application launcher to open the Tide > Nap page where sound scenarios and alarm time for the nap can be set and
memorized for the specific account.
Nap by Time: You can set a nap countdown to wake you up at the set time. You can also
choose to continue or end the nap upon the alarm.
Nap by Charge: If the vehicle is in the DC charging process, you can set a battery level
within the charging limit to have a nap until the set level is reached.
More settings are
provided, including volumes and timed playback of sleep aid sounds, alarm clock sounds and volumes,
and seat position restoration switch upon the end of nap.
Set sleep aid
sound scenarios.
After the vehicle enters the Nap Mode, the in-vehicle lighting will be turned off, with windows
and doors closed and locked, the climate control will be automatically set to the temperature comfortable
for a nap, and the air purifier will be automatically turned on. If you sit in a front seat, the seat will
automatically move to the relax position (if set previously) or the default position. NOMI will enter the
Do Not Disturb Mode to create a relaxing atmosphere for you. After the nap ends, the vehicle will restore
the settings before the nap.
Caution小憩模式-无长滑轨
Before entering the Nap Mode, make sure the vehicle is in PARK and not in the power
swap mode.
Close all the doors and the liftgate before starting the Nap Mode to ensure safety.
A fault with the climate control system may compromise the comfort during the nap.
When the front seats are moving backward at the beginning of the nap, pay attention to
the space for occupants on rear seats.
If the vehicle is not being charged, make sure that its remaining range is not less
than 60 km. The time alarm will be triggered automatically when the remaining range is less than
30 km, and the charging alarm will be triggered automatically when the charging connector is
disconnected or the charging runs into a fault, to remind you to check the battery level.
The vehicle will automatically exit the Nap Mode under certain circumstances, for
example, when the vehicle is not in PARK, the battery has a risk of ignition, a software update is
in progress, the vehicle is in the power swap mode, the vehicle is locked for sleep, the climate
control is faulty, and the account is switched. In this case, the seats cannot be automatically
restored to the positions before the nap.
Meditation Mode
The Meditation Mode provides an immersive experience to give your brain break, so that you can
feel your inner self and your surroundings and reduce your physical and mental exhaustion.
You or your authorized users can enter the application launcher to open the Tide > Meditation page where sound scenarios and sound volumes for the
meditation can be set and memorized for the specific account.
After the vehicle enters the Meditation Mode, the in-vehicle lighting will be turned off, with
windows and doors closed and locked, the climate control will be automatically set to the temperature
comfortable for meditation, and the air purifier will be automatically turned on. NOMI will enter the Do
Not Disturb Mode to create an immersive and quiet atmosphere for you. After the meditation ends, the
vehicle will restore the settings before the meditation.
CautionMeditation and Breathing
Please verify that the vehicle is in the park gear and not in the power swap mode.
Please close all doors and the tailgate before starting the mode to ensure safety.
If the vehicle is not in charging process, it is necessary to ensure that the vehicle
range is not less than 30 kilometers.
The vehicle will automatically exit the current mode in certain situations, such as if it
is in a non-park gear, has a risk of battery fire, has software updates, has entered power swap
mode, is locked and asleep, and is switching accounts.
Breathing Mode
The Breathing Mode helps you learn how to breathe properly, calm yourself down, and relieve
stress.
You or your authorized users can enter the application launcher to open the Tide > Breathing page where breathing scenarios and background sound scenarios
and volumes can be set and memorized for the specific account.
CautionMeditation and Breathing
Please verify that the vehicle is in the park gear and not in the power swap mode.
Please close all doors and the tailgate before starting the mode to ensure safety.
If the vehicle is not in charging process, it is necessary to ensure that the vehicle
range is not less than 30 kilometers.
The vehicle will automatically exit the current mode in certain situations, such as if it
is in a non-park gear, has a risk of battery fire, has software updates, has entered power swap
mode, is locked and asleep, and is switching accounts.
Instrument Cluster Indicators
If the following indicators do not light up or go out normally, please contact the NIO Service
Center for assistance immediately.
Indicator
Description
Automatic high and low beam control indicator
High beam indicator
Autohold indicator
Position lights indicator
Low beam indicator
Front fog lights indicator
Vehicle ready indicator
Left turn signal indicator
Right turn signal indicator
Automatic wiper start indicator
Rear fog lights indicator
Ice- and snow-covered road indicator
Pedestrian Warning Alert off indicator
Parking fault indicator
Electronic stability control system on indicator
Electronic stability control system off indicator
Low battery indicator of high-voltage battery
Exceeding speed limit prompt or speed limit mode malfunction indicator
Trailer connection status indicator
Intelligent headlight malfunction indicator
Drowsiness and Distraction Warning fault/start self-inspection indicator
Drowsiness and Distraction Warning indicator for no face detected
Lane Departure Warning and Assist off indicator
Overspeed Alert off indicator
Limited power warning light
Anti-lock braking system fault warning light
Tire Pressure Monitoring System (TPMS) warning light
High-voltage battery cut-off warning light
Autonomous Emergency Brake (AEB)/Forward Collision Warning (FCW) off and fault warning
light
Emergency Lane Keeping off indicator
Emergency Lane Keeping fault warning light
Hands-off reminder status indicator
Charging cable connected indicator
Electric Parking Brake indicator
Drowsiness and Distraction Warning status indicator
Blind Spot Detection and Lane Change Alert fault warning light
Collision warning and assistance fault warning light
Shiftless Advanced Parking Assist with Fusion fault warning light
Assisted Driving fault warning light
Lane Departure Warning and Assist fault warning light
Emergency Lane Keeping fault warning light
Controls on Center Display
Front Center Display
When you or an authorized user logs in, the Center Display can seamlessly access rich and
customized content, such as music, navigation, radio, etc. You can also personalize and save your favorite
content to your account. The vehicle will automatically load any saved content the next time you log in.
When you switch between different accounts, the vehicle will display personalized content saved to the
corresponding account.
You can access the desired features (e.g. media, navigation) from the Home interface. The
following features are provided on the Center Display:
Info bar
Displays alert messages, warning messages and warning icons, etc.
You can easily manage Bluetooth, network, hotspot, wireless charging, and smart devices on
the info bar.
Tile feature menu
Press and hold to switch to different feature tiles, such as music, weather, etc.
Home Interface
To return to the Home interface, tap the button on the home page or swipe inward with four
or five fingers on any interface of the Center Display.
Vehicle Settings
Configure the settings for common features.
You can also swipe right on the Center Display to enter the Quick Access interface, where
you can use common features and customize shortcuts.
Climate control and comfort feature interface
Quickly set the climate control, seats, and comfort features here.
Application center
You can select different applications here, such as Weather, Photos, etc.
Volume settings
Quickly set the system and media volume.
To manage permissions for third-party applications, as well as view and clear storage space for
both the system and applications, go to the Settings interface on the Center Display and tap Settings > General > Storage and App Management.
To set the vehicle system in standby mode after you leave and power off the vehicle, go to the
Setting interface on the Center Display and tap Settings > General >Standby
Mode. In this mode, when you open the door and get in the vehicle, the vehicle system can start
quickly without waiting. Additionally, the experience of Smart Action features will be enhanced. This
feature is enabled by default and consumes the range by approximately 0.5 kilometers over 24 hours. You
may choose whether to enable it based on your actual needs.
Event Data Recorder (EDR)
This vehicle is equipped with an Event Data Recorder (EDR). The main purpose of Event Data
Recorder (EDR) is to record the data of some collisions or the conditions similar to a collision, such as
airbag deployment or collision with obstacles on the road; these data can help to check the operation status
of the vehicle's systems.
The EDR on this vehicle can temporarily or permanently store technical information such as
vehicle status, events and faults. The technical information can usually record the following status of
components, modules, systems and environments:
Status information of the vehicle and its components, such as vehicle speed, acceleration
and vehicle identification code.
Feature status of important system components, such as seat belt buckles.
Vehicle reaction under special conditions, such as the triggering of airbags and the
intervention of electronic stability program (ESP).
Data of a period of time before and after a collision accident, such as braking,
acceleration, steering operation, accident occurrence time, deployment information of occupant
protection devices, seat belt status information, etc.
In EDR, the recording of vehicle speed comes from the brake control unit.
These data help to better check the conditions when a collision or an injury occurs.
These data are only of natural attributes, which are used to identify and eliminate faults and
optimize vehicle features, but the motion characteristics of road sections passed cannot be created based on
these data.
These technical parameters and other information related to the vehicle, such as accident
records, vehicle damage, evidence, etc. (which may require the intervention of professionals), can be read
with OBD or ACM in a NIO Service Center.
Third parties with specialized equipment, such as law enforcement agencies, can also access and
read this technical data if they have permission to access the EDR.
You can check or purchase the related equipment at: https://www.its-tari.com/fzcsxt/219.
If the EDR does not have enough space to record an event, the current event data will overwrite
the previously unlocked event data, but the overwriting will be in chronological order. A locked event will
not be overwritten by subsequent events.
NoteNIO在未经车主允许的情况下不会将数据记录系统的信息透露给第三方人员使用。
NIO will not disclose the information in the data recording system to third-party personnel
without the owner's permission.
System Update
Your vehicle comes with a remote upgrade system. When the vehicle is connected to the Internet,
you can go to the Settings interface on the Center Display, and tap General > System
Update to upgrade the vehicle system software. remotely upgrade the vehicle and keep your vehicle
features up to date.
When there is a system update available for your vehicle, you will receive a notification in a
timely manner. You can either start the upgrade immediately or schedule it for a later time. If you choose
to schedule the upgrade, your vehicle will automatically begin the update at the designated time.
During the upgrade, the Center Display will show the time needed to complete the process (which
depends on the size of the upgrade package).
Caution车辆在充电过程中时请勿执行系统升级。
The system update feature is only available for the owner's account.
The system update must be performed when the vehicle is in Park (P gear) and connected to
the network.
The system update process consumes a certain amount of power, so please ensure that the
vehicle's battery level is above 20% and plan your travels accordingly before initiating the update.
If the vehicle is charging during the system update process, the charging process will be
automatically stopped. After the system update is completed, you can manually resume the charging
process.
During the system update process, the vehicle can be unlocked or locked using the Smart
Key, NFC and Bluetooth key on the mobile phone.
The system update may add or update certain features or modify how you typically use them.
After the system update is completed, please carefully read the instructions to understand the upgrade
content. Exercise caution and avoid misuse or unintended operations that may cause personal injury or
property damage if you are not familiar with the updated features.
If the system update fails to start or is unsuccessful, please contact the NIO Service
Center immediately.
Please refrain from modifying vehicle components or modifying software on your own to avoid
system update failures that may cause personal injury or property damage.
Reset All Settings
Before selling your vehicle, you can perform Reset All Settings on your vehicle data.
You can enter the Settings interface in the control bar at the bottom of the Center Display, tap
General > Reset All Settings, clear the vehicle usage data, and reset them
to their default values.
Data to be cleared includes: vehicle settings (such as seat settings, side mirror settings, and
A/C), driving settings (such as ADAS settings and driving mode), NOMI settings, system settings (such as
time and date), navigation settings, media playlists, photos, videos, etc.
Caution 恢复出厂设置
Reset All Settings is only accessible to the main user and must be performed while the
vehicle is not in motion.
During the reset, the instrument cluster and center display will go dark and flash. Do not
drive the vehicle at this time because it may cause unanticipated consequences.
After the reset, the vehicle will be returned to inactive status and must be reactivated
before it may be used.
All application data and system settings will be reset following a reset. All images and
videos stored in this vehicle will be deleted. It is recommended that users back up any necessary
files in advance. You can access Photos from the application center on
the center display, choose the files you wish to save, and then tap Export to USB
drive.
Reset All Settings will not delete the user's personal cloud data, such as driving
preferences, frequently visited destinations in Navigation and music playlists.
Basic Operations
Starting the Vehicle
The vehicle will get ready to drive when the following conditions are met:
The driver is seated.
Close the driver door or press the brake pedal.
The driver can start the vehicle in many ways such as with the Smart Key, NFC card, and mobile
phone NFC key.
If the mobile phone NFC key or NFC card is used, place the mobile phone with the NFC key or NFC
card on the wireless charging board, keep the mobile phone unlocked and fit it into the wireless charging
board, and then try to engage the gear and start the vehicle.
Warning请妥善管理好车辆智能钥匙/NFC卡片和手机App
Please manage your vehicle's Smart Key, NFC card and the NIO App on your phone properly,
and do not allow individuals without driving qualifications to sit in the driver seat.
When starting the vehicle, there may be a slight delay in the lighting of the Center
Display or the Instrument Cluster panel. Please wait for the screen to complete a self-check before
shifting gears, driving the vehicle, or performing other operations, to avoid personal injury or
property damage.
Caution 使用NFC启动时,请确保手机或卡片钥匙处于无线充电面板处。
When using NFC for vehicle startup, ensure that your phone or card key is placed on the
wireless charging board.
When using the NFC key, ensure that your phone is powered on and unlocked.
Unfortunately, due to Apple's restrictions on third-party access to NFC permissions, the
iOS system is currently not supported.
Note当发生碰撞时,撞击力会通过加速踏板传递至小腿,对驾驶员造成伤害。
When a collision occurs, the impact is transmitted to the calf through the accelerator,
causing injury to the driver. To protect the driver's safety, the accelerator has a fracture limiter
groove.
When an accident happens and the accelerator is subjected to a great lateral external
force, the groove's design may cause the accelerator to break to protect the driver's leg.
Gear Shifting
After pressing the brake pedal and toggling the gear shifter into the DRIVE (D) or REVERSE (R)
gear, the digital instrument cluster displays , indicating that power output is ready. After shifting the gear, the digital instrument
cluster will display the real-time gear position of the vehicle. If the shifting fails, the digital
instrument cluster will prompt you to confirm the current gear.
You can use the P-R-D gear shifter to control gear switching, including:
DRIVE (D): used in normal drive mode.
REVERSE (R): can only be engaged in the parking state.
PARK (P): prevents slipping in the parking state.
Go to the Settings interface on the Center Display, and tap Sound >
Gear Shift Sound to enable or disable the ringer and alerts.
The vehicle can be switched to NEUTRAL (N) in specific conditions such as while pushing the
vehicle and automatic washing.
Go to the Settings interface on the Center Display, and tap Driving and
Parking > N (NEUTRAL) to enable or disable NEUTRAL (N).
Be sure to confirm the gear position on the digital instrument cluster after shifting, and
re-shift the gear if the digital instrument cluster indicates a different gear than intended.
Caution只有在停车状态且踩下制动踏板时,才能挂入驻车挡(P挡)。
The Park (P) gear can only be engaged while the vehicle is stationary and the brake pedal
is depressed.
Before leaving the vehicle or parking it on a slope, please ensure that the Park (P) gear
is engaged. If no gear position is displayed on the instrument cluster, the vehicle may move without
control.
Electric Parking Brake
When switching to PARK (P), the parking brake will be automatically activated, and the digital
instrument cluster displays ,
indicating that the Electric Parking Brake has been enabled.
When locked from the outside of the vehicle, the vehicle's power will be automatically turned
off, and the Center Display and digital instrument cluster will be shut down at the same time.
You can switch the vehicle to PARK (P) in the following ways:
Press the PARK (P) button on the side of the gear shift in the center console.
Go to the Settings interface on the Center Display, and tap Driving
and Parking > EPB to park.
When the digital instrument cluster displays , it indicates that the brake system is faulty. Please drive carefully and
contact the NIO Service Center for maintenance.
Feature Settings
Autohold
Autohold is to keep the vehicle stationary for temporary parking when the brake pedal is
released.
During the driving process, when you press the brake pedal until the vehicle comes to a stop,
pressing the brake pedal further will activate the Autohold feature.
The icon is
displayed on the digital instrument cluster when the Autohold feature is activated. When it is activated,
you can step on the accelerator pedal or the brake pedal to deactivate Autohold.
Caution当车辆处于后退挡(R 挡)时,自动激活的驻车方式不生效。仍需使用深踩激活的方式驻车。
The Autohold mode will not be enabled when the vehicle is in REVERSE (R gear). You still
need to use Full Press Activation to park.
You can also floor the brake pedal to activate Autohold in an emergency.
You can also activate Autohold when parking on an uphill road, where the braking system will
provide sufficient braking force to keep the vehicle stationary in accordance with the gradient of the
slope.
Caution坡度不得超过20%。
The gradient of the slope should not exceed 20%.
Emergency Braking
In the event of a brake pedal failure, you can activate Emergency Braking by pressing the PARK
(P) button, which will produce full braking deceleration under normal circumstances to stop the vehicle.
Press and hold the PARK (P) button to activate Emergency Braking.
Release the PARK (P) button, or step on the accelerator pedal to deactivate Emergency
Braking. To re-activate Emergency Braking, you will need to press the button again.
Caution 只有遇到制动踏板失灵或卡滞等紧急情况,才需要激活应急制动功能。
The Emergency Braking feature should only be activated in emergency situations, such as
brake pedal failure or sticking.
When you drive on large curves, uneven roads, or icy and snowy roads in winter, activating
the emergency braking feature may cause your vehicle to spin or slip. Please drive with caution.
Hill Start Assist
Hill Start Assist prevents your vehicle from rolling backwards when starting uphill.
When your foot switches from the brake pedal to the accelerator pedal, the pressure on the
brake pedal will be maintained in the brake system for a maximum of 2 seconds. The temporary braking
effect will disappear after 2 seconds or when you accelerate.
Go Notifier
Go to the Settings interface on the Center Display, tap Driver Assistance
> Go Notifier to turn this feature on or off.
With this feature enabled in the manual driving mode, if you do not follow after the lead
vehicle starts, the vehicle will remind you.
Go Notifier serves as a reference only and cannot substitute your visual observation. You
must always pay attention to the traffic conditions and road conditions, and drive at an appropriate
and safe speed in compliance with applcable traffic laws and regulations.
Blind Spot Camera View
Go to the Settings interface on the Center Display, tap Driving and
Parking > Blind Spot Camera View to turn this feature on or off.
With this feature enabled, when you toggle the left or right turn signal, the images of the
surrounding view cameras on both sides will appear on the Center Display. These images will cover the
blind spots on the side of the vehicle and provide necessary safety alerts, reducing potential safety
hazards during driving. The image window will be closed when the turn signal is off or when you tap the
Close button in the top left corner of the Center Display.
Scenario Assist
Snow Mode
Low-traction surfaces such as snowy roads, icy or mixed surfaces, wet and slippery asphalt, and
wet and slippery grass are all suited for Snow mode.
Go to the Settings interface on the Center Display,
and tap Driving and Parking > Snow Mode to turn the feature on or off.
When the mode is activated, the vehicle retains all-wheel drive, with power distributed evenly
to the front and rear wheels, and the accelerator pedal is relatively gentle, so as to guarantee a smooth
start and to avoid slipping on slippery surfaces such as ice, which secures the driving through wet
terrain.
The Snow Mode of your vehicle can improve your driving safety. However, please still drive
with caution, and depress the accelerator and brake pedal slowly to control your vehicle speed. Pay
attention to whether there are foreign objects in the surrounding environment of your vehicle to avoid
damaging your vehicle.
Wet Mode
Wet Mode is appropriate for slick hard asphalt or congested, slick sand and mud conditions, as
well as flooded roads.
Go to the Settings interface on the Center Display,
Tap Driving and Parking > Wet Mode to turn the feature on or off.
The Wet Mode enhances the smoothness and stability of vehicle during acceleration, braking, and
cornering. The vehicle will maintain all-wheel drive with power distributed evenly to the front and rear
wheels. The regenerative braking will maintain minimal.
The Wet Mode of your vehicle can improve your driving safety. However, please still
drive with caution, and depress the accelerator and brake pedal slowly to control your vehicle
speed. Pay attention to whether there are foreign objects in the surrounding environment of your
vehicle to avoid damaging your vehicle.
Do not drive your vehicle onto muddy or swampy roads to avoid getting stuck or
trapped.
Sand Mode
Sand Mode is appropriate for congested hard roadbed sandy soil road surfaces and gobi deserts.
Go to the Settings interface on the Center Display,
Tap Driving and Parking > Sand Mode to turn the feature on or off.
Sand Mode smooths out the vehicle's starting and braking, allowing for some side-to-side
slippage while preventing bogging and retaining forward ability. The vehicle retains all-wheel drive with
increased power delivery to the rear axle, more aggressive power delivery, and vehicle stability control
with extremely low regenerative braking.
The Sand Mode of your vehicle can improve your driving safety. However, please still
drive with caution, and pay attention to whether there are foreign objects in the surrounding
environment of your vehicle to avoid damaging your vehicle.
Please do not drive your vehicle into soft deserts and seaside beaches to avoid
getting stuck.
Wash Mode
Activating the Wash Mode can reduce the chances of damaging vehicle components due to
misoperation when washing the vehicle.
Go to the Settings interface on the Center Display,
Tap Driving and Parking > Wash Mode to turn the feature on or off.
Once the Wash Mode is activated, the vehicle's windows, side mirrors, glass roof*, and spoiler* will be closed. Features such as the
liftgate kick sensor, automatic wiper sensor, recessed door handle extension, automatic door handle
pop-in, and the press-to-open charge port door* will be disabled. Additionally,
the Walk-Away Lock, Walk-Up Unlock, and Auto Defog will be turned off, while the air conditioner will
switch to recirculation.
Features marked with "*" will vary by model. Please refer to the actual
product.
The above settings can also be manually changed during the washing process. The features will
be restored once you exit the Wash Mode. Additionally, you can quickly adjust the side mirrors and
enable/disable the Screen Clean Mode on this interface.
The Wash Mode will be disabled when the vehicle speed exceeds 15 km/h.
Caution强烈建议您开启洗车模式
Before a car wash, you are strongly advised to turn on Wash Mode from the Center Display,
quickly close the doors and windows with one touch, and disable the sensing function to avoid
unnecessary losses.
Caution 车辆进行自动洗车前,请在中控屏应用程序中心,点击。
Before your vehicle undergoes an automatic vehicle wash, please switch to NEUTRAL (N). Go to
the Settings interface from the control bar at the bottom of the Center Display and tap Driving & Parking>NEUTRAL (N).
Trailer Mode
The Trailer Mode automatically detects trailer connection and adjusts settings such as ride
height, side mirror angle, assisted driving, and safety features to adapt to the towing scenario.
Before towing, please shift to PARK (P), go to the Settings from on the Center Display,
and tap Driving and Parking > Tow Hitch to extend the tow hitch.
When a trailer is towed, Trailer mode must always be active. When you connect the trailer's
electrical harness, the vehicle will enable Trailer mode after you confirm. Trailer mode will be
deactivated when the trailer's electrical harness is disconnected.
To enable or exit Trailer Mode, go to the Settings interface on the Center Display and tap
Driving and Parking > Trailer Mode. One of the following indicators will
be displayed on the instrument cluster at this time:
Icon
Description
The vehicle has detected the connection of the trailer lights, but the Trailer Mode
is not activated. The vehicle may already have an accessory connected.
The vehicle has detected an electrical connection fault with the trailer lights.
Some or all of the trailer lights may be faulty. To ensure your safety, pull over as soon as
possible and check the wiring or connection of the trailer lights for faults. If the problem has
been resolved but the red icon is still on, please try turning off Trailer mode and then turning it
on again.
Warning拖车前,务必检查拖车模式是否已启用。
Before towing, always check if Trailer Mode is enabled.
Under no circumstances should Trailer Mode be exited during towing. Doing so may
result in serious injury or death.
Do not use the suspension adjustment setting on the Center Display to match the tow
hitch height with the trailer height.
Note启用拖车模式时,某些 PILOT 功能(转向、召唤、车道辅助等)以及脚踢传感器、便利进出、超声波传感器功能可能不可用。
When Trailer Mode is enabled, some Driver Assist features (SteeringAssist, Lane
Keeping Assist, etc.) and the kick sensor, Easy Entry & Exit, and ultrasonic sensor may not
be available.
Please complete the trailer connection with the ride height set to the Normal mode.
If the Trailer Mode is engaged while the ride height is in a non-Normal mode, the ride height
will automatically adjust to the Normal mode.
When installing the tow hitch equipment, the rear tow hook cannot be used.
ECO+ Mode
The power consumption of the vehicle can be reduced to attain greater range by disabling
features that are not required for driving to meet the driving needs at the minimum.
In ECO+ Mode, the vehicle's top speed is constrained, Assisted Driving and other features are
momentarily inaccessible, and comfort features like air conditioning and ambient lighting are also
restricted.
Go to the Settings interface on the Center Display,
Tap Driving and Parking > ECO+ Mode to enable or disable the feature.
Disabling this mode will return the vehicle to the previous regular drive mode.
You can also switch to the regular drive mode by pressing the physical button of Drive Mode.
Pet Mode
When the vehicle is PARK (P), go to Settings from the bottom of the Center Display, and tap
Driving and Parking > Pet Mode to turn it on or off.
When Pet Mode is ON and you lock your vehicle, the A/C enters automatic mode (the temperature in
your vehicle is 22 °C by default and can be manually set). The Center Display will show the cabin
temperature and prompts, the brightness of the Instrument Cluster will be adjusted to the minimum, and the
brightness of the Center Display will be adjusted to 50%. At this time, the NOMI voice wake-up feature will
be disabled, the window adjustment button will be unavailable, and the child locks will be activated for the
rear doors and windows.
When the feature is on, you can also view the current vehicle status remotely or turn the feature
off through the NIO App.
Pet Mode is disabled by default before each drive, and once enabled, it can maintain the previous
functional settings even if the account is switched.
Caution宠物模式
Pet Mode should only be enabled for the temporary placement of pets. Please do not
leave children alone in your vehicle.
It is not possible to activate Pet Mode simultaneously with Power-Keep Mode or Camp
Mode.
After Pet Mode is activated, Guardian Mode and Real-Time Surround View are temporarily
unavailable. They can be reactivated after Pet Mode is exited and your vehicle is locked.
After Pet Mode is activated, system update and gear shifting operations cannot be
performed for your vehicle.
Pet Mode can only be activated when your vehicle is in PARK (P) and all four doors are
closed. If your vehicle is in NEUTRAL (N), Pet Mode cannot be activated.
After Pet Mode is activated, you will be prompted with a message that your pets are in
your vehicle through your NIO App every two hours. If the current remaining range of your vehicle
is less than 60 kilometers and it is not being charged, you will be prompted with a message; if
the current remaining range of your vehicle is less than 10 kilometers, Pet Mode will be
automatically exited and the windows will be opened to enter Ajar Mode to protect your pets.
If the high-voltage or A/C system of your vehicle is abnormal, Pet Mode will be
automatically exited and the windows will be opened to enter Ajar Mode to protect your pets.
Power-Keep Mode
Go to Settings from the bottom of the Center Display, and tap Driving and
Parking > Power-Keep Mode to turn the mode on. When you need to leave the vehicle temporarily
(such as to buy coffee or breakfast), enabling the Power-Keep Mode can maintain the current comfortable
environment inside the vehicle.
You can set the duration of Power-Keep Mode, and after reaching the set time, the vehicle will
automatically exit this mode.
When Power-Keep Mode is enabled and you lock the vehicle, it will retain the current status of
the lights, A/C, seats, windshield wipers, and other features. Alternatively, it can save the status before
you left the vehicle and automatically restore it once the mode is exited.
When the feature is on, you can also view the current vehicle status remotely or turn the feature
off through the NIO App.
Power-Keep Mode is disabled by default before each drive, and once enabled, it can maintain the
previous functional settings even if the account is switched.
Caution离车不下电模式
Power-Keep Mode is only designed to maintain a comfortable interior climate during a
temporary walk-away. Do not leave children and pets alone in your vehicle.
It is not possible to activate Power-Keep Mode simultaneously with Pet Mode or Camping
Mode.
After Power-Keep Mode is activated, Smart Guardian and Real-Time Surround View are
temporarily unavailable. They can be reactivated after Power-Keep Mode is exited and your vehicle
is locked.
Power-Keep Mode can only be activated when your vehicle is in P gear. If your vehicle
is in N gear, Power-Keep Mode cannot be activated.
After Power-Keep Mode is activated, system update and gear shifting operations cannot
be performed for your vehicle.
If the current remainder range of your vehicle is less than 60 kilometers and it is not
being charged, you will be prompted by a message; if the current remainder range of your vehicle
is less than 10 kilometers, Power-Keep Mode will be automatically exited.
If the high-voltage system or climate control system of your vehicle is abnormal,
Power-Keep Mode will be automatically exited.
Camp Mode
When the vehicle is in PARK (P), go to the Settings interface from the bottom of the Center
Display, and tap Driving and Parking > Camp Mode to turn the mode on.
Camp Mode is disabled by default before each drive. When Camp Mode is on, the A/C is turned on,
with the front and rear row temperatures set at 25 °C by default, the air circulation is turned on, and air
purification is adjusted to Silent mode; all screens in the car will be turned off according to the preset
delay; and NOMI enters Do Not Disturb mode.
When the feature is on, you can also view the current vehicle status remotely or turn the feature
off through the NIO App.
Caution露营模式
It is not possible to activate Camp Mode simultaneously with Pet Mode or Power-Keep
Mode.
Camp Mode can only be activated when your vehicle is in PARK (P). If your vehicle is in
NEUTRAL (N), Camp Mode cannot be activated.
When Camp Mode is on, the liftgate kick sensor will be automatically turned off.
When Camp Mode is on and the vehicle is locked, if someone opens the door from inside
and leaves the vehicle, the Center Display will light up with an alert that the vehicle is
unlocked.
After Camp Mode is activated, Guardian Mode and Real-Time Surround View are temporarily
unavailable. They can be reactivated after Camp Mode is exited and your vehicle is locked.
After Camp Mode is activated, system update and gear shifting operations cannot be
performed for your vehicle, and the features of Walk-Up Unlock and Walk-Away Lock will be
temporarily turned off. They will resume after Camp Mode is exited.
If the current remaining range of your vehicle is less than 60 kilometers and it is not
being charged, you will be prompted with a message; if the current remaining range of your vehicle
is less than 10 kilometers, Camp Mode will be automatically exited and the windows will be opened
to enter Ajar Mode.
If the high-voltage or A/C system of your vehicle is abnormal, Camp Mode will be
automatically exited and the windows will be opened to enter Ajar Mode.
Digital Video Recorder
The Digital Video Recorder feature includes Rolling Recording, Emergency Recording and Quick
Record.
Caution停车下电后,行车记录仪不再工作。
The DVR will cease to function when the vehicle is powered off.
Loop Recording
The recording angle of a Digital Video Recorder includes the main view angle and the front,
rear, left, right and surround view angles, supporting simultaneous recording and real-time previews.
Main Angle: only records the main view angle of the camera, which supports a maximum
resolution of 3,840x1,696 and has a picture fluency of 30 frames per second.
Multi-Angle: records all view angles of the camera, with four surrounding view cameras that
support a maximum resolution of 1,280×1,000 and have a picture fluency of 30 frames per second.
The longest continuous rolling recording time for the main view angle of a Digital Video
Recorder is about 10 hours, and 5.7 hours for the five-view angle. When the corresponding time is
exceeded, the original video file will be overwritten.
The contents of the Loop Recording will be stored in the Album > DVR
> Loop Recording folder. If you need to save specific video files, please use a USB drive or
other storage device.
Go to the Settings interface on the Center Display,
Tap Safety > DVR to turn the feature on or off.
When the feature is enabled, the Center Display will show
When the feature is disabled, the Center Display will show
When the DVR feature is enabled, the camera will be turned on and continue to record rolling
videos until the video recording is terminated.
The Digital Video Recorder supports watermarking features, which are disabled by default and
need to be enabled manually.
In the Settings of the DVR interface, tap
Driving Data Watermarking to enable or disable the feature. Once this
feature is enabled, some driving data will be watermarked in the video.
Emergency Event Video
The Emergency Recording feature can record video images in the vehicle's memory. If the
Autonomous Emergency Brake is triggered or the airbag is deployed, the DVR will automatically record and
save emergency event videos.
The emergency event videos include videos recorded 30 seconds before the emergency and 60
seconds after the emergency. The contents of the emergency event video will be stored in the Album > DVR > Emergencies folder. If you need to save specific video files,
please use a USB drive or other storage device.
Quick Record
You can use the Quick Record feature to promptly record and save the ongoing events.
Go to the Quick Access interface by swiping right on the Home interface of the Center Display,
tap Quick Record to start recording, while the Center Display will show
.
The Quick Record saves clips recorded 30 seconds before and 60 seconds after it is triggered.
The recordings are stored in
the Album > More > Quick Record folder. If you need to save specific
video files, please use a USB drive or other storage device.
The storage space for emergency videos will not be cyclically overwritten, and manual
cleaning is required when the storage space is full. Otherwise, the video recording feature will be
affected.
Pedestrian Warning Alert
When your vehicle is traveling at low speeds (typically lower than 30 km/h), it emits a sound to
alert other road users in the surrounding area, such as pedestrians and other vehicles.
Seat Belts
Seat Belt Instructions
Seat belts are the primary passenger safety protection system which can protect passengers from
serious injury in the event of an accident especially when used with airbags.
There are pretensioning devices for both the front and both outer rear seats of the vehicle.
This kind of device provides a certain pretension force for the seat belt in the event of a serious
collision. They retract part of the seat belt quickly to protect passengers reliably. At the same time,
they prevent excessive restraint force of the seat belts that could cause injury to passengers.
Warning不系安全带或未正确佩戴安全带可能带来严重的人员伤亡,请务必正确佩戴安全带。
If the seat belt is not fastened or correctly fastened, serious injury or death may
occur as a result. Always fasten your seat belt correctly.
Do not unfasten your seat belt while your vehicle is in motion. Otherwise, serious
injury may occur in the event of an accident.
Please keep your seat belt clean, and avoid blocking the socket with foreign objects.
Otherwise, the seat belt will not be able to be buckled reliably.
Before use, please check your seat belt and its fixing mechanism carefully for damage
and aging. If there is any damage, never continue using it, and replace your seat belt
immediately.
Do not repair damaged seat belts by yourself. Do not remove or install seat belts by
yourself under any circumstances.
Do not share one seat belt with another person (such as holding a child), or it may
cause secondary injury to passengers in the event of an accident.
A seat belt that is stretched and deformed during an accident has lost its safety
protection feature. Even if its surface is not damaged, it shall be replaced immediately.
Once the pretension force limiting device of the seat belt is triggered during an
accident, it shall be replaced immediately. In some accidents, even if the pretension force
limiting device is not triggered, it is recommended to go to the NIO Service Center for inspection
and have it replaced if necessary.
Please do not tilt your backrest too far back. Otherwise, the protective function of
your seat belt will be seriously affected.
Seat Belt Unfastened Warning Light
All seats in your vehicle are equipped with seat belts.
When you, as a driver, are seated in the driver's seat (and the driver's door is closed or the
brake pedal is depressed) or your vehicle is driving, if the front passenger does not fasten his/her seat
belt, the Seat Belt Unfastened Warning Light on the digital instrument cluster will illuminate to remind you and the front passenger
to fasten his/her seat belt immediately.
When a front row seat belt is not fastened:
If your vehicle speed is higher than 22 km/h and his/her seat belt is still not fastened,
the Seat Belt Unfastened Warning Light will flash and the warning chime will sound. After his/her
seat belt is fastened, the warning light and warning chime will disappear;
If the seat belt remains unfastened, the warning chime will stop after 95 seconds, but
the warning light will be steadily on.
When you, as a driver, are seated in the driver's seat (and the driver's door is closed or the
brake pedal is depressed), if a rear row passenger does not fasten his/her seat belt, the corresponding
Seat Belt Unfastened Warning Light on the digital instrument cluster will illuminate to remind the rear row passenger to
fasten his/her seat belt immediately. The warning light will go out after the seat belt is fastened.
When a rear row seat belt is not fastened:
If your vehicle speed is higher than 22 km/h and a rear row passenger releases his/her
seat belt, the warning chime will sound at the same time when the Seat Belt Unfastened Warning Light
illuminates. This warning light will go out after all seat belts are fastened.
If the rear row seat belt remains unfastened, the warning chime will stop after 33
seconds, but the warning light will be steadily on.
Warning若安全带未系报警功能异常,请勿使用相关座椅,并请立即联系服务中心检查安全带功能。
If the seat belt reminder malfunctions, do not use the seat and contact NIO immediately for
inspection.
Use of Seat Belts
The correct use of seat belt is as follows:
Pull the seat belt tongue across the front of your body. The upper part of the seat belt
shall be across your shoulder, and the lower part of the seat belt shall be across your hip. Do not
put the seat belt across your neck or abdomen. Insert the tongue into the buckle for the same seat
until you hear a click. Pull the seat belt to confirm that the seat belt is locked.
Press and hold the seat belt height adjustment button and move the seat belt up and down
to adjust the seat belt height. After the seat belt reaches a comfortable height, release the
adjustment button. After the height is adjusted, pull the seat belt shoulder part to confirm that
the seat belt is locked.
To release the seat belt, press the red button at the buckle, and the tongue will pop out. Now
the seat belt can be retracted by hand. The tongue can be rolled back automatically into the upper fixing
device of the seat belt.
Ensure that the backrest and head restraint are positioned correctly before wearing a
seat belt, so that the seat belt can protect the occupant to the fullest extent possible.
A seat belt that is either too loose or too tight can cause injury if a collision occurs.
For a pregnant occupant, the seat belt must rest evenly across the chest and as low and
flat as possible across the hips. Failure to do so can cause severe injury to both the unborn fetus
and the mother if the seat belt tightens in the event of an accident.
Airbag
Airbag Instructions
Airbags are a supplementary restraint system that works with the seat belts. Airbags quickly
deploy in serious accidents to protect the head and chest of passengers and reduce the severity of injury.
However, they do not prevent limb injuries or scrapes and bruises. Therefore, the airbags should be used
together with the seat belt to provide maximum protection.
Your vehicle is equipped with collision sensors. In case of a frontal or side collision that
meets the conditions (depending on the type, angle and object of collision) for the airbag system to
deploy, the airbags will deploy from their position. The gas generator inside the airbag will ignite and
release gas at high pressure to blow open the cover of the airbag. Gas will fill the airbag to form a
buffer protection layer that protects passengers, thereby reducing the risk of injury or death.
The vehicle airbag system includes frontal airbags and side airbags. The word "AIRBAG" is
marked on the places where the airbag is placed to remind you that there is an airbag herein.
The front airbags include the front row head airbags, which are located in the trim cover
of the steering wheel and at the instrument panel on the front passenger side respectively;
The side airbags include the front side airbags (located on both sides of the driver's seat
and the outside of the front passenger seat) and the curtain airbags (located above the doors on both
sides, in the ceiling area from the A-pillar to the C-pillar).
Airbags are a supplementary restraint system and cannot replace seat belts. The airbag
can only maximize your safety when used in conjunction with the seat belt. Thus, all occupants
should always correctly wear their seat belt and sit in the correct position.
The driver should sit at least 25 cm away from the steering wheel, since the airbag may
injure the driver when deployed with great force.
Children must not sit in the front passenger seat if the front passenger airbag is
enabled. In the case of an accident, the impact of the airbag when deployed may cause severe
injury to children.
Do not place any objects on the front passenger seat. These objects will enter the
deployment area and be ejected if the airbag deploys in the event of emergency braking, which may
injure occupants.
The airbag system can only provide protection once. If the airbag has been deployed,
you must have it replaced; during certain accidents, the airbag may not deploy. However, to ensure
that the airbag system works properly, please contact NIO immediately for inspection or
replacement if necessary.
If any damage or fractures are found on the airbag cover, do not use the vehicle and
contact NIO immediately.
If the airbag system has never been deployed for a period of ten years from its
production date, please visit NIO to have it replaced. A record of the airbag system’s replacement
needs to be kept and given to the new owner when the vehicle’s ownership is transferred.
Installing or removing airbag system components, including airbag labels, is
prohibited.
Smoke and fine powder may be produced when the airbag deploys. Even if the fine powder
is nontoxic, it may still make occupants feel uncomfortable.
When using seat covers, avoid the area around the side airbags for the front seats.
Doing so may impair the protective function of the side airbags.
Do not place any objects in the deployment area of the curtain airbags (including
pillars, headliner or handles). Occupants should not lean against the doors. Doing so may result
in injury if a curtain airbag deploys.
Do not place any hard objects (including clothes hangers, fruits, or glass bottles) on
the garment hooks in the vehicle. Doing so may result in injury if a curtain airbag deploys.
Never place your feet, knees or other body parts on or near the airbag covers. Do not
place or hang any objects on or near the airbag covers. Doing so may impair the functionality of
the airbags and may result in injury if an airbag deploys.
Never place, hang or install any objects on or near the instrument panel on the
passenger side. Doing so may result in injury if an airbag deploys.
Never modify the headliner of the vehicle. Doing so may impair the functionality of the
curtain airbags, and result in injury if they deploy.
Never place or hang any heavy or sharp-edged objects on the front passenger sun visor.
Doing so may result in injury if the front passenger airbag deploys.
The smoke and dust generated during the rapid airbag deployment may cause skin or eye
irritation/scalds/burns, and the airbag fibers may cause skin scratches or burns.
Airbag Deployment Conditions
The airbag may deploy in the following conditions:
High speed frontal impact with a wall or vehicle.
Impact with hard roadbed.
Falling into a deep ditch.
Side impact by a vehicle traveling at a high speed.
Leaving the road surface and then impacting it violently.
The airbags may not deploy in some collision situations, including but not limited to the
following situations. Please use seat belts correctly to protect passengers.
Impact with a tree, column or other slender objects;
Rear collision from a vehicle behind;
Lateral roll;
Collision with or getting stuck under the rear of the truck in front;
A collision with a vehicle from the side at the nose of the vehicle;
A collision with a wall from the side at the nose of the vehicle;
Side collision with a post;
Side collision at the front of the vehicle at a certain angle;
Side collision on the body of the vehicle at a certain angle;
Partial side collision;
Partial side collision.
Airbag Warning Light
The airbag warning light indicating the airbag status is displayed on the digital instrument cluster. If this
warning light is on after the digital instrument cluster is started, please stop using your vehicle and
contact the NIO Service Center immediately.
Deactivating the Front Passenger Airbag
Because the airbag expands rapidly and has a large impact force when it deploys, it is safer
for the front passenger to stay at least 25 cm away from the front airbag. However, if a child or a
passenger with special medical needs must ride in the front row, go to the Settings interface in the
control bar at the bottom of the center display, tap Security > Front Passenger
Airbag, and select the option to turn off the front passenger airbag. At this time, the icon
appears at the top of the center
display to remind you that the front passenger airbag has been disabled to prevent the front passenger
airbag from causing serious injury to the special front passenger.
Safety Measures after Airbag Deployment
When the vehicle has a collision and the airbags deploy, the vehicle will automatically
implement some safety measures to protect the occupants in the vehicle:
Unlock all doors to ensure that passengers in the vehicle or rescue personnel can open
the doors;
Turn on the hazard warning light to show the vehicle position and warn vehicles coming
from behind;
Cut off the high-voltage power supply to protect occupants;
Open the windows to prevent occupants from being trapped if the vehicle falls into water;
Turn off the steering wheel and seat memory features to avoid being adjusted to a
position where the driver is trapped;
Turn on the interior reading lights in the vehicle to facilitate rescue at night.
Child Locks
The child locks are disabled by default and need to be enabled manually. You can go to the
Settings from the bottom of the Center Display and tap Doors & Windows Locks >
Doors to see the settings for the child locks.
Manually Enable or Disable Door and Window Child Locks
Tap the corresponding Rear Door/Window Child Lock button. ON means this feature is enabled, and OFF means it
is disabled.
When a door/window child lock is enabled and a passenger attempts to open the door/window from
the inside, a pop-up reminder will appear on the Center Display.
You can still open a door from the outside even when its child lock is enabled.
Caution儿童锁开启时,请勿单独将儿童留在车内,以免造成意外伤害。
When Child Protection Locks are on, please do not leave children unattended in the
vehicle. Doing so may result in injury or death.
After turning on Child Protection Locks, please check their status again.
If a door/window child lock fails to be enabled or disabled, a pop-up reminder will appear on
the Center Display. Repeat the above steps until successful.
Child Safety Seat
When a child under 12 years old or with a height less than 1.5 meters rides in your vehicle,
always install a child safety seat or booster cushion. Please have the child sit in the child safety seat or
booster cushion instead of holding him or letting him sit on an adult's lap to fully protect the child.
Only child safety seats that are approved for children and comply with relevant regulations or
standards are allowed to be used. Check the markings on the child safety seat when selecting a child safety
seat. When installing and using a child safety seat, follow the relevant laws and regulations, the
instructions of the child safety seat manufacturer and the instructions on the safety of children in this
user manual.
Important Instructions for Using Child Safety Seats
Proper use of child safety seats will greatly reduce the risk of injury to children and
reduce the severity of injury in accidents. Please be aware of the following when using child safety
seats:
We advise not to install a child safety seat in the middle seat of the rear row.
When installing a seat belt type child safety seat in the front passenger seat, adjust
the front passenger seat to its highest position.
Children must use child safety seats, maintain a correct posture and have their seat
belts fastened during their ride.
Never let your child ride without protection.
One child safety seat cannot be shared by more than one child.
Do not ride with a child in your arms.
Hard or sharp objects may injure a child in an accident. Keep them away from the child
safety seat.
If a rearward-facing child safety seat is installed in the rear seat of your vehicle, it
is necessary to adjust the corresponding front seat forward as appropriate. If a forward-facing
child safety seat is installed on the rear seat of your vehicle, it may be necessary to adjust the
height of the seat headrest.
Children need to be supervised by adults when sitting in child safety seats. Never leave
children alone in your vehicle.
Do not let children stand in your vehicle or kneel on the seat during driving. A standing
or kneeling child could be thrown forward during an accident, which may lead to injury or death to
the child or another passenger.
The instructions of the child safety seat manufacturer on the correct use of the seat
belt must be observed. Proper fastening of seat belts can make full use of the protection afforded
by the child safety seat.
In case of collision or emergency braking, a child safety seat that is not properly
installed and fixed in place could move and injure other passengers in your vehicle. Therefore, even
when the child safety seat is not in use, it must also be properly installed and secured in your
vehicle.
When a child is riding in the child safety seat, do not let him lean his head or body
against the door, the side of the seat or the pillar, or below the roof beam. In case of an
accident, side airbags or curtain airbags will deploy in those areas, increasing the risk of injury
to the child.
Child Safety Seat Grouping
Only a child safety seat that is approved and suitable for the child is allowed to be used.
Children taller than 1.5 meters can use the vehicle seat belts as would an adult. If a child safety seat
needs to be used, it must comply with relevant regulations or standards.
Table 1. CRS Table
Seat position
Driver
1st row passenger
2nd row left
2nd row middle
2nd row right
Passenger Airbag OFF
Passenger Airbag ON
Seating position suitable for universal belts (yes/no)
N/A
Yes (*a)
No
Yes
Yes (*b)
Yes
i-Size seating position (yes/no)
N/A
No
No
Yes
No
Yes
Seating position suitable for lateral fixture (L1/L2)*
N/A
No
No
No
No
No
Largest suitable rearward-facing fixture (R1/R2X/R2/R3)*
N/A
No
No
R1/R2X/R2/R3
No
R1/R2X/R2/R3
Largest suitable forward-facing fixture (F1/F2X/F2/F3)*
N/A
No
No
F2X/F2/F3
No
F2X/F2/F3
Largest suitable booster cushion fixture (B2/B3)*
N/A
No
No
B2/B3
No
B2/B3
Suitable for support leg
N/A
Yes
No
Yes
No
Yes
Note:
*The child seat category is defined according to ECE R16/R44/R129, you can find the
category of child seat on it's specification. The child restraint system must be appropriate to
the age, weight and size of the child.
(a) If it is absolutely necessary for you to install a child seat to the front
passenger seat, be sure to turn passenger airbag off. Adjust front passenger seat to the highest
position before installing universal CRS on it.
(b) It is forbidden to install a child seat with a support base or with a support leg
on the middle seat of the 2 nd row.
Table 2. Recommended Child
Restraints by NIO
Group
Manufacturer
Model
Attachment
0 & 0+
Besafe
iZi Combi X4 ISOfix
ISOFIX mounted with support leg, rearward-facing
Up to 13 kg
I
9-18 kg
II
Cybex
SolutionZ i-Fix
ISOFIX with seat belt, forward-facing
15-25 kg
III
Ossan
UP
With seatbelt, forward-facing
22-36 kg
NIO recommend to put your kids in corresponding CRS on the 2 nd row outer seating position, and CRS should be mounted to vehicle with
ISOFIX, support leg or seatbelt. In order to have the best protection for your younger kids,
kids weight under 18kg please use recommended rearward-facing CRS.
Q6 recommended CRS: Cybex Solution Z i-Fix
Q10 recommended CRS: Osann Up
Selection of Child Safety Seat
There is a warning label for the front row airbag on the sun visor on the front passenger side.
To place a child safety seat in the front row seat, you need to disable the front passenger
airbag. Go to the Settings interface from the control bar at the bottom of the center display, tap Security > Front Passenger Airbag, and turn off the front passenger airbag.
After doing so, the icon appears
at the top of the center display to remind you that the front passenger airbag is disabled.
Children should use a child safety seat or seat belt in either outer rear seat according to the
age, height and weight of the child:
Reclining child safety seats should be used for infants weighing less than 13 kg. They
should be installed rearwards in rear seats whenever possible.
Child safety seats with safety platforms or five-point seat belts should be used for
children with a weight of 9-18 kg. It is recommended to install them rearwards in rear seats.
Forward-facing child safety seats should be used for children with a weight of 15-25 kg.
They should be installed in rear seats in coordination with seat belts.
Child booster cushions should be used for children with a weight of 22-36 kg and a height
less than 1.5 meters. They should be installed in rear seats in coordination with seat belts.
The upper belt must lay flat across the shoulder and chest, and never lay across the neck;
the lower belt must lay flat across the pelvis, and never lay across the abdomen.
Installation of Child Safety Seat
Before installing a child safety seat, please read the instructions for the child safety seat
carefully to confirm that it can be installed in your vehicle. If the vehicle seat belt or ISOFIX
connection can be used to fix the child safety seat according to the installation method of the child
safety seat, it is recommended to use the ISOFIX connection preferentially.
Securing with Vehicle Seat Belt
Install the child safety seat in the rear seat, put the vehicle seat belt through the child
safety seat and insert the tongue into the buckle. Make sure that the seat belt is straight, not
twisted. Pull the seat belt to confirm that it cannot be pulled out.
Securing with ISOFIX Connection
Both outer rear seats in your vehicle are equipped with ISOFIX connections suitable for
installing child safety seats. The ISOFIX connection is hidden under the cover between the seat back
and the seat cushion. After opening the cover, insert it into the gap between the seat back and the
cushion, and then use the ISOFIX connection to install the child safety seat.
Lift the cover between the seat back and the seat cushion, and insert the lower part of
the child safety seat into the hook in the ISOFIX connection until you hear a click.
Pass the upper fixing belt of the child safety seat under the seat headrest and connect
it with the hook in the upper safety device of the rear seat.
Pull the child safety seat hard to check whether it is firmly installed.
The ISOFIX attachment points are designed solely for child safety seats with the ISOFIX
system. To avoid injury, never secure other objects to ISOFIX.
Always follow the child safety seat manufacturer’s instructions and this manual when
installing and removing a child safety seat. Improper usage can result in injury to your child or
other passengers.
Multi Collision Braking (MCB)
Multi Collision Braking (MCB) comes standard on ET5. In certain types of collisions, the
vehicle's brakes are applied to help prevent or mitigate a secondary collision.
In order to avoid or mitigate a secondary collision, the system applies the brakes automatically
to bring the vehicle to a stop. The brake lights and hazard warning flashers will be activated and the
flashers will remain on after the vehicle has come to a standstill. The electrical parking brake will then
be applied automatically.
In a situation where stopping the vehicle may not be desirable, you can override this operation
by depressing the accelerator pedal.
This feature can only operate when the braking system is sufficiently intact after the collision.
Speed Limit Mode
Speed Limit Mode ensures safety by limiting the maximum driving speed of your vehicle.
Go to the Settings interface on the Center Display,
and tap Driving and Parking > Speed Limit Mode to set the maximum driving
speed of your vehicle and turn this feature on or off.
After the feature is enabled, press or press and hold the buttons on the Center Display to
quickly/continuously adjust the speed limit.
Caution限速模式开启后,车速达到设定值将不再上升;
After Speed Limit Mode is activated, the set speed limit range is 30-180 km/h, and your
vehicle speed will not increase when it reaches the set value;
After the Driver Assistance feature is activated, Speed Limit Mode will be exited
automatically, and after the deactivation of the Driver Assistance feature, Speed Limit Mode will
not be reactivated automatically;
Speed Limit Mode can only be activated after the Driver Assistance feature is
deactivated;
By deeply or quickly pressing the accelerator pedal, you can override the limit of Speed
Limit Mode temporarily. When your vehicle speed drops below the set value, Speed Limit Mode will be
reactivated.
Child Presence Detection
As an auxiliary feature for the safety of children, Child Presence Detection (CPD) can
effectively remind users when children are left alone in the vehicle, reducing the probability of accidents
caused by leaving children in the vehicle.
The in-vehicle cameras and other sensors will detect the presence of children after the user
locks the vehicle. If any child is left alone in the vehicle, it will remind the user by means of flashing
hazard warning flasher, audible alerts, messages on the NIO App, etc.
Go to the Settings interface on the Center Display, and tap Safety >
Child Presence Detection to enable or disable this feature.
When this feature is enabled, in the event of a hardware failure (including in-vehicle camera,
millimeter-wave radar or air conditioning, etc.), the status icon will be displayed at the top of the Center Display,
and corresponding prompts will be displayed when the icon is tapped.
When the camera is fully covered, the status icon will be displayed at the top of the Center Display,
and corresponding prompts will be displayed when the icon is tapped.
Caution儿童遗留检测
The primary purpose of Child Presence Detection (CPD), an auxiliary safety feature, is to
detect and notify users of children who have been left behind in the backseat. However, there is
possibility of omissions and false alerts, so users are not encouraged to leave children unattended in
the vehicle.
After receiving an SMS or push notification from the NIO App, please return to the vehicle
as soon as possible to check on the children to avoid any accident.
Alcohol Interlock
The purpose of alcohol interlocks is to enhance traffic safety by preventing anyone with alcohol
concentration exceeding a set limit value from driving a motor vehicle.
Before you install the interlock, the following safety risks should be considered:
With your vehicle in the P gear, turn off the high-voltage power supply (to cut off the
high-voltage circuit, disconnect the emergency high-voltage cutoff plug located under the hood near the
coolant reservoir, and then disconnect the cable connected to the negative terminal of the 12V battery).
The responsibility for the safe installation will remain on the alcohol interlock installer.
The alcohol interlock electrical plug is located below the front right seat. The alcohol
interlock is connected as follows:
Move the right seat to its foremost top position.
Lift the carpet and the alcohol interlock cover, and take out the electrical plug of the
alcohol interlock.
Connect the alcohol interlock electrical plug and the alcohol interlock handset.
Mount the alcohol interlock handset and the alcohol interlock control unit under the console
box.
Note酒精锁说明
After installing the alcohol interlock, no visual or audible indication will be given from
the vehicle, but the alcohol interlock handset will show the operation instructions.
Warning请勿自行拆卸酒精锁设备。如需要拆卸,请联系蔚来汽车服务中心。
Do not remove the alcohol interlock by yourself. If you need to remove the alcohol interlock,
please contact the NIO Service Center.
The alcohol interlock connection schematics are as follows:
Feature
Cable or pin
Position of connection
1
Battery feed (KL30), uninterrupted
For nominal 12 V, the alcohol interlock requires.
Gray Cable
Pin 1
0.5 mm²
In Instrument Electrical Center box under front passenger foot pedal.
2
Ground
Black Cable
Pin 2
0.5 mm²
Under driver's seat for Left Driver and under front passenger seat for Right Driver.
3c
Data bus connection
Connection to an internal data bus of the vehicle for information exchange between the
vehicle and the alcohol interlock.
White-Red Cable
Pin 4
0.35mm²
Under driver's seat for Right Driver and under front passenger seat for Left Driver.
Forward Collision Warning (FCW)
Forward Collision Warning (FCW) will alert you with visual, auditory, and tactile warnings if the
system detects a potential collision risk with a lead vehicle, pedestrian, or cyclist ahead.
For vehicles, pedestrians, or cyclists in front of you that are heading in the same direction,
Forward Collision Warning system operates at speeds higher than 4 km/h.
Warning前向碰撞预警仅供参考,无法替代您的注意力与判断。
The Forward Collision Warning is for reference only and cannot replace your attention and
judgment.
The Forward Collision Warning is only applicable to the prevention of frontal collisions,
and will not work when the vehicle is in reverse gear.
As a driving assist feature, the Forward Collision Warning can neither respond to all
traffic, weather or road conditions, nor detect vehicles in all cases. It may become ineffective,
inappropriate or untimely due to a number of factors.
You must always pay attention to the traffic conditions and road environment. Do not rely
on the judgment of the Forward Collision Warning. Otherwise, personal injury or vehicle damage may
occur.
When danger is detected, do not wait for the Forward Collision Warning to activate before
taking action
If the risk of a collision further increases, Autonomous Emergency Braking will intervene
regardless of whether the driver applies the brake or not.
You always bear the ultimate responsibility for safe driving and shall abide by the
current traffic laws and regulations.
Go to Settings on the Center Display, and tap Driver Assistance > Forward
Collision Warning to enable or disable this feature.
Go to Settings on the Center Display, and tap Driver Assistance >Forward
Collision Warning>Timing to set the warning timing for this feature.
Dynamic Environment Simulation and Display displays warning messages when the Forward Collision
Warning is triggered.
When FCW is triggered, the vehicle will sound an alarm reminding you to keep your distance from
the lead vehicle.
Once the Forward Collision Warning is deactivated, the vehicle will not provide alerts for
potential collisions. It is recommended that you do not deactivate this feature.
The feature will automatically be reactivated when the vehicle's system restarts.
Precautions and Restrictions
Some situations may lead to a camera failure and cause FCW to malfunction. They include but are
not limited to:
The position of the camera has been changed.
The camera is obstructed or blocked. The camera lens is contaminated with a variety of
foreign substances, including water, dust, micro-scratches, oil sludge, dirt, wipers, ice, and snow.
Sudden changes in ambient brightness, such as at tunnel entrances or exits. Or the bright
light interferes with the camera's view.
Reduced detection capability due to dim surroundings, such as at dawn, dusk, night, or in a
tunnel.
Large shadows are cast by buildings, landscapes, or large vehicles.Exhaust gas, water
spray, snow, or dust stirred up by a vehicle ahead that falls onto your vehicle.
Severe weather conditions such as rain, snow, fog, or haze.
Navigating on wet roads.
Some situations may lead to a LiDAR failure and cause FCW to malfunction. They include but are
not limited to:
Severe weather conditions, such as rain, snow, fog, or haze, may also affect the
performance of LiDAR.
Exhaust gas, water spray, snow, or dust stirred up by the vehicle ahead.
The presence of water, dust, micro-scratches, oil sludge, dirt, ice, snow, tinted or
transparent film, or other obstructions on the LiDAR lens.
Driving on wet or waterlogged roads.
Exhaust gas, water spray, snow or dust stirred up by the vehicle ahead.
Overheating of the LiDAR caused by prolonged sun exposure.
Due to the limitation of LiDAR characteristics, in rare special cases, false alarms may
occur for traffic signs and high-speed anti-collision barrels in high-speed or elevated sections.
FCW will only respond to vehicles in the same direction that meet the conditions. Some targets
below will not trigger a response, including but not limited to:
This feature cannot guarantee the recognition of all special vehicles in all
circumstances, especially during nighttime, extra caution is required. For example, three-wheeled
vehicles, vehicles with damaged taillights or indistinct rear contours, vehicles with obstructions
at the rear, vehicles with irregular shapes, vehicles with a rear vertical surface below a certain
height, and unloaded commercial vehicles, among others.
The feature may have false negatives for stationary or slow-moving vehicles, especially
during nighttime, so extra caution is necessary.
There is a possibility of false triggering of the feature in special scenarios where
vehicles need to drive close to carrier trucks or recovery vehicles.
FCW may malfunction if the target is not right in front in some situations, including but not
limited to:
It will not respond to targets in the blind spots of the sensor, such as targets in blind
spots at corners, and sides and back of the vehicle.
The target may be incorrectly selected or missed when the vehicle is approaching or
navigating a curve.
The target may be lost or the distance to the target may be misjudged when the vehicle is
on a slope.
When only a part of the vehicle in the adjacent lane cuts in front of you (especially large
vehicles such as buses and trucks), the target may not be identified in time.
When your vehicle suddenly cuts to the back of a vehicle in front, or when other vehicles
abruptly cut into or out of the front of your vehicle, the target may not be detected in time.
FCW may malfunction due to special or complicated road conditions, including but not limited
to:
Driving on the water, mud, potholes, snow, ice, speed bumps, or obstacles on the road.
Complex and varied traffic conditions, such as busy intersections, expressways, and
congested roads.
Winding roads and sharp turns. Uphill or downhill roads. Bumpy roads.
Tunnel entrances and exits.
Large numbers of pedestrians, bicycles, electric bicycles, or animals.
The following actions may result in the Forward Collision Warning not issuing an alert,
including but not limited to:
When the driver is already applying the brakes, the Forward Collision Warning may not
issue an alert.
When the driver presses the accelerator pedal deeply or suddenly, the Forward Collision
Warning may not issue an alert.
When the driver makes a sudden steering maneuver, the Forward Collision Warning may not
issue an alert.
Warning如遇极端恶劣天气(包括但不限于雨、雪、雾、霾等),不建议使用此功能。
It is not recommended to use this feature in the event of extreme weather conditions (such
as rain, snow, fog, haze, etc.).
The above warnings, precautions, and restrictions do not cover all the situations that may
affect the proper operation of FCW. Many factors may interfere with the FCW. To prevent accidents, be sure
to always drive attentively and focus on traffic, road, and vehicle conditions. Drive with caution.
Front Cross Traffic Alert (FCTA)
When driving at low speeds, if the system detects a potential collision risk with a front
crossing vehicle, the Front Cross Traffic Alert (FCTA) feature can warn the driver through visual and
auditory alerts.
Cross Traffic Alert is for reference only. It is not a substitute for your visual inspection.
As a driver assist feature,Front Cross Traffic Alert cannot handle all situations in all
traffic, weather and road conditions.
You must always pay attention to traffic and road conditions, and decide whether to use Front
Cross Traffic Alert or not after your safety is ensured.
It is always your responsibility to ensure that the vehicle is driven safely and complies
with applicable traffic laws and regulations.
Enabling/Disabling FCTA
Go to the Settings interface on the bottom of the Center Display, and tap Driver Assistance > Front Cross Traffic Alert to enable or disable this
feature.
When the operating conditions are satisfied, if a collision risk with a front crossing vehicle
is detected, it will remind you through visual and auditory alerts on the Dynamic Environment Simulation
and Display (ESD), 360 Surround View interface, and Parking Assist interface.
Operating conditions for FCTA:
The vehicle speed is lower than 15 km/h and higher than 0 km/h.
The speed of a front crossing vehicle is within a certain range of the normal vehicle
speed.
The front lateral radar operates normally and has a clear field of view.
The Dynamic Environment Simulation and Display (ESD) is only for illustrative purposes and
cannot fully reflect actual traffic conditions. Therefore, do not rely on the content displayed from
the ESD.
Precautions and Restrictions
Some targets may not be identified or may trigger a response, including but not limited to:
Motorcycles;
Electric bikes;
Tricycles;
Pedestrians;
Animals;
Bicycles;
Other non-vehicle objects;
Some targets will not trigger a response, including but not limited to:
Oncoming vehicles/vehicles driving in the same direction;
Stationary objects.
FCTA does not respond to targets in the blind spots of the sensor. It cannot detect lateral
vehicles in front of your vehicle through obstacles or parked vehicles.
For example, FCTA cannot detect a front crossing vehicle in situations including but not
limited to:
The vehicle is parked in the innermost position.
The parking space is at an angle.
Some situations may lead to a radar detection failure and affect the performance of FCTA. They
include but are not limited to:
The radars are misplaced or blocked by dirt, ice, snow, metal plates, tape, labels, leaves,
or other obstructions.
The radars or the surrounding areas are impacted by collisions or scratches;
Rain, snow, fog, haze, and other extreme weather which may impair radar performance.
Due to the limitations of radar detection functions, in very rare and specific situations,
false warnings may occur due to certain metal fences, median strips, concrete walls, and other similar
objects.
Warning如遇极端恶劣天气(包括但不限于雨、雪、雾、霾等),不建议使用此功能。
It is not recommended to use this feature in the event of extreme weather conditions (such
as rain, snow, fog, haze, etc.).
The above warnings, precautions, and restrictions do not cover all situations that may affect
the normal operation of the FCTA system. Many factors may interfere with the FCTA system. To prevent
accidents, be sure to always drive attentively and focus on traffic, road, and vehicle conditions. Drive
with caution.
Autonomous Emergency Braking (AEB)
If the system judges that collision between the vehicle and a vehicle, pedestrian or cyclist in
front of it is inevitable, the Autonomous Emergency Braking (AEB) will be triggered. The system will
actively apply emergency braking to try to slow the vehicle down, so as to reduce the impact of the rear-end
collision as much as possible.
For vehicles, pedestrians or cyclists in front of you, the AEB system operates at speeds
between about 4 and 150 km/h.
For pedestrians behind you, the AEB system operates at speeds between about 4 and 15 km/h.
When AEB is triggered, the vehicle speed will be reduced by up to 60 km/h to mitigate a possible
collision. For example, if AEB is triggered at 90 km/h, the brake will be released when the speed drops to
30 km/h.
When AEB is triggered, the Dynamic Environment Simulation and Display (ESD) shows an image
warning and turns on the brake light.
Caution对于后方行人的识别及制动尚处于持续优化阶段,该功能不能保证所有情形下都识别到行人。
The function of recognizing pedestrians behind the vehicle and braking is still being
optimized. This feature cannot guarantee recognition of pedestrians in all situations.
As a Driver Assist Feature, Autonomous Emergency Braking cannot handle all traffic, weather,
and road conditions and cannot detect vehicles in all situations. False, inaccurate, or untimely
warnings may occur due to multiple factors.
You must pay attention to traffic and road conditions at all times. Never depend on
Autonomous Emergency Braking to avoid collisions or reduce the impact of a collision. Doing so can cause
personal injury or vehicle damage. For safety reasons, never test Autonomous Emergency Braking when
facing other vehicles, cyclists, or pedestrians. If you come across a dangerous situation, never wait
for Autonomous Emergency Braking to intervene before taking action. You always bear the ultimate
responsibility for driving safely and complying with applicable traffic laws and regulations.
Autonomous Emergency Braking may apply short and sharp braking to reduce the risk of a
potential collision, which may deviate from your normal driving habit and cause you discomfort.
Enabling/Disabling AEB
Go to the Settings interface on the Center Display, and tap Driver
Assistance > Autonomous Emergency Braking to enable or disable this feature.
WarningWhen AEB is switched off, the vehicle will not perform the brakes even if a
possible collision is detected. It is recommended that you do not turn off the function. This function
will be activated when the vehicle's system is restarted.
When AEB is switched off, the vehicle will not perform the brakes even if a possible
collision is detected. It is recommended that you do not turn off the function.
This function will be activated when the vehicle's system is restarted.
Precautions and Restrictions
Some situations may lead to a camera failure and AEB malfunction. They include but are not
limited to:
The position of the camera has been changed.
The camera is obstructed or blocked. The camera lens is contaminated with a variety of
foreign substances, including water, dust, micro-scratches, oil sludge, dirt, wipers, ice, and snow.
Sudden changes in ambient brightness, such as at tunnel entrances or exits. Or the bright
light interferes with the camera's view.
Reduced detection capability due to dim surroundings, such as at dawn, dusk, night, or in a
tunnel.
Large shadows are cast by buildings, landscapes, or large vehicles.Exhaust gas, water
spray, snow, or dust stirred up by a vehicle ahead that falls onto your vehicle.
Severe weather conditions such as rain, snow, fog, or haze.
Navigating on wet roads.
Some situations may lead to a LiDAR failure and AEB malfunction. They include but are not
limited to:
Severe weather conditions, such as rain, snow, fog, or haze, may also affect the
performance of LiDAR.
Exhaust gas, water spray, snow, or dust stirred up by the vehicle ahead.
The presence of water, dust, micro-scratches, oil sludge, dirt, ice, snow, tinted or
transparent film, or other obstructions on the LiDAR lens.
Driving on wet or waterlogged roads.
Exhaust gas, water spray, snow or dust stirred up by the vehicle ahead.
Overheating of the LiDAR caused by prolonged sun exposure.
Due to the limitation of LiDAR characteristics, in rare special cases, false alarms may
occur for traffic signs and high-speed anti-collision barrels in high-speed or elevated sections.
AEB will only respond to vehicles in the same direction that meet the conditions. Some targets
below will not trigger a response, including but not limited to:
This feature cannot guarantee the recognition of all special vehicles in all
circumstances, especially during nighttime, extra caution is required. For example, three-wheeled
vehicles, vehicles with damaged taillights or indistinct rear contours, vehicles with obstructions
at the rear, vehicles with irregular shapes, vehicles with a rear vertical surface below a certain
height, and unloaded commercial vehicles, among others.
The feature may have false negatives for stationary or slow-moving vehicles, especially
during nighttime, so extra caution is necessary.
There is a possibility of false triggering of the feature in special scenarios where
vehicles need to drive close to carrier trucks or recovery vehicles.
Vehicle targets may cause AEB to malfunction in the following situations, which include but are
not limited to:
AEB will not respond to targets in blind spots of the sensor, such as those in blind spots
at the corners, sides and back of the vehicle.
The target may be incorrectly selected or missed when the vehicle is approaching or
navigating a curve.
The target may be lost or the distance to the target may be misjudged when the vehicle is
on a slope.
When only a part of the vehicle in the adjacent lane cuts in front of you (especially large
vehicles such as buses and trucks), the target may not be identified in time.
When your vehicle suddenly cuts to the back of a vehicle in front, or when other vehicles
abruptly cut into or out of the front of your vehicle, the target may not be detected in time.
When a lead vehicle is positioned at a large angle to this vehicle, it may not be detected
in time.
When only part of the body of a lead vehicle overlaps with this vehicle, that vehicle may
not be detected in time.
Situations such as within a short amount of time after powering on, when the vehicle is in
the Park gear, when a seat belt is unfastened, etc.
The following situations may affect the ability of AEB to mitigate collisions due to special or
complex road conditions, including but not limited to:
Water, mud, potholes, snow, ice, speed bumps, or obstacles on the road.
Large numbers of pedestrians, bicycles, electric bicycles, or animals.
Complex and varied traffic conditions, such as busy intersections, expressway ramps, and
congested roads.
The braking distance is extended on slippery surfaces. If the anti-lock brake system,
traction control system, and vehicle stability control system are triggered, it may affect the ability
of Autonomous Emergency Braking to mitigate collisions.
During Autonomous Emergency Braking, the brake pedal automatically moves down quickly.
Therefore, do not place any item under the pedal to avoid obstructing the free movement of the pedal.
Autonomous Emergency Braking is not a substitute for maintaining a safe following distance
between you and the vehicle in front. Do not stay too close to vehicles in front of you and avoid
driving aggressively.
Warning自动紧急制动主要用于减轻正面碰撞的冲击。
Autonomous Emergency Braking is mainly used to reduce the impact of a frontal collision.
Warning 以下情况可能导致自动紧急制动不会制动或者停止制动,包括但不限于:
Autonomous Emergency Braking may not apply the brakes or may stop applying the brakes in
some situations, including but not limited to:
The driver fully or suddenly presses the accelerator pedal.
The driver turns the steering wheel sharply.
The driver's seat belt is unbuckled.
The driver's door is not closed.
Autonomous Emergency Braking has been triggered and cannot be triggered again within
roughly 30 seconds.
No vehicle is detected in front of the vehicle.
Warning如遇极端恶劣天气(包括但不限于雨、雪、雾、霾等),不建议使用此功能。
It is not recommended to use this feature in the event of extreme weather conditions (such
as rain, snow, fog, haze, etc.).
The above warnings, precautions, and restrictions do not cover all the situations that may
affect the normal operation of the AEB system. Many factors may interfere with the AEB system. To prevent
accidents, be sure to always drive attentively and focus on traffic, road, and vehicle conditions. Drive
with caution.
Lane Departure Warning (LDW)
Lane Departure Warning (LDW) helps reduce the risk of unintentionally drifting out of your lane
by providing visual, auditory, and steering wheel vibration alerts when your vehicle shows a non-autonomous
tendency to drift towards an adjacent lane or is about to cross lane markings.
Warning车道偏离预警可能无法检测到道路边缘,请谨慎驾驶并始终保持行驶在车道内。
The Lane Departure Warning may not detect road edges, so it is important to drive cautiously
and always stay within the lane.
Lane Departure Warning system is designed to aid drivers and cannot address all traffic,
weather, and road situations. Lane Departure Warning system is for reference only and cannot replace
your visual inspection.
To protect your safety, you must always pay attention to the traffic and road conditions and
decide for yourself whether to activate Lane Departure Warning. When utilizing the Lane Departure
Warning system, you should always be ready to take control of the vehicle if you discover that the road,
the traffic, the state of the vehicle, or any other risky factor makes it unsafe for you to utilize this
feature. You always bear the ultimate responsibility for keeping your vehicle in its lane and should
abide by the current traffic laws and regulations.
Enabling/Disabling LDW
To enable or disable this feature, go to the settings interface on the Center Display, tap
Driver Assistance > Lane Departure Warning and Assist> Assist Level: Warning
.
This feature will be turned on when the vehicle's system restarts. When enabled, you can select
the alert methods and sensitivity:
Warning types:
Visual: Visual warning.
Audio: Audible warning.
Vibration: Steering wheel vibration warning.
Sensitivity:
Low: alerts later than normal sensitivity under the same conditions.
Medium: normal sensitivity.
High: alerts earlier than normal sensitivity under the same conditions.
Operating Conditions of LDW:
Your vehicle speed is about 50-130 km/h.
Your vehicle drives normally without suddenly accelerating, decelerating or steering.
Your vehicle is in the center of its lane and does not drive on the lane markings.
The lane markings on at least one side are clear.
The high-definition cameras are operating normally and provide clear vision.
No components of the LDW system are faulty.
Your vehicle meets all safety conditions, such as:
The driver is seated.
The driver has fastened their seat belt.
All doors are closed.
Your vehicle is in DRIVE (D).
The anti-lock brake system, traction control system and vehicle stability control
system are not triggered.
The traction control system and vehicle stability control system are not manually
disabled.
Caution 当转向灯打开,爱车向相应一侧偏离时,车道偏离预警系统不会提醒或控制。
The Lane Departure Warning will not provide alerts or interventions when the turn signal is
activated and the vehicle intentionally deviates to the corresponding side.
Digital Instrument Cluster Display
LDW System Status Icon
Lane marking display
No status icon: the LDW system is not enabled.
Gray status icon: the LDW system is enabled, in standby status, and not activated yet.
White status icon and central lane marking: the LDW system is active.
Red status icon and red on one side of the central lane markings: there is a risk of
unintentional lane departure toward that side.
The digital instrument cluster display is only for illustrative purposes and cannot fully
reflect the actual traffic conditions. Therefore, it is important not to rely solely on the information
displayed on the digital instrument cluster display.
Precautions and Restrictions
Some situations may cause the LDW system to malfunction or automatically exit. They include but
are not limited to:
The vehicle navigating sharp curves, such as on expressway ramps.
Lane markings being unclear, worn, missing, overlapping or obscured by shadows cast by
other vehicles, buildings or landscape features;
The road section having no lane lines, such as non-standard roads, intersections, or
construction areas;
Passing through road sections with special lane markings, such as speed reduction markings
and channelizing-line markings;
Lane lines not being clearly divided, such as merging or diverging lanes, expressway ramps,
urban intersections, or left-turn waiting areas;
Presence of edges or other high-contrast lines on the road instead of lane lines, such as
road joints or curbs;
Inability to recognize lane markings totally or correctly due to changes in height, such as
on sloped roads;
Inability to recognize lane markings totally or correctly due to light, such as reflection
of lane markings caused by strong light, poor visibility or insufficient light caused by bad weather
and/or at night;
The distance between lane markings on both sides is too wide or too narrow.
Some situations may cause the LDW system to malfunction or automatically exit due to a camera
failure. They include but are not limited to:
The position of the camera has been changed.
The camera is obstructed or blocked. The camera lens is contaminated with a variety of
foreign substances, including water, dust, micro-scratches, oil sludge, dirt, wipers, ice, and snow.
Sudden changes in ambient brightness, such as at tunnel entrances or exits. Or the bright
light interferes with the camera's view.
Reduced detection capability due to dim surroundings, such as at dawn, dusk, night, or in a
tunnel.
Large shadows are cast by buildings, landscapes, or large vehicles.Exhaust gas, water
spray, snow, or dust stirred up by a vehicle ahead that falls onto your vehicle.
Severe weather conditions such as rain, snow, fog, or haze.
Navigating on wet roads.
It is not recommended to use the LDW system for special or complex road conditions, as that may
cause it to malfunction or automatically exit. Such conditions include but are not limited to:
Water, mud, potholes, snow, ice, speed bumps, or obstacles on the road.
Large numbers of pedestrians, bicycles, or animals on the road.
Complex and varied traffic conditions, such as busy intersections, expressway ramps, and
congested roads.
Winding roads and sharp turns.
Uphill or downhill roads.
Bumpy roads.
Narrow roads
Tunnel entrances and exits.
Non-standard roads
Roads without a median
Lane Keeping Assist (LKA)
When your vehicle drifts out of the lane or shows a tendency to do so, Lane Keeping Assist (LKA)
will briefly assist the driver in controlling the steering wheel to guide the vehicle back into the lane and
provide visual, auditory, or steering wheel vibration alerts to the driver.
The LKA system includes:
Warning: When the vehicle unintentionally drifts towards
another lane or is about to cross a lane marking, LKA will issue suitable visual, auditory, and steering
wheel vibration warnings
Warning & Lane Correction: When the moving vehicle tends to
drift towards an adjacent lane or is about to cross lane markings, LKA will apply a slight corrective
Steering Assist to the steering wheel to reduce the possibility of lane deviation. If the vehicle
deviates too much from the lane, LKA can provide appropriate visual and auditory warnings
WarningLKA can only provide some steering assistance and cannot control the vehicle speed.
LKA is unable to continuously control the direction of the vehicle, i.e. it is unable to keep the
vehicle in the middle of the lane.
LKA can only provide some steering assistance and cannot control the vehicle speed.
LKA is unable to continuously control the direction of the vehicle, i.e. it is unable to keep
the vehicle in the middle of the lane.
WarningLKA has limited steering force and can only provide slight steering assistance to
prevent the vehicle from deviating from the lane completely. Therefore, do not rely on LKA for steering,
always be prepared to increase your steering effort, especially in curves. Take over the steering wheel
immediately if you need to turn, turn around, or pass through winding or sharp roads.
LKA has limited steering force and can only provide slight steering assistance to prevent the
vehicle from deviating from the lane completely. Therefore, do not rely on LKA for steering, always be
prepared to increase your steering effort, especially in curves.
Take over the steering wheel immediately if you need to turn, turn around, or pass through
winding or sharp roads.
WarningLane Keeping Assist, as a driver assistance function, cannot handle all traffic,
weather and road conditions. LKA is for reference only and cannot replace your visual inspection. You
must always pay attention to traffic conditions and the road environment, and decide whether to use LKA
when it is safe to do so.
Lane Keeping Assist, as a Driver Assist feature, cannot handle all traffic, weather and road
conditions.
Lane Keeping Assist is for reference only and cannot replace your visual inspection. You must
always pay attention to traffic conditions and the road environment, and decide whether to use LKA when
it is safe to do so.
When using Lane Keeping Assist, stay prepared to take over your vehicle if you find
surrounding traffic, road conditions or vehicle unsuitable for use, or if there are other unsafe
factors.
You always have the ultimate responsibility to keep your vehicle safe in the lane and in
compliance with applicable road traffic safety laws and regulations.
The following behaviors are prohibited when driving:
Relying solely on the Lane Keeping Assist.
Using the Lane Keeping Assist in bad weather conditions.
Using the Lane Keeping Assist on special roads.
Hands off the steering wheel.
Eyes off the road.
Enabling/Disabling LKA
To enable or disable this feature, go to the settings interface on the Center Display,
tapDriver Assistance > Lane Departure Warning and Assist> Assist Level: Warning
& Lane Correction.
When enabled, you can customise the sensitivity:
Alert level
Warning: provides alerts only.
Warning & Lane Correction: provides an alert and a slight Steering Assist.
Warning type:
Default configuration is on visual and audio.
Sensitivity:
Low: alerts later than normal sensitivity under the same conditions.
Medium: normal sensitivity.
High: alerts earlier than normal sensitivity under the same conditions.
Caution 请您务必审慎设置提醒方式与灵敏度,确保该等设置符合您的驾驶习惯。
Set your alert methods and sensitivity carefully to ensure they align with your driving
habits.
Operating Conditions for LKA:
Your vehicle speed is about 50-130 km/h.
Your vehicle drives normally without suddenly accelerating, decelerating or steering.
Your vehicle is in the center of its lane and does not drive on the lane markings.
The lane markings on at least one side are clear.
The high-definition camera works normally and provides clear vision.
No components of the LKA system are faulty.
Your vehicle meets all safety conditions, such as:
The driver is seated.
Your vehicle is in D gear.
The anti-lock brake, traction control, and vehicle stability control systems are not
triggered.
The traction control and vehicle stability control systems are not manually disabled.
CautionLane Keeping Assist does not alert or control when the turn signals are turned on
and the vehicle deviates to the appropriate side.
Lane Keeping Assist does not alert or control when the turn signals are turned on and the
vehicle deviates to the appropriate side.
Dynamic Environment Simulation and Display (ESD)
LKA status icon:
No icon: not enabled;
Gray icon: standby status;
White lane markings: The lane markings of that side have been detected.
Yellow lane markings: Level 1 Lane Keep Assist.
Red lane markings: Level 2 Lane Keep Assist.
Lane marking display:
No status icon: The LKA system is not enabled;
The status icon is gray: The LKA system is enabled, in standby status, and not activated
yet;
The status icon and the central lane markings are white: The LKA system is active.
The status icon and one side of the central lane markings are red:
When "Warning" is selected, it indicates a risk of accidental departure from the lane
on the corresponding side.
When "Warning & Lane Correction" is selected, it indicates that the vehicle has
deviated from the lane unexpectedly, and LKA is no longer able to keep the vehicle in the lane
through a slight Steering Assist.
The status icon and one side of the central lane markings are yellow: only occurs when
Warning & Lane Correction is selected; indicates that LKA is providing a degree of Steering Assist
on the corresponding side to reduce the possibility of the vehicle deviating from the lane.
The Dynamic Environment Simulation and Display (ESD) is only for illustrative purposes and
cannot fully reflect actual traffic conditions. Therefore, do not rely on the content displayed from
the ESD.
Precautions and Restrictions
Some situations may cause the LKA system to malfunction or automatically exit. They include but
are not limited to:
The vehicle navigating sharp curves.
Unclear, worn, missing, overlapping lane markings or them being obscured by shadows cast by
other vehicles, buildings or landscape features.
No lane lines on a road section, such as non-standard roads, intersections, or construction
areas.
Passing through road sections with special lane markings, such as speed reduction markings
and channelizing line markings.
Vaguely divided lane lines, such as merging or diverging lanes, expressways, urban
intersections, or left-turn waiting areas.
There are edges or other high-contrast lines on the road instead of lane lines, such as
road joints or curbs.
Lane markings cannot be or are incorrectly identified due to changes in height, such as on
sloped roads;
Lane markings cannot be recognized or are not recognized correctly due to light, such as
reflection of lane markings caused by strong light, poor visibility or insufficient light caused by
bad weather and/or at night.
The distance between lane markings on both sides is too wide or too narrow;
Some situations may cause the LKA system to malfunction or automatically exit due to a camera
failure. They include but are not limited to:
The position of the camera has been changed.
The camera is obstructed or blocked. The camera lens is contaminated with a variety of
foreign substances, including water, dust, micro-scratches, oil sludge, dirt, wipers, ice, and snow.
Sudden changes in ambient brightness, such as at tunnel entrances or exits. Or the bright
light interferes with the camera's view.
Reduced detection capability due to dim surroundings, such as at dawn, dusk, night, or in a
tunnel.
Large shadows are cast by buildings, landscapes, or large vehicles.Exhaust gas, water
spray, snow, or dust stirred up by a vehicle ahead that falls onto your vehicle.
Severe weather conditions such as rain, snow, fog, or haze.
Navigating on wet roads.
Use of the LKA system is not recommended for special or complex road conditions, as that may
cause the LKA system to malfunction or automatically exit. Such conditions include but are not limited to:
Water, mud, potholes, snow, ice, speed bumps, or obstacles on the road.
Large numbers of pedestrians, bicycles, or animals on the road.
Complex and varied traffic conditions, such as busy intersections, expressways, and
congested roads.
Winding roads and sharp turns.
Uphill or downhill roads.
Bumpy roads.
Narrow roads.
Tunnel entrances and exits.
Non-standard roads.
Roads without a median.
Warning如遇极端恶劣天气(包括但不限于雨、雪、雾、霾等),不建议使用此功能。
It is not recommended to use this feature in the event of extreme weather conditions (such
as rain, snow, fog, haze, etc.).
The above warnings, precautions, and restrictions do not cover all situations that may affect
the normal operation of the LKA system. Many factors may interfere with the LKA system. To prevent
accidents, be sure to always drive attentively and focus on traffic, road, and vehicle conditions. Drive
with caution.
Emergency Lane Keeping (ELK)
Emergency Lane Keeping (ELK) can provide some degree of Steering Assist to help the driver
correct the vehicle position urgently to prevent collision as much as possible when the vehicle deviates
from its lane involuntarily or when there is a risk of side collision from its adjacent lane.
When the vehicle speed is about 50-130 km/h, ELK may be triggered in the following four emergency
scenarios:
When your turn signal light is off, your vehicle deviates involuntarily from its lane to the
road curb.
When your turn signal light is off and the lane marking is a solid line, your vehicle
deviates involuntarily from its lane to the side where the solid line is.
When your turn signal light is off and there is an oncoming vehicle in your left lane, your
vehicle deviates involuntarily from its lane to the left.
When there is a vehicle approaching rapidly from behind in your left lane, your vehicle
deviates from its lane involuntarily or actively switches to the left lane.
Enabling/Disabling ELK
Go to the Settings interface from the bottom of the Center Display, and tap Driver Assistance> Emergency Lane Keeping to turn this feature on or off.
It is not recommended to turn off this feature. When turned off, it will not be able to assist
the driver by taking emergency control of the steering when there is risk of a side collision.
The vehicle may not be entirely prevented from drifting out of its lane or avoiding dangers
by the limited steering torque of ELK, which only offers modest corrective steering assistance. Please
take timely control of your vehicle's direction rather than relying on the ELK for steering control.
Please take over the steering immediately when cornering, turning around, and driving on
winding roads or roads with sharp curves.
As a driving assist feature, ELK cannot handle all situations in all traffic, weather and
road conditions. It may become ineffective, inappropriate or untimely due to a number of factors.
You must pay attention to the traffic and road conditions at all times, and never depend on
ELK to ensure your safety. For safety reasons, never intentionally or actively trigger ELK to test this
feature. If you come across a dangerous situation, never wait for ELK to intervene before taking action.
You always bear the ultimate responsibility for keeping your vehicle in its lane and should abide by the
current traffic laws and regulations.
Warning 驾驶时不可以有以下行为:完全依靠ELK
The following behaviors are prohibited when driving:
Relying solely on ELK;
Hands off the steering wheel; or
Eyes off the road.
Operating Conditions of ELK:
Your vehicle speed is about 50-130 km/h.
Your vehicle drives normally without sudden acceleration, deceleration or steering.
Your vehicle is in the center of its lane and does not drive on the lane markings.
The high-definition camera works normally and provides clear vision.
No components of the Lane Keeping Assist system are faulty.
Your vehicle meets all safety conditions, such as:
The driver is seated.
Your vehicle is in DRIVE (D).
The anti-lock brake system, traction control system and vehicle stability control system
are not triggered.
ELK can be activated automatically in emergency situations when certain requirements are met.
ELK only provides some steering assistance and does not regulate the vehicle speed.
ELK is unable to maintain constant vehicle direction control, which means it cannot maintain
the vehicle always in the center of the lane.
When ELK controls your steering, the steering wheel will turn accordingly.
You can take control of the vehicle by manually turning the steering wheel. In this case, the
direction of the vehicle will be under your control.
ELK in Case of Deviation to Road Curb
When the operating conditions of ELK are met, it can provide a certain degree of Steering
Assist if your vehicle deviates from its lane involuntarily to the right curb when the turn signal light
is off. At this time, the corresponding side of the central lane marking will be displayed in yellow.
The following conditions may cause the vehicle to drift towards the right roadside, and the
Emergency Lane Keeping may not operate as intended or cancel automatically, so regulate the vehicle's
direction in a timely manner. These conditions include, but are not limited to:
The roadside is unclear or the roadside markings are not properly recognized due to
factors such as reflection caused by strong light, poor visibility or insufficient light caused by
bad weather and/or at night;
The presence of obstacles such as fences, guardrails, traffic cones or poles alongside
the road may prevent the ELK from responding; or
When encountering sharp bends, uphill or downhill slopes, bumpy surfaces, waterlogged
areas, ice or snow-covered roads.
ELK in Case of Deviation to Solid Lane Marking
When the operating conditions of ELK are met, it can provide a certain degree of Steering
Assist if your vehicle deviates from its lane involuntarily to a solid lane marking when the turn signal
light is off. At this time, the corresponding side of the central lane marking will be displayed in red.
The following conditions may cause the vehicle to veer toward the lane marking on the solid
side of the road, and the Emergency Lane Keeping may not operate as intended or cancel automatically,
so regulate the vehicle's direction in a timely manner. These conditions include, but are not limited
to:
Lane markings are unclear, worn, missing, overlapping or obscured by shadows cast by
other vehicles, buildings or landscape features;
The distance between lane markings on both sides is too wide or too narrow;
There are special lane markings;
Lane markings cannot be or are incorrectly identified due to changes in height, such as
on sloped roads;
Lane markings cannot be recognized or are not recognized correctly due to light, such
as reflection of lane markings caused by strong light, poor visibility or insufficient light
caused by bad weather and/or at night; or
When encountering sharp bends, uphill or downhill slopes, bumpy surfaces, waterlogged
areas, ice or snow-covered roads.
ELK in Case of Oncoming Vehicle
When the operating conditions of ELK are met, it can provide a certain degree of Steer Assist
if your vehicle deviates from its lane involuntarily to the left when the turn signal light is off, there
is an oncoming vehicle in your left lane, and the lane marking is clear. At this time, the left side of
the central lane marking will be displayed in red.
The following conditions may cause frontal collision to the left, and the Emergency Lane
Keeping may not operate as intended or cancel automatically, so regulate the vehicle's direction in a
timely manner. These conditions include, but are not limited to:
Lane markings are unclear, worn, missing, overlapping or obscured by shadows cast by
other vehicles, buildings or landscape features;
The distance between lane markings on both sides is too wide or too narrow;
There are special lane markings;
Lane markings cannot be or are incorrectly identified due to changes in height, such as
on sloped roads;
Lane markings cannot be recognized or are not recognized correctly due to light, such
as reflection of lane markings caused by strong light, poor visibility or insufficient light
caused by bad weather and/or at night; or
When encountering sharp bends, uphill or downhill slopes, bumpy surfaces, waterlogged
areas, ice or snow-covered roads; or
Among the approaching vehicles are motorcycles and other non-vehicle types.
ELK in Case of Overtaking Vehicle
When the operating conditions of ELK are met, it can provide a certain degree of Steering
Assist if your vehicle deviates from its lane involuntarily or actively switches to the left lane when
there is a vehicle approaching rapidly from behind in the left lane and the lane marking is clear. At this
time, the left side of the central lane marking will be displayed in red.
The following conditions may cause rear-end collision to the left, and the Emergency Lane
Keeping may not operate as intended or cancel automatically, so regulate the vehicle's direction in a
timely manner. These conditions include, but are not limited to:
Lane markings are unclear, worn, missing, overlapping or obscured by shadows cast by
other vehicles, buildings or landscape features;
The distance between lane markings on both sides is too wide or too narrow;
There are special lane markings;
Lane markings cannot be or are incorrectly identified due to changes in height, such as
on sloped roads;
Lane markings cannot be recognized or are not recognized correctly due to light, such
as reflection of lane markings caused by strong light, poor visibility or insufficient light
caused by bad weather and/or at night; or
When encountering sharp bends, uphill or downhill slopes, bumpy surfaces, waterlogged
areas, ice or snow-covered roads.
Precautions and Restrictions
Some situations may cause ELK to malfunction or exit automatically due to a camera failure, in
which case please steer your vehicle in a timely manner. These situations include but are not limited to:
The position of the camera has been changed.
The camera is obstructed or blocked. The camera lens is contaminated with a variety of
foreign substances, including water, dust, micro-scratches, oil sludge, dirt, wipers, ice, and snow.
Sudden changes in ambient brightness, such as at tunnel entrances or exits. Or the bright
light interferes with the camera's view.
Reduced detection capability due to dim surroundings, such as at dawn, dusk, night, or in a
tunnel.
Large shadows are cast by buildings, landscapes, or large vehicles.Exhaust gas, water
spray, snow, or dust stirred up by a vehicle ahead that falls onto your vehicle.
Severe weather conditions such as rain, snow, fog, or haze.
Navigating on wet roads.
Some situations may cause ELK to malfunction or exit automatically due to a radar failure, in
which case please steer your vehicle in a timely manner. These situations include but are not limited to:
The radars being misplaced, blocked or covered with dirt, ice, snow, metal plates, tape,
labels, leaves or other obstructions;
The radars or the surrounding areas being impacted by collisions or scratches;
Rain, snow, fog, haze, and other extreme weather which may impair radar performance; and
Due to the limitations of radar detection function, in very rare and specific situations,
false warnings may occur due to certain metal fences, median strips, concrete walls, and other similar
objects.
Some situations may lead to a LiDAR failure, affecting ELK performance and even causing it to
exit. These situations include but are not limited to:
Severe weather conditions, such as rain, snow, fog, or haze, may also affect the
performance of LiDAR.
Exhaust gas, water spray, snow, or dust stirred up by the vehicle ahead.
The presence of water, dust, micro-scratches, oil sludge, dirt, ice, snow, tinted or
transparent film, or other obstructions on the LiDAR lens.
Driving on wet or waterlogged roads.
Exhaust gas, water spray, snow or dust stirred up by the vehicle ahead.
Overheating of the LiDAR caused by prolonged sun exposure.
Due to the limitation of LiDAR characteristics, in rare special cases, false alarms may
occur for traffic signs and high-speed anti-collision barrels in high-speed or elevated sections.
Special or complex road conditions may cause the ELK system to malfunction or exit
automatically, in which case please steer your vehicle in a timely manner. These situations include but
are not limited to:
Water, mud, potholes, snow, ice, speed bumps, or obstacles on the road.
Large numbers of pedestrians, bicycles, or animals on the road
Complex and varied traffic conditions, such as busy intersections, expressway ramps, and
congested roads.
Winding roads and sharp turns.
Uphill or downhill roads.
Bumpy roads.
Narrow roads
Tunnel entrances and exits.
Construction areas.
The above warnings, precautions, and restrictions do not cover all situations that may affect
the normal operation of the ELK system. Many factors may interfere with the ELK system. To prevent
accidents, be sure to always drive attentively and focus on traffic, road, and vehicle conditions. Drive
with caution.
Blind Spot Detection (BSD)
Blind Spot Detection (BSD) reminds you to pay attention to lane change safety through visual,
auditory and vibration alerts when there are other vehicles in the blind spot of your vehicle or other
vehicles approaching quickly in the blind spot.
BSD will only be activated when the speed of your vehicle exceeds 15 km/h.
Caution盲点监控与变道预警的监测区域为爱车旁边车道,及其向后约70米的范围。
This feature is able to detect the lanes next to the vehicle and more than 70 meters from
the rear.
Go to the Settings interface on the Center Display, and tap Driver
Assistance > Blind Spot Detection to enable or disable this feature and select an appropriate
reminder method.
When the feature is enabled and activated, the Dynamic Environment Simulation and Display (ESD)
will remind you when there is a vehicle approaching from behind as shown in the image.
When a vehicle in the driver's blind spot or a vehicle approaching rapidly from behind is
detected, a marker indicating a vehicle on the side will be displayed on the side mirrors. If you activate
the turn signal for that side in this case, it will remind you not to change lanes with the following
warnings:
Marker light on the side mirror flashes;
Sound + Marker light on the side mirror flashes;
Steering wheel vibrates + Marker light on the side mirror flashes;
Sound + Steering wheel vibrates + Marker light on the side mirror flashes.
The Dynamic Environment Simulation and Display (ESD) is only for illustrative purposes and
cannot fully reflect actual traffic conditions. Therefore, do not rely on the content displayed from the
ESD.
When you drive on a road with sharp curves, wide lanes or an uneven surface,Blind Spot
Detection may not be able to warn you about vehicles in adjacent lanes.
Blind Spot Detection may give false warnings in the following situations:
Driving near protective fences.
Driving on or under a bridge or tunnel.
Driving alongside bushes and trees, etc.
Driving on the roadside with wires, street lights or low walls.
Driving near construction areas such as factory buildings, ports, etc.
Driving on urban roads or multi-lane intersections.
Radars are mounted on or behind the bumper. Keep the bumper clean and free of mud, ice,
metal plates, stickers, labels, and leaves. Failure to do so may impact the performance of the
radars.
If this feature does not function properly due to a collision, scratches, radar failure,
or malfunction, please contact NIO as soon as possible.
If the radar malfunctions for a long period of time and fails to receive any
fault-related alerts, please contact NIO as soon as possible.
This feature only detects and alerts you about vehicles and large motorcycles or objects,
and may have a delay or omission, or even fail to detect or alert you to objects such as
pedestrians, bicycles, or skateboards.
This feature does not alert you about stationary objects. False warnings may be generated
by certain metal fences, median strips, or concrete walls.
Heavy rain, snow, fog, and other extreme weather conditions may impair radar performance.
Please drive with caution, and pay attention to your surroundings.
Never use this feature in the Trailer Mode.
You always bear the ultimate responsibility for driving safely and complying with
applicable traffic safety laws and regulations.
Warning盲点监控不能取代安全驾驶及车内后视镜和车外后视镜的使用。
Even with Blind Spot Detection, you should still drive with caution and use the rearview
mirror and the side mirrors properly.
Warning如遇极端恶劣天气(包括但不限于雨、雪、雾、霾等),不建议使用此功能。
It is not recommended to use this feature in the event of extreme weather conditions (such as
rain, snow, fog, haze, etc.).
The above warnings, precautions, and restrictions do not cover all situations that may affect the
normal operation of the BSD system. Many factors may interfere with the BSD system. To prevent accidents, be
sure to always drive attentively and focus on traffic, road, and vehicle conditions. Drive with caution.
Door Open Warning (DOW)
When you open the door of your vehicle, if vehicles, cyclists, or pedestrians approaching from
behind may pose a safety risk to the door opening or even cause a collision, Door Open Warning (DOW) will
remind you to be careful through visual and auditory alerts.
Go to the Settings interface on the Center Display, and tap Driver
Assistance > Door Open Warning to enable or disable this feature.
When the DOW feature is enabled, your vehicle will remind you in the following ways. At this
time, you or your passengers should avoid opening the door and check whether it is safe to open the door
first:
The ambient light turns red.
The icon on the side mirror lights up.
Alert sounds.
Dynamic Environment Simulation and Display (ESD) displays "Vehicles from behind".
Note 侧方开门预警可监测本车侧后方快速接近的目标。
Door Open Warning monitors for targets approaching fast from behind.
Caution爱车处于前进挡(D 挡)或驻车挡(P 挡),该功能才可启用。
This feature is only available when the vehicle is in DRIVE (D) or PARK (P).
Door Open Warning cannot accurately alert you in all situations and cannot replace active
observation by you and passengers, as well as the function of the rearview mirror and side mirrors.
Please do not rely excessively on this feature and always be aware of the environment outside the
vehicle when opening doors.
Radars are mounted on or behind the bumper. Keep the bumper clean and free of mud, ice,
metal plates, stickers, labels, and leaves. Failure to do so may impact the performance of the radars.
If this feature does not function properly due to a collision, scratches, radar failure, or
malfunction, please contact NIO as soon as possible.
If the radar malfunctions for a long period of time and fails to receive any fault-related
alerts, please contact NIO as soon as possible.
This feature only detects and alerts you about vehicles and large motorcycles or objects,
and may have a delay or omission, or even fail to detect or alert you to objects such as pedestrians,
bicycles, or skateboards.
This feature does not alert you about stationary objects. False warnings may be generated
by certain metal fences, median strips, or concrete walls.
Heavy rain, snow, fog, and other extreme weather conditions may impair radar performance.
Please drive with caution, and pay attention to your surroundings.
Never use this feature in the Trailer Mode.
You always bear the ultimate responsibility for driving safely and complying with
applicable traffic safety laws and regulations.
Warning如遇极端恶劣天气(包括但不限于雨、雪、雾、霾等),不建议使用此功能。
It is not recommended to use this feature in the event of extreme weather conditions (such as
rain, snow, fog, haze, etc.).
The above warnings and precautions do not cover all situations that may affect the normal
operation of the DOW system. Many factors may interfere with the DOW system. To prevent accidents, be sure
to always drive attentively and focus on traffic, road, and vehicle conditions. Drive with caution.
Rear Cross Traffic Alert (RCTA)
When reversing, if the system detects a collision risk with a rear-crossing vehicle, the Rear
Cross Traffic Alert (RCTA) feature can warn the driver through visual and auditory alerts and even enhance
the warning to the driver by braking briefly if necessary.
Rear Cross Traffic Alert only provides a warning and cannot guarantee to stop your vehicle.
Never depend on it to avoid a collision or reduce the impact of a collision.
Go to the Settings interface on the Center Display, and tap Driver
Assistance > Rear Cross Traffic Alert to enable or disable this feature.
When it is enabled, you can select the assist level in the RCTA settings:
Warning: When the vehicle speed is lower than 15km/h and the operating conditions are
satisfied, if a collision risk with a rear crossing vehicle is detected, it will warn you through
visual and auditory alerts on the digital instrument cluster, surround view interface and Parking
Assist interface.
Warning & Braking: When the vehicle speed is about 1-15 km/h and the operating
conditions are satisfied, besides visual and auditory alerts, the system will warn you actively
braking briefly if necessary, but cannot ensure that the vehicle will come to a complete stop.
Operating conditions for RCTA:
The speed of a rear-crossing vehicle is between 5 and 60 km/h.
The rear lateral radar operates normally and has a clear field of view.
The driver is seated.
All doors are closed.
Your vehicle is in REVERSE (R) gear.
Caution当您选择提醒及主动制动时,若深踩制动踏板或加速踏板,主动制动功能可能不会介入。
When you select Warning & Braking, if you fully press the brake pedal or accelerator
pedal, the function may not intervene.
The Dynamic Environment Simulation and Display (ESD) is only for illustrative purposes and
cannot fully reflect actual traffic conditions. Therefore, do not rely on the content displayed from
the ESD.
Precautions and Restrictions
Some targets may not be identified or may trigger a response, including but not limited to:
Motorcycles, electric bikes,tricycles, bicycles.
Pedestrians.
Animals.
Other non-vehicle objects.
Some targets will not trigger a response, including but not limited to:
Oncoming vehicles/vehicles driving in the same direction
RCTA does not respond to targets in blind spots of the sensor, and cannot detect vehicles
behind through obstacles or parked vehicles.
RCTA cannot detect rear crossing vehicles in situations including but not limited to:
When the vehicle is parked in the innermost position.
When the parking space is at an angle.
Some situations may lead to a radar detection failure that affects the performance of RCTA.
They include but are not limited to:
The radars being misplaced, blocked or covered with dirt, ice, snow, metal plates, tape,
labels, leaves or other obstructions.
The radars or the surrounding areas are being impacted by collisions or scratches.
Rain, snow, fog, haze, and other extreme weather which may impair radar performance.
Due to the limitations of radar detection functions, in very rare and specific situations,
false warnings may occur due to certain metal fences, median strips, concrete walls, and other similar
objects.
Warning如遇极端恶劣天气(包括但不限于雨、雪、雾、霾等),不建议使用此功能。
It is not recommended to use this feature in the event of extreme weather conditions (such
as rain, snow, fog, haze, etc.).
The above warnings, precautions, and restrictions do not cover all situations that may affect
the normal operation of the RCTA system. Many factors may interfere with the RCTA system. To prevent
accidents, be sure to always drive attentively and focus on traffic, road, and vehicle conditions. Drive
with caution.
Advanced Driver Monitoring System (ADMS)
Advanced Driver Monitoring System (ADMS) monitors the driving status with an in-vehicle camera
while the vehicle is in motion.
When it is enabled and activated, once the in-vehicle camera detects that the driver is drowsy or
distracted, NOMI will provide different levels of warnings through expressions and sounds. The instrument
cluster screen will also alert the driver simultaneously.
Advanced Driver Monitoring System cannot operate under all conditions and is only designed to
assist driving. The driver should always bear the ultimate responsibility for driving safely.
Therefore, it is of great importance that you pay attention when driving and take regular
breaks. When a driver is alerted or feels fatigued, they should adjust their behavior or pull over
safely as soon as possible to take a break.
When the ADMS is disabled, related features for advanced driver assistance systems such as Lane
Centering Control (LCC/Pilot) and Adaptive Cruise Control (ACC) will be unavailable or exited.
After the driver adjusts the steering wheel, the feature requires a brief recalibration, during
which the fault indicator for the ADMS may light up.
Enabling/Disabling the Driver Drowsiness or Driver Distraction Warning System
The ADMS monitors the driver's drowsiness and distraction state.
Drowsiness Warning
Distraction Warning
Go to the Settings interface on the Center Display and tap Driver
Assistance > Drowsiness Warning or Distraction Warning to
enable or disable this feature.
After this feature is enabled, when the vehicle speed is 20 km/h or above, the system will keep
monitoring the statuses and provide sound or voice warnings.
Dynamic Environment Simulation and Display (ESD)
Level 1 alarm (with the Distraction Warning feature as an example)
Level 2 alarm (with the Distraction Warning feature as an example)
If the driver still does not take control of the vehicle after a Level 2 alarm, the
Emergency Active Stop (EAS) will be activated and triggered when the normal working conditions of the
system are met.
When the following are displayed due to a deliberate obstruction of the camera, it
indicates that the feature is limited. Please clean the camera or contact the NIO Service Center
promptly.
When the following are displayed due to a system failure, it indicates that the feature is
limited. Please contact the NIO Service Center promptly.
Caution 摄像头不会记录或共享图像、音频或视频。
The camera does not capture or distribute photos, audio or videos.
Precautions and Restrictions
In some cases, detection of driver fatigue and distractedness may be affected or fail,
resulting in the system not providing corresponding warnings, being partially unavailable, or issuing
false alarms. Such situations include:
Nighttime or dim light.
Sunlight, opposite headlights and other direct light interference.
The driver is adjusting seats, or adjusting or turning the steering wheel.
When the driver's eyes are covered, including but not limited to wearing various types of
dark glasses with low transmittance, polarizers, sunglasses, and blockage by eyeglass frames.
The driver wears hats, scarves, bandanas, or other accessories that may alter the shape of
their head.
The driver wearing a mask or other accessories that cover their face. The driver should
ensure their face is not covered, for accurate detection of fatigue or distractedness.
Warning如遇极端恶劣天气(包括但不限于雨、雪、雾、霾等),不建议使用此功能。
It is not recommended to use this feature in the event of extreme weather conditions (such
as rain, snow, fog, haze, etc.).
The above warnings, precautions, and restrictions do not cover all situations that may affect
the normal operation of the ADMS. Many factors may interfere with the ADMS. To prevent accidents, be sure
to always drive attentively and focus on traffic, road, and vehicle conditions. Drive with caution.
Emergency Active Stop (EAS)
When the system detects that you are not in a normal driving state (e.g., your hands have not
been on the steering wheel for a long time, you have been distracted and tired from driving for a long time,
or you have left your seat, etc.), it will activate the Emergency Active Stop (EAS) feature if the system
meets the conditions for normal operation.
When EAS is activated, your vehicle will sound an auditory warning, provide a voice warning,
issue a Dynamic Environment Simulation and Display (ESD) alert, and turn on the hazard warning lights. The
system will alert you to take control of your vehicle by continuously braking and emitting loud alerts until
the vehicle stops. After stopping, the doors will be automatically unlocked and emergency rescue will be
called.
When EAS is active, you can deactivate it and take control of your car at any time by stepping on
the accelerator pedal or brake pedal, turning the steering wheel, or turning off the hazard warning lights.
Precautions and Restrictions
Some situations may lead to a camera failure that affects the performance of EAS. They include
but are not limited to:
The position of the camera has been modified.
The camera is obstructed or blocked. The camera lens is contaminated with a variety of
foreign substances, including water, dust, micro-scratches, oil sludge, dirt, wipers, ice, and snow.
Sudden changes in ambient brightness, such as at tunnel entrances or exits. Or the bright
light interferes with the camera's view.
Reduced detection capability due to dim surroundings, such as at dawn, dusk, night, or in a
tunnel.
Large shadows are cast by buildings, landscapes, or large vehicles.Exhaust gas, water
spray, snow, or dust stirred up by a vehicle ahead that falls onto your vehicle.
Severe weather conditions such as rain, snow, fog, or haze.
Navigating on wet roads.
Some situations may lead to a radar failure that affects the performance of EAS. They include
but are not limited to:
The radars are misplaced, blocked or covered with dirt, ice, snow, metal plates, tape,
labels, leaves or other obstructions.
The radars or the surrounding areas are impacted by collisions or scratches;
Extreme weather such as heavy rain, snow, fog, which may affect radar performance.
Due to the limitation of radar detection functions, in rare special circumstances, false
alarms may occur for some metal barriers, green belts, cement walls, etc.
Some situations may lead to a LiDAR failure that affects EAS performance or even deactivates
the feature. They include but are not limited to:
Severe weather conditions, such as rain, snow, fog, or haze, may also affect the
performance of LiDAR.
Exhaust gas, water spray, snow, or dust stirred up by the vehicle ahead.
The presence of water, dust, micro-scratches, oil sludge, dirt, ice, snow, tinted or
transparent film, or other obstructions on the LiDAR lens.
Driving on wet or waterlogged roads.
Exhaust gas, water spray, snow or dust stirred up by the vehicle ahead.
Overheating of the LiDAR caused by prolonged sun exposure.
Due to the limitation of LiDAR characteristics, in rare special cases, false alarms may
occur for traffic signs and high-speed anti-collision barrels in high-speed or elevated sections.
EAS will only respond to vehicles that meet conditions. The below targets may not be detected
or may trigger a response, including but not limited to:
Side-crossing vehicles.
Motorcycles, tricycles.
Some targets will not trigger a response, including but not limited to:
This feature cannot guarantee the recognition of all special vehicles, especially at
night and in poorly lit environments, where extra caution is necessary. For example, vehicles with
obstructions at the rear, vehicles with irregular shapes, vehicles with a rear vertical surface
below a certain height, and unloaded commercial vehicles, among others.
The feature may have false negatives for stationary or slow-moving vehicles, especially
during nighttime, so extra caution is necessary.
In some situations where the target is not directly ahead, EAS may detect and respond to it
late. They include but are not limited to:
EAS will not respond to targets in blind spots of the sensor, such as those in blind spots
at the corners and sides of the vehicle.
When approaching or turning along a road, some targets may be wrongly selected or missed,
resulting in unexpected acceleration and deceleration of the vehicle.
The target may be lost or the distance to the target may be misjudged when the vehicle is
on a slope. When going downhill, EAS may accelerate the vehicle, causing it to exceed the cruising
speed.
When only part of the body of a vehicle in an adjacent lane cuts in front of your vehicle
(especially when it’s a larger vehicle such as a bus, truck, etc.), EAS may not recognize and respond
to the target.
When your vehicle abruptly cuts into the rear of a vehicle ahead, or another vehicle
abruptly cuts into or out of the front of your vehicle, EAS may not recognize the target in a
responsive manner.
EAS does not guarantee reliable target recognition in all circumstances, as its operation may
be affected by special or complicated road conditions, including but not limited to:
Water, mud, potholes, snow, ice, speed bumps, or obstacles on the road.
Large numbers of pedestrians, bicycles, or animals on the road.
Complex and varied traffic conditions, such as busy intersections, expressways, and
congested roads.
Winding roads and sharp turns.
Uphill or downhill roads.
Bumpy roads.
Narrow roads.
Tunnel entrances and exits.
Non-standard roads.
Roads without a median.
It may not be able to provide sufficient lateral grip in the following situations, including
but not limited to:
The brake feature cannot fully work (such as when brake parts are too cold, too hot, wet,
etc.)
Improper vehicle maintenance (excessive wear of the brake or tires, abnormal tire pressure,
etc.)
The vehicle is driving on special road surfaces (such as uphill and downhill, roads with
water, mud, potholes, ice, snow, etc.)
Warning如遇极端恶劣天气(包括但不限于雨、雪、雾、霾等),不建议使用此功能。
It is not recommended to use this feature in the event of extreme weather conditions (such
as rain, snow, fog, haze, etc.).
The above warnings, precautions, and restrictions do not cover all situations that may affect
the normal operation of the EAS system. Many factors may interfere with the EAS system. To prevent
accidents, be sure to always drive attentively and focus on traffic, road, and vehicle conditions. Drive
with caution.
Adaptive Cruise Control (ACC)
Adaptive Cruise Control (ACC) can be used to sync your vehicle speed automatically with the speed
of a lead vehicle. When there is no target in front of your vehicle to respond to, your vehicle will drive
at the set cruise speed. When there is a target to respond to, your vehicle will automatically control its
speed to try to maintain the following distance you set.
ACC manages the vehicle's speed and distance. This system allows your vehicle to follow a lead
vehicle until it stops if certain deceleration conditions are met. If the lead vehicle moves away shortly
after stopping, your vehicle can automatically start and follow.
ACC is mainly applicable to long-distance driving on dry and smooth standardized straight roads,
such as highways, expressways, and long straight roads.
Adaptive Cruise Control is a Driver Assist Feature and cannot address all traffic, weather,
and road situations.
Adaptive Cruise Control can only control your vehicle's speed and not its direction.
To protect your safety, you must always pay attention to the traffic and road conditions and
decide for yourself whether to activate Adaptive Cruise Control. When utilizing the Adaptive Cruise
Control system, you should always be ready to take control of the vehicle if you discover that the road,
the traffic, the state of the vehicle, or any other risky factor makes it unsafe for you to utilize this
feature. You always bear the ultimate responsibility for keeping your vehicle at an appropriate distance
and speed and should abide by the current traffic laws and regulations.
Adaptive Cruise Control is a comfort feature and not a collision-proof feature, so its
maximum deceleration is limited to less than the maximum deceleration that can be requested during
Autonomous Emergency Braking and manual driving. Therefore, do not rely on Adaptive Cruise Control to
slow your vehicle down sufficiently to avoid collisions.
If your vehicle speed is too high relative to the lead vehicle, such as if the lead vehicle
is stationary or moving slowly, Adaptive Cruise Control may not be able to bring your vehicle to a
complete stop or maintain a safe distance. In this case, please intervene manually to brake your vehicle
immediately. Do not attempt to rely on Adaptive Cruise Control to bring your vehicle to a complete stop
behind the stationary vehicle or stop following the lead vehicle.
Enabling ACC
Enter the Settings interface on the Center Display, tapDriver
Assistance and choose Adaptive Cruise Control to select this
feature. To activate or deactivate ACC, press the middle button on the left side of the steering wheel.
You can control the ACC feature with buttons on the left side of the steering wheel.
Middle button :
activates or exits ACC
Up button: increases or resumes the cruising speed.
Down button: decrease the cruising speed.
Left button: decrease the following distance.
Right button: increases the following distance
When the operating conditions of ACC are met, press the Middle button on the left side of the
steering wheel to activate ACC.
ACC can be enabled at a vehicle speed of 0-180 km/h.
If the vehicle speed is lower than 10 km/h, the cruising speed will be set at 10 km/h.
If the vehicle speed is higher than 10 km/h without exceeding 180 km/h, the current vehicle
speed will be set as the cruising speed.
When ACC is activated, you can release the accelerator to maintain the set cruising speed.
If there is a lead vehicle, ACC will adjust the speed of your vehicle according to the
speed and distance of the lead vehicle without exceeding the cruising speed.
If there is no vehicle ahead, ACC will quickly adjust the speed of your vehicle to the
cruising speed.
When driving with ACC, you can press the accelerator at any time to take over your vehicle in a
short amount of time. At this time, ACC will no longer respond to any target lead vehicle, and your
vehicle will be completely under your control. When you release the accelerator, your vehicle will return
to the cruising speed.
When ACC actively accelerates your vehicle, the accelerator will not move. When ACC decelerates
your vehicle, the brake pedal may move.
After you exit ACC by pressing the Middle button on the left side of the steering wheel or depressing the brake pedal, you
can activate it again and restore the vehicle speed to the previously set cruising speed by pressing the
Up button on the left side of the steering wheel. If you press the Up button on the left side of the
steering wheel while pressing the accelerator, the current speed will be set as the cruising speed. The
maximum set speed is 180 km/h.
Operating Conditions of ACC:
The high-definition camera, LiDAR and radar work normally, with a clear field of vision.
No components of ACC are faulty.
Your vehicle meets all safety conditions, such as:
The driver is seated.
The driver’s hands are on the steering wheel.
The driver has fastened their seat belt.
All doors are closed.
Your vehicle is in DRIVE (D).
The driver does not step on the brake pedal.
The anti-lock brake system, traction control system and vehicle stability control
system are not triggered.
The feature cannot be activated when the steering angle of the steering wheel is too large.
When driving with this feature on, if the system detects that you are not in a normal
driving state (e.g., you are not holding the steering wheel for an extended period of time, you are
distracted and fatigued for an extended period of time, or you are out of your seat), it will activate
Emergency Active Stop when the normal operating conditions for the system are met.
Disabling ACC
ACC is deactivated in the following situations:
The steering wheel button is pressed.
The brake pedal is pressed.
In addition, when the conditions for ACC are not met, it will be automatically deactivated. You
can take control of the vehicle immediately after ACC is deactivated.
After ACC is deactivated, the vehicle may slow down due to regenerative braking, and will not
be able to maintain the set distance to a lead vehicle.
Adaptive Cruise Control may be exited unexpectedly due to unforeseen circumstances. Please
always pay attention to the traffic conditions and road environment, and be prepared to take control of
your vehicle at any time.
Adjusting ACC Speed
When ACC is active, go to the Settings interface on the Center Display, tap Driver Assistance> Cruise Speed Adjustment, and select the appropriate option
to adjust the cruising speed.
The available options are:
Short press for 1 km/h, long press for 5 km/h
Press the Up or Down button on the left side of the steering wheel to increase/decrease
the cruise speed by 1 km/h.
Press and hold the Up or Down button on the left side of the steering wheel to
increase/decrease the cruise speed to the closest 5 km/h increment. For example, if the speed is
80 km/h, press and hold the Up button on the left side of the steering wheel, and the speed will
increase to 85 km/h.
Short press for 5 km/h, long press for 1 km/h
Long press the Up or Down button on the left side of the steering wheel to
increase/decrease the cruise speed by 1 km/h.
Short pressthe Up or Down button on the left side of the steering wheel to
increase/decrease the cruise speed to the closest 5 km/h increment. For example, if the speed is
80 km/h, press the Up button on the left side of the steering wheel, and the speed will increase
to 85 km/h.
The maximum set speed for ACC is 180 km/h.
The minimum set speed for ACC is 10 km/h, but it allows the vehicle to decelerate to 0 km/h
when following a vehicle ahead.
To activate the feature for the first time, the default step is to short press for 1
km/h and long press for 5 km/h.
Cruising speed cannot be adjusted through NOMI.
Adjusting Following Time and Distance with ACC
When ACC is active or on standby, the following time and distance can be adjusted in 5 levels.
Press the Right button on the left side of the steering wheel to set the following time and
distance farther by one level.
Press the Left button on the left side of the steering wheel to set the following time and
distance closer by one level.
Caution当跟车时间距离被设置较近时,自适应巡航驾驶行为较为激烈,可能会引起不适。
When the set following time and distance to the lead vehicle is relatively short, the
driving behavior of Adaptive Cruise Control is intense and may cause discomfort.
Warning您有责任在任何时候确定并保持安全的跟车距离,请勿完全依靠自适应巡航保持车距。
You are responsible for ensuring and maintaining a safe distance to the lead vehicle at all
times. Do not rely solely on Adaptive Cruise Control to maintain vehicle distance.
Dynamic Environment Simulation and Display (ESD)
An intelligent driving status indicator light has been incorporated into the digital instrument
cluster, situated to the left of the real-time vehicle speed. This indicator light enables the user to
comprehend the features of intelligent driving that can be activated at this time and those that are
currently operational. Furthermore, the status of cruise speed in intelligent driving can be discerned.
Feature
Active state
To be activated
Loss of lateral control
Lane Centering Control
Adaptive Cruise Control
/
When Dynamic Environment Simulation and Display displays a warning to drive cautiously, it
means that there is a risk of collision because the maximum deceleration available to Adaptive Cruise
Control can no longer maintain a safe distance, and you need to take control of the brake pedal and
steering wheel immediately to control the speed and direction of the vehicle.
The Dynamic Environment Simulation and Display (ESD) is only for illustrative purposes and
cannot fully reflect actual traffic conditions. Therefore, do not rely on the content displayed from
the ESD.
Warning如您发现危险,切勿等待该警示出现再采取行动,请立刻接管车辆。
If you encounter a dangerous situation, do not wait for a warning before taking action and
take over immediately.
Adaptive Cruise Control cannot detect other traffic participants in all situations, as
this feature may fail, work improperly, or work with delay under the impact of multiple factors.
You must always pay attention to the traffic and road conditions. Never rely on Adaptive
Cruise Control to automatically start the vehicle to follow,, otherwise it may cause personal injury
or vehicle damage.
Intelligent Speed Assist
Once activated, when the vehicle detects new speed limit signs, it will alert you to manually
confirm adjusting cruise speed to the new speed limit.
Go to the Settings interface on the Center Display, and tap Driver
Assistance > Intelligent Speed Assist to turn this feature on or off.
Intelligent Speed Assist is only a supplement to, and does not function as a substitute
for, your visual observation. Never rely solely on the speed limit information recognized by Traffic
Sign Recognition.
When the speed of the vehicle exceeds the speed limit of the road, you will be visually
alerted of overspeed.
As a driving assist feature, Intelligent Speed Assist is not designed to handle all
situations in all traffic, weather, and road conditions. It is the driver's responsibility to pay
attention to traffic and road conditions and to decide whether to use Intelligent Speed Assist.
Intelligent Speed Assist does not work in complex road conditions such as ramps.
You always bear the ultimate responsibility for driving safely and complying with
applicable traffic laws and regulations.
Intelligent Speed Assist combines the speed limit information from the map and camera
to display the speed limit information on the digital instrument cluster. No speed limit
information will be displayed when no speed limit information source is available.
The Dynamic Environment Simulation and Display (ESD) is only for illustrative purposes and
cannot fully reflect actual traffic conditions. Therefore, do not rely on the content displayed from
the ESD.
Precautions and Restrictions
Some situations may lead to a camera failure, affecting the performance of ACC or even causing
to be deactivated. They include but are not limited to:
The position of the camera has been changed.
The camera is obstructed or blocked. The camera lens is contaminated with a variety of
foreign substances, including water, dust, micro-scratches, oil sludge, dirt, wipers, ice, and snow.
Sudden changes in ambient brightness, such as at tunnel entrances or exits. Or the bright
light interferes with the camera's view.
Reduced detection capability due to dim surroundings, such as at dawn, dusk, night, or in a
tunnel.
Large shadows are cast by buildings, landscapes, or large vehicles.Exhaust gas, water
spray, snow, or dust stirred up by a vehicle ahead that falls onto your vehicle.
Severe weather conditions such as rain, snow, fog, or haze.
Navigating on wet roads.
Some situations may lead to a LiDAR failure, affecting the performance of ACC or even causing
it to be deactivated. They include but are not limited to:
Severe weather conditions, such as rain, snow, fog, or haze, may also affect the
performance of LiDAR.
Exhaust gas, water spray, snow, or dust stirred up by the vehicle ahead.
The presence of water, dust, micro-scratches, oil sludge, dirt, ice, snow, tinted or
transparent film, or other obstructions on the LiDAR lens.
Driving on wet or waterlogged roads.
Exhaust gas, water spray, snow or dust stirred up by the vehicle ahead.
Overheating of the LiDAR caused by prolonged sun exposure.
Due to the limitation of LiDAR characteristics, in rare special cases, false alarms may
occur for traffic signs and high-speed anti-collision barrels in high-speed or elevated sections.
Some situations may lead to a radar failure, affecting the performance of ACC or even causing
it to be deactivated. They include but are not limited to:
The radars are misplaced, blocked or covered with dirt, ice, snow, metal plates, tape,
labels, leaves or other obstructions.
The radars or the surrounding areas are impacted by collisions or scratches;
Extreme weather such as heavy rain, snow, fog, which may affect radar performance.
Due to the limitations of radar detection functions, in very rare and specific situations,
false warnings may occur due to certain metal fences, median strips, concrete walls, and other similar
objects.
Only vehicles meeting conditions will trigger a response from ACC. Some targets may not be
detected or may trigger a response, including but not limited to:
Transverse vehicles
Motorcycles, tricycles
Some targets will not trigger a response, including but not limited to:
This feature cannot guarantee the recognition of all special vehicles, especially at
night and in poorly lit environments, where extra caution is necessary. For example, vehicles with
obstructions at the rear, vehicles with irregular shapes, vehicles with a rear vertical surface
below a certain height, and unloaded commercial vehicles, among others.
The feature may have false negatives for stationary or slow-moving vehicles, especially
during nighttime, so extra caution is necessary.
Some situations may cause late recognition and response of ACC because the target is not
directly ahead, including but not limited to:
ACC does not respond to targets in the sensor’s blind spots, such as those at the corners
and sides of the vehicle.
When approaching or turning along a road, some targets may be wrongly selected or missed,
resulting in unexpected acceleration and deceleration of the vehicle.
The target may be lost or the distance to the target may be misjudged when the vehicle is
on a slope. When going downhill, EAS may accelerate the vehicle, causing it to exceed the cruising
speed.
When only part of the body of a vehicle in an adjacent lane cuts in front of your vehicle
(especially when it’s a larger vehicle such as a bus, truck, etc.), it may not recognize the target in
a responsive manner, in which case you need to take over your vehicle in time.
When your vehicle abruptly cuts into the rear of a vehicle ahead, or another vehicle
abruptly cuts into or out of the front of your vehicle, it may not recognize the target in a
responsive manner, in which case you need to take over your vehicle in time.
This feature may accelerate your vehicle when no acceleration is required or planned by
you. This may be caused by a change or loss of a followed target (particularly during a turn or lane
change).
This feature may brake your vehicle when no braking is required or planned by you. This
may be caused by detection of a change or loss of a vehicle, object, or stationary target in an
adjacent lane (particularly during a turn or lane change).
When following a lead vehicle, if your vehicle or the lead vehicle swerves out of the
current lane, acceleration by this feature may be limited for a period of time due to safety
reasons. You can manually step on the accelerator to take over your vehicle.
This feature cannot guarantee accurate recognition of the target in all situations. If you
find that the display of "target lead vehicle" on the digital Instrument Cluster does not match the
actual situation, please take control of your vehicle in a timely manner. These scenarios include but
are not limited to:
There is actually a lead vehicle, but the digital Instrument Cluster does not display the
target vehicle.
There is actually no lead vehicle, but the digital Instrument Cluster shows a lead
vehicle.
When driving in special or complex road conditions, use of ACC is not recommended because it
may affect the performance of the feature or even cause it to be deactivated. Such conditions include but
are not limited to:
Water, mud, potholes, snow, ice, speed bumps, or obstacles on the road.
Large numbers of pedestrians, bicycles, or animals on the road.
Complex and varied traffic conditions, such as busy intersections, expressways, and
congested roads.
Winding roads and sharp turns.
Uphill or downhill roads.
Bumpy roads.
Narrow roads.
Tunnel entrances and exits.
Non-standard roads.
Roads without a median.
In some situations, if the vehicle speed is too high relative to a lead vehicle, ACC may have
limited control where it cannot maintain a safe distance in a responsive manner. Such situations include
but are not limited to:
Sudden maneuvers of a vehicle ahead (such as sudden turns, acceleration, deceleration,
etc.)
Another vehicle abruptly cutting in or out of the front of your vehicle.
Your vehicle abruptly cutting in behind a vehicle ahead.
Your vehicle driving towards a stationary or slow-moving target at a high speed.
Sufficient braking force may not be available in situations including but not limited to:
The brake feature does not work fully (such as when the brake parts are too cold, too hot,
wet, etc.)
Improper vehicle maintenance (excessive wear of the brake or tires, abnormal tire pressure,
etc.)
The vehicle is driving on special roads (such as going uphill and downhill, and roads with
water, mud, potholes, ice, snow, etc.)
Warning如遇极端恶劣天气(包括但不限于雨、雪、雾、霾等),不建议使用此功能。
It is not recommended to use this feature in the event of extreme weather conditions (such
as rain, snow, fog, haze, etc.).
The above warnings, precautions, and restrictions do not cover all situations that may affect
the normal operation of the ACC system. Many factors may interfere with the ACC system. To prevent
accidents, be sure to always drive attentively and focus on traffic, road, and vehicle conditions. Drive
with caution.
Lane Centering Control (LCC/Pilot)
Lane Centering Control (LCC/Pilot) provides Steering Assist to keep the vehicle in the lane on
top of the vehicle speed control and distance maintenance features under Adaptive Cruise Control (ACC). LCC
(Pilot) uses high-definition cameras, radar and LiDAR to detect vehicles ahead on the driving path, so as to
actively control the speed of the vehicle and maintain the distance between itself and the vehicle ahead.
Meanwhile, it also uses high-definition cameras to identify lane markings. When the lane markings on both
sides are clear, it can assist steering to keep the vehicle in the current lane.
LCC (Pilot), as a driving assist feature, does not support automated driving, so the driver must
keep both hands on the steering wheel and stay focused, ready to take over the vehicle at any time.
LCC (Pilot) is mainly intended for use on motorways, expressways, and other major roads.
If the lane markings are clear on both sides, Lane Centering Control (LCC/Pilot) will seek to
keep the vehicle in the lane. Under special road conditions, such as on rainy days, with poor lighting
at night or in other undesirable situations, LCC (Pilot)'s ability to recognize lane markings will be
reduced, potentially resulting in a failure to keep the vehicle in the lane in an appropriate manner or
risk of scratching. In such cases, it is recommended to temporarily disable LCC (Pilot) or switch to
Adaptive Cruise Control.
Lane Centering Control (LCC/Pilot) is designed to aid drivers and cannot address all traffic,
weather, and road situations.
To protect your safety, you must always pay attention to the traffic and road conditions and
decide for yourself whether to activate LCC (Pilot).
When utilizing Lane Centering Control (LCC/Pilot), you should always be ready to take control
of the vehicle if you discover that the road, the traffic, the state of the vehicle, or any other risky
factor makes it unsafe for you to utilize this feature.
You always bear the ultimate responsibility for maintaining an appropriate vehicle distance
and speed and complying with applicable road and traffic safety laws and regulations.
Lane Centering Control (LCC/Pilot) is a comfort feature and is not intended for collision
avoidance, so it has a limited maximum deceleration that is less than the maximum deceleration that can
be requested during Autonomous Emergency Braking and manual driving. Please do not rely solely on LCC
(Pilot) to achieve sufficient deceleration to avoid collisions.
Lane Centering Control (LCC/Pilot) may not be able to bring your vehicle to a complete stop
or maintain a safe distance when there is a significant speed difference between your vehicle and the
lead vehicle, especially if the lead vehicle is stationary or moving slowly. In this case, it is
important to exit LCC (Pilot) immediately for your safety. Do not depend on LCC (Pilot) to bring your
vehicle to a full stop or stop following the lead vehicle in the above situation.
Lane Centering Control (LCC/Pilot) has a limited steering torque that is less than the
maximum steering force required in normal driving scenarios. Please do not rely solely on LCC (Pilot) to
steer your vehicle. You should always be prepared to take over the steering wheel, especially when
navigating curves.
Please take over the steering wheel immediately when cornering, turning around, and driving
on winding roads or roads with sharp curves, due to limited visibility of lane markings. Do not rely on
Lane Centering Control (LCC/Pilot) in these situations.
Enabling/Disabling LCC (Pilot)
Go to the Settings interface on the Center Display, tap Driver
Assistance and choose Lane Centering Control (Pilot) to turn this
feature on or off.
Turning on Lane Centering Control in the Settings does not
activate LCC (Pilot). To activate or deactivate LCC (Pilot), press the middle button on the left side of
the steering wheel.
You can control the Assisted Driving features with the left buttons on the steering wheel.
Middle button: activates or deactivates LCC (Pilot)
Up button: increases or resumes the cruising speed.
Down button: decrease the cruising speed.
Left button: decrease the following distance.
Right button: increases the following distance
When the operating conditions are met, press the Middle button to activate LCC (Pilot).
If the lane markings on both sides are clear and the vehicle is in the center of the
current lane, activating Steering Assist will activate Adaptive Cruise Control (ACC) as well.
If the lane markings on both sides are unclear or the vehicle is not in the center of the
current lane, it will first activate ACC and start searching for lane markings, then activate Steering
Assist when the conditions are met.
LCC (Pilot) is enabled at a vehicle speed of 0-180 km/h.
If the vehicle speed is lower than 10 km/h, the cruising speed will be set at 10 km/h.
If the vehicle speed is higher than 10 km/h without exceeding 180 km/h, the current vehicle
speed will be set as the cruising speed.
When LCC (Pilot) activates ACC and starts searching for lane markings, you can release the
accelerator and the system will maintain the set cruising speed.
If there is a lead vehicle, LCC (Pilot) will adjust the speed of your vehicle according to
the speed and distance of the lead vehicle, with the maximum speed not exceeding the cruising speed.
When there is no vehicle ahead, LCC (Pilot) will quickly adjust the speed of your vehicle
to the cruising speed.
When LCC (Pilot) activates Steering Assist, it will actively assist with steering control, but
please keep your hands lightly on the steering wheel. The pressure of your hands may have a slight effect
on Steering Assist, so please pay close attention to the driving situation, and be ready to take control
of the steering wheel at any time to control the direction of the vehicle.
The steering wheel turns when LCC (Pilot) is controlling the steering. When LCC (Pilot) is
actively accelerating, the accelerator does not move; when it is decelerating, the brake pedal may move.
Operation Conditions for LCC (Pilot):
The vehicle speed does not exceed 180 km/h.
High-definition cameras, radar and LiDAR are functioning properly with a clear view.
No components of LCC (Pilot) are faulty.
The feature cannot be activated when the steering angle of the steering wheel is too large.
Your vehicle meets all safety conditions, such as:
The driver's hands are on the steering wheel.
The driver is seated.
The driver has fastened their seat belt.
All doors are closed.
Vehicle is in DRIVE (D).
The driver does not step on the brake pedal.
The anti-lock brake, traction control, and vehicle stability control systems are not
triggered.
Cruise Speed Adjustment
When LCC (Pilot) is active, you can increase or decrease the cruise speed by pressing the Up or
Down button on the left side of the steering wheel. You can customize the cruise speed adjustment from the
menu by tapping Driver Assistance > Cruise Speed Adjustment.
The available options are:
Short press for 5 km/h and long press for 1 km/h
Press and hold the Up or Down button on the left side of the steering wheel to
increase/decrease the cruise speed by 1 km/h
Press the Up or Down button on the left side of the steering wheel to increase/decrease
the cruise speed to the closest 5 km/h increment. For example, if the speed is 80 km/h, press the
Up button on the left side of the steering wheel, and the speed will increase to 85 km/h.
Short press for 1km/h and long press for 5 km/h
Press the Up or Down button on the left side of the steering wheel to increase/decrease
the cruise speed by 1 km/h
Press and hold the Up or Down button on the left side of the steering wheel to
increase/decrease the cruise speed to the closest 5 km/h increment. For example, if the speed is
80 km/h, press and hold the Up button on the left side of the steering wheel, and the speed will
increase to 85 km/h.
The maximum set speed for LCC (Pilot) is 180 km/h.
The minimum set speed for LCC (Pilot) is 10 km/h, but it allows the vehicle to decelerate to 0
km/h when following a vehicle ahead.
When driving with this feature on, if the system detects that you are not in a normal
driving state (e.g., you are not holding the steering wheel for an extended period of time, you are
distracted and fatigued for an extended period of time, or you are out of your seat), it will activate
Emergency Active Stop when the normal operating conditions for the system are met.
Adjusting Following Time and Distance under LCC (Pilot)
When the system is active or to be activated, the following time and distance can be adjusted
in 5 settings.
Press the Right button on the left side of the steering wheel to set the following time and
distance to a farther setting.
Press the Left button on the left side of the steering wheel to set the following time and
distance to a closer setting.
Takeover and Resume
When driving with LCC (Pilot) on, you can actively take over the vehicle by stepping on the
accelerator or turning the steering wheel. LCC (Pilot) will no longer respond to a target lead vehicle
after you actively take control by heavily stepping on the accelerator.
LCC (Pilot) will re-activate ACC as soon as you release the accelerator.
LCC (Pilot) and Steering Assist will retreat to the standby status for the time being when you
actively take control by turning the steering wheel, but ACC will remain active and search for lane
markings, during which time you will be controlling the direction of the vehicle.
When you stop turning the steering wheel, if the lane markings on both sides are clear and the
vehicle is in the center of the current lane, Steering Assist will resume automatically.
After you exit LCC (Pilot) by pressing or depressing the brake pedal, you can activate it again by pressing the Up button on
the left side of the steering wheel, and you can restore the vehicle speed to the previously set cruising
speed.
When LCC (Pilot) stops the vehicle as the lead vehicle stops, you can press the Up button on
the left side of the steering wheel, or step on the accelerator to restore the previously set cruising
speed.
Reactivate LCC (Pilot), then activate ACC first which will start searching for lane markings
and, if the lane markings on both sides are clear and the vehicle is in the center of the current lane,
activate Steering Assist.
Caution在增强车道居中辅助的转向辅助功能正常工作时,
When the Steering Assist feature of Lane Centering Control (LCC/Pilot) is working properly,
if the Active Lane Change feature is activated in the Settings and you toggle the turn
signal lever, an automatic lane change will be performed once the conditions are met. Please refer
to "Active Lane Change" for details.
If the Active Lane Change feature is not activated in the Settings, when you toggle the
turn signal lever, the Steering Assist feature of Lane Centering Control (LCC/Pilot) will be
temporarily exited to enter standby state, and you need to take over the steering wheel to control
your vehicle direction in a timely manner. During this time, Adaptive Cruise Control will remain
on and continue searching for lane markings. When the required conditions are met, Steering Assist
will resume automatically.
When the Steering Assist feature of Lane Centering Control (LCC/Pilot) is working properly
and the Active Lane Change (ALC) feature is not activated in the Settings, if you need to change
lanes, take over the steering wheel to control your vehicle direction and exit the Steering Assist
feature to enter standby state.
The following situations may cause the Steering Assist feature of Lane Centering Control
(LCC/Pilot) to function in an expected manner or temporarily exit to enter standby mode. In such
cases, an auditory or text alert will sound to remind you to take over the steering wheel in a timely
manner. During this time, Adaptive Cruise Control will remain on and continue searching for lane
markings. When the required conditions are met, Steering Assist will resume automatically. Such
situations include but are not limited to:
Navigating bends with excessive curvature;
Lane markings being unclear, worn, missing, overlapping or obscured by shadows cast by
other vehicles, buildings or landscape features;
The road section having no lane lines, such as non-standard roads, intersections, or
construction areas;
Passing through road sections with special lane markings, such as speed reduction
markings and channelizing-line markings;
Lane lines not being clearly divided, such as merging or diverging lanes, urban
intersections, or left-turn waiting areas.
Presence of edges or other high-contrast lines on the road instead of lane lines, such
as road joints or curbs;
Inability to recognize lane markings totally or correctly due to changes in height,
such as on sloped roads;
Inability to recognize lane markings totally or correctly due to light, such as
reflection of lane markings caused by strong light, poor visibility or insufficient light caused
by bad weather and/or at night; or
The distance between lane markings on both sides is too wide or too narrow.
Disabling LCC (Pilot)
In the following situations, LCC (Pilot) will be deactivated, no longer be in active control of
speed and direction, and remind you with sound alerts:
The steering wheel button is pressed.
The brake pedal is pressed.
In addition, when the working conditions are no longer met, LCC (Pilot) will be automatically
deactivated. Thereafter, you should take control of the brake pedal, accelerator and steering wheel
immediately to control the speed and direction of the vehicle.
Dynamic Environment Simulation and Display (ESD)
An smart driving status indicator has been added next to the real-time vehicle speed on the
left side of the digital instrument cluster. It shows the features of intelligent driving that can be
activated now, are running now, and that fail to be activated, as well as the cruise speed status of Smart
Driving.
The Dynamic Environment Simulation and Display (ESD) is only for illustrative purposes and
cannot fully reflect actual traffic conditions. Therefore, do not rely on the content displayed from
the ESD.
Caution 当两侧车道线都不清晰,但近距离正前方有符合条件的车辆时,爱车可在短时间内跟车行驶。
When neither lane line is clear, but there is a vehicle in front that meets requirements,
your vehicle can follow the lead vehicle for a short time.
While following a lead vehicle, if the lane markings on both sides are unclear and the lead
vehicle slowly changes its driving path, your vehicle is at risk of colliding with adjacent vehicles.
You need to be ready to take over your vehicle at any time to ensure driving safety.
Keep your hands on the steering wheel and eyes on the road ahead when driving with LCC (Pilot)
active.
When the system detects that your hands have been off the steering wheel and your eyes have
been off the road ahead for a period of time, Dynamic Environment Simulation and Display (ESD) will
display a warning, and remind you with sound alerts.
When the system detects that your hands are still off the steering wheel and your eyes are
still off the road ahead after a period of time, Dynamic Environment Simulation and Display (ESD) will
display a warning immediately, or Pilot is about to be exited”, or “Take control of the vehicle
immediately, or Pilot is about to be exited”, and keep reminding you with sound alerts.
When the system detects that your hands have been constantly off the steering wheel and
your eyes have been constantly off the road ahead after a period of time, Dynamic Environment
Simulation and Display (ESD) will display “Emergency Active Stop (EAS) is activated, the vehicle is
about to stop” and remind you with sound alerts, accompanied by a NOMI voice prompt “The vehicle is
stopping” with double flashing lights.
When the system detects that your hands are on the steering wheel and your eyes are on the road
ahead, the warning disappears.
Maintaining Safe Distance
When Dynamic Environment Simulation and Display (ESD) displays a warning. It means that there
is a risk of collision because you are not maintaining a safe distance with the maximum deceleration
available to LCC. You need to take control of the brake pedal and steering wheel immediately to control
the speed and direction of the vehicle.
Warning如您发现危险,切勿等待该警示出现再采取行动,请立刻接管车辆。
If you come across a dangerous situation, never wait for a warning to appear before taking
action. Take over the vehicle immediately.
Intelligent Speed Assist
Once activated, when the vehicle detects new speed limit signs, it will ask you to manually
confirm adjusting your cruise speed to the new speed limit.
Go to the Settings interface on the Center Display, and tap Driver
Assistance > Intelligent Speed Assist to turn this feature on or off.
Intelligent Speed Assist is only a supplement to, and does not function as a substitute
for, your visual observation. Never rely solely on the speed limit information recognized by Traffic
Sign Recognition.
When the speed of the vehicle exceeds the speed limit of the road, you will be visually
alerted of overspeed.
As a driving assist feature, Intelligent Speed Assist is not designed to handle all
situations in all traffic, weather, and road conditions. It is the driver's responsibility to pay
attention to traffic and road conditions and to decide whether to use Intelligent Speed Assist.
Intelligent Speed Assist does not work in complex road conditions such as ramps.
You always bear the ultimate responsibility for driving safely and complying with
applicable traffic laws and regulations.
Intelligent Speed Assist combines the speed limit information from the map and camera
to display the speed limit information on the digital instrument cluster. No speed limit
information will be displayed when no speed limit information source is available.
The Dynamic Environment Simulation and Display (ESD) is only for illustrative purposes and
cannot fully reflect actual traffic conditions. Therefore, do not rely on the content displayed from
the ESD.
Precautions and Restrictions
Some situations may cause a camera failure, affecting the performance of LCC (Pilot) or even
causing it to be deactivated. They include but are not limited to:
The position of the camera has been modified.
The camera is obstructed or blocked. The camera lens is contaminated with a variety of
foreign substances, including water, dust, micro-scratches, oil sludge, dirt, wipers, ice, and snow.
Sudden changes in ambient brightness, such as at tunnel entrances or exits. Or the bright
light interferes with the camera's view.
Reduced detection capability due to dim surroundings, such as at dawn, dusk, night, or in a
tunnel.
Large shadows are cast by buildings, landscapes, or large vehicles.Exhaust gas, water
spray, snow, or dust stirred up by a vehicle ahead that falls onto your vehicle.
Severe weather conditions such as rain, snow, fog, or haze.
Navigating on wet roads.
Some situations may cause a radar failure, affecting the performance of LCC (Pilot) and even
causing it to be deactivated. They include but are not limited to:
The radars are misplaced, blocked or covered with dirt, ice, snow, metal plates, tape,
labels, leaves or other obstructions.
The radars or the surrounding areas are impacted by collisions or scratches;
Extreme weather such as heavy rain, snow, fog, which may affect radar performance.
Due to the limitations of radar detection functions, in very rare and specific situations,
false warnings may occur due to certain metal fences, median strips, concrete walls, and other similar
objects.
Some situations may cause a LiDAR failure, affecting the performance of LCC (Pilot) or even
causing it to be deactivated. They include but are not limited to:
Severe weather conditions, such as rain, snow, fog, or haze, may also affect the
performance of LiDAR.
Exhaust gas, water spray, snow, or dust stirred up by the vehicle ahead.
The presence of water, dust, micro-scratches, oil sludge, dirt, ice, snow, tinted or
transparent film, or other obstructions on the LiDAR lens.
Driving on wet or waterlogged roads.
Exhaust gas, water spray, snow or dust stirred up by the vehicle ahead.
Overheating of the LiDAR caused by prolonged sun exposure.
Due to the limitation of LiDAR characteristics, in rare special cases, false alarms may
occur for traffic signs and high-speed anti-collision barrels in high-speed or elevated sections.
Only vehicles that meet conditions will trigger a response from LCC (Pilot). The targets below
may not be detected or may trigger a response, including but not limited to:
Transverse vehicles
Motorcycles, tricycles
Some targets will not trigger a response, including but not limited to:
Pedestrians
Bicycles
Traffic cones
Animals
Traffic lights
Walls
Barriers
Oncoming vehicles
Other non-vehicle objects
Some situations may cause late recognition and response of LCC (Pilot) because the target is
not directly ahead. They include but are not limited to:
LCC (Pilot) will not respond to targets in blind spots of the sensor, such as those in
blind spots at the corners and sides of the vehicle.
When approaching or turning along a road, some targets may be wrongly selected or missed,
resulting in unexpected acceleration and deceleration of the vehicle.
The target may be lost or the distance to the target may be misjudged when the vehicle is
on a slope. When going downhill, EAS may accelerate the vehicle, causing it to exceed the cruising
speed.
When only part of the body of a vehicle in an adjacent lane cuts in front of your vehicle
(especially when it’s a larger vehicle such as a bus, truck, etc.), it may not recognize the target in
a responsive manner, in which case you need to take over your vehicle in time.
When your vehicle abruptly cuts into the rear of a vehicle ahead, or another vehicle
abruptly cuts into or out of the front of your vehicle, it may not recognize the target in a
responsive manner, in which case you need to take over your vehicle in time.
This feature may accelerate your vehicle when no acceleration is required or planned by
you. This may be caused by a change or loss of a followed target (particularly during a turn or
lane change).
This feature may brake your vehicle when no braking is required or planned by you. This
may be caused by detection of a change or loss of a vehicle, object, or stationary target in an
adjacent lane (particularly during a turn or lane change).
When following a lead vehicle, if your vehicle or the lead vehicle swerves out of the
current lane, acceleration by this feature may be limited for a period of time due to safety
reasons. You can manually step on the accelerator to take over your vehicle.
This feature cannot guarantee accurate target recognition in all situations. If you find
that the displayed "lane marking" from the Dynamic Environment Simulation and Display (ESD) does not
match the actual situation, please drive with caution so as to take control of your vehicle in a
timely manner. Which include but are not limited to:
There is actually a lead vehicle, but the digital instrument cluster does not display
the target vehicle.
There is actually no lead vehicle, but the digital instrument cluster shows a lead
vehicle.
When driving in special or complex road conditions, the use of LCC (Pilot) is not recommended
because they may affect the performance the feature or even cause it to be deactivated. Such conditions
include but are not limited to:
Water, mud, potholes, snow, ice, speed bumps, or obstacles on the road.
Large numbers of pedestrians, bicycles, or animals on the road.
Complex and varied traffic conditions, such as busy intersections, expressways, and
congested roads.
Winding roads and sharp turns.
Uphill or downhill roads.
Bumpy roads.
Narrow roads.
Tunnel entrances and exits.
Non-standard roads.
Roads without a median.
In some situations, if the vehicle is driving too fast relative to a lead vehicle, LCC (Pilot)
may have limited control thus being unable to maintain a safe distance in a responsive manner. Such
situations include but are not limited to:
Sudden maneuvers of a vehicle ahead (such as sudden turns, acceleration, deceleration,
etc.)
Another vehicle abruptly cutting in or out of the front of your vehicle.
Your vehicle abruptly cutting in behind a vehicle ahead.
Your vehicle driving towards a stationary or slow-moving target at a high speed.
Sufficient braking force may not be available in situations including but not limited to:
The brake feature is not working fully (such as when the brake parts are too cold, too hot,
wet, etc.)
Improper vehicle maintenance (excessive wear of the brake or tires, abnormal tire pressure,
etc.)
The vehicle is driving on special roads (such as going uphill and downhill, or roads with
water, mud, potholes, ice, snow, etc.).
Warning如遇极端恶劣天气(包括但不限于雨、雪、雾、霾等),不建议使用此功能。
It is not recommended to use this feature in the event of extreme weather conditions (such
as rain, snow, fog, haze, etc.).
The above warnings, precautions, and restrictions do not cover all situations that may affect
the normal operation of the LCC (Pilot) system. Many factors may interfere with the LCC (Pilot) system. To
prevent accidents, be sure to always drive attentively and focus on traffic, road, and vehicle conditions.
Drive with caution.
Active Lane Change (ALC)
Active Lane Change (ALC) is a subfeature of Lane Centering Control (LCC/Pilot) and provides
assistance for lane changes. Once enabled in the Settings, the system will complete the lane change after
the driver activates the turn signal lever and when specific environmental and road conditions are met.
ALC applies to high-speed roads. The current and target lanes must be well-lit and have clear
lane markings, with space to change lanes.
Active Lane Change is a Driver Assist Feature and cannot address all traffic, weather, and road
situations.
To protect your safety, you must always pay attention to the traffic and road conditions and
decide for yourself whether to activate Active Lane Change. When utilizing Active Lane Change, you should
always be ready to take control of the vehicle if you discover that the road, the traffic, the state of
the vehicle, or any other risky factor makes it unsafe for you to utilize this feature.
You always bear the ultimate responsibility for safe lane change and compliance with current
traffic laws and regulations.
Enabling/Disabling ALC
Go to the Settings interface on the Center Display, and tap Driver
Assistance > Active Lane Change to enable or disable this feature.
Operating conditions for ALC:
The driver's hands are on the steering wheel.
LCC (Pilot) is enabled and operating normally.
ALC is enabled and operating normally.
The sensor works properly and the field of view is clear.
The vehicle speed is about 60-130 km/h.
The current and target lanes meet all the safety conditions for changing lanes. For
example:
The lane marking on the side of the lane change is a dotted line.
The curvatures of the current and target lanes are small.
The vehicle maintains a safe distance to vehicles in front of and behind it in the
current and target lanes.
There are no Blind Spot Detection and Lane Change Alert and other alarms triggered for
the target lane.
The lane markings on both sides of the target lane are clear.
None of the components for ALC are faulty and the vehicle meets all safety conditions. For
example:
The driver is seated and has fastened their seat belt.
The vehicle is in D gear and all door are closed.
The driver does not step on the brake pedal.
The turn signals are working.
The anti-lock brake, traction control, and vehicle stability control systems are not
triggered.
Enabling the ALC feature in Settings does not mean that the feature has been activated.
After meeting the operating conditions, you must perform a visual check to confirm the safety
of the lane change environment, and then toggle the turn signal lever on the corresponding side. The
system will detect if your hands are on the steering wheel.
The system will activate the ALC feature to assist in a lane change if it detects that the
conditions to change lanes have been met. At this time, the Dynamic Environment Simulation and Display
(ESD) will show the lane marking on the corresponding side turning blue and disappearing after a
successful lane change. After the lane change is completed, please confirm that the turn signal lever
has been toggled back.
The system will not perform a lane change if it detects that the conditions to change lanes
have not been met and the Dynamic Environment Simulation and Display (ESD) will show the lane marking
on the corresponding side turning red.
You can toggle the turn signal lever in the opposite direction of the target lane before or
during the lane change. When the lane change is terminated, the turn signal stops flashing immediately to
cancel the lane change.
When the following situations occur, the lane change will be interrupted, and you will be
reminded to take control of your vehicle through the digital instrument cluster and sound alerts:
ALC detects an unsafe lane change environment, such as when the activation alarms for Blind
Spot Detection and Lane Change Alert go off.
Steering Assist is exited, such as when the driver has taken over the steering wheel, the
lane markings are unclear, and navigating excessively curved bends.
Adaptive Cruise Control (ACC) and Steering Assist are exited at the same time, such as when
the button has been pressed
and the brake pedal is depressed.
Caution ALC 每次只能变换一个车道。
Active Lane Change can only change lanes one at a time.
Caution 夜晚若光线、视野不佳,车道线不清晰,可能无法完成辅助变道。
Active Lane Change may not be completed in the event of poor lighting or vision at night
or unclear lane markings.
Active Lane Change may be exited unexpectedly due to unforeseen circumstances. Please
always pay attention to the traffic conditions and road environment, and be prepared to take control
of your vehicle at any time.
You must always confirm whether it is safe and appropriate to change lanes before and
during a lane change. Please note that Active Lane Change cannot respond to pedestrians, obstacles,
oncoming vehicles, etc. Do not rely on driving routes determined by Active Lane Change. You always
bear the ultimate responsibility for safety during lane changes.
The Dynamic Environment Simulation and Display (ESD) is only for illustrative purposes and
cannot fully reflect actual traffic conditions. Therefore, do not rely on the content displayed from
the ESD.
Precautions and Restrictions
Some situations may prevent ALC from completing a lane change or operating normally, requiring
the driver to take control of the steering wheel at any time. They include but are not limited to:
Navigating bends with excessive curvature, such as high-speed ramps.
The lane markings of the current lane and target lane are not clear, worn, missing,
crossed, or shaded by other vehicles, buildings or landscapes.
No lane lines on a road section, such as non-standard roads, intersections, or construction
areas.
Vaguely divided lane lines, such as merging or diverging lanes, expressways, urban
intersections, or left-turn waiting areas.
Passing through road sections with special lane markings, such as speed reduction markings
and channelizing line markings.
There are edges or other high-contrast lines on the road instead of lane lines, such as
road joints or curbs.
Lane markings cannot be or are incorrectly identified due to changes in height, such as on
sloped roads;
Lane markings cannot be recognized or are not recognized correctly due to light, such as
reflection of lane markings caused by strong light, poor visibility or insufficient light caused by
bad weather and/or at night.
The distance between the lane markings on both sides of the current lane or the target lane
is too wide or too narrow.
Some situations may lead to a camera failure, making it impossible to complete lane change
assistance. They include but are not limited to:
The position of the camera has been changed.
The camera is obstructed or blocked. The camera lens is contaminated with a variety of
foreign substances, including water, dust, micro-scratches, oil sludge, dirt, wipers, ice, and snow.
Sudden changes in ambient brightness, such as at tunnel entrances or exits. Or the bright
light interferes with the camera's view.
Reduced detection capability due to dim surroundings, such as at dawn, dusk, night, or in a
tunnel.
Large shadows are cast by buildings, landscapes, or large vehicles.Exhaust gas, water
spray, snow, or dust stirred up by a vehicle ahead that falls onto your vehicle.
Severe weather conditions such as rain, snow, fog, or haze.
Navigating on wet roads.
Some situations may lead to a radar failure, making it impossible to complete lane change
assistance. They include but are not limited to:
The radars are misplaced, blocked or covered with dirt, ice, snow, metal plates, tape,
labels, leaves or other obstructions.
The radars or the surrounding areas are impacted by collisions or scratches;
Rain, snow, fog, haze, and other extreme weather which may impair radar performance.
Due to the limitations of radar detection functions, in very rare and specific situations,
false warnings may occur due to certain metal fences, median strips, concrete walls, and other similar
objects.
Some situations may lead to a LiDAR failure, causing lane change assistance to malfunction and
even the feature to be exited. They include but are not limited to:
Severe weather conditions, such as rain, snow, fog, or haze, may also affect the
performance of LiDAR.
Exhaust gas, water spray, snow, or dust stirred up by the vehicle ahead.
The presence of water, dust, micro-scratches, oil sludge, dirt, ice, snow, tinted or
transparent film, or other obstructions on the LiDAR lens.
Driving on wet or waterlogged roads.
Exhaust gas, water spray, snow or dust stirred up by the vehicle ahead.
Overheating of the LiDAR caused by prolonged sun exposure.
Due to the limitation of LiDAR characteristics, in rare special cases, false alarms may
occur for traffic signs and high-speed anti-collision barrels in high-speed or elevated sections.
ALC may omit or wrongly detect obstacles in target and current lanes. You must always check
whether it is safe and appropriate to change lanes before and during a lane change. The targets below
cannot be guaranteed to be identified, and may trigger a response, which include but are not limited to:
Side-crossing vehicles
Motorcycles, tricycles
Some targets will not trigger a response, including but not limited to:
Active Lane Change cannot guarantee the recognition of special vehicles, especially at
night, when extra caution is necessary. For example, vehicles with obstructions at the rear,
vehicles with irregular shapes, vehicles with a rear vertical surface below a certain height, and
unloaded commercial vehicles, among others.
Active Lane Change may have false negatives for stationary or slow-moving vehicles,
especially during nighttime, so extra caution is necessary.
Use of ALC is not recommended for special or complex road conditions, which include but are not
limited to:
Water, mud, potholes, snow, ice, speed bumps, or obstacles on the road.
Large numbers of pedestrians, bicycles, or animals on the road.
Roads without a median.
Complex and varied traffic conditions, such as busy intersections, expressways, and
congested roads.
Winding roads and sharp turns.
Uphill or downhill roads.
Bumpy roads, narrow roads.
Tunnel entrances and exits.
Non-standard roads.
Warning如遇极端恶劣天气(包括但不限于雨、雪、雾、霾等),不建议使用此功能。
It is not recommended to use this feature in the event of extreme weather conditions (such
as rain, snow, fog, haze, etc.).
The above warnings, precautions, and restrictions do not cover all situations that may affect
the normal operation of the ALC system. Many factors may interfere with the ALC system. To prevent
accidents, be sure to always drive attentively and focus on traffic, road, and vehicle conditions. Drive
with caution.
Predictive Speed Control (PSC)
Predictive Speed Control (PSC) is an auxiliary function that supports the driver by reducing the
driving speed through curves when Driver Assistance is activated in either Adaptive Cruise Control (ACC) or
Lane Centering Control (LCC/Pilot) mode.
If the function is enabled in the Settings, and the environment and road conditions meet certain
requirements, the system will assist the vehicle to decelerate before entering the curve and limit the
driving speed throughout the curve. After the curve, the cruise speed defined by the user will be resumed.
Enabling/Disabling Predictive Speed Control
Enter the Settings interface on the Center Display, tap Driver Assistance
> Predictive Speed Control, and turn on or off this function.
If the system detects that the environment and conditions are met, and the Set Speed for ACC or
LCC (Pilot) is higher than recommended to safely and comfortably drive through the upcoming curve, PSC will
intervene by gradually reducing the driving speed. At this time, the Dynamic Environment Simulation and
Display indicates the PSC activation function by following the icon
Dynamic Environment Simulation and Display
The dynamic Environment Simulation and Display is only for illustration and cannot fully reflect
the real traffic situation. Therefore, do not rely on the content displayed in the dynamic Environment
Simulation Display, e.g. In case of no lane markings are detected.
Intended Use
PSC is a Driver Assistance feature like ACC or Lane Centering Control. Therefore, the feature is
mainly designed for the following scenarios:
Motorways, expressways and other major roads
Using and following in-vehicle navigation
The driver is always responsible for safe speed at any time.
CautionPSC驾驶员始终有责任选择安全的行车速度,并遵守现行的交通法规。
The driver always bears the responsibility to choose a safe driving speed and comply with
current traffic laws and regulations.
PSC may provide limited or no assistance in the following scenarios, including but not limited
to:
Curves with excessive curvature, such as highway ramps.
If the vehicle position cannot be determined by the navigation system.
The sensors are blocked or dirty.
In extreme weather conditions, including but not limited to rain, snow, fog, haze.
Dynamic Environment Simulation and Display (ESD)
Dynamic Environment Simulation and Display (ESD) can display the external environment monitored
by the vehicle in real-time through the digital instrument cluster, including other traffic elements such as
lane markings.
The indicators related to Assisted Driving statuses on the digital instrument cluster are as
follows:
Displayed Icon on Instrument Cluster
Description
ACC available but not activated
ACC activated
ACC activation failed
LCC/Pilot available but not activated
LCC/Pilot activated
LCC/Pilot activation failed
Warning动态环境模拟显示仅供参考,无法替代您的目视检查。
The Dynamic Environment Simulation and Display (ESD) is for reference only and cannot
replace your visual inspection. Do not rely solely on the Dynamic Environment Simulation and Display
(ESD) for driving.
Since the detection range of the cameras and sensors associated with the Dynamic
Environment Simulation and Display (ESD) is limited, and road and weather conditions may have
adverse effects on detection, always drive with caution.
Caution动态环境模拟显示仅作示意,并不能完全反映真实的交通状况。
The Dynamic Environment Simulation and Display (ESD) is only for illustrative purposes
and cannot fully reflect the actual traffic conditions. Therefore, do not rely on the content
displayed from the Dynamic Environment Simulation and Display (ESD).
As a driving assist feature, the Dynamic Environment Simulation and Display (ESD) can
neither respond to all traffic, weather or road conditions, nor detect vehicles in all cases. It may
become ineffective, inappropriate or untimely due to a number of factors.
You always bear the ultimate responsibility for safe driving and shall abide by the
current traffic laws and regulations.
ESD may not always be able to detect various objects, vehicles, riders, or pedestrians, nor
accurately display all the conditions of the surrounding environment. Display errors may also occur. Some
situations may cause ESD to malfunction or have limitations, including but not limited to:
Change in camera position.
Blocked or dirty camera.
Reduced recognition capability due to dim surroundings, such as at dawn, dusk, night, or in a
tunnel, etc.
Sudden changes in ambient brightness, such as at tunnel entrances or exits.
Large shadows cast by buildings, landscapes or large vehicles.
Camera's exposure to straight or oblique sunlight.
Severe weather such as rain, snow, fog or haze.
Exhaust gas, water spray, snow or dust stirred up by a vehicle ahead that falls onto your
vehicle;
Water, dust, micro-scratches, oil sludge, dirt, wipers, ice, snow, etc., on the windshield in
front of the camera.
Wet roads.
The camera being out of focus or faulty.
Vehicle traveling on roads with sharp turns or in poor condition.
Misrepresentation of one kind of object as another kind of object.
Displaying an object in an incorrect direction or at an incorrect distance.
The above warnings, precautions, and restrictions do not cover all conditions that may affect the
normal operation of ESD. Many factors may interfere with ESD. To prevent accidents, be sure to always drive
attentively and focus on traffic, road, and vehicle conditions. Drive with caution.
Parking Camera and Parking Assist
While driving at low speeds, the vehicle monitors its surrounding environment through ultrasonic
sensors. When parking, your vehicle will warn you with sound alerts and images according to the distance
between obstacles and the front or rear of your vehicle.
Vehicle to Obstacle Distance Range
Frequency of Sound Alert
Alert Curve Color
1.2-1.5 m
None
White
0.9-1.2 m
0, 1, 2 times per second
White
0.6-0.9 m
0, 2, 3 times per second
Orange
0.3-0.6 m
3, 4, 5 times per second
Orange
Less than 0.3 m
High-frequency beeps
Red
Caution爱车前方和后方报警区域不超过1.5 米。
The warning zones in front of and behind the vehicle are limited to a distance of 1.5 meters.
Warning 泊车辅助提示仅供参考,无法替代您的目视观察。
Parking Assist Alert is provided for reference only and cannot replace your visual
observation.
Parking Assist Alert is a driving assist feature and cannot address all traffic, weather,
and road situations. To protect your safety, you must always pay attention to the traffic and road
conditions and decide for yourself whether to activate Parking Assist Alert.
You always bear the ultimate responsibility for safe driving and compliance with current
traffic laws and regulations.
Activating the Parking Camera
You can enable the parking camera in the following ways:
Swipe right from the home interface of the Center Display to enter the Quick Access
interface, and tap the Surround View icon to open the surround view.
Enter the App Center from the Center Display and tap Parking
to open the memory view (surround view or dual-view).
Engage the vehicle in REVERSE (R) and open the memory view (surround view or dual-view).
After setting the custom feature of the Middle button on the right side of the steering
wheel to Surround View, press and hold the button to activate the
surround view.
Wake up NOMI, enable Parking with your voice, and open the
surround view.
You can tap the Audio icon on the Parking Camera interface and
select to turn off the sound alerts.
It is recommended to only disable the Parking Assist warning sound when the surrounding
environment clearly does not require it. When you manually disable the Parking Assist warning
sound, you assume all risks associated with it.
The parking camera will automatically exit when the vehicle is shifted into PARK (P) or
when the vehicle speed exceeds 16 kilometers per hour.
If the vehicle is not in REVERSE (R), you can also manually exit the parking camera by
using your fingers to swipe the Center Display or by tapping the OFF button on the user interface.
The ultrasound sensors may be restricted under the following conditions, resulting in
messages such as "Front parking radar fault," "Rear parking radar fault," or "Parking radar fault."
These conditions include, but are not limited to:
One or more ultrasonic sensors are damaged, misplaced, or obscured (such as by mud or
ice).
Adverse weather conditions such as rain, snow, fog, or haze affecting the sensors.
Interference from electrical devices or equipment that can generate disturbances
affecting the sensors.
Due to the characteristics of ultrasonic sensors, they may produce false alarms in certain
situations. These false alarms will end on their own as road conditions change and will not affect
driving. Such situations include but are not limited to:
Rough asphalt, concrete, cobblestone roads, waterlogged roads, and other uneven
surfaces
Induction loops and similar devices buried under roads
Interference caused by large vehicles, construction machinery, and other equipment
nearby
The ultrasonic sensors may have limitations in detecting obstacles with low heights,
obstacles coming from above or the sides of the vehicle, narrow objects, and other items, including
but not limited to the following. It is crucial for you to always pay attention to the surrounding
environment. Failure to do so may result in property damage or personal injury:
Pedestrians, children, animals.
The activated ground lock, low stone pillars, cylindrical objects, thin poles, sharp
objects, and uneven ground surfaces.
Height-restricted gates, poles, or overhead structures.
Obstacles on the sides of the vehicle that may cause collisions or scratches.
Bicycles, wall corners, edges of parking lot barriers, etc.
Parking Camera Interface
The parking camera consists of two interfaces: surround-view and dual-view. Tap the button on
the surround view to switch the interfaces.
Button
Feature
Switch to the dual-view
Switch to the surround-view
Quick Access
Switch to the hub view
Parking Camera View
After opening the Dual-View interface, you can change to the front or rear view by switching
between the DRIVE (D) gear and the REVERSE (R) gear, or tap the 3D view, front view, rear view, left and
right hub view, front hub view and rear hub view in the lower left area of the Center Display to switch
between different views.
In the 3D view, you can adjust the viewing angle by swiping with one finger, adjust the viewing
distance by zooming in with two fingers, and adjust the viewing height by swiping up and down with two
fingers.
Adjusting the Brightness of the Parking Camera
Auto Adjustment
Tap “Quick Access” in the Parking Camera interface, go to “Brightness”, then select “AUTO”. The
brightness of the Center Display can be automatically adjusted to the brightness of the environment.
Manual Adjustment
Tap “Quick Access” in the Parking Camera interface, go to “Brightness”, then slide the
brightness adjustment slider to manually adjust the brightness of the Central Display.
Dynamic Steering View
Enter the App Center on the Center Display, tap Parking and turn
on
Dynamic Steering View in the parking settings.
After the feature is activated, the viewing angle of the front and rear reversing images will
be adjusted according to the rotation of the steering wheel, helping users expand their reversing view and
improving parking safety.
Dynamic Transparent Chassis
Dynamic transparent chassis refers to a transparent effect that can be presented, via technical
processing, on road images collected by the camera in advance when the vehicle is moving, and transmitted
to the Center Display so that the road conditions can be seen in the vehicle.
You can enable this feature on the Settings interface of the parking camera. After the dynamic
transparent chassis is enabled, the transparency of the vehicle model while driving can be customized
through four options: Opaque, Low, Medium, and High.
The Dynamic Transparent Chassis cannot detect possible environmental changes under the
chassis when the vehicle is stationary. Please drive with caution and always pay attention to your
surroundings to avoid damage to the vehicle.
Blind Spot Camera View
Due to the relative positioning of the cameras and the vehicle body, there is a dynamic blind
spot range covering 20 centimeters around your vehicle model in the surround-view. Please pay attention to
the actual surroundings of your vehicle when parking.
The blind area around the vehicle shown in the Surround View is for reference only and does
not replace your visual observation.
You must always pay attention to traffic and road conditions, and park your vehicle while
ensuring safety.
Due to the presence of blind spots, some low objects closer to the vehicle may not be shown
fully. Please observe and drive with caution.
Shiftless Advanced Parking Assist with Fusion (S-APA with
Fusion)
Shiftless Advanced Parking Assist with Fusion (S-APA with Fusion) uses surround-view cameras and
ultrasonic sensors to detect ground markings or parking spaces between two vehicles, so as to provide
reverse parking assistance.
S-APA with Fusion supports perpendicular parking, parallel parking, but does not support parking
in three-dimensional parking spaces.
Caution为保证该功能的正常和安全运行,在使用该功能过程中,请务必全程系好安全带。
To ensure the normal and safe operation of this feature, please make sure to fasten your seat
belt during the use of this feature.
The performance of the Shiftless Advanced Parking Assist with Fusion system depends on the
detection and recognition ability of the surround-view camera and ultrasonic sensor.
Do not use the Shiftless Advanced Parking Assist with Fusion system if any of the left and
right side mirrors, surround-view camera, and ultrasonic sensor is damaged or in an abnormal position.
Pay special attention to the presence of pedestrians, children, animals, and thin, pointed,
short, suspended, and other obstacles that ultrasonic sensors have limited detection of near your
vehicle, such as ground locks, low stone piers, traffic cones, low cylinders, thin rods, sharp objects,
wall corners, and edges of parking lot barriers.
Shiftless Advanced Parking Assist with Fusion is a Driver Assist Feature and cannot address
all traffic, weather, road, and lighting situations.
To protect your safety, you must always pay attention to traffic and road conditions and
decide for yourself whether to activate Shiftless Advanced Parking Assist with Fusion.
When utilizing Shiftless Advanced Parking Assist with Fusion, you should always be ready to
take control of the vehicle if you discover that the road, the traffic, the state of the vehicle, or any
other risky factor makes it unsafe for you to utilize this feature. You always bear the ultimate
responsibility for safe parking and shall abide by the current traffic laws and regulations.
Enabling S-APA with Fusion
S-APA with Fusion parks the vehicle as follows:
Parking space search:
Manual parking space search: Enter the Dual-view Image interface and open Parking Space
Search. Drive forward slowly at a speed of lower than 16 km/h, and stop after the digital
instrument cluster or Center Display shows that a parking space has been found. Keep the brake on,
check, and choose a safe and suitable parking space.
Auto parking space search: When the road conditions and system conditions are met,
drive forward slowly at a speed of lower than 16 km/h. When a parking space is found in the
background, the Parking Assist button will appear on the Map interface. Tap the button and stop the
vehicle according to the text prompts on the interface. Keep the brake on, check, and choose a
safe and suitable parking space.
Parking: Select a safe and suitable parking space, and follow the instructions in the
Center Display to allow the vehicle to perform the parking maneuvers. Keep checking the surroundings
to ensure that the vehicle is parked safely.
Parking completed: The Dual-view Image interface will prompt "Parking Completed".
Details are as follows:
Parking Space Search
Before searching for a parking space, the vehicle must meet the following conditions:
The vehicle speed is lower than 16 km/h.
The vehicle is in the DRIVE (D) or REVERSE (R) gear.
All doors are closed.
The driver is seated.
ACC or LCC is disabled.
The ultrasonic sensors and surround-view cameras work properly with a clear view.
No system error.
The anti-lock brake, traction control, and vehicle stability control systems are not
triggered.
The traction control system and vehicle stability control system are enabled.
Not available in ECO+ Mode.
When the above conditions are met, you can initiate Parking Space Search in any of the
following ways:
Where the parking camera is off, say a command such as “I want to park” or “Park the
vehicle” to wake up NOMI, which will open the Dual-view Image interface and activate Parking Space
Search.
Swipe right on the main interface of the Center Display to enter the Quick Access
interface, tap Parking Assist, enter the Dual-view Image interface
and open Parking Space Search.
Put your vehicle in REVERSE (R), enter the image interface, and tap the button in the upper left
corner to open Parking Space Search.
Tap the parking camera to enter the surround-view interface, and tap the button in the upper left
corner to open Parking Space Search.
After turning on Parking Space Search, keep the vehicle at a distance of 0.5 to 1.5 m from
the target parking space, and drive forward slowly at a speed of lower than 16 km/h to search for a
parking space.
During the search for a parking space, when a white “P” appears on the left or right side
of your vehicle on the screen, it means that the system has found a parking space on the corresponding
side. If a “P” appears on both sides, it means that the system has found parking spaces on both sides.
Stop the vehicle at this time, keep the brake on, and check whether the parking space is
safe and suitable. If multiple parking spaces are found, you can manually select the appropriate
parking space on the Dual-view Image interface.
Note开始搜索车位后,若爱车挂入 R 挡并后退,车位搜索将保持。
After starting parking spot search, if you engage the vehicle in REVERSE (R) gear and
reverses, parking spot search will remain in operation.
Caution若车速大于约16 公里/小时,车位搜索会退出。
If the vehicle speed is above 16 km/h, the parking space search will stop.
Caution若搜索车位时,车辆前进方向与道路方向偏角过大,会影响最终泊车的效果。
When searching for a parking spot, the final parking effect will be affected if the
angle between the vehicle's forward direction and the road's direction is too big.
Shiftless Advanced Parking Assist with Fusion can be used to identify the barrier-free
parking space sign in the parking space. After successful identification, the barrier-free parking
space will display the corresponding icon on the lower-left corner of the parking space interface.
Currently, the identification of barrier-free signs that are not located within parking spaces,
such as standing metal plates and text signs, is not supported. Additionally, this type of parking
space may be misidentified. Please select a parking space according to the actual situation.
You must always check and confirm that the parking spots found by the system are
safe and suitable for parking. Do not rely on Shiftless Advanced Parking Assist with Fusion to
find suitable parking spots.
Do not use this feature on highways and urban expressways.
Do not use this feature while Trailer Mode is on.
The system may wrongly identify parking spots on roads, entrances, bushes, and
other places. Please exercise your judgment to determine the suitability of parking spots.
Shiftless Advanced Parking Assist with Fusion cannot determine whether a found
parking spot is legal. Please confirm that a parking spot is legal before starting the parking
process.
Parking
Select a safe and suitable parking space, release the steering wheel and brake pedal
according to the text prompts on the interface, then initiate S-APA with Fusion. During the parking
process, the interface will display the current gear and the remaining length of the route in this
gear as a reference. Keep checking the surroundings to ensure a safe parking process.
After selecting a parking space, you can de-select it by tapping the space again before
releasing the brake pedal.
When the vehicle is parked, the“P" on the left or right side of the vehicle in the digital
instrument cluster will turn green.
Caution请在车辆提示“请松开刹车和方向盘”后,再释放制动踏板,以免泊车功能退出,车辆后退。
Release the brake pedal only after the vehicle shows the prompt "Please release the
brake and steering wheel", to avoid exiting the parking function and causing the vehicle to
reverse.
Before releasing the brake pedal, make sure that your hands and arms are out of the
steering wheel's area and operating range, to avoid sustaining injury from its quick rotation.
Always be prepared to step on the brake pedal to pause the function or take over the vehicle.
Using Shiftless Advanced Parking Assist with Fusion in small spaces limits the sensor's
ability to accurately detect the location of obstacles, which can increase the risk of damage to
the vehicle or surrounding objects.
As the person responsible for driving safety, you need to pay attention to the
vehicle's surrounding environment at all times and ensure safety during the parking process, and
be ready to take over the vehicle at any time. In particular, you should pay attention to any
pedestrians, children, animals, and thin, pointed, short, suspended, and other obstacles that
ultrasonic sensors have limited detection of.
Any addition to or modification of the steering wheel will increase the risk of parking
and may cause the Shiftless Advanced Parking Assist with Fusion to not work, or not function as
expected. Such additions or modifications include but are not limited to installing a leather
steering wheel cover, modifying the steering wheel or weight ring, etc.
The system will only show parking spots that it is able to park in. Whether it can park
depends not only on the size of a parking spot, but also the environment. If you spot a sudden
obstruction around the vehicle while parking, take over the vehicle as the system may not stop it
in time.
Parking Completed
The vehicle is properly parked when the Dual-view Image interface prompts “Parking
Completed”, and the “P” on the left or right side of the vehicle in the digital instrument cluster
turns green.
After parking, you may need to make further adjustments to the vehicle to ensure that the
vehicle is in the best parking position.
Before leaving, make sure that the electric parking brake is activated and the vehicle is
in the PARK (P) gear.
Caution 受周围环境影响,系统可能会提前完成泊车,需要您酌情调整车辆位置。
Due to the surrounding environment, the system may complete parking in advance. Please
adjust your vehicle's location as needed.
Pausing Parking
During the process of parking under S-APA with Fusion, you can step lightly on the brake pedal
to slow the vehicle down without disengaging the feature; only when you keep stepping on the brake pedal
until the speed is reduced to 0 km/h, will the feature be suspended. In addition, stepping on the
accelerator while parking will also suspend the parking process.
If you actively interfere with the steering wheel, the parking feature will be suspended.
Interfering includes, but is not limited to, the process of perpendicularly backing into a
parking space with S-APA with Fusion on. If the system detects a safety risk or a parking result cannot be
guaranteed, the system will pause parking and ask you whether to continue parking.
After parking is paused, check the surroundings to ensure that it is safe to continue parking.
If so, release the brake pedal, and tap the “Resume Parking” button on the center display to re-activate
S-APA with Fusion.
Caution若泊车过程中暂停次数过多,会影响最终泊车的效果。
Too many pauses during the parking process will affect the final parking effect.
Disabling S-APA with Fusion
You can deactivate the parking process manually in the following ways. Take over control of the
speed and direction of your vehicle after actively disengaging S-APA with Fusion:
Step on the brake pedal and shift gears.
When S-APA with Fusion is suspended, tap the “Stop Parking” button on the Dual-view Image
interface.
Actively exit the Dual-view Image interface.
In addition, when S-APA with Fusion is active, the following situations will cause the ongoing
parking process to stop, requiring you to take over the vehicle in time:
The vehicle is too close to an obstacle.
Front trunk, liftgate or any door is open.
Electric parking brake is activated.
Anti-lock brake system, traction control system and vehicle stability control system are
triggered.
The driver has left their seat.
S-APA with Fusion has been suspended for more than 30 seconds.
Too many front and rear adjustments.
The overall parking process has timed out
System fault
When S-APA with Fusion is deactivated abnormally, the “P” on the left or right side of the
vehicle in the digital instrument cluster will turn red.
Precautions and Restrictions
S-APA with Fusion may not function normally when the vehicle is driving under the following
road conditions, including but not limited to:
Do not activate S-APA with Fusion when the road surface is slanted or sloped. It is only
designed for use on road surfaces with no gradients.
Do not activate S-APA with Fusion if the road surface is uneven or there are steps on the
road. It is designed for use on flat roads only.
Do not activate S-APA with Fusion if there is water, mud, potholes, ice, snow, speed bumps,
and obstacles on the road.
The curb material is special or cannot be detected. If parked improperly, the tires and
wheel rims of the vehicle are at risk of being damaged by the curb, and you need to promptly take over
the vehicle.
When the road surface is slanted or the slope is beyond the supported range, the success
rate of S-APA with Fusion cannot be guaranteed.
If the angle of the slanted parking space exceeds the supported range, the parking space
will not be released, and the success rate for parking cannot be guaranteed.
The ultrasonic sensors may have limited detection of the following obstacles, requiring you to
be ready to take over the vehicle at any time, so as to prevent property damage or personal injury. Such
obstacles include but are not limited to:
Pedestrians, children, animals, etc.
Thin, pointed, short, and suspended obstacles, such as ground locks, low stone piers, low
cylinders, thin rods, sharp objects, etc.
Wall corners, parking lot columns, etc.
The ultrasonic sensors may have limited detection in the following situations, resulting in
S-APA with Fusion failing to function or not functioning as expected. Such situations include but is not
limited to:
One or more of the ultrasonic sensors being damaged, misplaced, or obscured (such as by mud
or ice).
Severe weather like rain, snow, fog, and haze that affect the performance of the ultrasonic
sensors.
The sensors are affected by other electrical equipment or installations that can cause
interference.
The surround-view camera may have limited detection in the following situations, resulting in
S-APA with Fusion failing to function or not functioning as expected. Such situations include but are not
limited to:
The left and right side mirrors or the front and rear of the vehicle being damaged,
resulting in an abnormal position of the surround-view camera.
The surround-view camera being soiled (such as by mud or ice) or obscured;
Being under strong sunlight or dappled tree shade.
Reflective ground or water on the ground.
Poor lighting (darkness), strong reflection from the ground, or poor visibility (heavy
rain, heavy snow, dense fog).
A parking space of an unconventional size (too wide or narrow), or a tile-paved parking
space.
Worn, unclear, covered, or overlapping parking space lines.
Cylindrical, square and otherwise shaped pillars near the parking space.
Parking space being at a corner.
The system may not be able to detect and may therefore exclude parking spaces with
no-parking markings, cones, restricted-stop signs, ground locks, or other special parking spaces;
The system may not be able to exclude parking spaces with obstacles, such as pedestrians,
bicycles, tricycles, low debris, bricks, etc.
S-APA with Fusion may not function normally when the vehicle is driving in situations including
but not limited to:
Any addition to or modification of the steering wheel will increase the risk of parking and
may cause the Shiftless Advanced Parking Assist with Fusion to not work, or not function as expected.
Such additions or modifications include but are not limited to installing a leather steering wheel
cover, modifying the steering wheel or weight ring, etc.
Do not activate S-APA with Fusion if a trailer is attached to the rear of the vehicle.
Do not activate S-APA with Fusion if the vehicle is fitted with snow chains or a spare
wheel.
Do not activate S-APA with Fusion if a loaded object protrudes into the area surrounding
the vehicle.
Non-original tires or low tire pressure will affect the driving trajectory of S-APA with
Fusion. When the feature is active, make sure the tires are original and properly inflated.
After changing the tire size and specifications, you need to update the relevant parameters
at NIO Service Center. Currently only the tire models specified by NIO are supported; any modification
of the vehicle’s tire size and specifications may affect parking performance.
S-APA with Fusion may not function normally due to the following target parking space
conditions, including but not limited to:
The target parking space is adjacent to a roadside fence, high wall, street light, tree,
bush, pillar, suspended obstacle such as a railing, distribution box, charger, etc., which will affect
the final parking effect and may even cause vehicle damage.
The target parking space is on a curve, which will affect the final parking effect.
Do not activate S-APA with Fusion when the target parking space is at an angle.
Do not activate S-APA with Fusion when there are obstacles such as unlocked ground locks,
cones, shopping carts, and lampposts in the target parking space.
Do not activate S-APA with Fusion in conditions that may lead to poor vision of the observed
environment while driving. They include but are not limited to:
Any one of the left and right side mirrors being blurred, damaged or in an abnormal
position.
The surround-view camera being blurry, damaged, or in an unusual position.
Visibility is poor at night or due to insufficient light.
Do not activate S-APA with Fusion repeatedly in the following situations, including but not
limited to:
Vigorous driving or repeated parking operations may trigger overheating protection of the
steering system. Do not activate S-APA with Fusion repeatedly for a long period of time.
The above warnings, precautions, and restrictions do not cover all situations that may affect
the normal operation of the S-APA with Fusion system. Many factors may interfere with the S-APA with
Fusion system. To prevent accidents, be sure to always drive attentively and focus on traffic, road, and
vehicle conditions. Drive with caution.
Power Swap with Assisted Parking (PSAP)
Power Swap with Assisted Parking (PSAP) can help drivers park their vehicles into a Power Swap
Station without any steering wheel input, braking, acceleration, or gear shift operations.
Search for a Power Swap Station on the map, or open the power-up assistant to screen for a Power
Swap Station:
If you are within the order placing range of a Power Swap Station, just tap to place an
order;
If you are not in the order placing range, navigate to the Power Swap Station and place an
order when you are nearby.
The locations of your vehicle and the NIO App are checked during order placement. An
order cannot be placed successfully unless your vehicle is within 200m of the power swap station.
In the event of an order placement failure due to unavailable vehicle network, please try
again after the network resumes or consult the field specialist.
Please read the Agreement and Disclaimer before placing an order.
When an order is placed successfully, a power-swapping serial number will be generated to enter
the queuing sequence. You can check the battery’s charging status, the number of people in the current
queue, the estimated waiting time, and other information on the order interface of the NIO App and the
vehicle.
After the last vehicle finishes a power swap and leaves the Power Swap Station, the Power Swap
Station will send a number-calling command after checking to notify you to enter the station for your power
swap. Tap the “Activate Power Swap Process” button on the Center Display to start the parking process.
Please await your turn in the vicinity of the Power Swap Station and monitor the queue
status on your center display or NIO App. Should you fail to take your turn, please contact the
field specialist in a timely manner.
If you have to leave the Power Swap Station for some reason, please pay attention to the
queuing status on the NIO App or cancel the order in time.
Please avoid the lane in front of the station when waiting for Power Swap.
The PSAP feature may not operate normally in the following situations:
The curb is not made out of stone or is undetectable. If parked improperly, the tires and
wheel rims of the vehicle are at risk of being damaged by the curb, and you need to promptly take over
the vehicle.
Any addition to or modification of the steering wheel will increase the risk of parking and
may cause the Power Swap with the Assisted Parking not work, or not function as expected. Such additions
or modifications include but are not limited to installing a leather steering wheel cover, modifying the
steering wheel or weight ring, etc.
One or more of the ultrasonic sensors are tainted or impaired (e.g., by sludge, ice, snow,
etc.)
Weather conditions (heavy rain, snow, fog, extreme heat or cold, etc.) that interfere with
the sensors' operation.
Reflective ground or water on the ground.
The sensors are affected by other electrical equipment or installations that can cause
interference.
The road surfaces are uneven, have grass-planting bricks, grooves, etc.
The vehicle is equipped with snow chains or spare wheels.
Loaded objects protruding out of the vehicle.
Any one of the left and right side mirrors is damaged or in an abnormal position.
After the tire size is changed, you need to go to the service center to update the
relevant parameters. Currently, only the official tire models are supported. Any modification
related to the vehicle tire size and performance may affect the parking performance.
Parking may be impaired if you pause too many times during the parking process.
High-speed driving or multiple parking operations may trigger overheat protection for the
steering system. Do not use this feature repeatedly for an extended period.
When the target parking space is close to roadside fences, high walls, street lights,
trees, bushes, pillars, or overhanging obstacles such as railings, power distribution boxes and
charging connectors, these obstacles may affect the parking result and even cause vehicle damage.
Parking into a Power Swap Station
After tapping the “Activate Power Swap Process" button, please enter the starting area for the
power swap in the specified direction at a speed lower than 18 km/h according to the vehicle’s
instructions.
A high speed may cause positioning detection failure. Please keep the speed below 18
km/h.
Please drive as instructed by the arrows on the ground and avoid vehicles and
pedestrians around.
If positioning detection fails, please contact the field specialist to take over your
vehicle and manually reverse for power swap.
After entering the starting area for the power swap, when the Dynamic Environment Simulation
and Display (ESD) shows and NOMI plays a voice prompt saying that the vehicle has been successfully
located, press the brake pedal to keep the vehicle stationary and wait for positioning detection.
Make sure your seat belt is fastened and the doors are closed while waiting in the starting
area.
Tap the “Power Swap with Assisted Parking” button. When you see “Release brake and steering
wheel”, follow the instructions to start parking into the Power Swap Station.
Parking will be suspended if obstacles are detected during the process.
If parking is suspended due to systemic reasons or active intervention during the process,
please confirm that there are no obstacles in the surrounding area and manually resume parking.
If you are unable to continue parking, you can select “Terminate Parking” and exit, after which
an on-site specialist will manually swap your vehicle’s power. If the Power Swap Station is unmanned, you
can either park automatically or manually again, or contact the specialist.
After parking is completed, swap the vehicle’s power as instructed on the interface.
Before or during parking into the power swap station, please always pay attention to your
surroundings to confirm that there are no passing vehicles, pedestrians, children, etc. and ensure
parking safety.
Please do not take over the accelerator pedal, unbuckle the seat belt, leave the driver’s
seat, or open the door during parking into the power swap station.
Starting/Ending a Power Swap
After parking successfully, your vehicle will automatically enter the one-click power swap
process. Please read the instructions on the Center Display screen carefully and tap to start the power
swap.
Your vehicle will automatically switch to the power swap state, during which NOMI will emit a
constant light and the Center Display will show the power swap process. The Center Display system will
automatically turn on the airflow function according to the ambient temperature. You can also turn on the
airflow function and set the air volume manually as needed. Meanwhile, the media audio played before the
start of the power swap will continue to play during the process.
If your vehicle is not parked in place or failed to be automatically adjusted, please
adjust your vehicle as instructed by the field specialist.
The windows or air conditioning cannot be adjusted during the power swap. Please adjust
them to proper positions in advance.
During the power swap, it is normal that the vehicle jerks slightly with some noise and
some warning lights are on temporarily.
During the process, do not try to open any door, shift gears, press the brake pedal, or
perform other actions, which may cancel the power swap abnormally.
After the Power Swap is completed, the vehicle's screen returns to the original interface. At
this time, the vehicle can leave the Power Swap Station normally.
Caution 驶出换电站时请注意观察前方的车辆及行人,确认安全后再驶出换电站。
Please pay attention to any vehicles or pedestrians in front for safety before exiting the
power swap station.
The above warnings and precautions do not cover all situations that may affect the normal
operation of the PSAP system. Many factors may interfere with the PSAP system. To prevent accidents, be
sure to always drive attentively and focus on traffic, road, and vehicle conditions. Drive with caution.
Side Distance Indication System (SDIS)
The Side Distance Indication System (SDIS) monitors the front of the vehicle when it is driving
at a low speed with ultrasonic sensors. When approaching obstacles, it automatically activates the Parking
Camera interface to assist in gauging parking spaces or navigating through narrow passages, such as roads
with restricted widths.
The Side Distance Indication System is for reference only and cannot replace your visual
inspection.
The Side Distance Indication System is a driving assist feature and cannot address all
traffic, weather, and road situations. In extreme and adverse weather conditions, including but not
limited to rain, snow, fog, and haze, it is not recommended to activate this feature.
To protect your safety, you must always pay attention to the traffic and road conditions and
decide for yourself whether to activate the Side Distance Indication System.
You always bear the ultimate responsibility for safe driving and compliance with current
traffic laws and regulations.
Enabling/Disabling the SDIS
The SDIS can be enabled or disabled with the Settings button on the Parking Camera interface.
When the feature is enabled, different layout styles can be selected, such as Dual-View, Full Screen, and
Picture-in-Picture.
The Parking Camera interface will be automatically activated when the following conditions are
met simultaneously:
Vehicle is in DRIVE (D).
The vehicle speed does not exceed 16 km/h.
There are obstacles in any of the areas ahead and they are close to the vehicle.
Detection Areas and Range of the SDIS
Area
Range
1
Within 50 cm
2
Within 80 cm
3
Within 80 cm
You can tap the upper right of the Parking Camera interface to turn off the warning sound. At
the same time, you should bear all risks posed by turning off the warning sound.
Automatic Exit of the Parking Camera Interface:
The Parking Camera interface will be automatically closed 4.5 seconds after you have passed
the obstacle.
By tapping the blank area of the parking camera or pinching the screen with your fingers,
the SDIS can be temporarily disabled for 3 minutes and will resume its normal function thereafter.
When the vehicle speed exceeds 16 km/h, the Parking Camera interface will be exited
automatically.
When the working conditions for the SDIS are met again, the Parking Camera interface will
be automatically activated.
Warning如遇极端恶劣天气(包括但不限于雨、雪、雾、霾等),不建议使用此功能。
It is not recommended to use this feature in the event of extreme weather conditions (such
as rain, snow, fog, haze, etc.).
The above warnings do not cover all situations that may affect the proper operation of the
SDIS. Many factors may interfere with the SDIS. To prevent accidents, be sure to always drive attentively
and focus on traffic, road, and vehicle conditions. Drive with caution.
Vehicle Health Status
Please keep an eye on the health status of the vehicle to keep your vehicle in the best
condition. You can tap My ET5 on the Home interface of the Center Display to
enter the Vehicle Health Status interface. When you are on this interface, the vehicle can perform a
self-check, and show you the current health status of the vehicle once it is finished.
You can also check the power consumption of the current trip on the My
ET5 interface.
Maintenance Instructions
To ensure that the vehicle can operate normally and bring a good driving and riding experience,
you need to conduct regular vehicle maintenance.
In light of the complexity of vehicle systems and the after-sales service requirements of
electric vehicles by national laws and regulations, we recommend you to have your vehicle maintained
regularly at NIO’s service center. If you have any inquiries about the vehicle inspection, please contact
NIO at any time.
Routine Maintenance
Routine maintenance is very important for ensuring your vehicle performance, reducing your costs
of vehicle usage, and extending your vehicle service life. It is recommended to have your vehicle serviced
at the NIO Service Center according to the following requirements.
Daily Maintenance
The following items shall be checked on a daily basis. If any abnormalities are found, please
contact the NIO Service Center in a timely manner for relevant inspections.
Check that all vehicle lights and horns work properly.
Check that the wipers and windshield washers work properly.
Check that the brakes work properly.
Check that the seat belts work properly.
Check if there are abnormally lit indicator lights or text warning messages on the
Instrument Cluster and Center Display.
Check tire pressure and for damage or unusual wear on the tires.
Check if there is any abnormal accumulation of fluids under your vehicle body (water
accumulation caused by dehumidification in the air conditioning system is normal).
Check your vehicle body for any dirt (such as bird droppings, resin, asphalt spots,
insects, and industrial dust) that may damage the paint. If there is any dirt, please clean your
vehicle body according to the instructions. Refer to “Exterior Cleaning and Maintenance”.
Check for any dirt in the roof LiDAR area, high-definition camera area, and surround-view
camera area. If there is any dirt, please clean those areas according to the instructions. Refer to
“Exterior Cleaning and Maintenance”.
Replace the smart key battery according to the prompts on the Center Display of your
vehicle.
When driving, pay attention to any abnormal sounds such as bumps or impacts from the bottom
of your vehicle body.
Regular Maintenance
If you drive your vehicle in normal driving conditions, please have it serviced at the NIO
Service Center according to the following maintenance items and intervals:
Gearbox oil: Replace every 200,000 kilometers.
Brake fluid: Replace every 3 years.
Coolant: Check the coolant at the latest in the 5th year or at 100,000 kilometers
(whichever comes first), and replace it if necessary.
If the coolant is not replaced, check the coolant every 2 years or 40,000 kilometers
(whichever comes first) and replace it if necessary. If the coolant is replaced, check the new coolant
in the 5th year or at 100,000 kilometers (whichever comes first), and replace it if necessary.
When your vehicle is used in extremely cold (below -30 °C) climates, check the coolant and
replace it if necessary.
Brake pads: Check your brake pads for wear at the latest in the 5th year or at 100,000
kilometers (whichever comes first), and replace them if necessary.
If the brake pads are not replaced, check the brake pads every 2 years or 40,000 kilometers
(whichever comes first) and replace them if necessary. If the brake pads are replaced, check the new
brake pads for wear in the 5th year or at 100,000 kilometers (whichever comes first), and replace them
if necessary.
Brake discs: Check your brake discs for wear at the latest in the 10th year or at 200,000
kilometers (whichever comes first) and replace them if necessary.
If the brake discs are not replaced, check the brake discs every 2 years or 40,000
kilometers (whichever comes first) and replace them if necessary. If the brake discs are replaced,
check the new brake discs for wear in the 10th year or at 200,000 kilometers (whichever comes first),
and replace them if necessary.
Note上述”必要时“是指检测结果不满足蔚来汽车技术标准。
The above "when necessary" refers to when test results do not meet the requirements of NIO
technical standards.
Irregular Maintenance
It is recommended to have the following maintenance done at the NIO Service Center when needed
based on the conditions of your vehicle and the prompts on the Center Display:
Check the wiper strips for aging and scraping, and replace them if necessary.
Check the air filter according to the prompts on the Center Display of your vehicle and
replace it if necessary.
Replace the 12V battery according to the prompts on the Center Display of your vehicle.
Note上述”必要时“是指检测结果不满足蔚来汽车技术标准。
The above "when necessary" refers to when test results do not meet the requirements of NIO
technical standards.
It is recommended to have a comprehensive vehicle health check done at the NIO Service Center
when needed based on the usage environments and condition of your vehicle.
Special Maintenance
If your vehicle is frequently driven in the following harsh environments, additional
maintenance items or shorter maintenance intervals may be required. For specifics, please contact the NIO
Service Center.
Driving in a dusty environment.
Driving in extremely cold (below -20 °C) or high temperature (above 40 °C) environments.
Driving in humid environments or frequently wading in water.
Driving on roads with high salt content or corrosive materials.
Frequent braking or driving in mountainous areas.
Frequent use under heavy loads or driving for special purposes.
Vehicle retrofitted or modified for special purposes.
In extremely cold areas, it is recommended that your brake caliper be cleaned and lubricated
yearly or every 20,000 kilometers.
Front Wiper Blade Replacement
The front wipers remove rainwater and stains on the windshield (used together with windshield
washer fluid). If your vision through the windshield is blurred or if there are multiple obvious water marks
after the wiping, which affect the driver's vision and do not disappear, it's time to replace the wiper
blades.
The steps to replace the front wiper blades are as follows:
Enter the Settings interface on the Center Display, tap Doors &
Windows Locks > Wipers > Front Wiper Service Position, and then the front wipers will
move to a position that is convenient for replacement.
After the front wipers move to the service position, they can be lifted upwards: press and
hold the front wiper blade tab and slide the wiper blade down perpendicular to the wiper arm to remove
the wiper blade.
The sprinkler tube also needs to be disconnected.
Insert the new wiper blade until you hear a "click", which indicates that the wiper blade
has been properly secured.
Windshield Washer Fluid Refill
Windshield washer fluid helps maintain good visibility in the front windshield. How to add
windshield washer fluid:
Coolant Refill
Warning添加冷却液需打开前盖,请联系服务中心进行操作,以免意外触及高压部件造成人身伤害。
To avoid the risk of high voltage electric shock when opening the hood, please contact NIO to
top up the vehicle’s coolant.
Coolant helps the vehicle E-Powertrain System to run at a suitable temperature range. How to
refill coolant:
Caution请勿直接猛力关闭前盖或使其自由落下。
Do not slam or drop the hood.
Brake Fluid Refill
Warning添加制动液需打开前盖,请联系服务中心进行操作,以免意外触及高压部件造成人身伤害。
To avoid the risk of high voltage electric shock when opening the hood, please contact NIO to
top up the vehicle’s brake fluid.
Brake fluid is the medium that transmits brake pressure in the hydraulic brake system. How to add
brake fluid:
Caution请勿直接猛力关闭前盖或使其自由落下。
Do not slam or drop the hood.
Tire Inspection and Maintenance
Do not drive on damaged, over-worn, or incorrectly inflated tires. For driving safety, please
check the tires on a regular basis:
Inspect the tires frequently for damage (punctures, cuts, tears, and bulges), and remove
foreign matter embedded in the tire tread.
A puncture will cause the tire to lose pressure, so it’s important to check the tire
pressure frequently. Repair or replace punctured or damaged tires as soon as possible. If you feel
sudden shaking or bumps while driving, or suspect that the tires are damaged, slow down immediately
while avoiding heavy braking or sudden steering. Stop after confirming that it is safe, and then
contact the NIO Service Center for assistance immediately.
If the tire valve dust cap is lost, please replace it as soon as possible.
Keep the tires away from oil, grease or fuel.
Always store wheels in a cool, dry and dark place. Separate tires that are not on wheels
should be stored upright.
Do not store summer tires or park a vehicle with summer tires in ambient temperatures below
-15 °C.
Check the tread pattern for wear marks on a regular basis, especially before and after long
drives. If the tire is worn down to 1.6mm or less (or 3mm in winter), a wear
mark will appear, by then the ground grip of the tire will be greatly reduced, and the tire will need to be
replaced immediately to prevent the risk of an accident occurring.
For safety reasons, tires must be replaced if they show the following damage:
Damage such as cuts, splits, and cracks down to the carcass, and bulges that indicate inner
ply damage.
Frequently leaks, or irreparable damage due to the size or location of the cut or other
damaged locations.
Punctures, bulges and damage to tire sidewalls.
Deformation or corrosion of tires caused by long-term parking.
If you are not sure, please consult the NIO Service Center.
Caution若轮胎磨损不均匀,建议您到服务中心进行轮胎动平衡检查。
If tires show uneven wear, it is recommended that you visit the NIO Service Center for a
dynamic balancing check on the tires.
In order to reduce tire wear and prolong the service life of the tires, the tires should be
cared for according to your driving habits and road conditions:
New tires are in the running-in period during the first 500 kilometers. Running in at a
moderate speed and with a careful driving style will prolong the service life of the tires.
When passing a curb or similar sections of road, keep the wheels perpendicular to the curb
as much as possible, and drive slowly.
Hard impacts of the tires against curbs or objects with sharp edges, such as rocks, or
impacts against sharp edges can cause imperceptible tire damage that will add up in the future.
Depending on the severity of the impact, it may damage the rim flange.
Turning too fast, over acceleration and hard braking will increase tire wear.
When encountering larger potholes, speed bumps, or obstacles, please slow down and proceed
with caution for your safety.
New tires, after they are replaced, must undergo a dynamic balance check.
If the vehicle cannot remain straight or keeps deviating while driving, please go to the
NIO Service Center to check the wheel alignment parameters and make adjustments if necessary.
If the rear tires have less wear than the front tires, then swap the front and rear tires
as needed. It is recommended to swap the front and rear tires every 10,000 km.
Brake Pad and Disc Inspection and Maintenance
The brake pedal should be stepped on occasionally during rainy or snowy days, so that the heat
generated by friction can warm and dry the brake pads. Do the same when driving in extremely wet or cold
weather.
After having your vehicle cleaned, dry the brakes for a short time to preserve the braking effect
and prevent the brake discs from rusting.
Because the wear condition of brake pads and brake discs depends largely on your driving style
and usage environments, it is impossible to determine the wear condition in terms of actual driving mileage.
This high performance braking system is used to achieve comprehensive and excellent braking
effects at various vehicle speeds and temperatures. Therefore, at certain vehicle speed, braking force and
environment conditions (such as temperature and humidity), the brake may make a sharp noise.
New or replaced brake pads and brake discs can provide the best braking effect after a
“running-in” period of at least 500 kilometers. During the running-in period, you need to depress the brake
pedal harder to compensate for the reduced braking effect.
Brake Disc Descaling
You can go to the Settings interface on the control bar at the bottom of the Center Display,
and tap Driving and Parking > Brake Disc Descaling to turn this feature
on:
After the feature is turned on, only the brake calipers are used when braking in order to speed
up the friction between the brake discs and the brake pads so as to achieve rust and moisture removal. At
this time, the regenerative braking system will shut down temporarily, having a certain impact on the
remaining range.
It can remove rust on the brake discs caused by the vehicle being parked for too long.
It can quickly remove water stains on the brake disc surface after a rain, reducing
abnormal braking noise or the change of your foot’s sensation when braking.
It can speed up the running-in of the brake system.
When you switch between drive modes, Brake Disc Descaling will be automatically turned off.
Air Filter Inspection and Maintenance
After replacing the air filter, go to the Comfort settings interface on the bottom of the Center
Display, and tap Air Filter Indicator to reset the filter service life timer.
This estimated service life is for reference only as the actual service life depends on the environment and
other factors. Replace it when needed.
Make sure to keep the grille shutter of the air conditioner clear of any obstructions (such as
leaves and snow) before driving.
12V Battery Care
The 12V battery is located in the front truck and supplies 12V power for vehicle starting
equipment and electrical equipment.
Keeping the 12V battery fully charged will prolong its service life.
If the 12V battery is severely depleted (after the vehicle has not been used for long),
please contact the NIO Service Center and do not replace the 12V battery yourself.
When leaving the vehicle, be sure to turn off its electrical equipment (e.g. lights,
multimedia devices, etc.) and try to keep the vehicle in a cool, dry place.
Caution断开并重新连接低压电池后,车窗自动升降及防夹功能将不可用。
After the 12V battery is disconnected and reconnected, the automatic lifting and anti-pinch
features of the window will be temporarily unavailable.
High-voltage Battery Maintenance and Recycling
High-voltage Battery Maintenance
The high-voltage battery is a critical driving component of the vehicle. When utilizing it,
please pay attention to the following:
Avoid parking the vehicle in excessively high or low-temperature environments as it can
directly impact the lifespan of the high-voltage battery. Do not leave the vehicle parked in high or
low temperatures for more than 8 hours;
To reduce the risk of accidental fires, avoid parking the vehicle near high temperatures
or heat sources;
The vehicle should be parked in a dry location, avoiding damp or watery parking spots;
It is recommended not to stay in deep water (preferably not exceeding the battery base
plate) for a long time when the vehicle is wading, as it may cause damage to its high-voltage
components;
It is recommended to refrain from using high-power DC fast charging methods frequently in
order to preserve the lifespan of the high-voltage battery;
If the vehicle will be unused for an extended period, ensure that the high-voltage
battery’s charge level is above 50% (as indicated on the Instrument Cluster) and park it in a cool,
dry place to preserve the battery life. It is recommended to check the battery level weekly and use
the vehicle at least once a month;
For proper charging, use equipment that complies with the charging specifications and
adhere to the guidelines provided by the charging station; and
When driving over road surfaces with bumps, gravel, or raised obstructions, take care to
drive slowly or avoid the obstacles to prevent damage to the vehicle chassis or battery pack. In the
event of a bump or impact on the bottom of the vehicle, please contact NIO Service Center
immediately for safety inspection of components such as the chassis and high-voltage battery pack.
Warning动力电池属高压部件,请勿私自触碰、移动、拆解动力电池及其相应线路,以免发生人身伤害。
For information on remaining battery power and vehicle range, please consult the
instrument cluster; other display terminals (including but not limited to App, NIO Phone, Watch and
other wearable devices) may not provide the most recent information and should only be used for
reference purposes.
Battery is a high-voltage component. To avoid injury, do not touch, move or disassemble
it and its wiring.
If the vehicle's range is 0 kilometer (as indicated by the instrument cluster display),
be sure to charge the vehicle within 24 hours. In this case, the charging speed may be slow until
the high-voltage battery is charged to 50% in order to restore the performance of the battery.
Failure to charge the high-voltage battery within 72 hours may cause irreversible damage to the
battery.
High-voltage Battery Recycling
Proper recycling is required for used high-voltage batteries. During vehicle maintenance and
repair, high-voltage batteries meeting the following conditions are determined as needing recycling:
The capacity and condition of the high-voltage battery are assessed during their
maintenance and servicing at NIO Service Center. For batteries that need to be recycled according to
relevant laws and regulations, NIO takes primary responsibility and recycles them based on the current
market conditions;
When batteries are found to be unsuitable for continuous use but are still in acceptable
condition, they go through minor repairs before being recycled for cascaded utilization; or
If the battery has experienced severe failures or damage where cascaded utilization is
impossible, it will be recycled for regeneration.
Caution请勿随意处理或丢弃废旧动力电池,以免对环境造成严重污染。
Properly dispose of or discard the used high-voltage battery to avoid serious
environmental pollution.
Vehicles, vehicle parts and batteries must be disposed of by authorized recycling companies.
They must not be disposed of in general household waste or sent to a landfill as this can cause severe
environmental damage. Please see the NIO website for details.
This symbol on the battery means that this product must not be treated as household waste.
The high-voltage battery recycling process involves collection and subsequent processing
carried out by NIO or designated third-party recycling organizations.
Do not use fuses with a nominal current higher than the rated current. Only replace the blown
fuse with a fuse of the same nominal current and size.
S/N
Specifications
Description
PF01
450A
DC/DC converter
PF02
200A
Front trunk fuse box
PF03
200A
Instrument panel fuse box
PF04
200A
Rear trunk fuse box
PF05
125A
Electric power steering gear power supply 2
PF06
125A
Electric power steering gear power supply 1
Exterior Cleaning and Maintenance
Regular cleaning and waxing of your vehicle can protect it from damage caused by the external
environment. The interval to wash and wax your vehicle depends on the frequency of use, parking conditions
of your vehicle (in garage, under trees, or in direct sunlight, etc.), and weather conditions.
The deposition of bird droppings, insect residues, resins, industrial dust, tar lumps, coal
cinders, and other deposits on the body paintwork and roof will cause damage to the surface of your
vehicle's paint, headlights, and taillights. If your vehicle is exposed to high temperature and strong
light, the corrosion of the paintwork of your vehicle will be exacerbated. Therefore, it may be necessary to
wash your vehicle once a week. When washing, please soak the dirt with enough water first and then remove
it.
Caution强烈建议您开启洗车模式
Before a car wash, you are strongly advised to turn on Wash Mode from the Center Display,
quickly close the doors and windows with one touch, and disable the sensing function to avoid
unnecessary losses.
When washing and waxing the vehicle, use special-purpose cleaning and maintenance products.
Check that the products are not expired and be sure to store them out of reach of children after use.
Warning请勿在车辆充电时清洗车辆。
Do not wash the vehicle when it is charging.
Manual Wash
When manually washing your vehicle, first use enough water to moisten the exterior surface of
your vehicle and rinse off as much dirt as possible. Then, clean your vehicle carefully from the top down
using a soft sponge, cloth, or soft brush. If there is dirt that is difficult to remove, a cleaning agent
can be used. If there is a lot of dirt on the sponge or cloth, replacing it with a new cleaning sponge is
recommended. After cleaning your vehicle, rinse it thoroughly with water and wipe it clean with a towel.
After the salt spraying period ends in winter, the bottom of your vehicle needs to be thoroughly washed.
To protect the environment, please wash your vehicle on a dedicated washing platform. If this
equipment is not available, you need to choose a suitable place to wash your vehicle.
You can go to the Settings interface on the Center Display and tap Driving
and Parking > Wash Mode, where you can choose the opening and closing of the doors, windows,
rear trunk, and charge port, and unlock the settings, wipers, and door handles to reduce damage to your
vehicle components while the vehicle is washed.
Note请勿在阳光直射处清洗车辆,否则会有损伤油漆的风险。
Do not wash the vehicle in direct sunlight as this may damage the surface of the paint,
headlights, and taillights.
When washing the vehicle with a hose in winter, do not aim directly at the outer door
handles, charge port, and seams around the doors and glass roof. Otherwise, these parts may be
frozen in place.
Do not use coarse sponges or corrosive cleaning agents to wash the vehicle to avoid
damaging the surface of the paint.
Do not wash the vehicle with water above 60°C.
Do not use a dry cloth or sponge to clean the lights. Use only water or soapy water.
Alcohol-based or organic cleaning agents may damage the lights and cause them to crack.
Make sure the lights are protected when cleaning or applying film on the vehicle.
Automatic Wash
Your vehicle can be washed in automatic vehicle washing equipment. However, the structure and
filter of the vehicle washing equipment and the type of cleaning agent and maintenance agent can have an
impact on the body paintwork. If the paintwork of your vehicle is dull or even scratched after washing,
please notify the operator of the vehicle washing equipment immediately. If necessary, the vehicle washing
equipment shall be replaced.
Before the automatic vehicle wash of your vehicle is performed, all the doors and windows shall
be closed, the automatic wipers shall be turned off, and the side mirrors shall be folded. At the same
time, the operator of the vehicle washing equipment shall be informed in advance that your vehicle is
equipped with a roof rack, a radio antenna, etc.
You can go to the Settings interface on the Center Display and tap Driving
and Parking > Wash Mode, where you can choose the opening and closing of the doors, windows,
rear trunk, and charge port, and unlock the settings, wipers, and door handles to reduce damage to your
vehicle components while the vehicle is washed.
Caution 车辆进行自动洗车前,请在中控屏应用程序中心,点击。
Before your vehicle undergoes an automatic vehicle wash, please switch to NEUTRAL (N). Go to
the Settings interface from the control bar at the bottom of the Center Display and tap Driving & Parking>NEUTRAL (N).
High Pressure Wash
When using a high pressure washing machine to wash your vehicle, always follow the operating
instructions, and, in particular, maintain a sufficient distance between the spraying nozzle and the
paintwork or soft materials (such as rubber hoses or sound insulation materials). It is recommended that
the distance is more than 500 mm, the pressure is below 100 bar, and the maximum temperature is 60 °C.
When rinsing, try to make the jet perpendicular to the surface of your vehicle as much as possible. If
these requirements are not satisfied, your vehicle components may be damaged or water droplets may flow
into your vehicle.
Never use a circular or rotating nozzle, especially when washing tires. Even if the spraying
distance is large and the rinsing time is short, the tires may be damaged.
Never use a high pressure washing machine to rinse your vehicle nameplate and the gaps at the
edges and corners of the door glass.
Polishing and Waxing
A high quality wax layer can effectively protect your vehicle's paintwork from environmental
influences and even prevent minor scratches. When water droplets no longer roll off smoothly on the
cleaned body paintwork, a layer of high quality hard wax curing agent shall be applied immediately. If
cleaning and curing agents are applied regularly, applying hard wax at least twice a year is recommended
to protect the body paintwork.
Polishing is only necessary when the body paintwork has lost its gloss and the waxing cannot
restore its glossy appearance. Do not polish components coated with matte paint or plastic parts.
Wiper Blades
Wash in warm soapy water. Do not use cleaning agents derived from alcohol or petroleum
products.
Windows and Side Mirrors
Clean the inner and outer surfaces of all the windows regularly with glass cleaning agents.
Clean the inner surface of the rear windshield with a soft cloth and wipe it horizontally. Do
not scratch the glass or use abrasive cleaning agents to avoid damaging the heating element.
Wash the side mirrors with soapy water. Do not use abrasive cleaners to avoid damaging the
lens.
Plastic Parts
Plastic parts shall be cleaned through conventional cleaning methods. If the stains cannot be
removed, only solvent-free special cleaning agents for plastic parts can be used. Otherwise, the plastic
parts may be corroded.
Chromium-plated Parts
Chromium-plated parts can be cleaned with a damp cloth and then polished with a soft dry cloth.
If the effect is not good enough, chromium care agents can be used. When using chromium care agents, make
sure to cover the entire surface evenly and completely. Do not clean and polish chrome-plated surfaces in
dusty and sandy environments.
Wheels
To maintain the glossy appearance of the aluminum alloy wheel rims for a long time, you need to
perform regular maintenance on the wheels. It is recommended to clean them every two weeks to prevent fine
abrasive particles, dirt, or salt particles that fall after the vehicle brakes from adhering to them.
Otherwise, the aluminum alloy may be corroded. After cleaning the wheels, apply an acid- and alkali-free
cleaning agent designed specifically for aluminum alloy wheels. Apply hard wax to the wheels every three
months. If the protective paint layer is damaged due to being struck by a stone or other reasons, it must
be repaired immediately and no body paintwork polish or other polishing materials shall be used.
Severe dirt layers on the wheels can also lead to a wheel imbalance. This will be reflected
through wheel vibrations, which will be transmitted to the steering wheel. In some cases, this may cause
premature wear of the steering gear.
Bottom Plate Protection
The bottom of your vehicle has been treated to prevent chemical and mechanical damage. However,
damage to the protective layer is inevitable during driving. It is recommended to inspect the protective
layer on the bottom and chassis of your vehicle at regular intervals, preferably before winter and in
spring, and perform repairs if necessary.
External Area of Radar
The external area of the radar can be cleaned manually with a flannelet soaked with a proper
amount of water or neutral cleaning solution.
In case of snow or ice, it is necessary to first clean the external area of the radar from ice
and snow, and then wipe it with a flannelet or air dry it.
When using a high pressure washing machine to wash your vehicle, do not rinse the external area
of the radar directly to prevent damage.
Please be careful not to pollute or damage the sensors on the front/rear bumper when
maintaining your vehicle.
Do not apply film, wax, or coat in the external area of the LiDAR. Otherwise, the sensing
performance of the LiDAR will be affected.
Interior Cleaning and Maintenance
Regularly clean the interior with cleaners or conditioners to maintain the interior appearance.
Before using any cleaners, vacuum the interior first.
Some dyes (such as from dark-washed jeans or sheepskin clothing) may stain the interior
materials. When this happens, clean the stained surface as soon as possible.
Do not use strong solvents such as cleaning fluids, petrol or petroleum solvents which may
damage the interior materials.
Do not spray cleaners directly on electronic buttons, switches or parts. Wipe stains with a
soft cloth dampened with cleaning fluid.
Sharp objects may damage the fabric interior.
Fabric Interior
Only use specialized cleaners, dry foam, and a soft brush to clean the fabric materials on the
doors, rear trunk, roof, and other areas.
Leather Interior
You can use a slightly wet cotton or woolen cloth, or a cleaning cloth to clean common dirt on
the leather interior. You can use a cloth dipped in mild car shampoo to clean stubborn oil stains. Make
sure that the leather material is not fully wet and prevent water from seeping through the stitching. Any
remaining water on the leather surface should be quickly wiped off with a soft dry cloth. Stains from
ballpoint pens, ink, lipsticks, shoe polish, and other substances on leather surfaces should be removed as
soon as possible. We recommend you use a 100% pure polyurethane foam sponge for cleaning Nappa leather.
We recommend limiting the use of leather care products as much as possible, no more than twice
a year for light-colored leather and no more than once a year for dark-colored leather.
Note不可用含溶剂的清洁剂清洁仪表板、气囊饰盖或皮革制品
Do not use cleaning solvents to clean the instrument panel, air bag covers, or leather
interior.
To avoid leather fading, do not leave the vehicle under strong sunlight for long periods
of time. If you need to park the vehicle under strong sunlight, please cover all leather material.
Sharp objects on clothes such as zips, rivets, and sharp buckles may leave marks or dents
on the leather.
Avoid drinking coffee or using sunscreen in vehicles with a Nappa leather interior.
Remove coffee or sunscreen stains on Nappa leather with mild soapy water as soon as possible.
Do not spray formaldehyde cleaners on leather. Doing so may leave white spots on genuine
leather which are difficult to remove.
Seat Belts
Only use mild car shampoo to clean the seat belts. Do not remove the seat belts from the
vehicle. Allow the belts to dry fully while extended.
Protective Films
Sunroof Heat Insulation Film/TPU Film
The vehicle comes with a panoramic glass sunroof that can block most of the heat and
ultraviolet rays. In addition, high-precision positioning units are installed under the sunroof. Any
additional products such as a heat insulation film, TPU film, or roof luggage box installed on the sunroof
may interfere with the signals of the units, thus preventing relevant advanced driver assistance system
features from working properly.
If you want to install a heat insulation film or TPU film to the sunroof, make sure to avoid
the blue areas shown below. Otherwise, signal reception will be affected. If you have any questions,
please contact the NIO Service Center.
Color-Changing Film/Transparent Film
When installing a color-changing or transparent film, make sure to avoid areas around the
surround-view cameras, HD cameras, ultrasonic radars, and LiDAR radars to prevent interference with the
advanced driver assistance system features.
Side Window Film
Do not install the side window film too close to the edge of the window. Leave a small gap to
prevent the curling caused by the lifting and lowering of the window.
Front Windshield Film
The original front windshield of NIO electric vehicles has good thermal insulation and
ultraviolet blocking performance. We do not recommend to install a film on it.
If you still want to install a film, you should prevent installation liquid from seeping into
the area below the instrument panel. This will cause failure of electrical components inside the
instrument panel.
Rear Windshield Film
The original rear windshield of NIO electric vehicles has good thermal insulation and
ultraviolet blocking performance. We do not recommend to install a film on it.
If you still want to install a film on the rear windshield, be sure to:
Thoroughly remove water when applying the film to avoid causing excessive glare on the
windshield at night.
Prevent excessive installation liquid from seeping into the rear cover, which will cause
short circuit in the audio system.
Caution对于车辆信号发射和接收区域,贴膜时应避开此区域,以防影响部分系统的正常工作。
Avoid the signal emission and reception areas when installing the film in order not to
affect the normal operation of some systems.
After the installation of the sunroof insulation protection film, avoid exposure to
sunlight within 3 hours, do not wash your vehicle within 24 hours, and do not exceed 80 km/h while
driving.
Do not raise or lower the window or wipe the inside of the glass with force within 7-10
days after the installation of the side shield film.
Do not activate the rear windshield defogging feature within 30 days after the
installation of the rear windshield film.
The rear windshield film may have an impact on the auto-dimming feature of the rearview
mirror.
Avoid scratching the film area with hard objects during daily use and when washing the
vehicle.
Application of Antibacterial Product
Haptex
Haptex synthetic leather with antibacterial properties by means of a functional layer is based
on Biomaster AT300 (active ingredient silver chloride CAS-No. 7783-90-6) for use in automotive interior
parts (eg. seats, IP, CNSL, pillars) cladding: Antimicrobial product protection against gram-positive and
gram-negative bacteria (eg. Staphylococcus aureus and Escherichia coli according to GB/T 31402 or ISO
22196). No addition precautions need to be taken when the driver and passengers use the vehicle normally.
Fabric
Fabric with antibacterial properties is based on SILVADUR™ 960 Flex Antimicrobial, a polymeric
system incorporating a silver ion antimicrobial agent (active ingredient CAS-No. 7761-88-8) for use in
automotive interior parts: Antimicrobial product protection against gram-positive and gram-negative
bacteria (eg. Staphylococcus aureus and Escherichia coli according to GB/T 20944). No additional
precautions need to be taken when the driver and passengers use the vehicle normally.
Steering Wheel Leather
Artificial leather with antibacterial properties by means of a functional layer is based on
Biomaster AT300 (active ingredient silver chloride CAS-No. 7783-90-6) for use in the steering wheel
surface cover: Antimicrobial product protection against gram-positive and gram-negative bacteria (eg.
Staphylococcus aureus and Escherichia coli according to GB/T 31402 or ISO 22196). No additional
precautions need to be taken when the driver and passengers use the vehicle normally.
Paint
Novaron AG1100 coatings with antibacterial properties are based on silver sodium hydrogen
zirconium phosphate (active ingredient CAS-No. 265647-11-8) for use in the automotive interior paint
parts (eg. driver airbag cover): Antimicrobial product protection against gram-positive and
gram-negative bacteria (eg. Staphylococcus aureus and Escherichia coli according to GB/T 21866). No
additional precautions need to be taken when the driver and passenger use the vehicle normally.
PETER coatings with antibacterial properties are based on silver phosphate glass (active
ingredient CAS-No. 308069-39-8) for use in automotive interior paint parts (eg. ICS holder paint):
Antimicrobial product protection against gram-positive and gram-negative bacteria (eg. Staphylococcus
aureus and Escherichia coli according to ISO 22196). No additional precautions need to be taken when
the driver and passenger use the vehicle normally.
Filter
Filter with antibacterial properties by means of a functional layer is based on
dimethyltetradecyl[3-(trimethoxysilyl)propyl]ammonium chloride (N-46279) (active ingredient CAS-No.
41591-87-1) for use in air handling/ air conditioning systems: Bacteriostatic and fungistatic properties
against a multitude of gram-positive and gram-negative bacteria, yeast and fungi according to ISO 846 and
JIS L 1902. No additional precautions need to be taken when placing the filter on the market.
Evaporator core & Inner condenser coating
Hydrophilic composite coating with antimicrobial properties by means of a functional layer
based on active substances CAS-No.7631-86-9, 26530-20-1 and 4299-07-4 was attached to the surface of the
evaporator and inner condenser. The coating shows great antimildew properties for Aspergillus Niger,
Penicillium sp. and antibacterial properties for Escherichia coli and Staphylococcus aureus according to
GB 21551.2. No additional precautions need to be taken when placing the evaporator and inner condenser on
the market.
Vehicle Information
Contact NIO
+8000 999 6699
NIO website
http://www.nio.com
The vehicle nameplate is located under the B-pillar on the right side.
The vehicle brand logo can be found in the following places:
Instrumentation and Controls
1. Electronic switch for inner door handle
8. Emergency call and reading lights
2. Window control panel
9. NOMI Smart Assistant
3. Switches on the left side of the steering wheel
10. Touchscreen display
4. Turn signal and headlights stalk
11. Gears and central control panel
5. Digital instrument cluster display
12. Central control wireless charging board
6. Switches on the right side of the steering wheel
13. Accelerator pedal
7. Wiper and washer stalk
14. Brake pedal
Warning Sign Information
No.
Title
Diagram
Description
1
High Voltage Warning Sign
Do not touch high voltage components. Dangerous!
2
High Voltage Component Warning Sign 1
High voltage components. Caution: Danger. Do not touch high voltage components without
wearing protective gear. Beware of electric shock!
3
High Voltage Component Warning Sign 2
High voltage components. Caution: Danger. Do not touch high voltage components without
wearing protective gear. Beware of electric shock and scald!
4
High Voltage Battery Pack Warning Sign
Precautions for using high-voltage battery packs.
5
High Voltage Cable Sign
All high voltage components of the vehicle are connected with orange high voltage cables.
Do not touch high voltage components without wearing protective gear!
6
Mutual compatibility identifiers used for charging the vehicle
Mutual compatibility identifiers to guide you in charging the vehiucle are found in the
vehicle's charging port. When selecting the charging gun, you must make sure the identifier on the
charging gun equals one of the identifiers found in the car's charging port, either C, K or L.
Voltage ranges related to those identifiers are as follows:
C: AC ≤ 480 V
K: DC 50 V to 500 V
L: DC 200 V to 920 V
Vehicle Identification Number (VIN)
The vehicle identification number (VIN) is embossed on the floorboard under the front passenger
seat.
The vehicle identification number (VIN) can be found in the following places:
Inner side of the hood
Under the right rear door frame
On the left side of the instrument panel
Bottom left corner of the front windshield
Under the B-pillar on the left side of the body
Above the rear floorboard
On the right side of the liftgate
You can also read the vehicle identification number (VIN) with a diagnostic tool (NIO
Diagnostic System Generation II (BD2)) that is compatible with the vehicle:
Connect the diagnostic tool to the vehicle diagnostic port, and turn on the diagnostic
tool.
Start the diagnostic tool and log in to the main interface of the diagnostic tool.
The diagnostic tool will automatically read the vehicle identification number and display
it on the current interface of the diagnostic tool.
Drive motor identification mark
The front drive motor identification mark is located under the motor.
The rear drive motor identification mark is located on the lower left side of the motor.
Recommended Fluids and Capacities
Item
Specifications
Capacity
Brake fluid
DOT4
0.9L
Coolant
-40 °C OAT (glycol aqueous solution with inhibitor)
18L (100 kWh)
13.15L (75kWh- A )
12.9 L (100kWh - Jiangsu Contemporary Amperex Technology Limited)
12.8 L (100kWh - CALB Co., Ltd.)
12.8 L (75kWh - B)
Refrigerant
R1234yf
GWP
CO2 equivalent
1,000g
0.501
0.0005t
Windshield washer fluid
Freezing point < -30 °C
4L
Gear box oil
Castrol BOT350M3
0.8L (front) 1L (rear)
E-Powertrain System Information
High Voltage Control System
Emergency HV cut-off plug
Airbag
Curtain airbag gas cylinder
Structural reinforcement
Curtain airbag
Charge port
Drive Motor
Air conditioning HV electric heater
High-voltage battery
Rear HV power distribution unit
12V battery
Airbag control unit
Air conditioning compressor
Seat belt pre-tensioner
High-voltage battery
The vehicle is equipped with a lithium-ion high-voltage battery. Be sure not to damage the
high-voltage battery when lifting the vehicle. Take extra care not to break the battery's bottom plate
when using rescue tools.
Warning高压电池警告
Before repairing, disassembling, and installing high-voltage components, it is
necessary to disconnect the power supply and confirm that the emergency power cut-off switch and
12V power supplies are disconnected. After disconnecting the power, let your vehicle stand still
for more than 5 minutes.
Personnel without corresponding qualifications are prohibited from operating
high-voltage components. Operators must wear insulated protective equipment such as insulated
gloves that meet the requirements. They are not allowed to carry or wear any metal items.
Drive Motor
The electric drive system is responsible for the power output of the vehicle, which can convert
the DC energy of the high-voltage battery pack into mechanical torque in a controllable way, and transmit
it to the wheels to drive the vehicle. In addition, in the braking state, the electric drive system can
also regenerate braking energy to charge the high-voltage battery pack. The vehicle is equipped with two
electric drive systems, of which the front electric drive system is installed on the front sub-frame, and
the rear electric drive system is installed on the rear sub-frame.
12V battery
The 12V battery powers the SRS, windows, locks, touchscreens, vehicle lighting, etc.
Airbag
The vehicle airbag system includes frontal airbags and side airbags. The frontal airbags
include front row head airbags, of which the driver airbag is located inside the trim cover of the
steering wheel, and the front passenger airbag is located inside the instrument panel; the side airbags
include front side airbags (located on the outer side of the front seats, and the inner side of the driver
seat), and curtain airbags (located above the doors on both sides, in the ceiling area from the A-pillar
to the C-pillar, where there are curtain airbag gas cylinders inside). The word "AIRBAG" is marked on the
places where the airbag is placed to remind you that there is an airbag herein.
Vehicle Dimension
Item
Numerical value
Length A (mm)
4,790
Width B (mm) (without side mirrors)
1,960
Height C (mm)
1,499
Wheelbase D (mm)
2,888
Front track E (mm)
1,685
Rear track F (mm)
1,685
Front suspension G (mm)
897
Rear suspension H (mm)
1,005
Driving form
4x4 Timing 4WD
Ground clearance (mm)
135
Approach angle
13°
Departure angle
14.1°
Number of seats
5
Mass Parameters
Item
75kwh
100kwh
Unladen mass(kg)
2140
2160
Mass of vehicle with bodywork in running order (including coolant, oils,
fuel, tools, spare wheel and driver)(kg)
2215
2235
Distribution of this mass among the axles(kg)
Front Axle:
1121
1135
Rear Axle:
1094
1100
Technically permissible maximum laden mass stated by the manufacturer(kg)
2690
2690
Distribution of this mass among the axles and, in the case of a
semi-trailer or centre-axle trailer, load on the coupling point(kg)
Front Axle:
1237
1237
Rear Axle:
1453
1453
Technically permissible maximum mass on each axle(kg)
Front Axle:
1264
1264
Rear Axle:
1480
1480
CautionWhen a trailer is installed, it's still necessary to ensure that:
When a trailer is installed, it's still necessary to ensure that:
Technically permissible maximum laden mass no more than
2690
kg;
Technically permissible maximum mass on Front Axle no more than
1264
kg, and on Rear Axle no more than
1480
kg.
Version
MRO(kg)
GVW(kg)
Payload when full occupancy (kg)
Payload when 2 people (kg)
Payload when 4 people (kg)
Coupling point mass (kg)
75 kWh
2215
2690
175*
400*
250*
75
100 kWh
2235
2690
155*
380*
230*
75
* If 20" tyres are selected, the payload shall minus a mass of 20 kg;
if coupling device is fitted, the payload shall minus a mass of 30 kg.
Wheel and Tire Specifications
Item
Numerical value
Specifications
245/45R19 102V XL
245/40R20 99W XL
Tire pressure (bar)
2.6 (no load)
Camber angle
-0.37±0.5°
Total front camber angle
0±0.5°
Front toe-in angle (per wheel)
0.21±0.1°
Total front toe-in angle
0±0.05°
Front kingpin caster angle
4.17±0.5°
Total front kingpin caster angle
0±0.5°
Rear camber angle
-0.96±0.35°
Total rear camber angle
0±0.5°
Rear toe-in angle (per wheel)
0.08±0.05°
Thrust angle
0±0.15°
Steering wheel angle
0±1.5°
Wheel bolt torque (N·m)
140
Note: The tire specifications are subject to the actual configuration of the vehicle.
Caution为确保行车安全,车轮螺母建议拆装 20 次后进行更换。
To ensure driving safety, it is recommended to replace the wheel nuts or bolts after removing
and installing them 20 times.
Tire Markings
All tire signs and features are marked on the sidewall of the tire.
Product Name
Rated load mark
Tire Size
A tire marked 245/40R20 means that the tire width is 245 mm, the aspect ratio is 40, and R
means that the tire has a radial structure and the wheel diameter is 20 inches.
Tire load index and rated speed
The tire load represents the corresponding load weight of the tire, and the rated speed is
the maximum speed that the tire can be used for a long time.
Tire Load
98
99
100
101
102
103
104
105
106
107
108
109
110
Load Weight
750 kg
775 kg
800 kg
825 kg
850 kg
875 kg
900 kg
925 kg
950 kg
975 kg
1000 kg
1030 kg
1060 kg
Q
R
S
T
U
H
V
W
Y
Rated Speed
160 km/h
170 km/h
180 km/h
190 km/h
200 km/h
210 km/h
240 km/h
270 km/h
300 km/h
Maximum tire load and maximum inflation pressure allowed (not for normal driving)
DOT tire identification number
Starts with the letters DOT, followed by numbers/letters, where the first 2 digits
represent the code of the tire manufacturing plant, the second 2 digits represent the tire size, the
next 4 digits represent the tire type code, and the last 4 digits represent the year and week of
manufacturing. For example, 1721 means the 17th week of 2021. In the event of a recall of defective
tires, this information may be used to contact consumers.
Ternary lithium ion/lithium iron phosphate battery
Lithium iron phosphate battery
Ternary lithium ion battery
Rated voltage (V)
3.73
3.74
3.31
3.73/3.22
3.22
3.65
Rated capacity (Ah)
276
137
110
237/192
201.5
100
High-voltage battery pack system
Rated voltage (V)
358
358
337
386
367
350
Rated capacity (Ah)
280
280
446
195
204.5
200
L x W x H (mm)
2062 x 1539 x 185.6
2062 x 1539 x 183.1
2062 x 1539 x 185.6
2062 x 1539 x 185.6
2062 x 1539 x 185.6
2062 x 1539 x 136
Number of cells in battery pack
96
192
384
118
114
192
Weight of battery pack (kg)
555
555
575
535
535
525
Tire Inflation
Warning使用胎压过低或过高的轮胎将会引发事故,造成人身伤亡。
Using underinflated or overinflated tires will increase the risk of accident and injury.
To ensure driving safety, please check the tire pressure on a regular basis. When checking the
tire pressure, make sure it is the cold tire pressure (the tire temperature should be the same as the
ambient temperature, or the tire should be cooled off for 3 hours after driving). The recommended cold tire
pressure is marked on the door frame of the driver side. If hot tire is measured, the tire pressure is
generally about 0.3 bar higher than that of cold tires.
Over-inflated tires may compromise the comfort of the vehicle, and are easily damaged on uneven
road surfaces. In severe cases, there is even a risk of a tire blowout occurring, threatening the safety of
the vehicle. Under-inflated tires may cause uneven tire wear, affecting the maneuverability of the vehicle
and draining the battery.
If the tires used on the vehicle are self-repairing tires, the vehicle can still continue
to run within a certain speed range (below 120 km/h) when the puncture width is less than 5 mm and
the center display shows that the tire pressure is normal. However, self-repairing tires cannot be
used as permanent tire repair measures. If any tire is found to have a nail in it or is seriously
damaged, please contact the NIO Service Center in a timely manner for tire inspection or
replacement.
When repairing, please try to orient the tire so that the punctured spot is at the top of
the tire.
Tire sealant can only be used to repair the tread area.
To inflate the tires using the air pump in the emergency kit:
Park the vehicle on a safe road, put on your reflective vest and place a warning triangle.
Open the vehicle tool cover in the rear trunk, and take out the air pump.
Take out the air pump hose on the side of the air pump and connect it to the tire valve.
Take out the power plug of the air pump and connect it to the 12V power supply of the
vehicle.
Make sure that the vehicle is powered on, turn on the power switch of the air pump, and
start to inflate the tires. When the tire pressure reaches 2.6 bar, manually turn off the power of the
air pump and disconnect it from the vehicle's power supply.
After inflation is complete, disconnect the air pump hose from the tire valve, and put
everything away.
Direct Tire Pressure Monitoring System (dTPMS)
The vehicle is equipped with a direct tire pressure monitoring system (dTPMS). If the pressure or
temperature of one or more tires is abnormal, the tire pressure warning indicator will light up on the digital instrument cluster
display along with the location of the faulty tire, alerting you to stop as soon as possible and check the
tires, and to inflate/deflate the tires to the correct air pressure.
In the event of abnormal tire pressure or rapid air leakage, the tire pressure warning indicator
will light up along with a "Beep"
tone, alerting you to check the tires; if the Direct Tire Pressure Monitoring System (dTPMS) fails or the
tire temperature exceeds the safe value, the tire pressure warning indicator will flash for 75 seconds and then stay on, along
with a "Beep" tone. In this case, please stop the vehicle as soon as possible and contact the NIO Service
Center immediately.
You can tap My ET5 on the main screen of the center display to
check the current tire pressure detected by the direct tire pressure monitoring system. If it shows that the
current tire pressure is "--", it means that no valid tire pressure value has been obtained. In such a case,
drive at a speed of above 25 km/h for 10 minutes and check again. If the tire pressure is too low, the tire
is overheated or the direct tire pressure monitoring system has failed, the corresponding tire will be
highlighted along with the specific fault information.
The Direct Tire Pressure Monitoring System (dTPMS) is based on tire temperature and atmospheric
temperature. At high altitudes or in cold regions, you may need to inflate the tires to a slightly higher
pressure to clear the low tire pressure warning message.
If radio transmitting devices (e.g., wireless headsets, walkie-talkies) are used in or near the
vehicle, the operation of the Direct Tire Pressure Monitoring System (dTPMS) may be subject to interference.
Anti-skid Chain
Unsuitable anti-skid chains will damage the tires, wheels and braking system of the vehicle.
Please carefully check the specifications of the original tires and the relevant instructions of the
anti-skid chain manufacturer. For original tires, only rear tires are equipped with half-pack anti-skid
chains, and the rest of the tires are not suitable for anti-skid chains.
When installing the anti-skid chains, do not drive faster than 50 km/h or the limit speed
specified by the anti-skid manufacturer, whichever is lower.
Drive with caution to avoid road bumps, holes, sharp turns, or locked wheels which may affect
the vehicle in an adverse manner.
To prevent tire damage and excessive wear of the anti-skid chains, be sure to remove the
e.g., anti-skid chains when driving on snow-free roads.
AutoSock
Vehicle does not come with AutoSock, but you can purchase them separately. Please pay attention
to the following points when using AutoSock:
Improper AutoSock can damage the tires, wheels, and brake system of the vehicle. Please
carefully check the specifications of the original equipment (OE) tires and the relevant instructions
provided by the AutoSock manufacturer. AutoSock can be used on all the four wheels of the vehicle.
AutoSock is only used on ice and snow. When driving onto dry roads (asphalt roads, cement
roads, dirt roads, etc.), remove it immediately. AutoSock should be removed when the vehicle is
parked.
When the vehicle starts, ice and snow particles on the ground may be thrown up due to the
increased grip of AutoSock. Avoid standing at the rear of the vehicle.
No need to turn off the vehicle's electronic stability system when AutoSock is in use.
The speed of the vehicle must not exceed 50 km/h with AutoSock installed. Please also avoid
sharp acceleration, braking, turning, and other aggressive operations, otherwise, there is a high risk
of damage to AutoSock.
If any abnormal noise is heard during driving with AutoSock installed, stop the vehicle in
a safe position and, while ensuring personal safety, check whether AutoSock is installed correctly.
When the black fabric in the bottom layer below the white road contact fabric is exposed,
stop using AutoSock, and replace it with new ones.
AutoSock should not be used as direct substitutes for winter tires.
After use, dry AutoSock, place it in their original packaging, and store it in a dry place.
Due to the ease of use of the material, AutoSock can be washed at room temperature to keep the road
contact fabric clean but should not be ironed.
Winter Tires
The vehicle is configured with summer tires. In cold environments, tire performance is reduced,
grip is reduced and susceptibility to impact damage is increased. High performance tires may temporarily
stiffen in cold weather, and a rolling noise may be heard for the first few kilometers before the tires
warm up. To have your vehicle perform optimally, using winter tires in winter is recommended. Please
choose the applicable winter tires or stud tires according to the national laws in your country.
It is recommended to install winter tires for the vehicle when the ambient temperature is below
about 7 °C. The driving performance of summer tires will be reduced at low temperatures, and the comfort
will also be reduced. For example, there may be rattling noises caused by the tires when maneuvering on
dry and slippery surfaces, or when accelerating out of corners.
Extremely cold temperatures below -15 °C may cause permanent damage to summer tires.
Use winter tires of the same brand and tread pattern on all wheels to ensure safe maneuvering
characteristics.
Tire Size
Load Index
245/45R19
102
245/40R20
99
Caution冬季胎
The tires will be damaged if the vehicle speed is above the maximum speed rating. As a
result, the tires are likely to burst. Please do not drive over the speed limit allowed by the
tires.
Winter tires with a tread pattern depth of less than 4 millimeters must be replaced
immediately. These tires are no longer suitable for winter because they cannot provide sufficient
grip. As a result, you may lose control of the vehicle and potentially cause an accident.
Tire Repair
Warning若在轮胎穿刺漏气的情形下继续行驶车辆,容易发生爆胎事故,危及人身安全。
Do not drive with a punctured tire, as it may lead to a tire blowout and endanger your
safety.
Tire sealant can irritate the eyes and skin. Keep out of reach of children. When using tire
sealant, ignition, open flames, and smoking are prohibited.
If the tire sealant gets on the skin or in the eyes, rinse the affected part of the body
off i immediately and thoroughly with plenty of water. Change soiled clothing immediately. Get medical
attention immediately in the event of an allergic reaction. If sealant was swallowed, thoroughly rinse
out the mouth without delay and drink plenty of water. Do not induce vomiting.
CautionBefore using tire sealant, please check the expiry date marked on the tire sealant
tank to ensure that it is used before its expiry date. ET5 - 19 Inch
Before using tire sealant, please check the expiry date marked on the tire sealant tank
to ensure that it is used before its expiry date.
When the puncture width of a 19-inch tire is less than 6 mm, it is recommended to take
out the puncturing object and repair the tire. If the puncture width is greater than 6 mm or the
tire is even more seriously damaged, please do not continue to drive, and contact the NIO Service
Center in a timely manner to replace the tire.
If the tire is repaired while the puncturing object is not taken out, the tire can make
abnormal noises while driving after the repair, and air leakage may occur during long-distance
driving.
If self-repairing tires or silent cotton tires are used, it is not recommended to repair
tires with tire sealant. Please contact the NIO Service Center.
If the tires used on the vehicle are self-repairing tires, the vehicle can still continue
to run within a certain speed range (below 120 km/h) when the puncture width is less than 5 mm and
the center display shows that the tire pressure is normal. However, self-repairing tires cannot be
used as permanent tire repair measures. If any tire is found to have a nail in it or is seriously
damaged, please contact the NIO Service Center in a timely manner for tire inspection or
replacement.
When repairing, please try to orient the tire so that the punctured spot is at the top of
the tire.
Tire sealant can only be used to repair the tread area.
Park the vehicle on a flat and solid road and put it in Park, stay away from busy and congested
roads, then put on your reflective vest and place the warning triangle, turn on the hazard warning lights,
and use the tire sealant and air pump in the vehicle tools to repair the tire:
Park the vehicle on a safe road, and place the warning triangle.
Open the vehicle tool cover in the rear trunk, and take out the tire sealant tank and air
pump.
Stick the speed limit sign on the tire sealant canister onto the steering wheel to remind
yourself not to exceed 80 km/h when driving.
Connect the tire sealant canister to the wheel, remove the tire valve dust cap, and connect
the fill tube on the tire sealant canister to the tire valve.
Take out the power plug of the air pump and connect it to the 12 V power supply of the
vehicle.
Make sure the vehicle is powered on, turn on the tire inflator and start to inject tire
sealant into the tire. Observe the pressure gauge, and turn it off when the pointer reaches ≥2.2 bar
(which will take around five to 10 minutes). Turn off the tire inflator and disconnect the power plug
from the 12V power socket.
Note充气泵开始工作时,胎压指针可能会短暂最高指示至6bar, 随后压力恢复正常。
When the tire inflater begins operating, the pressure gauge will initially display a high
pressure up to six bar, after which the pressure will drop to a normal range.
Disconnect the inflation tube from the tire valve, and put everything away.
Drive for 3-10 kilometers (about 5-10 minutes) at a speed not higher than 80 km/h, so that
the tire sealant can be evenly spread inside the tire and block the puncture hole.
Park the vehicle on a safe road, set up the warning triangle, and check the tire pressure
readings on the center display. Continue driving if the tire pressure is ≥2.2 bar. Inflate the tire to
≥2.2 bar if the tire is under-inflated and drive the vehicle at a speed no higher than 80 km/h for 3
to 10 km (or around 5 to ten minutes). Check the tire pressure again. If the tire pressure is still
below 2.2 bar which means the tire is severely damaged or the tire sealant cannot seal the tire, park
the vehicle in a safe place and contact NIO immediately.
If the tire pressure cannot reach the designated range within 12 minutes during the tire
repair process, this indicates severe damage. Please park your vehicle safely and call for assistance.
Repairing with tire sealant is only for temporary emergency processing. After repairing the
tire, you can continue driving for up to 200 kilometers or 3 days. Please go to the nearest workshop
as soon as possible to have the tire repaired and the tire sealant wiped dry.
After repairing the tire by using tire sealant, please contact the NIO Service Center for
replacement of the inflation pump hose assembly.
Tire Replacement
When the vehicle is subject to a severe air leakage that it cannot be driven anymore, park the
vehicle on a flat and solid road and put it in Park, stay away from busy and congested roads, then put on
your reflective vest and place the warning triangle, turn on the hazard warning lights, then contact NIO
Service Center for a tire replacement.
When replacing a tire, the new tire must comply with the specifications of the original
one. Using a tire with different specifications may affect the vehicle’s handling and result in a loss
of vehicle control.
Never get underneath the vehicle when it is lifted on a jack as this may cause severe
injury or even death.
Do not lift the vehicle when people are inside.
The vehicle can only be lifted at specified lift points on the vehicle's underside.
Do not place any object above or underneath the jack when it is lifting the vehicle.
Never use a jack to lift the vehicle on an uphill or downhill slope or on a roadway that
slopes to one side.
Jacks should only be used to raise vehicles when changing tires.
How to replace the tire:
Have a jack and a spare tire of the right specification ready for the tire replacement.
Place a block in front of the tire diagonally to the flat tire to prevent the vehicle from
sliding.
Use the bolt cover remover in the emergency kit to remove the bolt covers, and loosen the
bolts counterclockwise with the wheel wrench.
CautionThere is a special protective coating on the exterior of the rim. During the
disassembly and assembly of bolts, tires or rims, the operating area of the rim shall be properly
protected to prevent the surface of the rim from being accidentally scratched by hard
objects.
There is a special protective coating on the exterior of the rim. During the
disassembly and assembly of bolts, tires or rims, the operating area of the rim shall be properly
protected to prevent the surface of the rim from being accidentally scratched by hard objects.
Place the jack below the correct jacking spot on the vehicle.
Make sure the jack is positioned correctly under the jack point. Failure to do so may
damage the vehicle, or the vehicle may slip off the jack and cause injury.
Jack the vehicle up to a tire changing height. As the jack touches the vehicle and jacks it
up, double check to make sure that the jack is in the correct position.
Remove the wheel bolts and replace the tire. When installing the wheel, make sure the bolts
are aligned with the mounting holes, and that the metal side of the wheel is in proper contact with
the mounting surface.
After installing the wheel bolts, lower the vehicle completely to the ground (using the
jack), then use a wrench to tighten all the bolts clockwise, and then use a torque wrench to tighten
the vehicle bolts to the specified torque value.
Check the tire pressure after the tire is replaced, inflate to the specified tire pressure
if necessary, then install the tire valve cap.
Put the tools, jack, and the flat tires away in a secure manner.
Set Up Warning Signs
In the event of an emergency, drive the vehicle to a safe area while ensuring safety, then step
on the brake pedal to stop the vehicle; put the vehicle in Park, and turn on the hazard warning lights on
the center console to alert other drivers and passersby.
Park gear switch
Hazard warning lights
Open the cover at the bottom of the rear trunk's storage space, and inside you will see the
emergency kit, take out the warning triangle and reflective vest, put on the reflective vest and place the
warning triangle within 50 meters to 100 meters behind the vehicle (when it's on an expressway, place it 150
meters behind the vehicle; when it's at night, place it 100 meters further than the normal distance; in the
event of rain and fog, place it 200 meters behind the vehicle).
How to assemble the warning triangle:
Unfold the bracket under the triangle.
Unfold the sides of the triangle.
Fasten the snap button on the top of the triangle.
Calling for Road Assistance
In case of accidents such as a vehicle collision, water soaking, battery pack fire, etc., after
setting up the warning signs, please leave the vehicle as soon as possible while ensuring the safety of the
surrounding environment and maintaining a safe distance (over 15 meters), then call the NIO for road
assistance.
In the event of a risk of battery fire, the vehicle will automatically cut off power, and a
warning message will appear on the instrument cluster and center display. Please leave the vehicle
promptly and call for assistance after ensuring the safety of the surrounding environment.
If the vehicle is connected to the network, you can press the SOS button on the roof to call
for road assistance, and you can cancel the call on the Center Display within 5 seconds after making the
call. The backlight of the SOS button indicates the status of the SOS feature: a constant green light
means that the SOS feature is available; a flashing green light means that road assistance is being
called; a constant or flashing red light means that the SOS feature is unavailable, in which case you
need to contact NIO Service Center immediately.
Note车辆在连接网络状态下,当发生事故且安全气囊弹出时,车辆将自动呼叫救援,为您的生命安全护航。
When your vehicle is connected to the network, if an accident occurs and the airbag is
deployed or the seat belt pre-tensioner is triggered, your vehicle will call for rescue automatically to
protect you from harm.
The 112-based eCall In-vehicle System
The 112-based eCall in-vehicle system is mandatory for new vehicle models in all EU countries.
In the event of a severe accident, the eCall system can connect you to an appropriate PSAP (Public Safety
Answering Point) via an audio link automatically if the vehicle safety system is triggered, or manually if
you press the SOS button on the roof console.
The 112-based eCall in-vehicle system is activated by default. It is activated automatically
when the activation level for seatbelt tensioners or airbags is reached in the event of a severe accident.
The 112-based eCall in-vehicle system can also be activated manually, if needed. To activate the eCall
manually, press the SOS button on the roof console for over 250 milliseconds and release the button within
10 seconds. The manual trigger is designed in such a way as to avoid mis-operation. To terminate the call,
press and release the SOS button again within five seconds after it is pressed the first time.
In the event of a critical system malfunction, the 112-based eCall in-vehicle system may be
impaired. The backlight of the SOS button indicates the status of the emergency call. Solid green
indicates the eCall system functions normally; flashing green indicates an emergency call is in progress;
flashing red indicates the eCall system has a minor fault but can still be activated; solid red indicates
the eCall system has a major fault and cannot be activated. In this case, you can find the fault
notification on the Center Display, and contact NIO if needed.
The processing of personal data through the 112-based eCall in-vehicle system is in line with
the personal data protection rules stipulated in Directives 95/46/EC (1) and 2002/58/EC (2) of the
European Parliament and of the Council, and in particular, is based on the necessity to protect the vital
interests of the individuals in accordance with Article 7(d) of Directive 95/46/EC (3). The processing of
such data is strictly limited to the purpose of handling emergency calls made to the single European
emergency number 112 in emergency situations within the meaning of Article 5(2) of Regulation (EU)
2015/758.
The 112-based eCall in-vehicle system may collect and process only the following data:
Vehicle identification number
Vehicle type (passenger vehicle)
Vehicle propulsion storage type (gasoline/diesel/CNG/LPG/electric/hydrogen).
Vehicle's last three locations and direction of travel. The recent vehicle locations are
selected by random so as to ensure that the IVS is not traceable and not subject to any constant
tracking.
Estimated number of occupants onboard.
Log file of eCall activation of the system and its timestamp.
Recipients of data processed by the 112-based eCall in-vehicle system are the relevant public
safety answering points of the area where the car is located. The data may be shared with other parties
such as police stations, fire stations, and hospitals limited for emergency aid purpose.
The 112-based eCall in-vehicle system is designed in such a way as to ensure that:
Data stored in the system is not available outside the system before an eCall is triggered.
The system is not traceable and not subject to any constant tracking in its normal
operation status.
Data stored in the system is automatically and continuously removed.
The vehicle location data is constantly overwritten in the internal memory of the system so
as to keep the last three up-to-date locations of the vehicle necessary for the normal functioning of
the system.
The log of activity data in the system is kept for no longer than necessary for the purpose
of handling an emergency call and in any case no longer than 13 hours after an emergency call is
triggered.
With regard to the arrangements for exercising data subjects'rights as well as the contact
service responsible for handling access requests, please contact NIO for support. For contact details,
please refer to our Connected Vehicle Privacy Notice or contact details in this manual. NIO GmbH
Data Protection
Montgelasstrasse 14
81679 Munich
Germany
privacy.eu@nio.io
00 8000 999 6699 (EU) / 800 24 789 (Norway)
TPS eCall
TPS ecall is a third party supported eCall service to 112-based eCall in EU. ARC Europe SA will
be acting as the TPS agency for NIO TPS eCall, operating the NIO TPS eCall with 24-hour, 7-days
availability.
TPS eCall agents will deliver users with services in the corresponding language according to
the language set in the user’s vehicle. TPS eCall agents evaluate if a call is a fake or real emergency
before addressing the relevant PSAPs, and would cancel a mis-call to avoid the legal risk of
mis-connecting to PSAPs. When an incident occurs, a TPS agent can help the user redirect RSA (Road Side
Assist service) or may advise the user to contact insurance companies providing RSA; if the incident is
evaluated to be a crash or an emergency, the TPS agent will transfer the MSD to the local Public Safety
Answering Point (PSAP) and track the rescue progress in time. During the rescue process, TPS agents can
act as a translator between the user and the local rescue staff to overcome language barriers in emergency
situations.
TPS eCall can be set by the main user in “Settings - General” in the settings page of the ICS
of the vehicle, replacing the statutory eCall. The default option is TPS eCall. Once the customer makes a
choice, it will be recorded within their user profile.
NIO TPS eCalls can only be ended by the TPS agent. Please inform the agent if a call is
connected by mistake and the agent will end the call for you.
The necessary vehicle data will be collected from the vehicle and sent to NIO TPS, then
forwarded to the TPS provider to handle the emergency when TPS eCall is triggered by user’s active
triggering, collision triggering and EDA triggering.
Uploaded TPS eCall data will be stored for 6 months to allow NIO to perform accident responding
and handling.
After contacting the driver and passengers, the TPS provider will pass the necessary data to
the local PSAP in the local language for rescue purposes.
The TPS provider may collect and process only the following data, then send it to the local
PSAP when it is needed:
Driving service information:
Crash type (front, side, rear, etc.) and delta Velocity (Vx and Vy).(NOTE: Delta Velocity is the collection of change of velocity every 10 ms at the
X-axis and Y-axis during 250 ms after the crash incident.) ;
Current vehicle location and direction;
Vehicle speed;
Vehicle propulsion storage type;
Airbag triggered (How many airbags are triggered after crash) ;
Language set up on the Center Display;
Number of passengers;
Contact information:
User's name (optional, if the user is registered);
User's email address (optional, if the user is registered);
User's mobile number (optional, if the user is registered).
Vehicle basic information:
Make/Model/Color/Model Year.
VIN number.
Jump Start
If the vehicle cannot be started normally due to a depleted 12V battery, you can start the
vehicle by connecting it to the 12V battery of another vehicle through a jumper cable.
CautionFor NT2, when starting the vehicle with jumper cables, it is crucial to avoid contact
between two vehicles. If the two vehicles' low-voltage battery-positive terminals are connected, the
current may run right away, causing damage to the vehicles.
When starting the vehicle with jumper cables, it is crucial to avoid contact between two
vehicles. If the 12V battery-positive terminals of the two vehicles are connected, the current may
run right away, causing damage to the vehicles.
When connecting the jumper cables to the vehicles, be sure to connect the positive
terminals first, followed by the negative terminals.
When using jumper cables to initiate an external power source, voltage requirements
apply. Please contact NIO Service Center when the battery is depleted to prevent damage to the
battery.
How to jump start a vehicle:
Put the vehicle in Park, make sure that the 12V battery is powered off and connected to the
electrical system of the vehicle correctly, open the hood, and locate the 12V battery of the depleted
vehicle A.
Connect one end of the red cable to the positive (+) terminal of the 12V battery of the
depleted vehicle A.
Connect the other end of the red cable to the positive (+) terminal of the 12V battery of the
supplying vehicle B.
Connect one end of the black cable to the negative (-) terminal of the 12V battery of the
supplying vehicle B.
Connect the other end of the black cable to the good ground point on the 12V battery of the
depleted vehicle A.
Start the supplying vehicle, wait a few minutes and then start the depleted vehicle. See if
the depleted vehicle A can be started normally.
Disconnect jumper cables in the reverse order of how they were connected, and put them away.
Emergency Unlocking from the Outside
When the vehicle cannot be unlocked by conventional methods (such as a smart key fob, keyless
entry, NIO app, or NFC), you can use the emergency key to unlock the driver's door.
Caution请将物理应急钥匙带出车外并妥善保管,以备紧急解锁或上锁时使用。
Do not leave the emergency key in your vehicle. Please keep it safe in case of emergency.
To use the emergency key:
Pull out the metal key portion of the emergency key while toggling the switch on the
emergency key.
Push the front end of the exterior handle on the driver's door.
Pull the door handle, and insert the emergency key into the lock. Rotate the key
counterclockwise to unlock the driver's door.
To lock the driver's door, rotate the key counterclockwise first for unlocking, and then
turn it clockwise.
After unlocking the driver side door using the physical emergency key, if you need to lock
the doors using the Smart Key, you must first toggle the driver door once to reset the door lock
cylinder. This will prevent the driver side door from remaining in an unlocked state.
Open the Door from the Inside in an Emergency
When the whole vehicle is locked, if you need to open the door in an emergency (such as when the
door handle electronic switch fails, or the vehicle is soaked in water), pull the mechanical switch of the
inner door handle once to open the corresponding side door.
CautionNT2 Opening the door from inside in an emergency
When the 12V battery of the vehicle is low on power, the physical emergency key can only
be used to unlock the door on the driver side. At such moments it cannot be used to unlock the whole
vehicle. The other doors can only be unlocked and opened by pulling the mechanical switch for the
inner door handle.
The windows cannot be lowered when the door is opened using the mechanical switch for the
inner door handle because doing so would risk damaging the window trim panel.
Neither rear door can be opened from inside when the child safety lock function is
enabled. They can only be opened from outside once the whole vehicle is unlocked.
In the event of an accident that is of sufficient gravity to trigger airbag deployment,
the child safety lock on the rear door will unlock automatically.
Emergency Opening of Liftgate
Open the square block above the latch from the inside of the rear trunk, and then use your
fingers to toggle the button in the hole to open the liftgate.
Emergency Evacuation
In case of danger or emergency situations with the vehicle, please evacuate the vehicle as soon
as possible and call for assistance while ensuring personal safety.
Collision Accidents
If your vehicle is involved in a severe collision accident and you can safely exit the vehicle,
please leave the vehicle promptly and move to a safe area to avoid further harm.
Vehicle Fire or Abnormal Temperature
If your vehicle is smoking, on fire or experiencing any other emergency situation, quickly
evacuate the vehicle and move to a safe area to ensure your personal safety.
If your vehicle's center display shows warnings about abnormal vehicle or battery pack
malfunctions, please ensure your safety while parking the vehicle. Quickly exit the vehicle and evacuate
to a safe area to ensure your personal safety.
Vehicle Submerged in Water
If your vehicle gets trapped in a heavily flooded area, such as an underpass or a low-lying
road, promptly evacuate the vehicle and move to a safe area to ensure your personal safety.
Severe Vehicle Breakdown
If your vehicle experiences a severe breakdown during driving or if the center display
indicates a serious vehicle malfunction, please ensure your safety while parking the vehicle. Then,
quickly exit the vehicle and call for assistance.
Miscellaneous
Other scenarios where it is necessary to evacuate the vehicle promptly.
First Aid Kit
If your vehicle is equipped with a first aid kit, the first aid kit will be located in the side
net pocket of the rear trunk. The first aid kit contains rescue items required for emergencies. See the
instructions in the first aid kit for specific directions.
The first aid kit is valid for 5 years. After expiration, please
contact NIO to purchase.
Protective Equipment for Rescue Operations
The vehicle E-powertrain system is driven by the high-voltage battery. In the event of a serious
collision, leakage of high-voltage electricity or battery fluid may occur; therefore, the rescue operation
on the vehicle should be undertaken by professional rescuers who wear corresponding protective equipment to
secure personal safety.
Warning对车辆进行操作时请确保身上未携带金属制品(如项链、手表等),以免发生电击伤害。
Remove all metal objects (such necklaces and watches) before carrying out any operation.
Failure to do so may increase the risk of electric shock.
Electrical Protection
Please wear the following protective equipment to avoid injury from high-voltage electric
shock:
Insulated rubber gloves (be able to insulate against voltage above 500V)
Goggles
Insulated rubber boots
Tools with insulated protective covers
Chemical Protection
In the event of a battery leakage or potential risk of battery leakage, please wear the
following protective equipment to prevent injury to your skin and face:
Protective face shield
Solvent resistant gloves
Cutting Off the High Voltage Circuit
To cut off the high voltage circuit, disconnect the emergency high voltage cutoff plug (located
in the left area under the hood), and then disconnect the cable connected to the negative terminal of the
12V battery (located in the left area of the trunk).
Towing a Vehicle that Had an Accident
CautionThis vehicle is not suitable for traction with wheels on the ground. Do not use a
traction chain to tow the vehicle directly.
This vehicle is not suitable for traction with wheels on the ground. Do not use a traction
chain to tow the vehicle directly.
When the vehicle is on snow, mud, or sand, or when the wheels are locked and unable to
rotate freely, do not use a towing hook to tow the vehicle. Please contact the NIO service center.
If you need the vehicle to be towed, please call a flatbed trailer to transport the vehicle.
How to tow a vehicle:
Take out the hitch from the vehicle kit in the rear trunk.
Press the lower end of the front towing flap of the vehicle to open it (1 in the picture),
insert the hitch into the hole and rotate until the hitch is firmly seated (2 in the picture). The
rear hitch (if present) is installed in the same way as the front hitch.
Press the brake pedal while the vehicle is in the Park gear, go to the Settings page from
the control bar at the bottom of the center display, tap Driving >
Trailer/Wash Mode, then the vehicle will be released from the parking brake and can be
towed (if the vehicle is at risk of slipping, use the brake stops).
Power the vehicle off before towing, turn on the hazard warning lights, make sure that
there is no one in the vehicle and lock the entire vehicle.
Install the tow chain on the hitch and slowly tow the vehicle onto the flatbed.
After the vehicle is towed to the designated location on the flatbed, use brake stops and
wheel straps to fix the tires.
Before having the vehicle transported on a flatbed, Exit Trailer/Wash Mode on the center
display; then tap Driving > Jack Mode on the current page to lock the
current vehicle suspension height to prevent the vehicle from being damaged due to bumps during
transportation.
Caution在确保车辆没有安全风险的前提下才可拖离现场。-NT2
Only when there is no safety risk to the vehicle can it be towed away from the site. If
the vehicle battery pack is deformed, leaking liquid, or emitting smoke, safety risks shall be
eliminated first.
If you are unable to enter the Neutral Mode normally, you can try restarting the 12V
battery. If the parking brake cannot be released, the vehicle can be transported in as short a
distance as possible by using tire slides or wheeled trailers.
Do not depress the brake pedal or accelerator pedal hard while exiting the Neutral Mode
on the center display.
When the parking brake is released and the vehicle can be towed, there is a risk that the
vehicle may slide down on a slope. If necessary, please use brake wedges in conjunction.
It is recommended not to stay in deep water for a long time (preferably not exceeding the
battery base plate) when the vehicle is wading, as it may cause damage to the high-voltage components of
the vehicle.
On the premise that the vehicle body and chassis are not damaged, there will be no greater risk
of electric shock caused by its short-time immersion in water. However, when dealing with the submerged
vehicle, the professional rescuers shall wear appropriate rescue protective equipment. Under the condition
of ensuring insulation protection, pull the vehicle out of the water, open the door, power off the vehicle,
and then clean the water stains inside the vehicle. After checking for electricity leakage, cut off the
high-voltage circuit normally.
Warning处理浸水车辆时,若救援人员未穿戴适当的救援防护装备将带来严重伤害甚至死亡。
When dealing with submerged vehicles, failure to wear proper rescue protective equipment by
the rescuers can result in serious injury or even death.
Vehicle Fire Rescue
Warning如果车辆发生火灾,切勿直接触摸车辆任意部分。请穿戴正确的防护装备对其进行操作。
If the vehicle is on fire, do not touch any part of the vehicle. Rescue operations should
be carried out by professional rescue personnel wearing correct protective equipment.
The gases stored in the curtain airbag gas cylinders and the high-pressure gas cylinders of
the air suspension may expand at high temperatures, causing an explosion. Always exercise caution to
avoid personal injury.
Fire extinguishers may be used if the vehicle’s fire does not involve a high-voltage battery.
If the vehicle’s high-voltage battery is heated or ignited, or even bent, cracked, or damaged,
cool the high-voltage battery with a large amount of water or a mixed foam fire extinguisher (F500 is
recommended). After the battery has completely cooled (this may take up to 24 hours), monitor for an
additional hour, ensuring the battery is no longer heating up before moving the vehicle to an open space
with a flat ground. Set up a safe area of 15 meters to prevent non-relevant persons from touching the
vehicle.
Warning对着火的高压电池采取降温措施后需警惕高压电池有复燃风险,避免运输过程中造成二次伤害。
After taking measures to cool the burning high-voltage battery, stay alert to the risk that the
battery may catch on fire again to avoid hazards when transporting the damaged vehicle.
If leakage from a high voltage battery is caused due to an impact, the rescue should be
performed by professionals who must wear protective face shields and chemical-resistant gloves. Never make
direct contact with the fluids.
When the high-voltage battery leaks, it may generate heat or even cause a fire. Please cool
down the high-voltage battery first and then clean up the fluids:
If the leak is not severe, use a liquid absorbing pad to clean up the fluids and then place
the used pad in a closed container or use incineration to dispose of the pad.
If the leak is severe, dispose of the fluids following the disposal guidelines for
hazardous chemical waste. Pour calcium gluconate solution over the leaked fluids.
If any fluids accidentally get on the skin, remove the contaminated clothes, and rinse the skin
with soap under running water for 15 minutes until all chemical residues are removed. Seek medical
attention immediately if the irritation or discomfort doesn’t improve.
When professional rescuers perform cutting operations, they must use appropriate tools such as
a hydraulic cutter and wear appropriate personal protective equipment to avoid serious injury.
When cutting is necessary during rescue, appropriate tools shall be used. The high-voltage and
high-pressure areas of the vehicle must not be cut, such as airbag-related components and high-voltage
components, as shown by the key areas in the figure below.

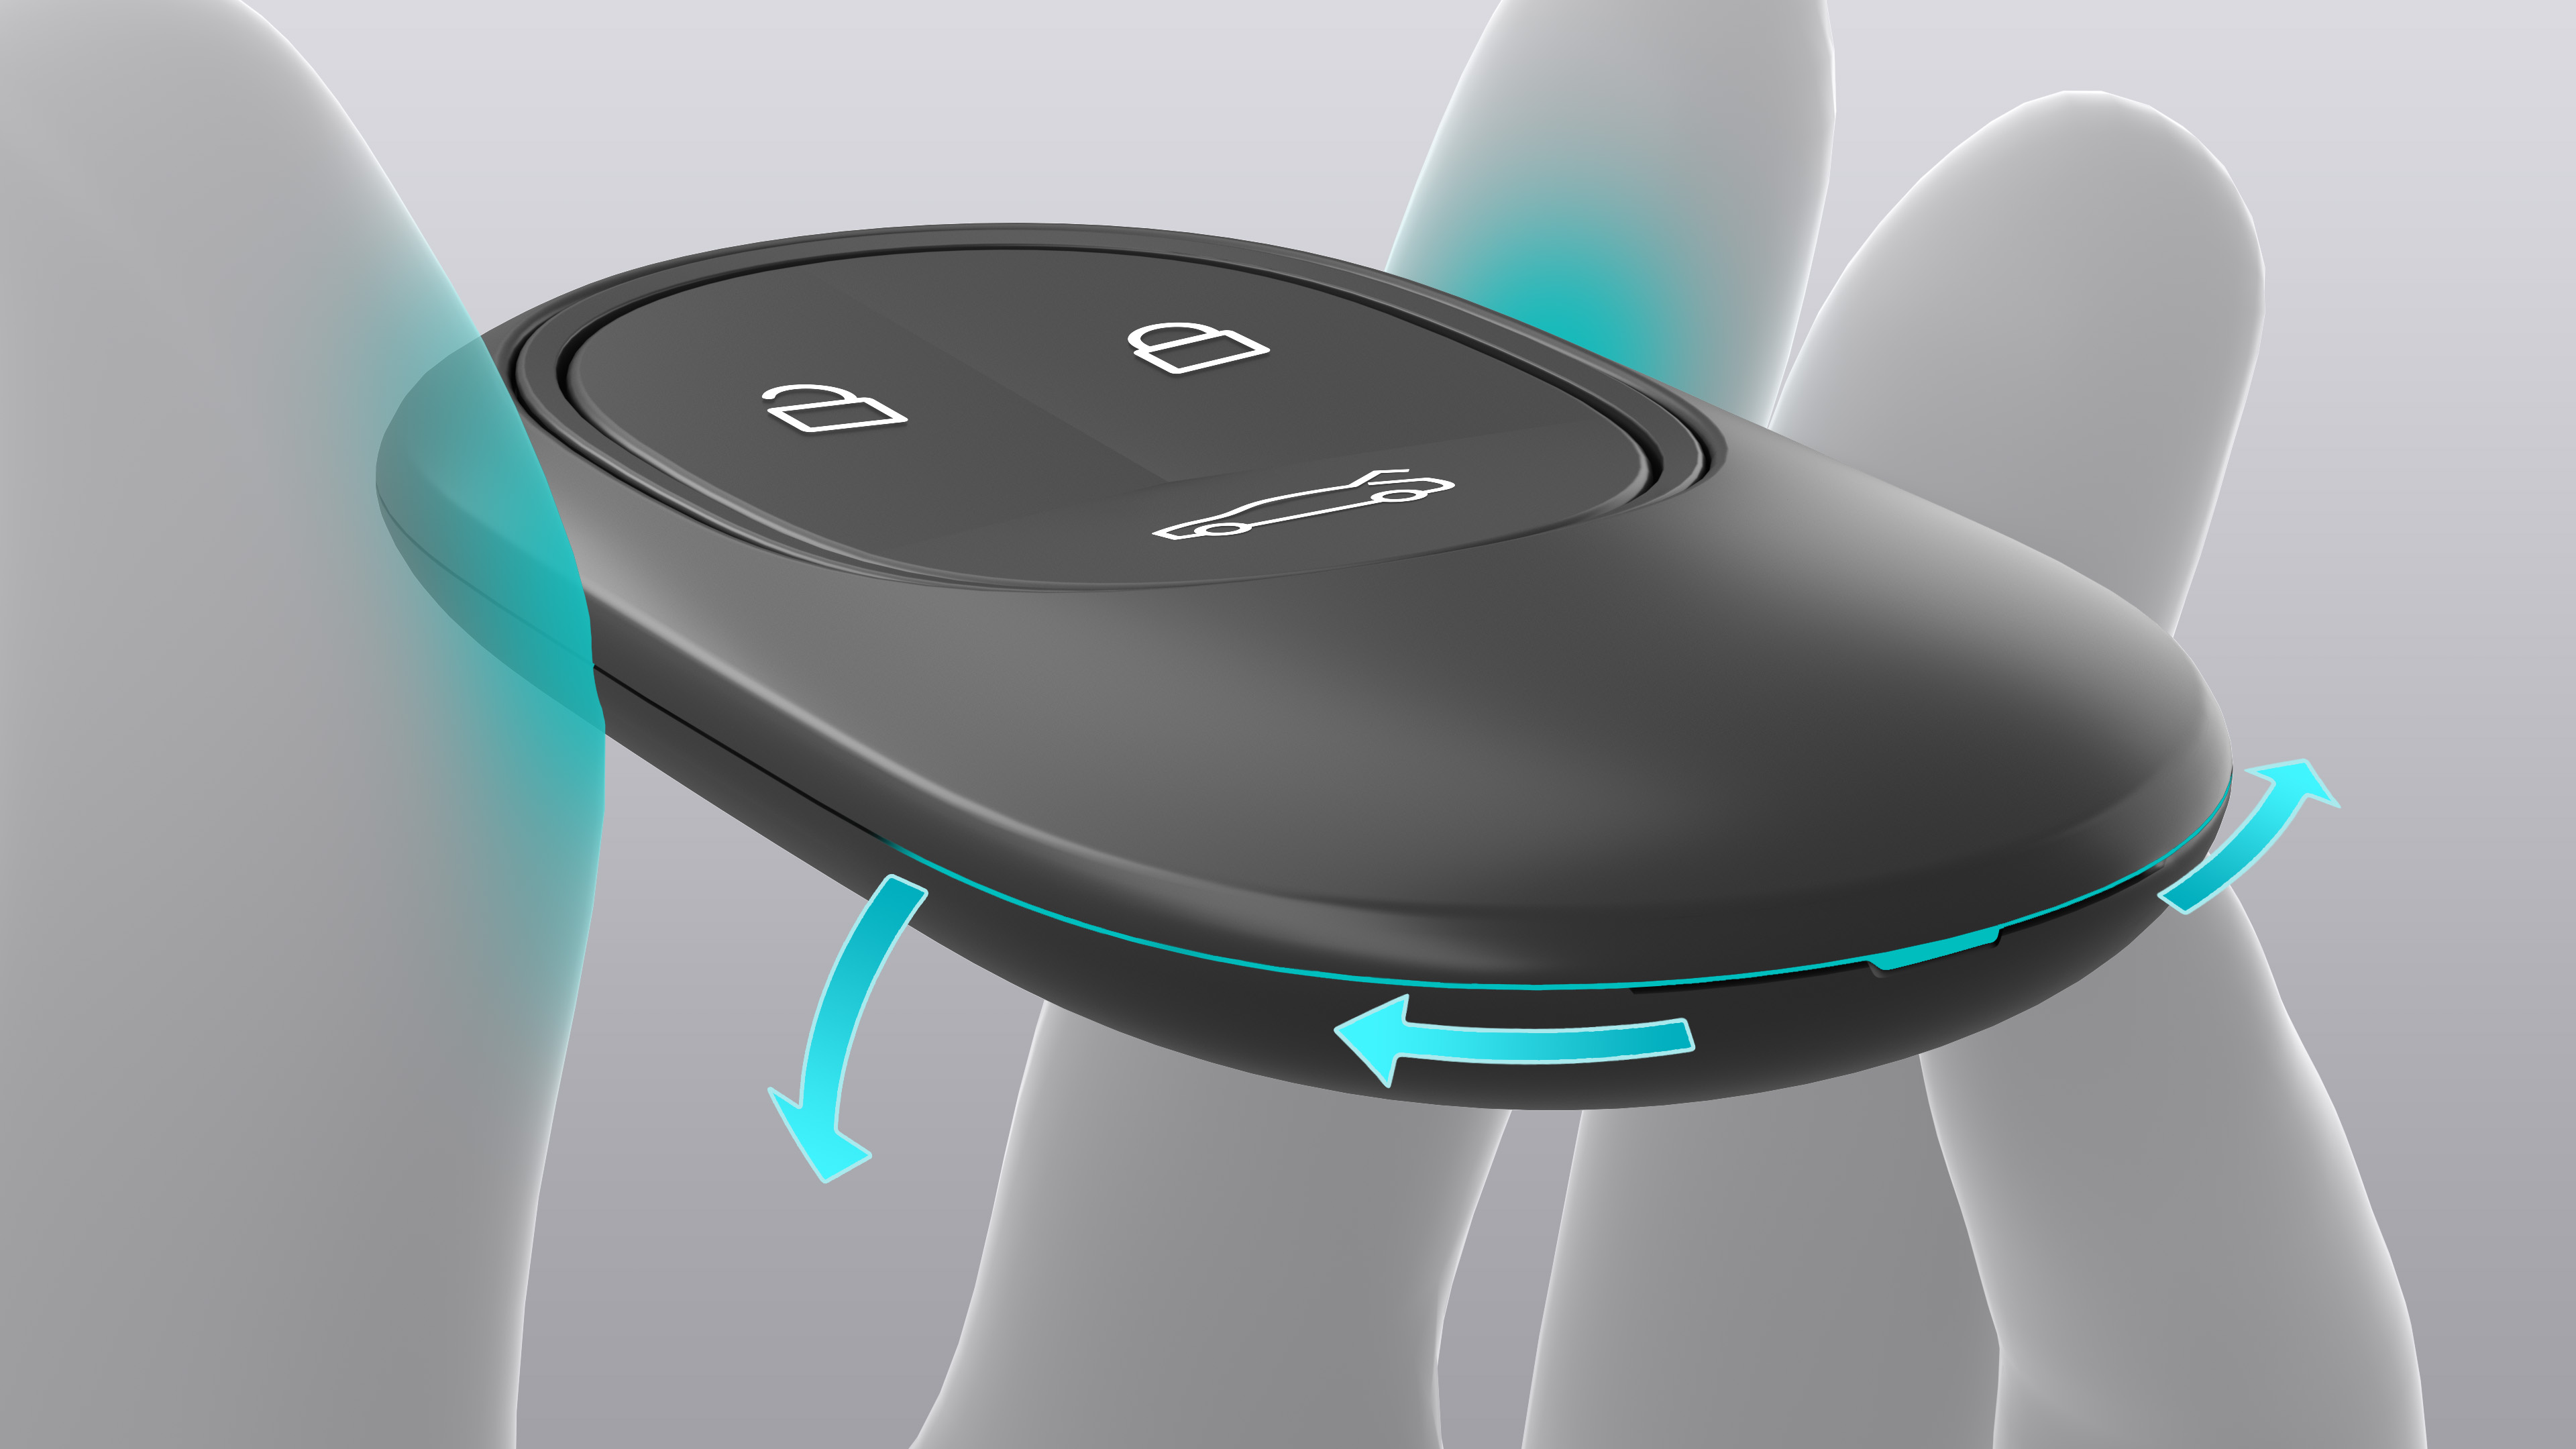
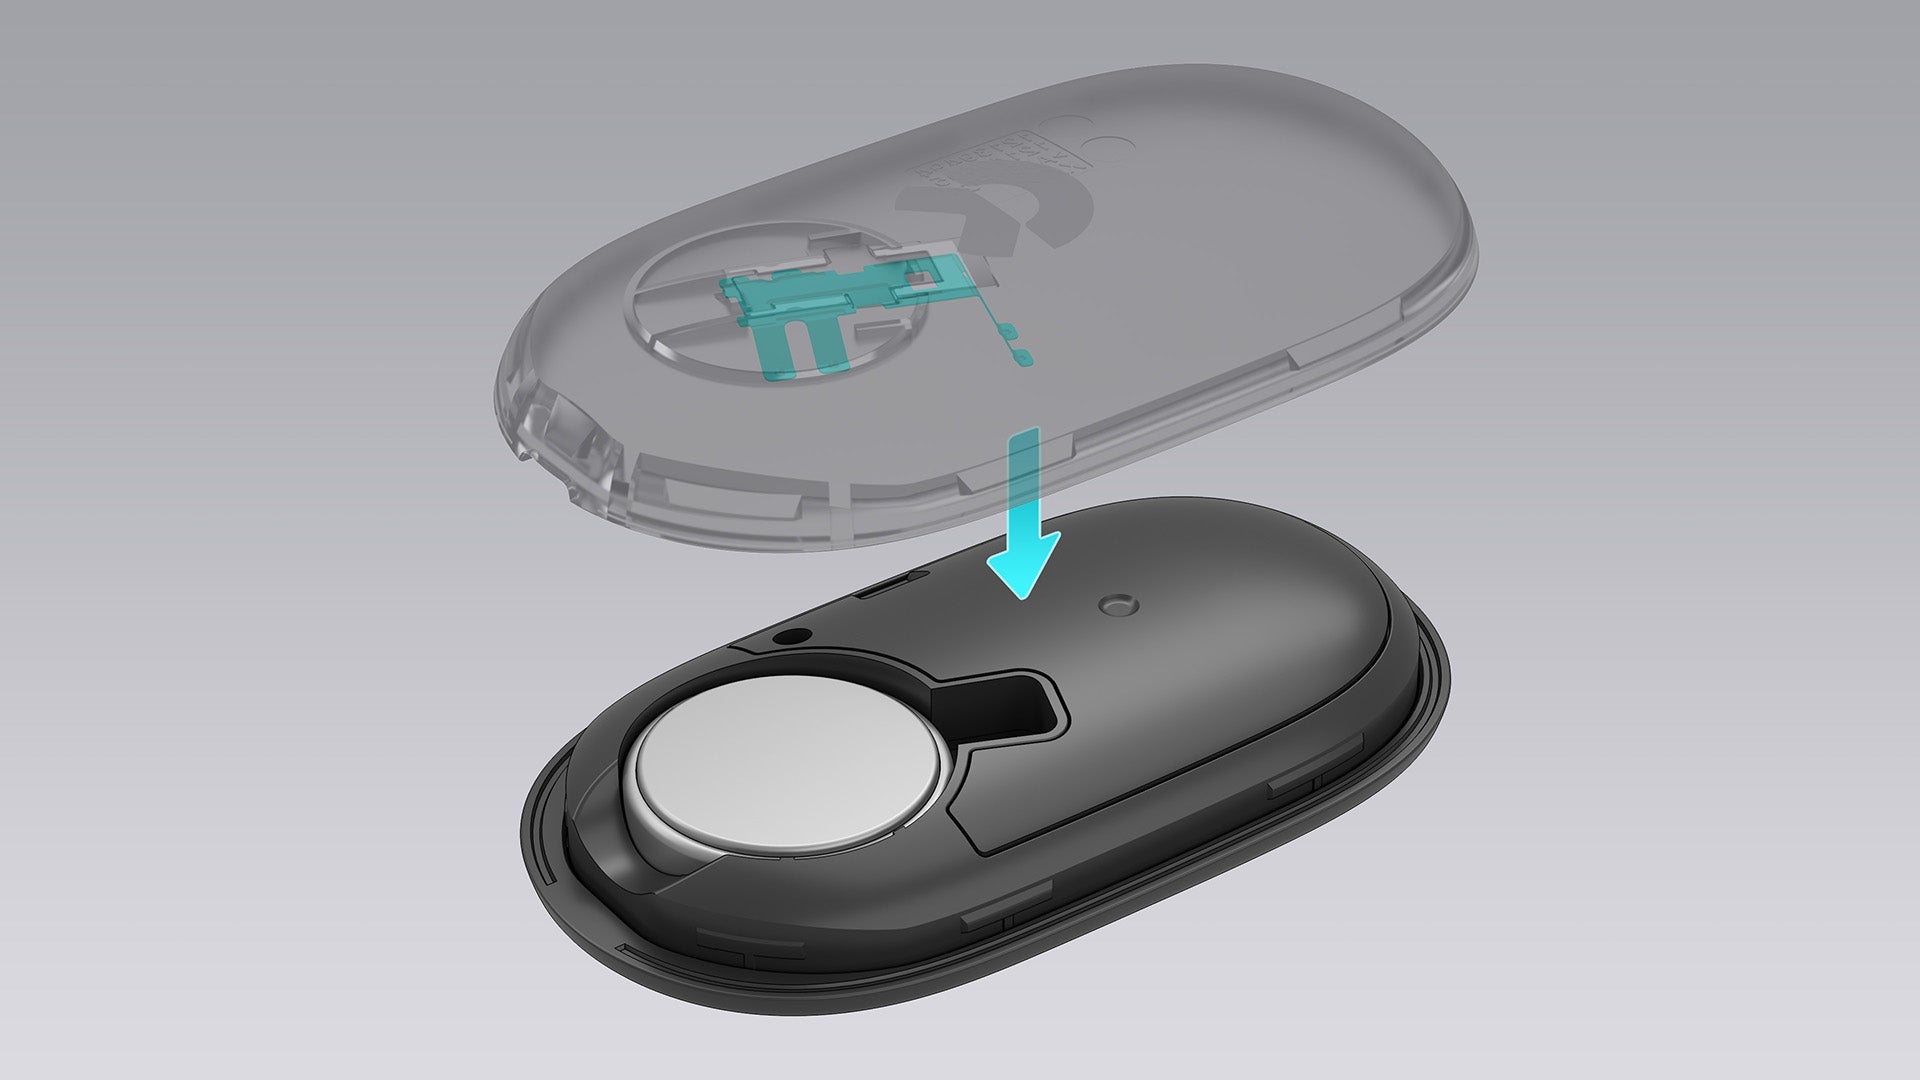
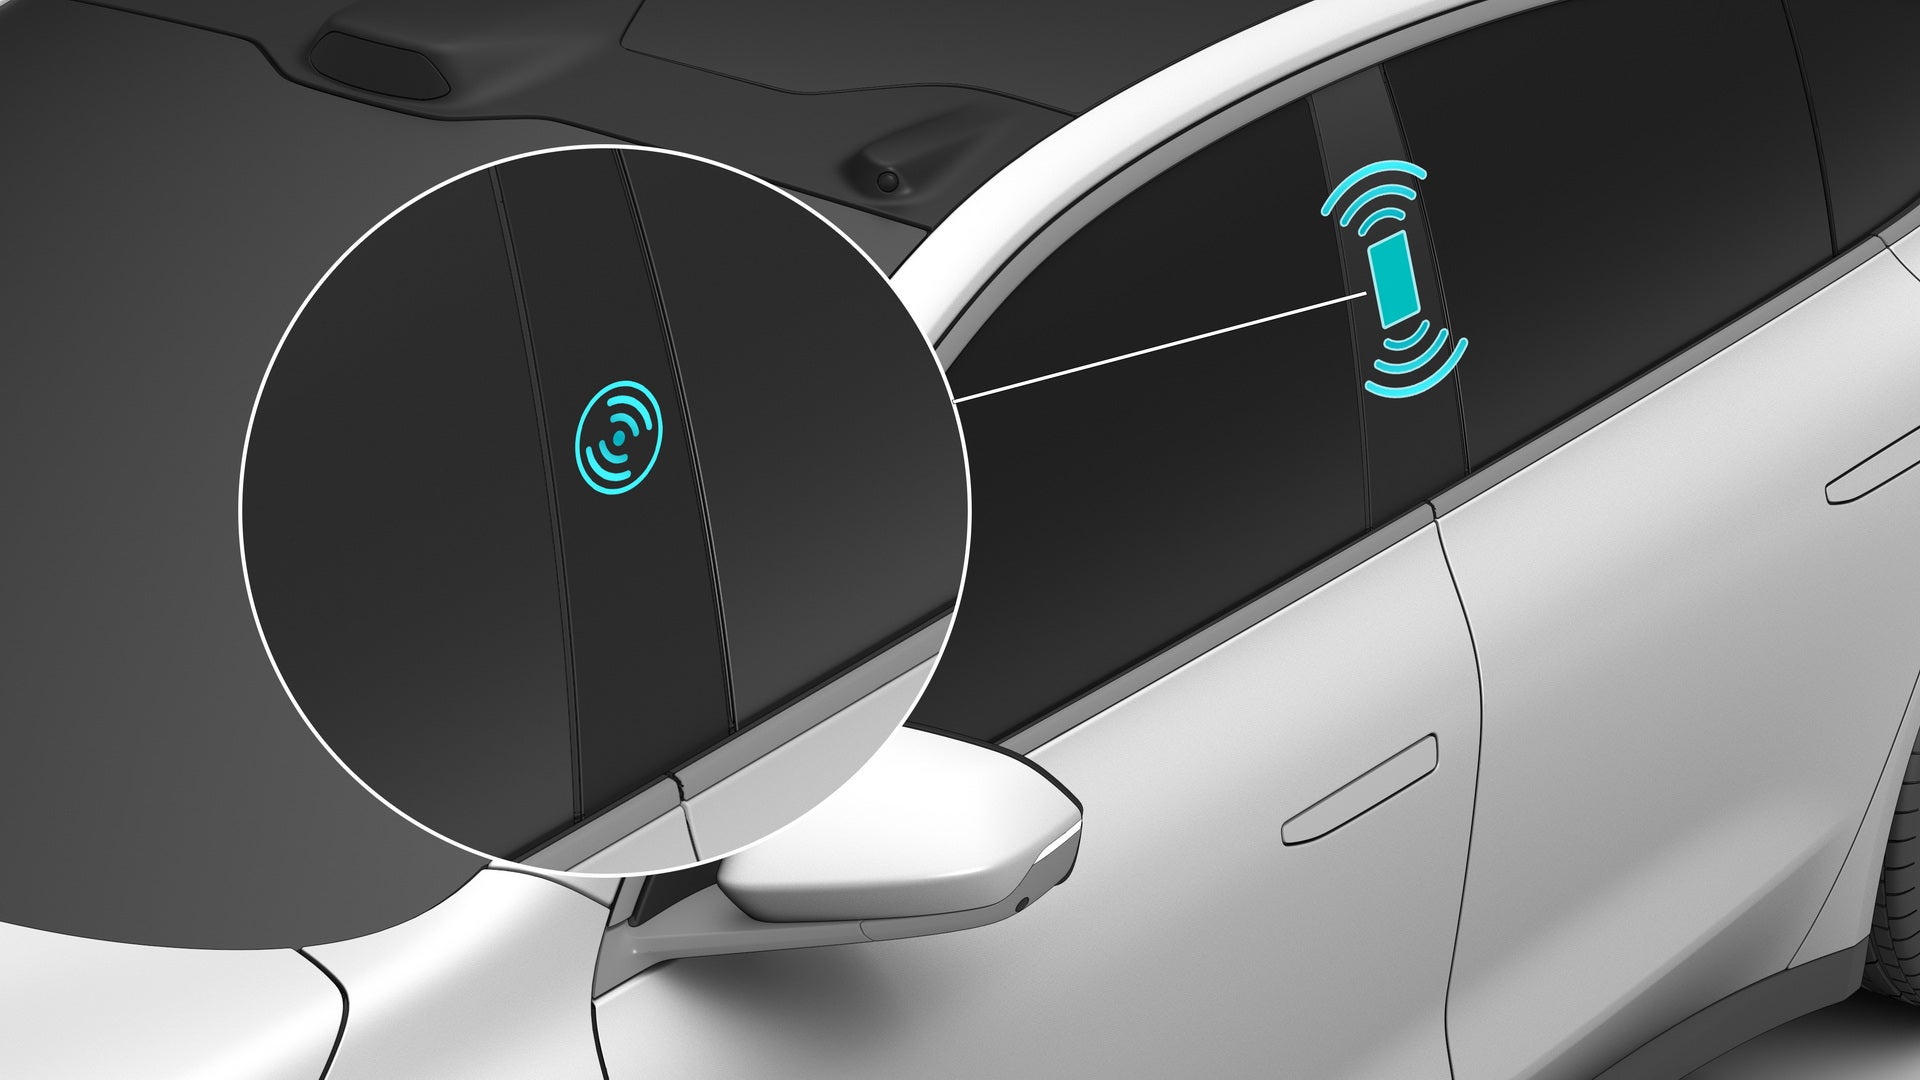
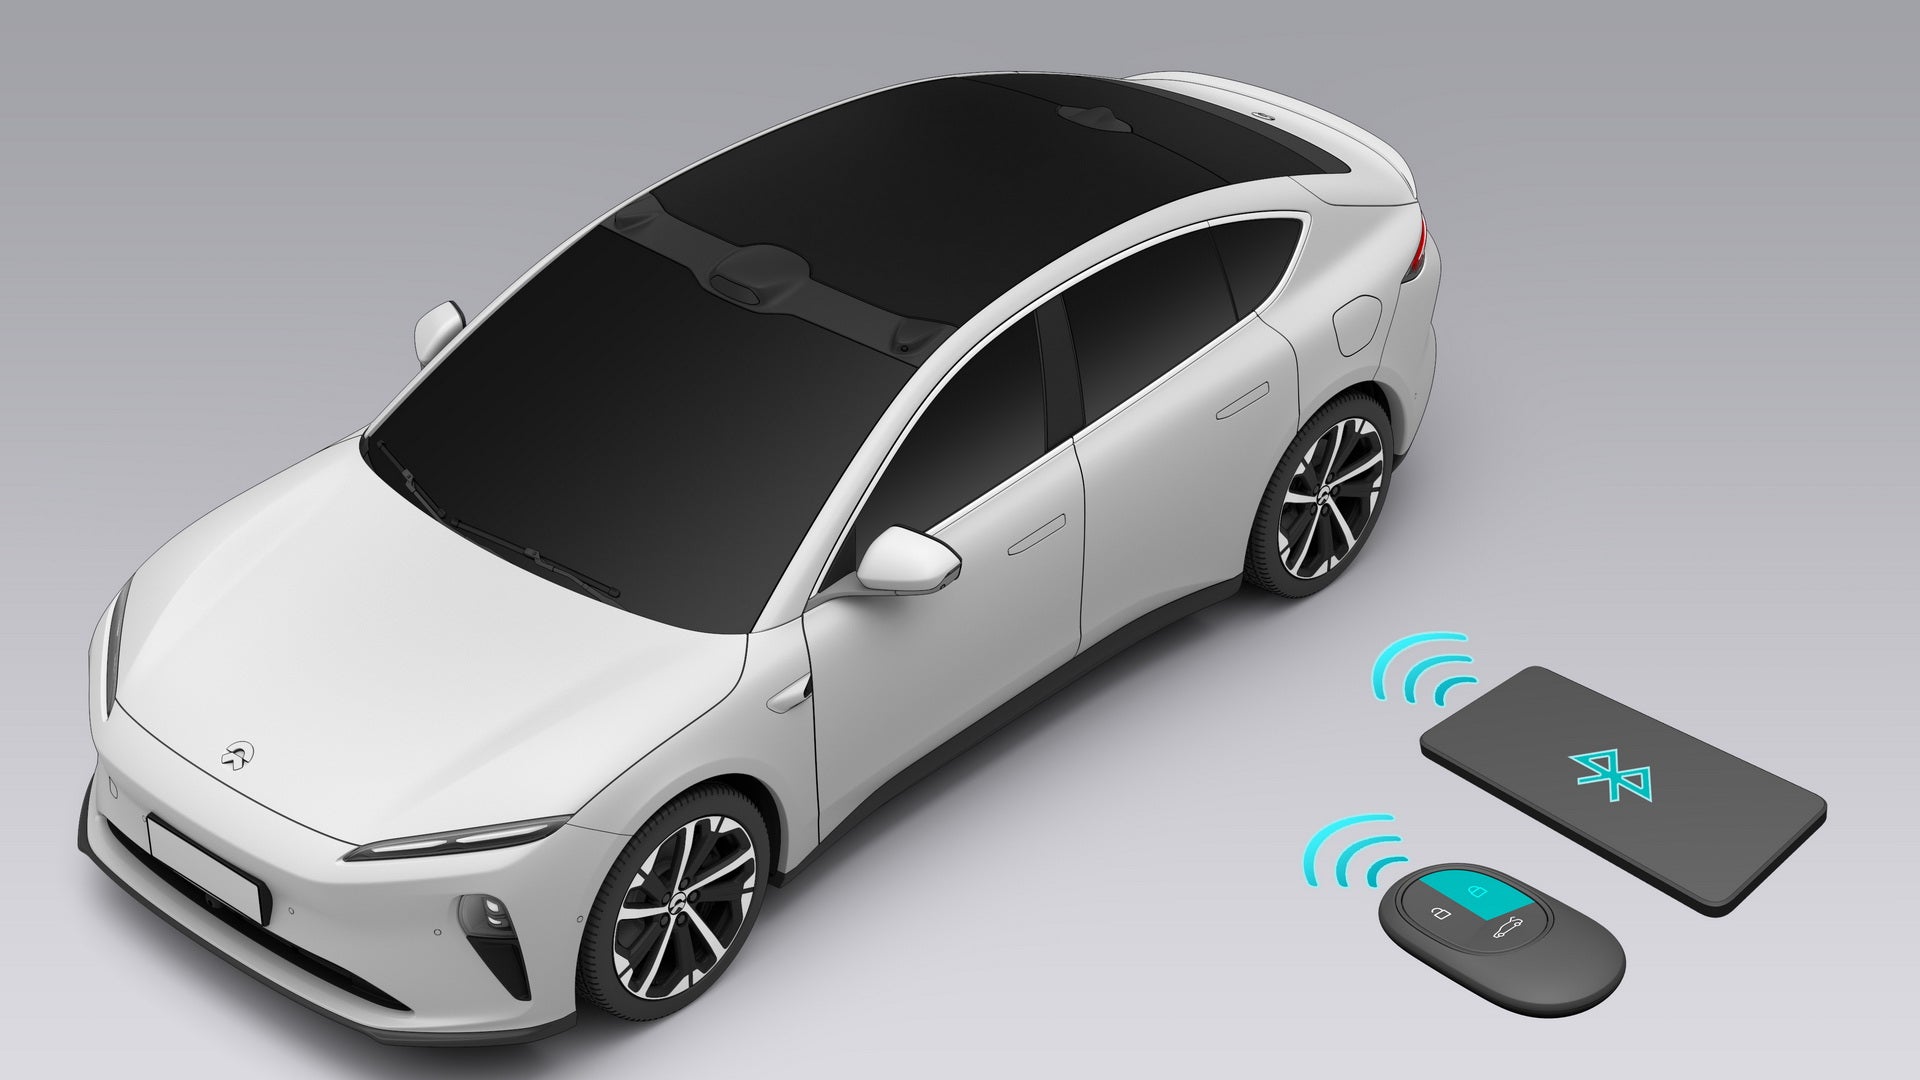
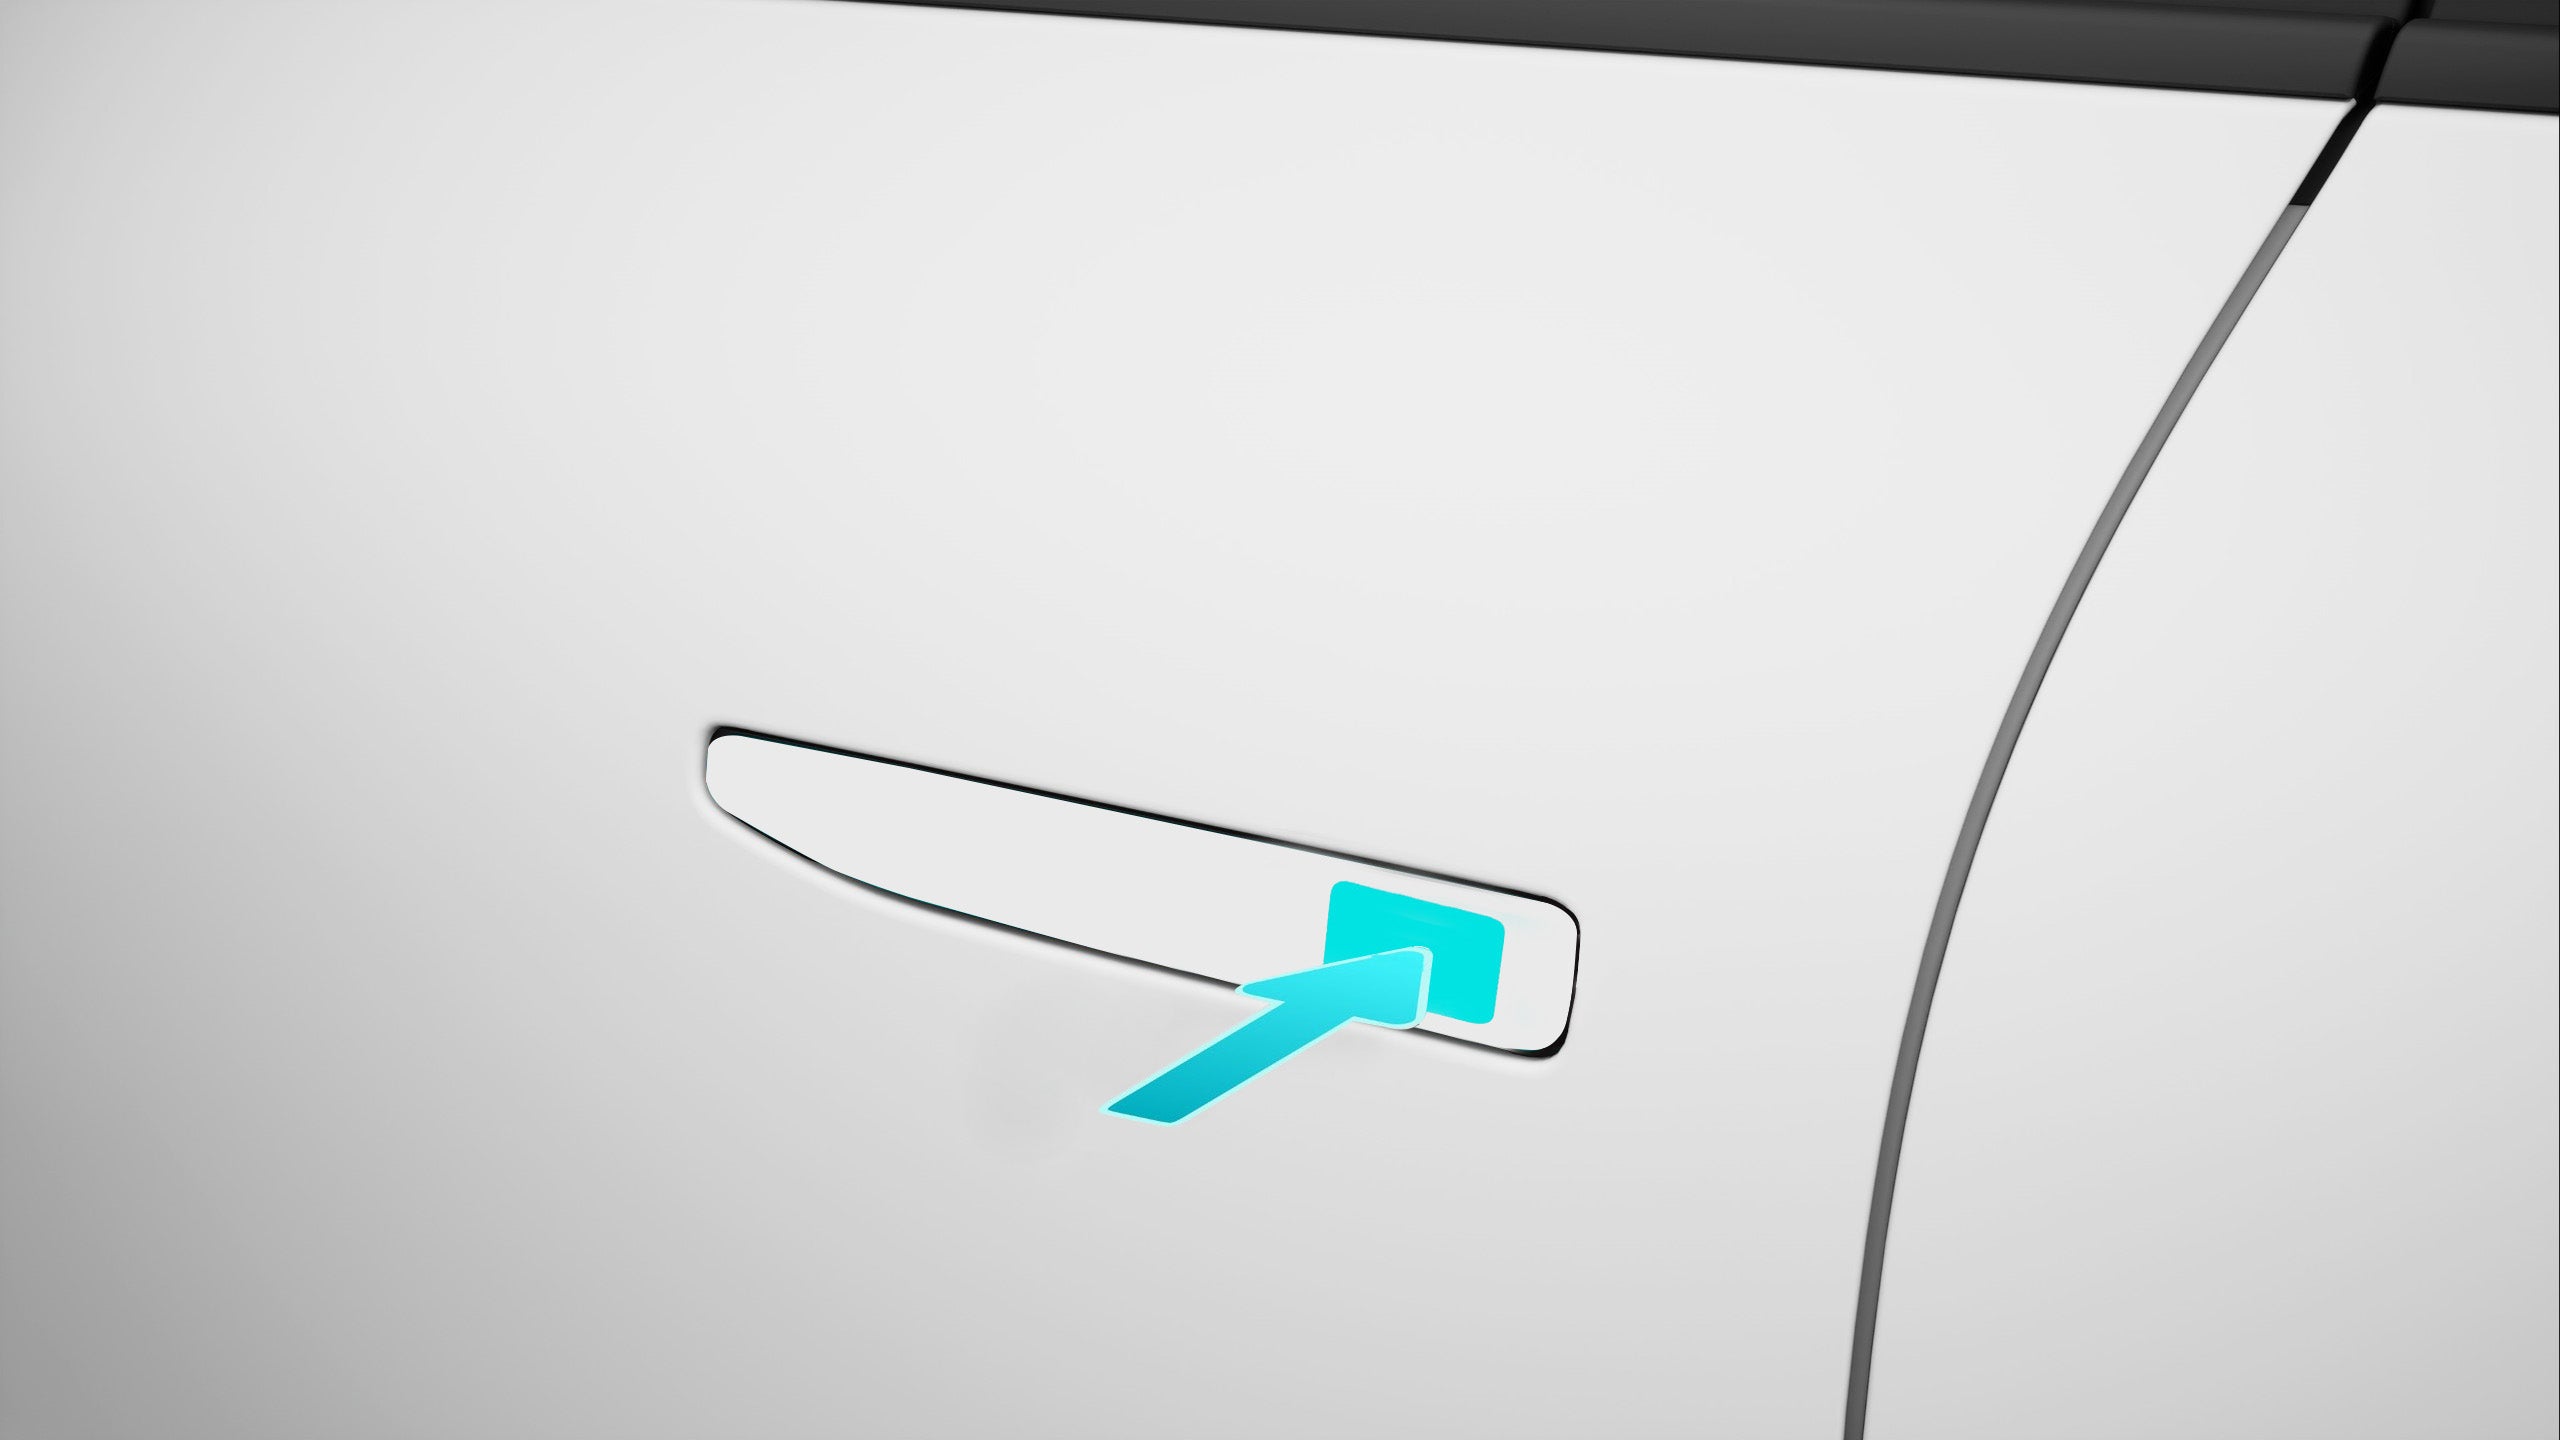
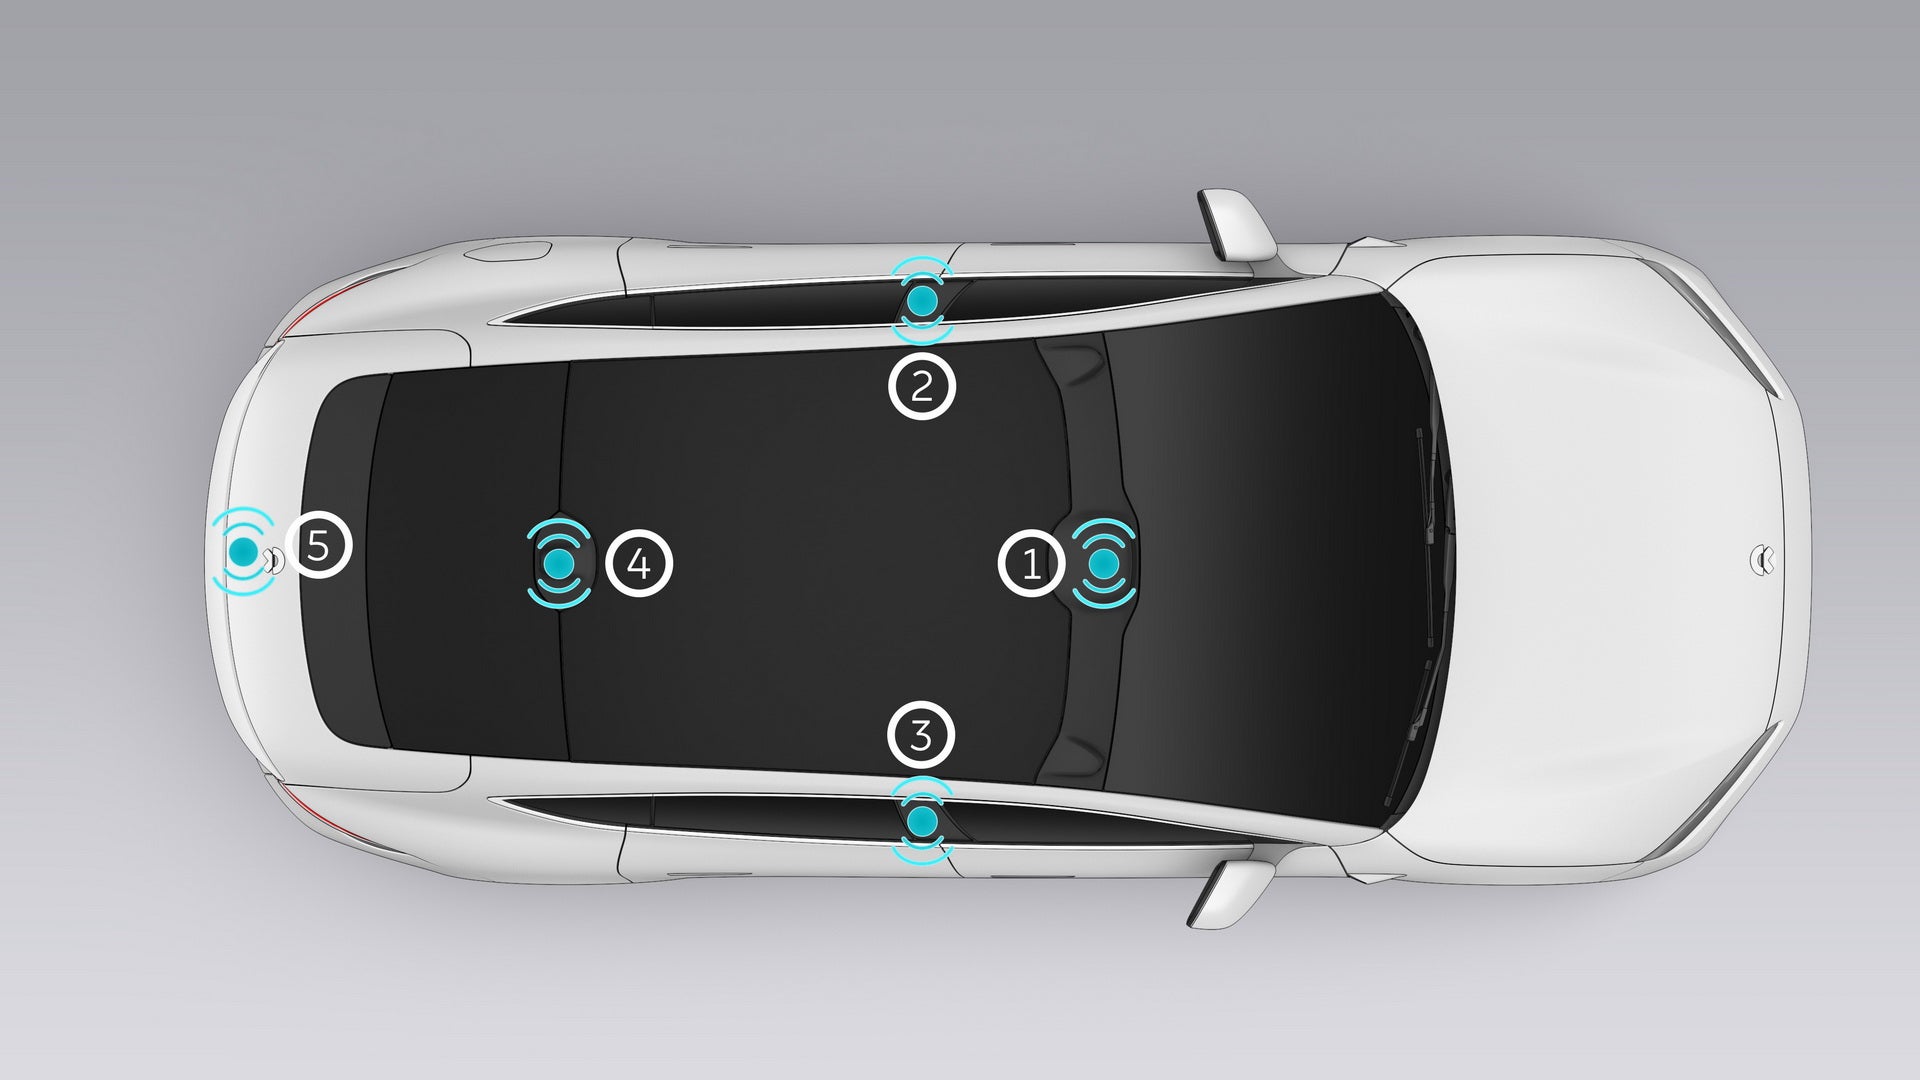
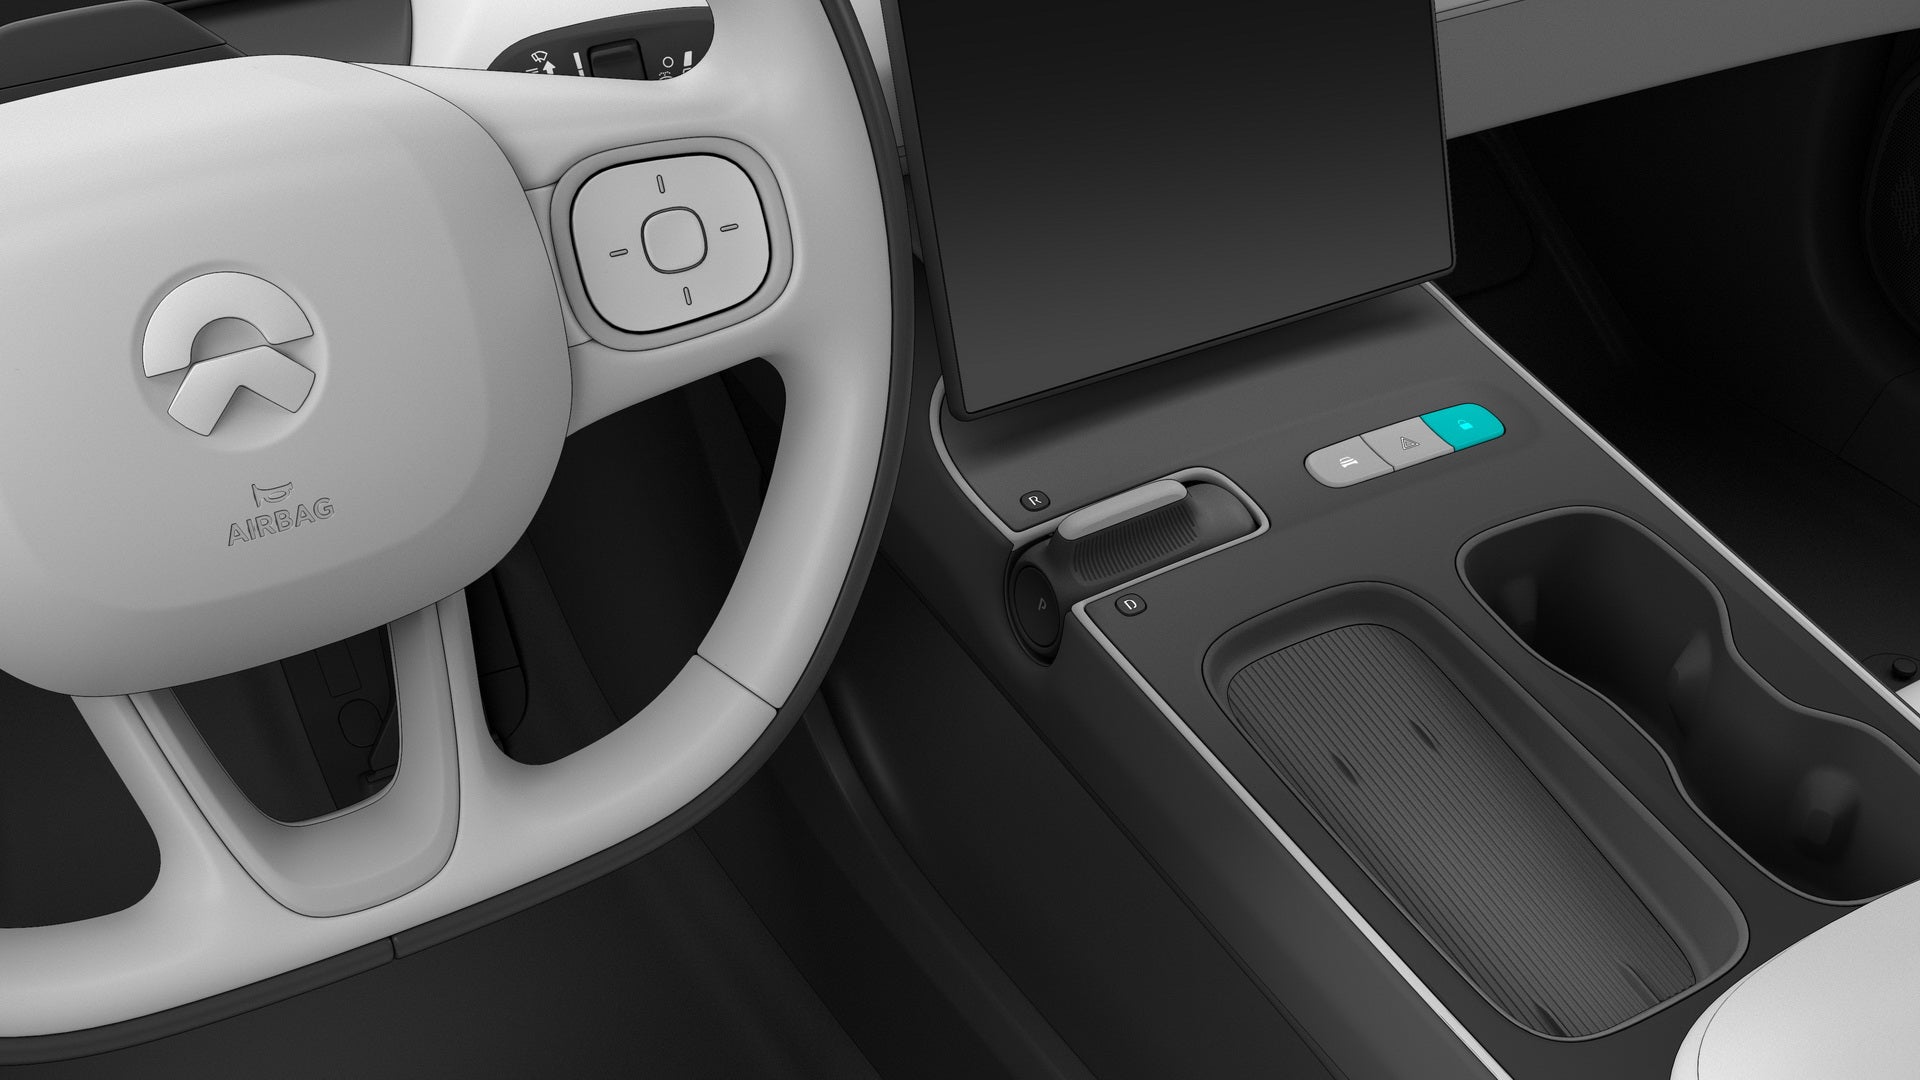
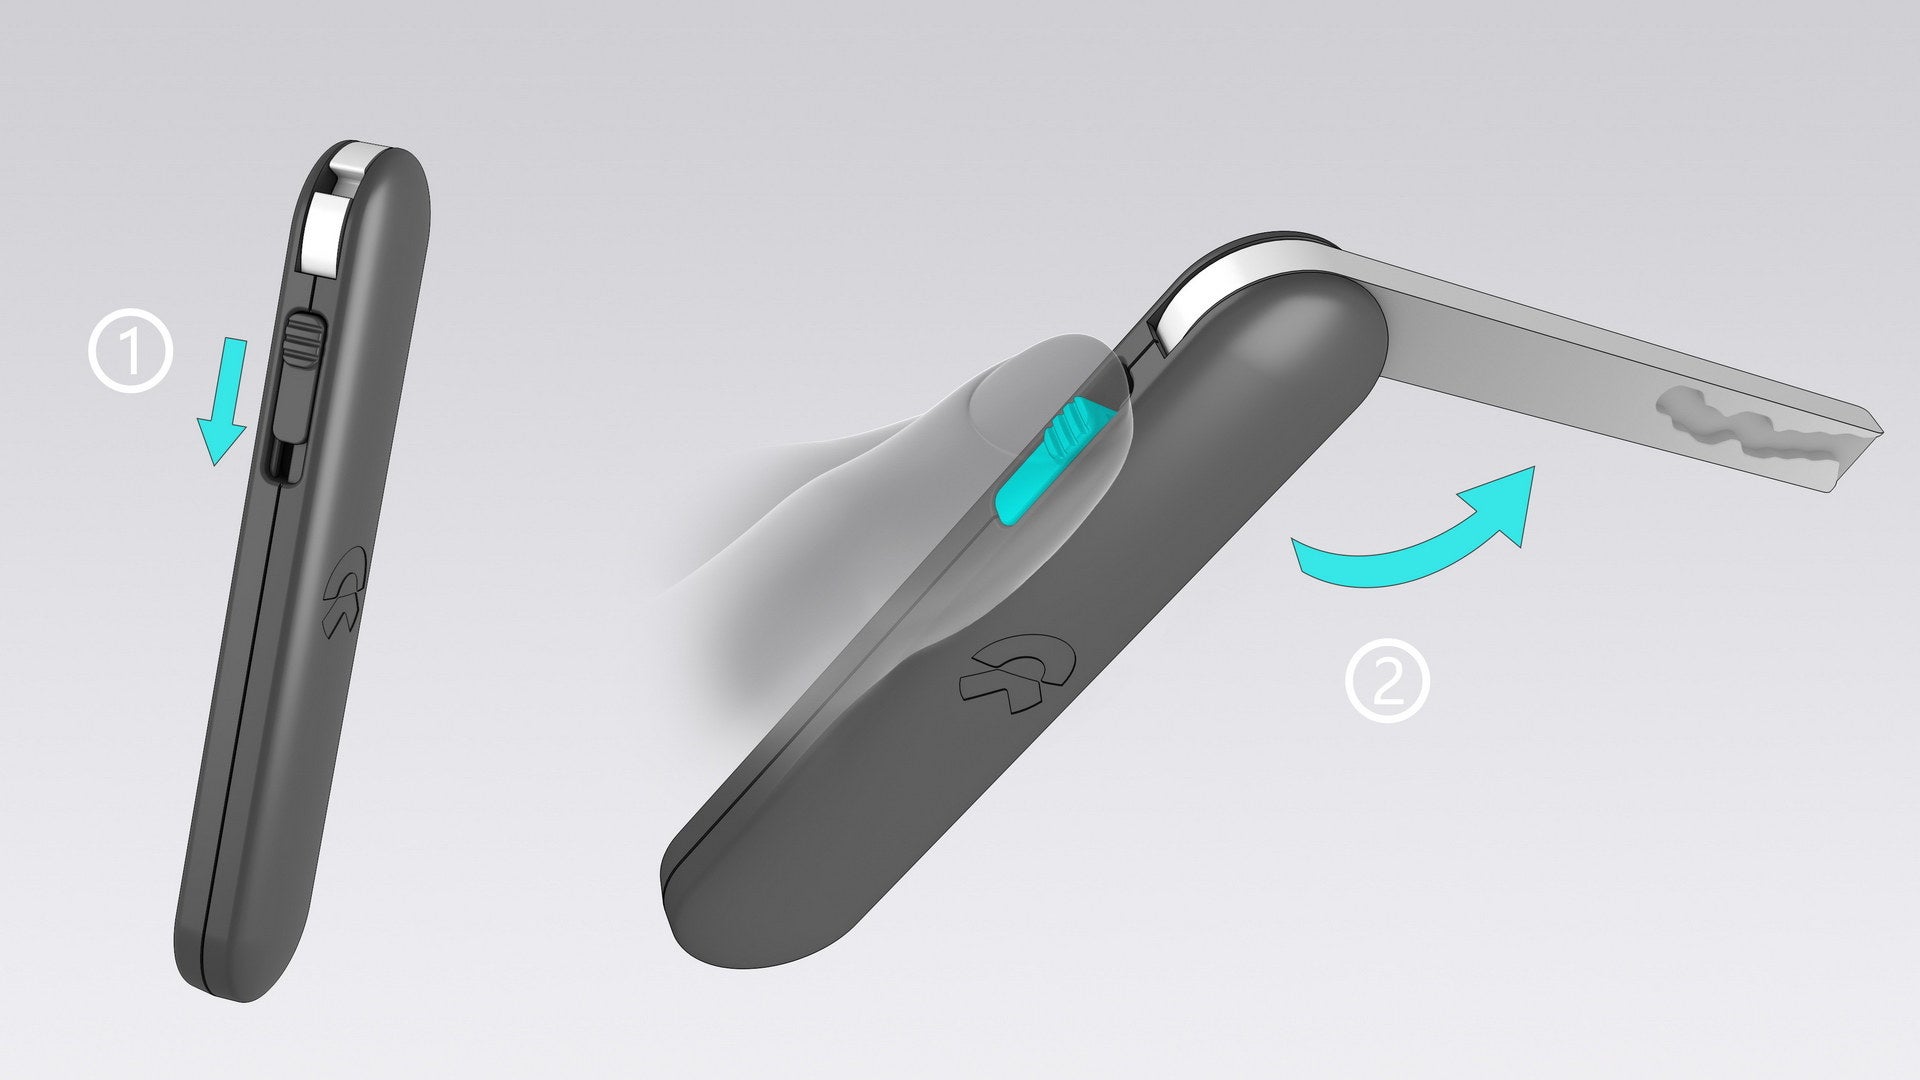
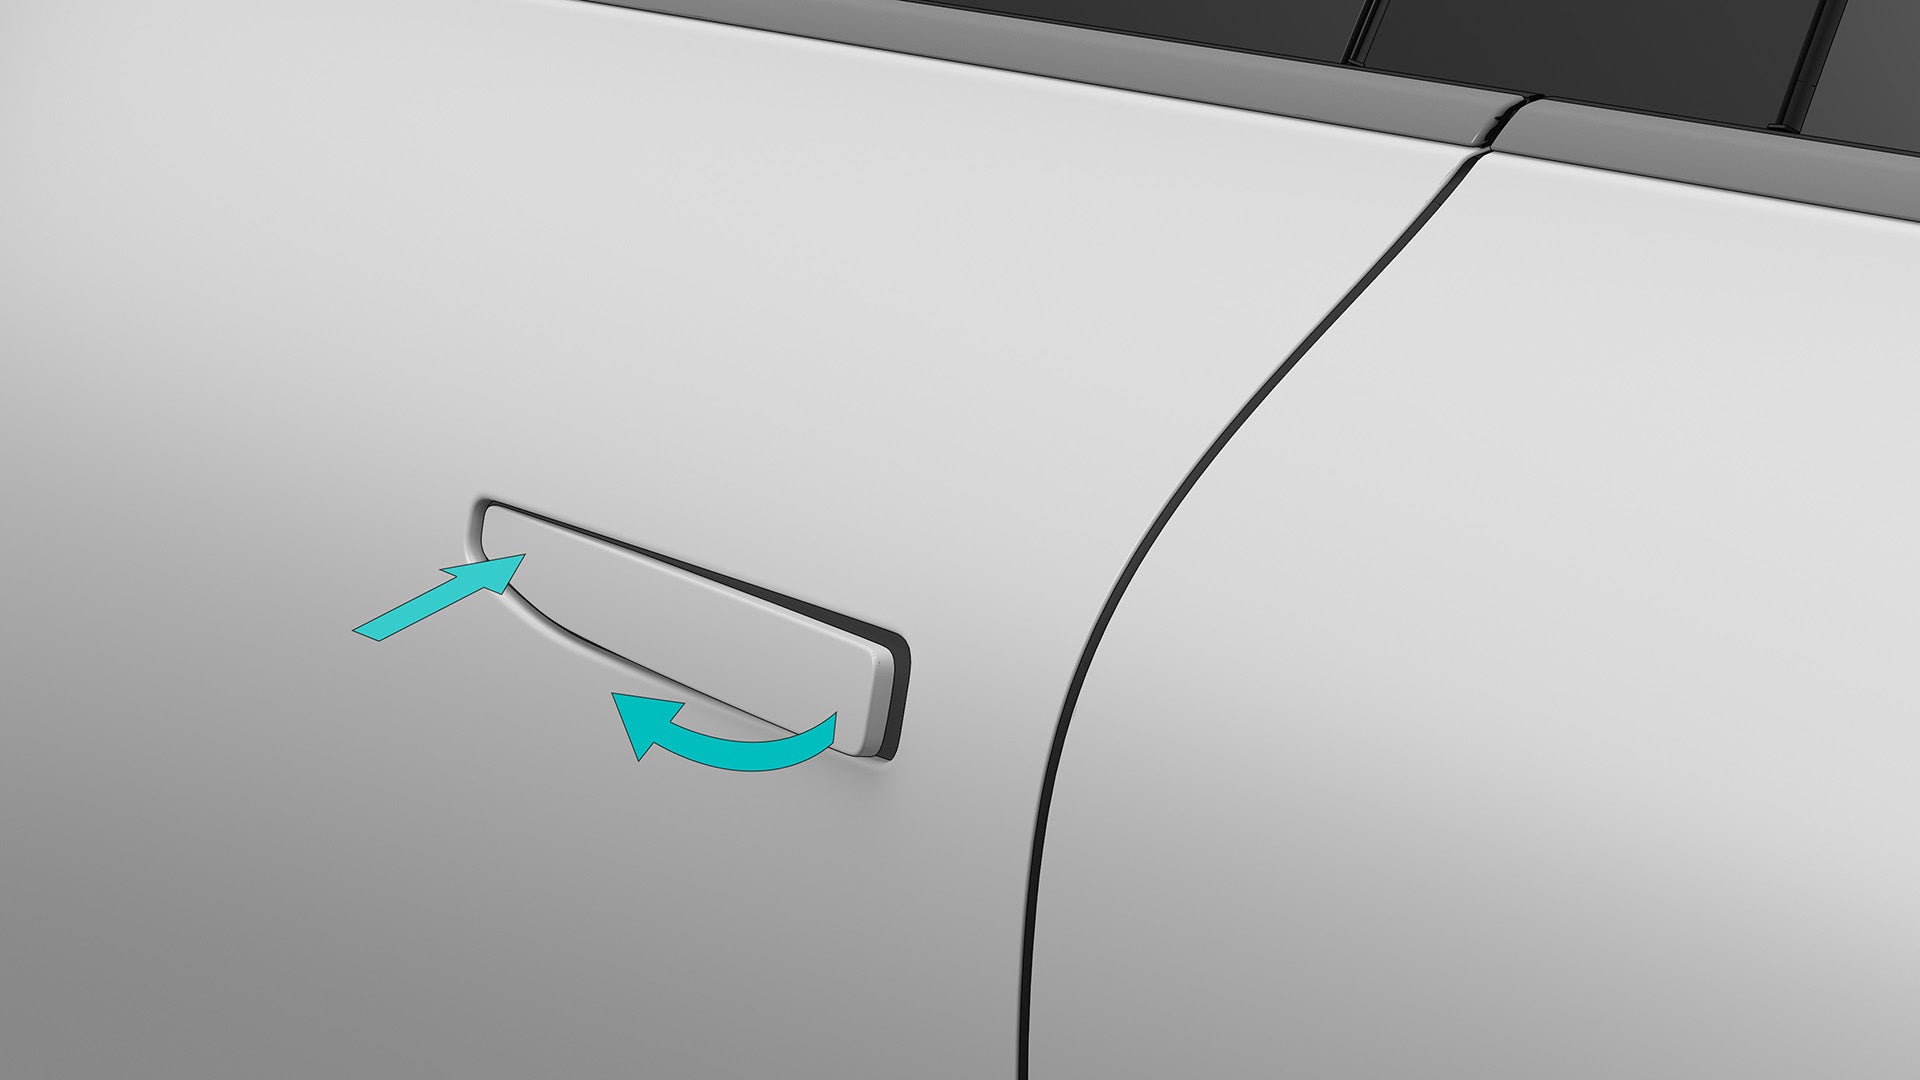
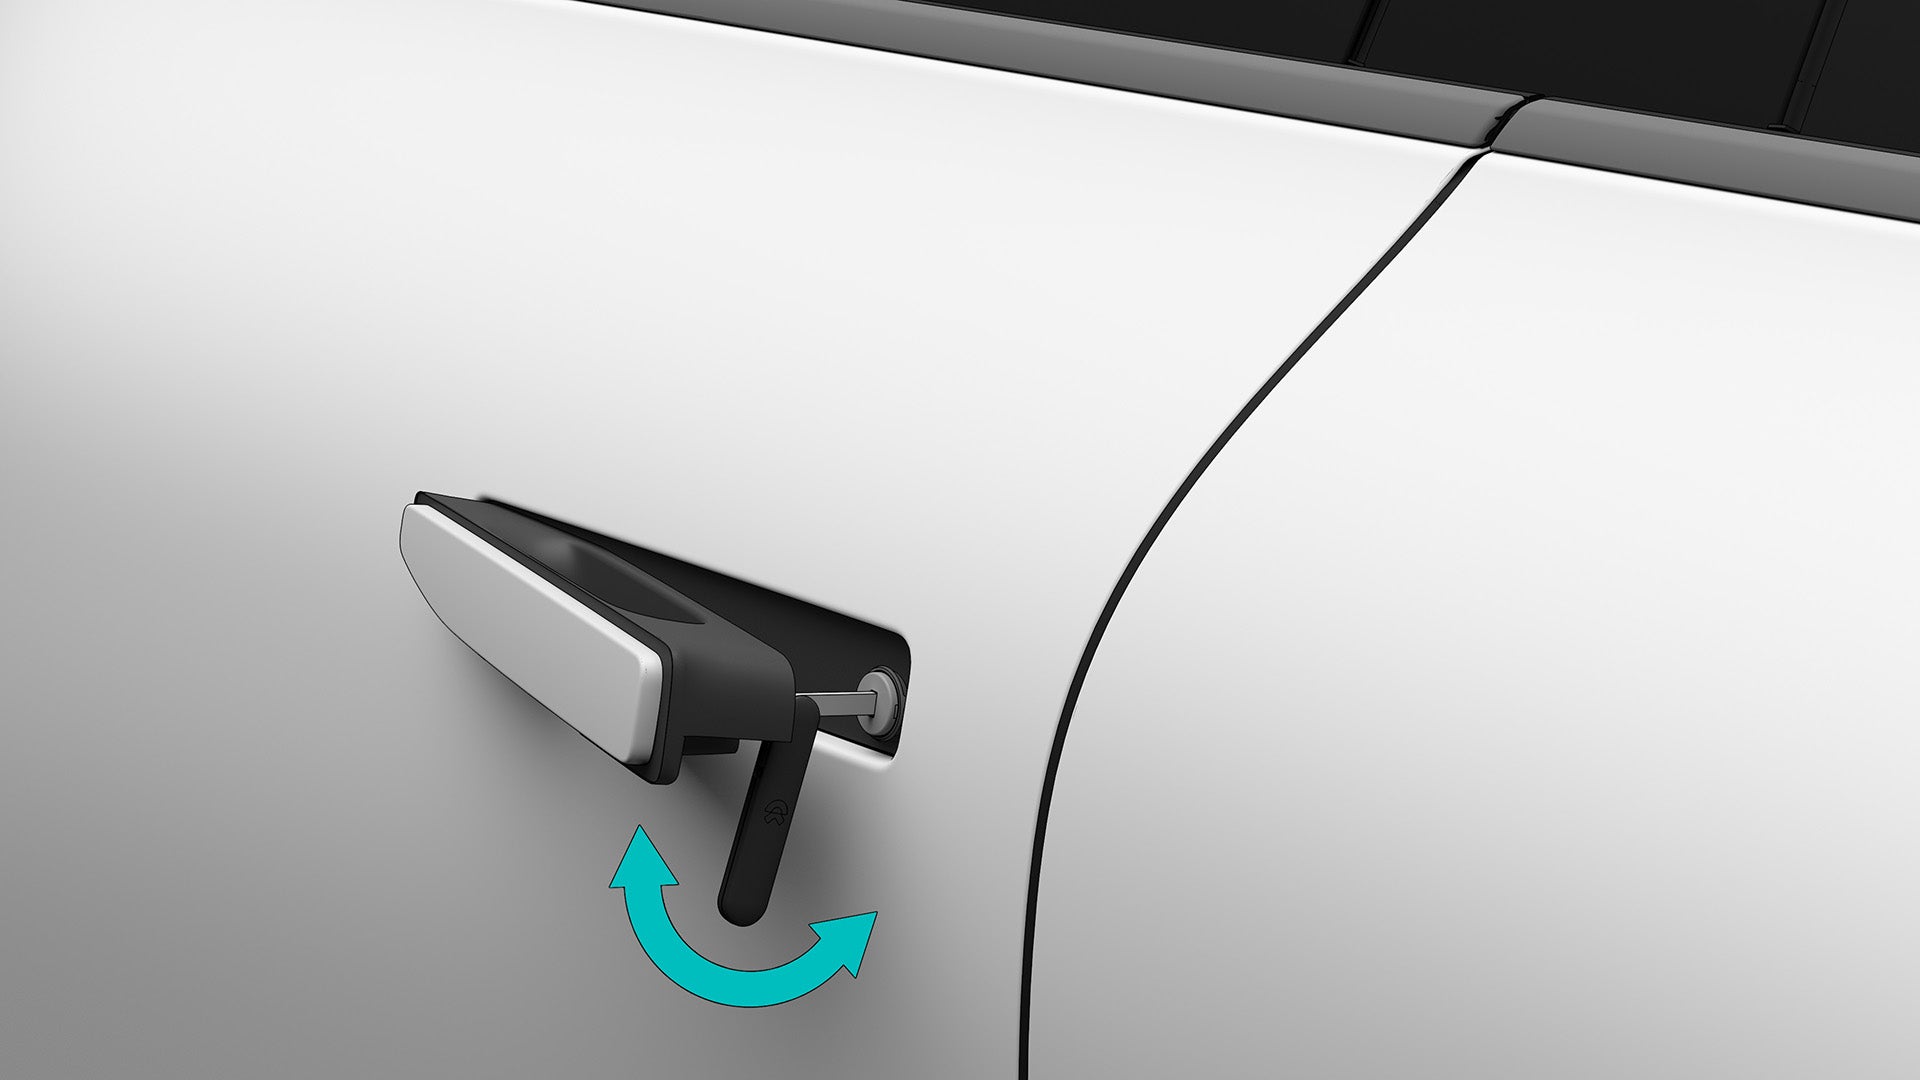
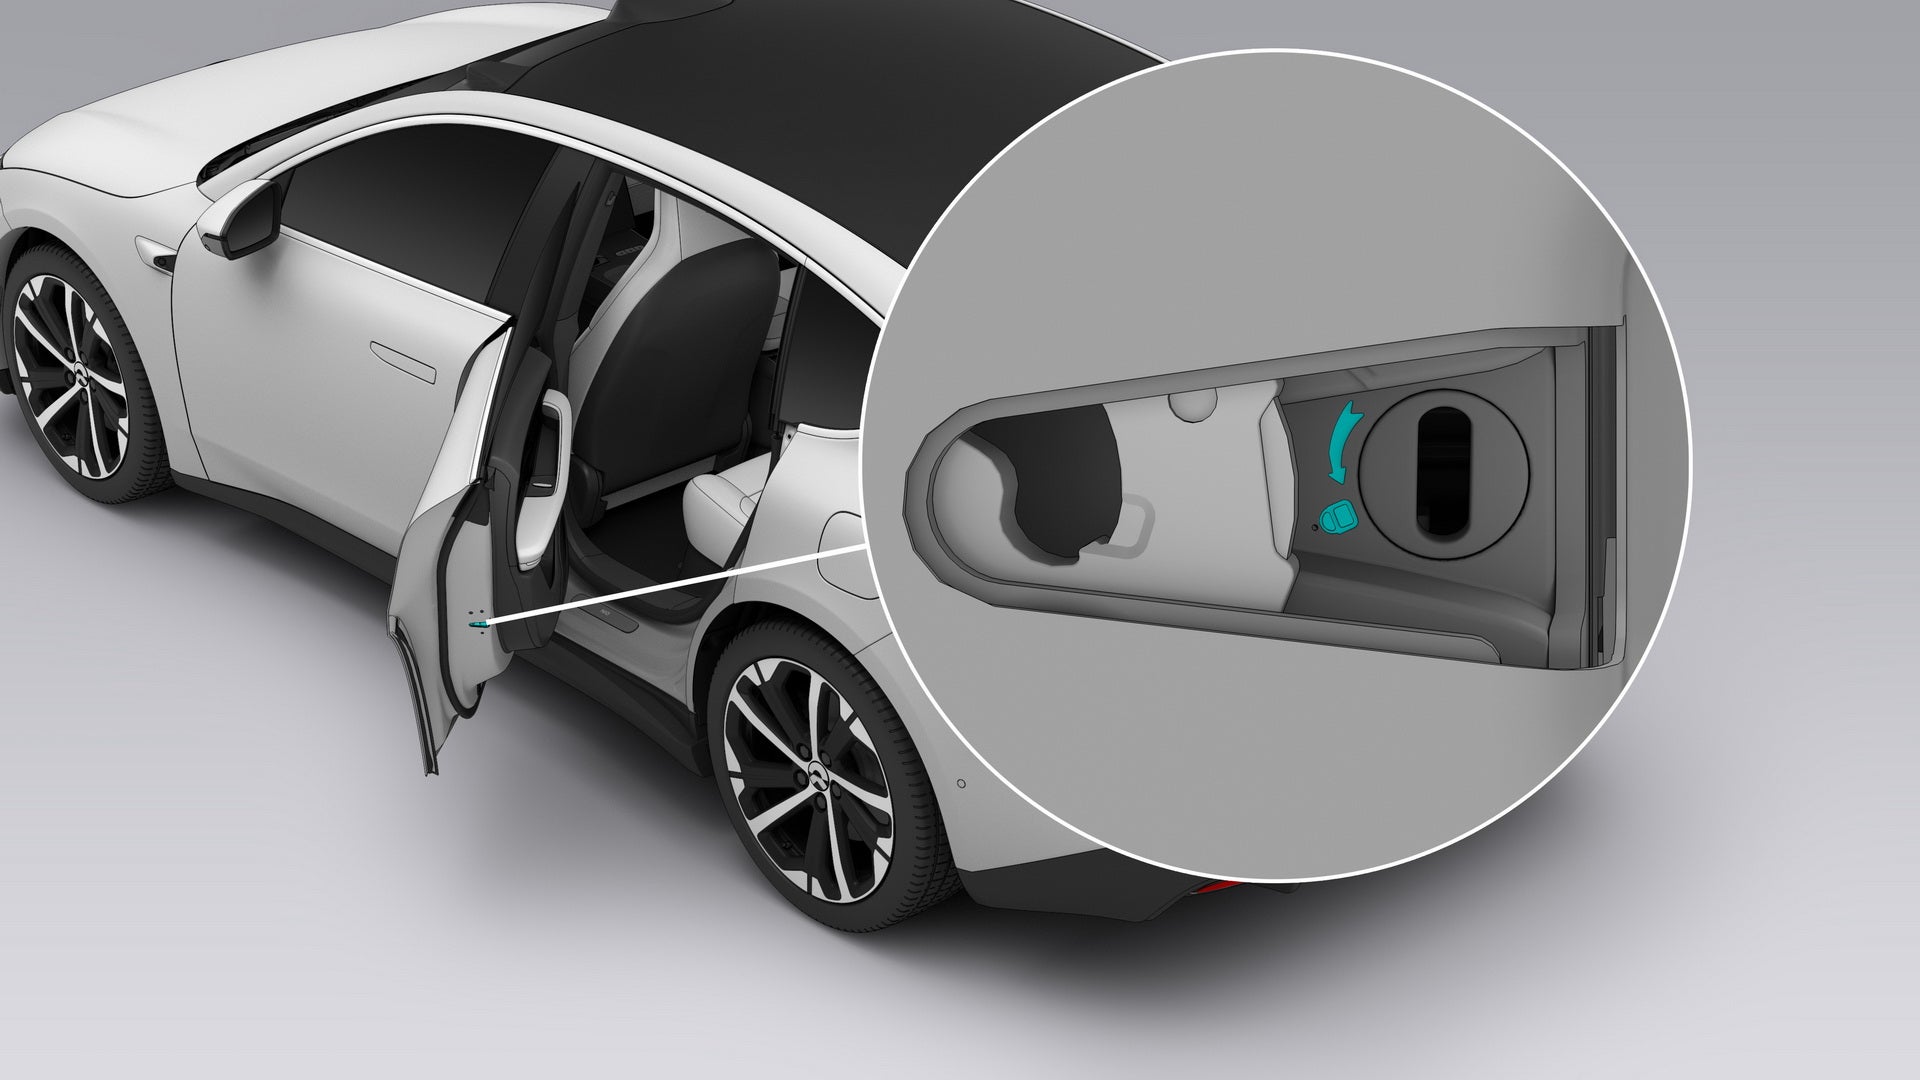

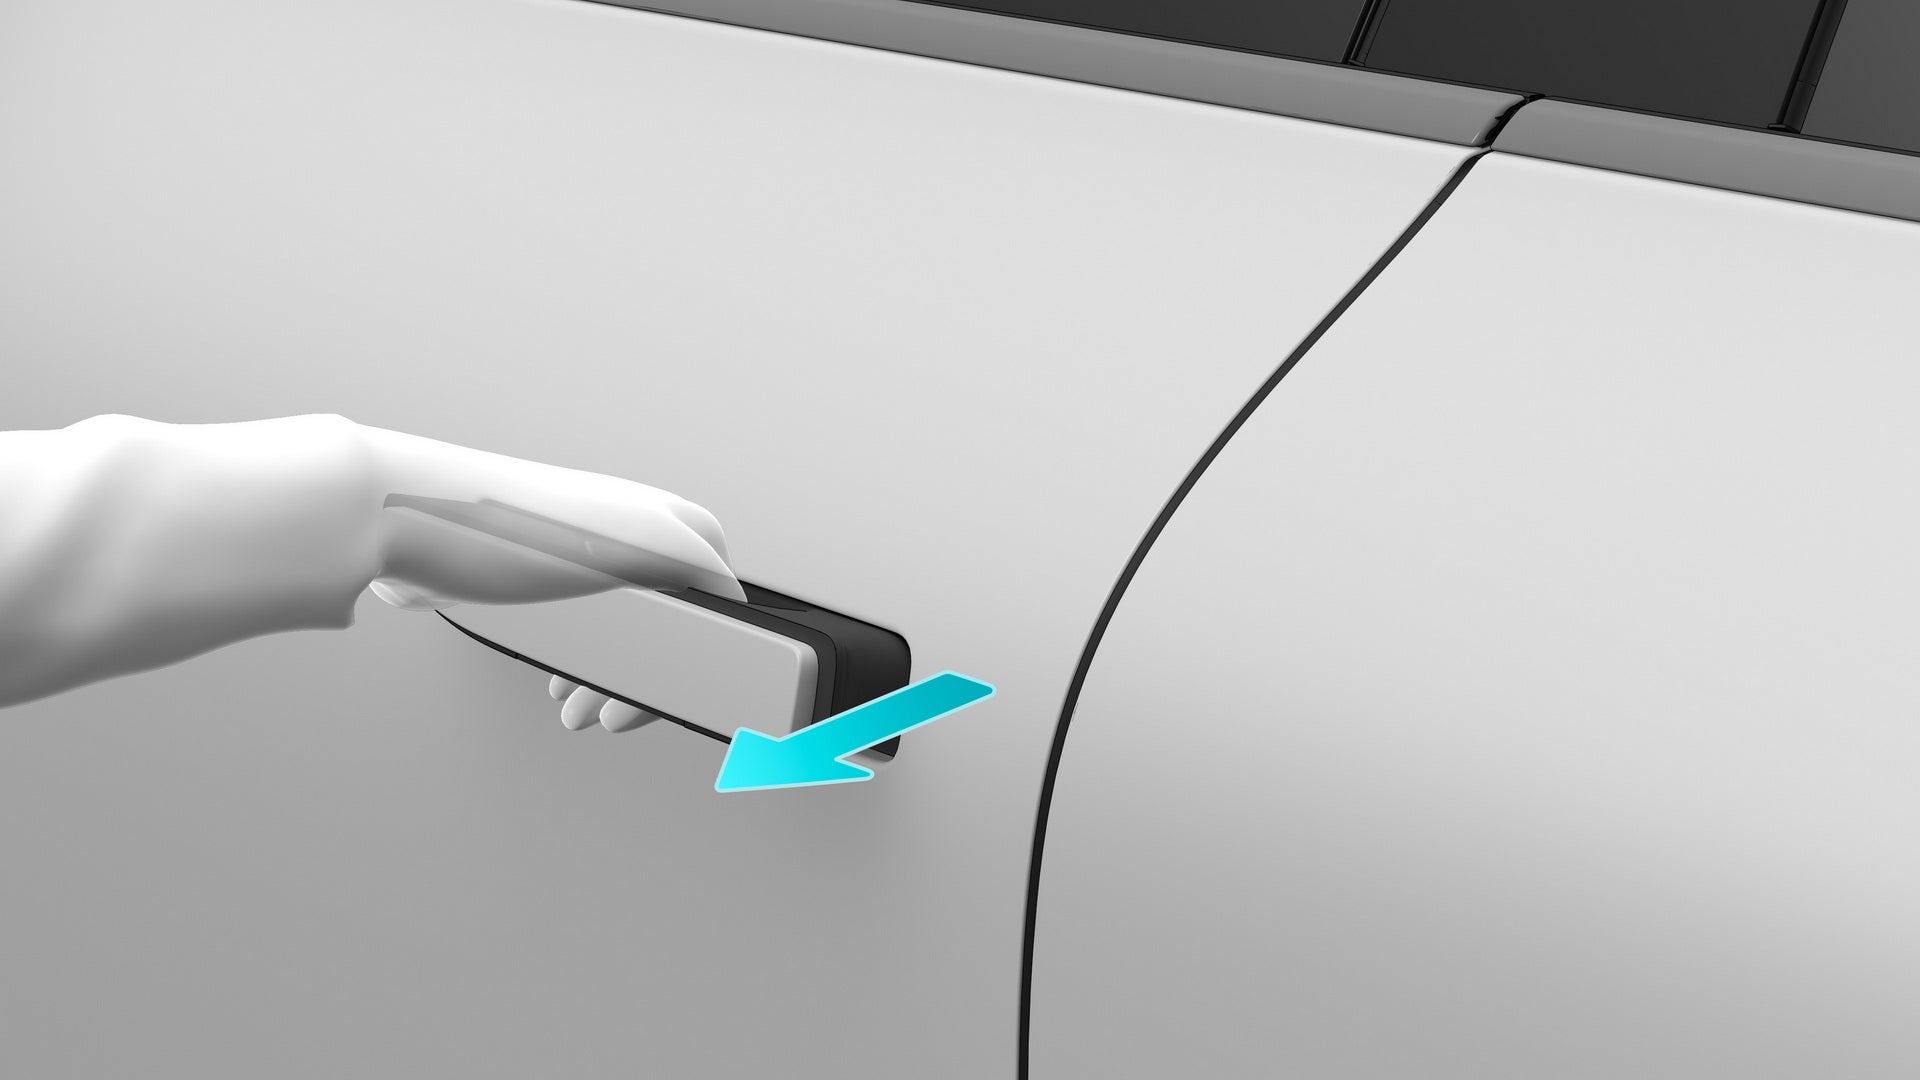
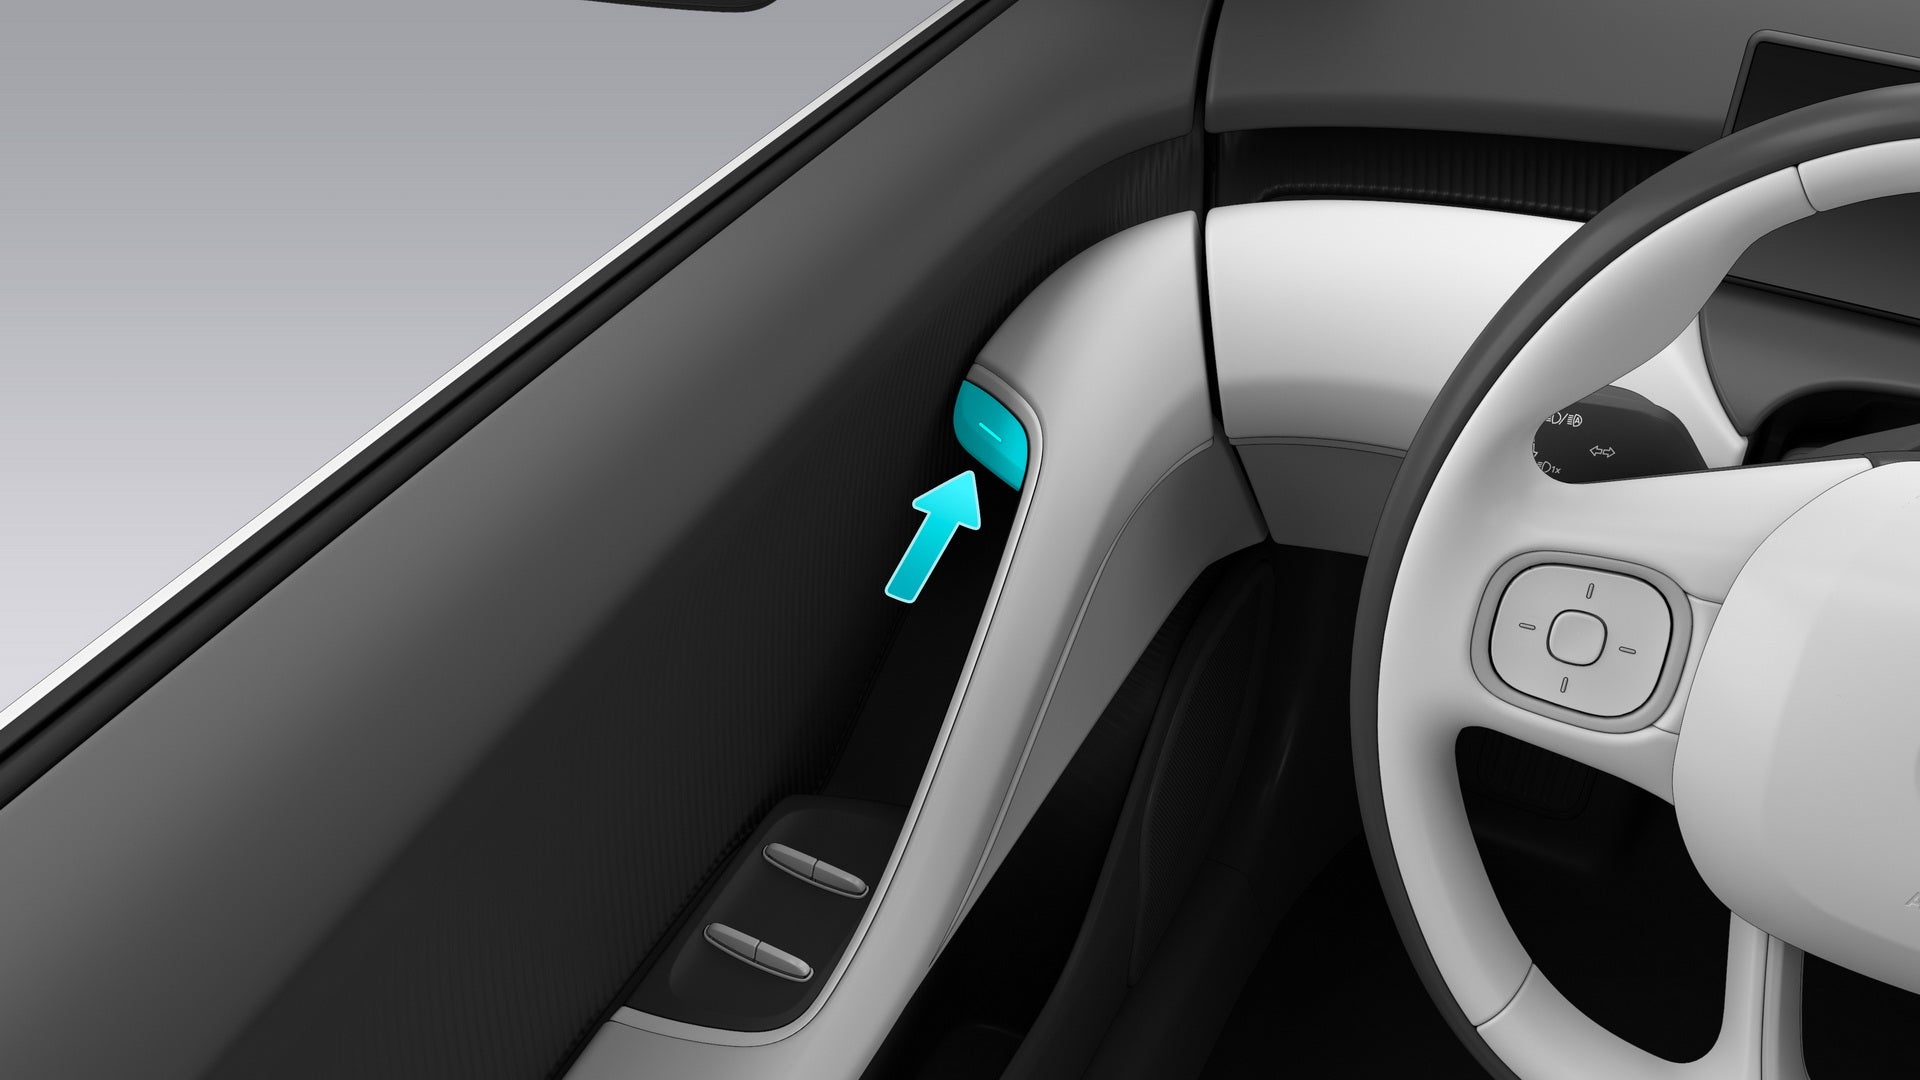
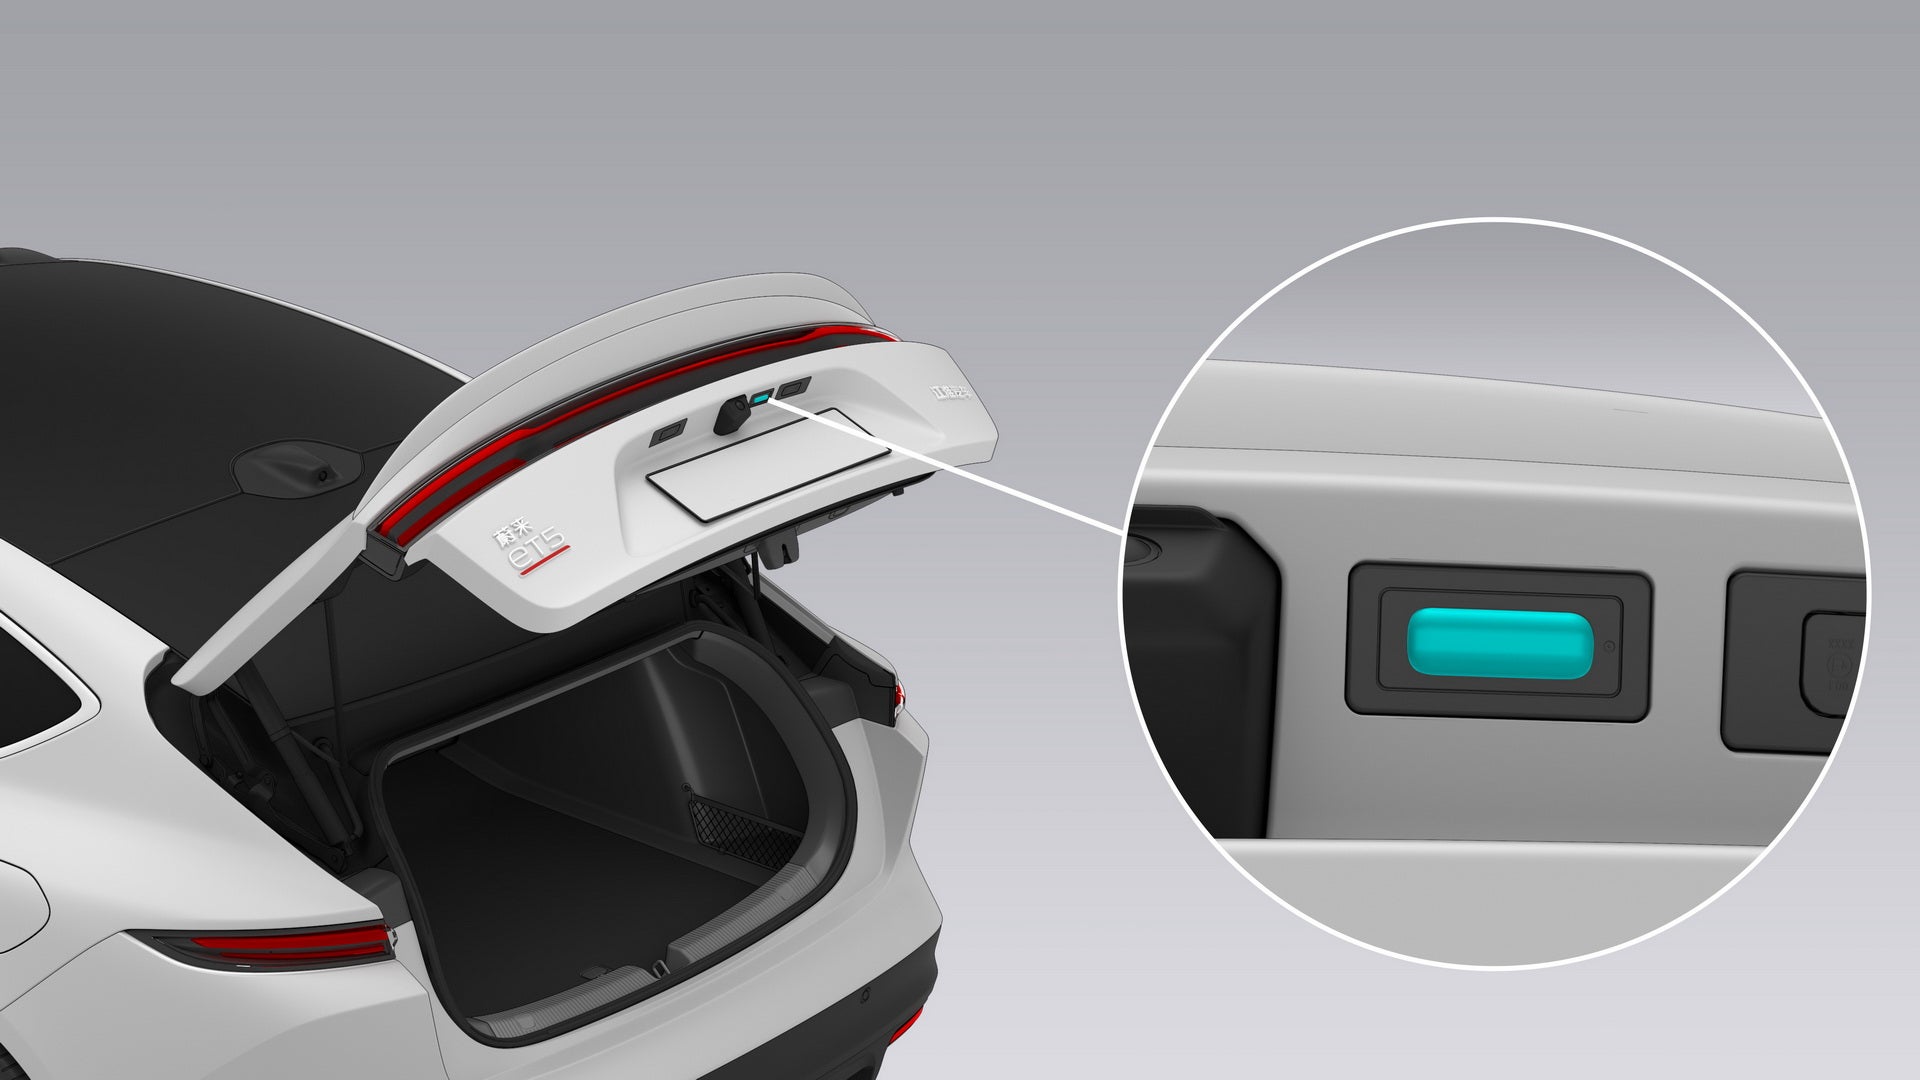
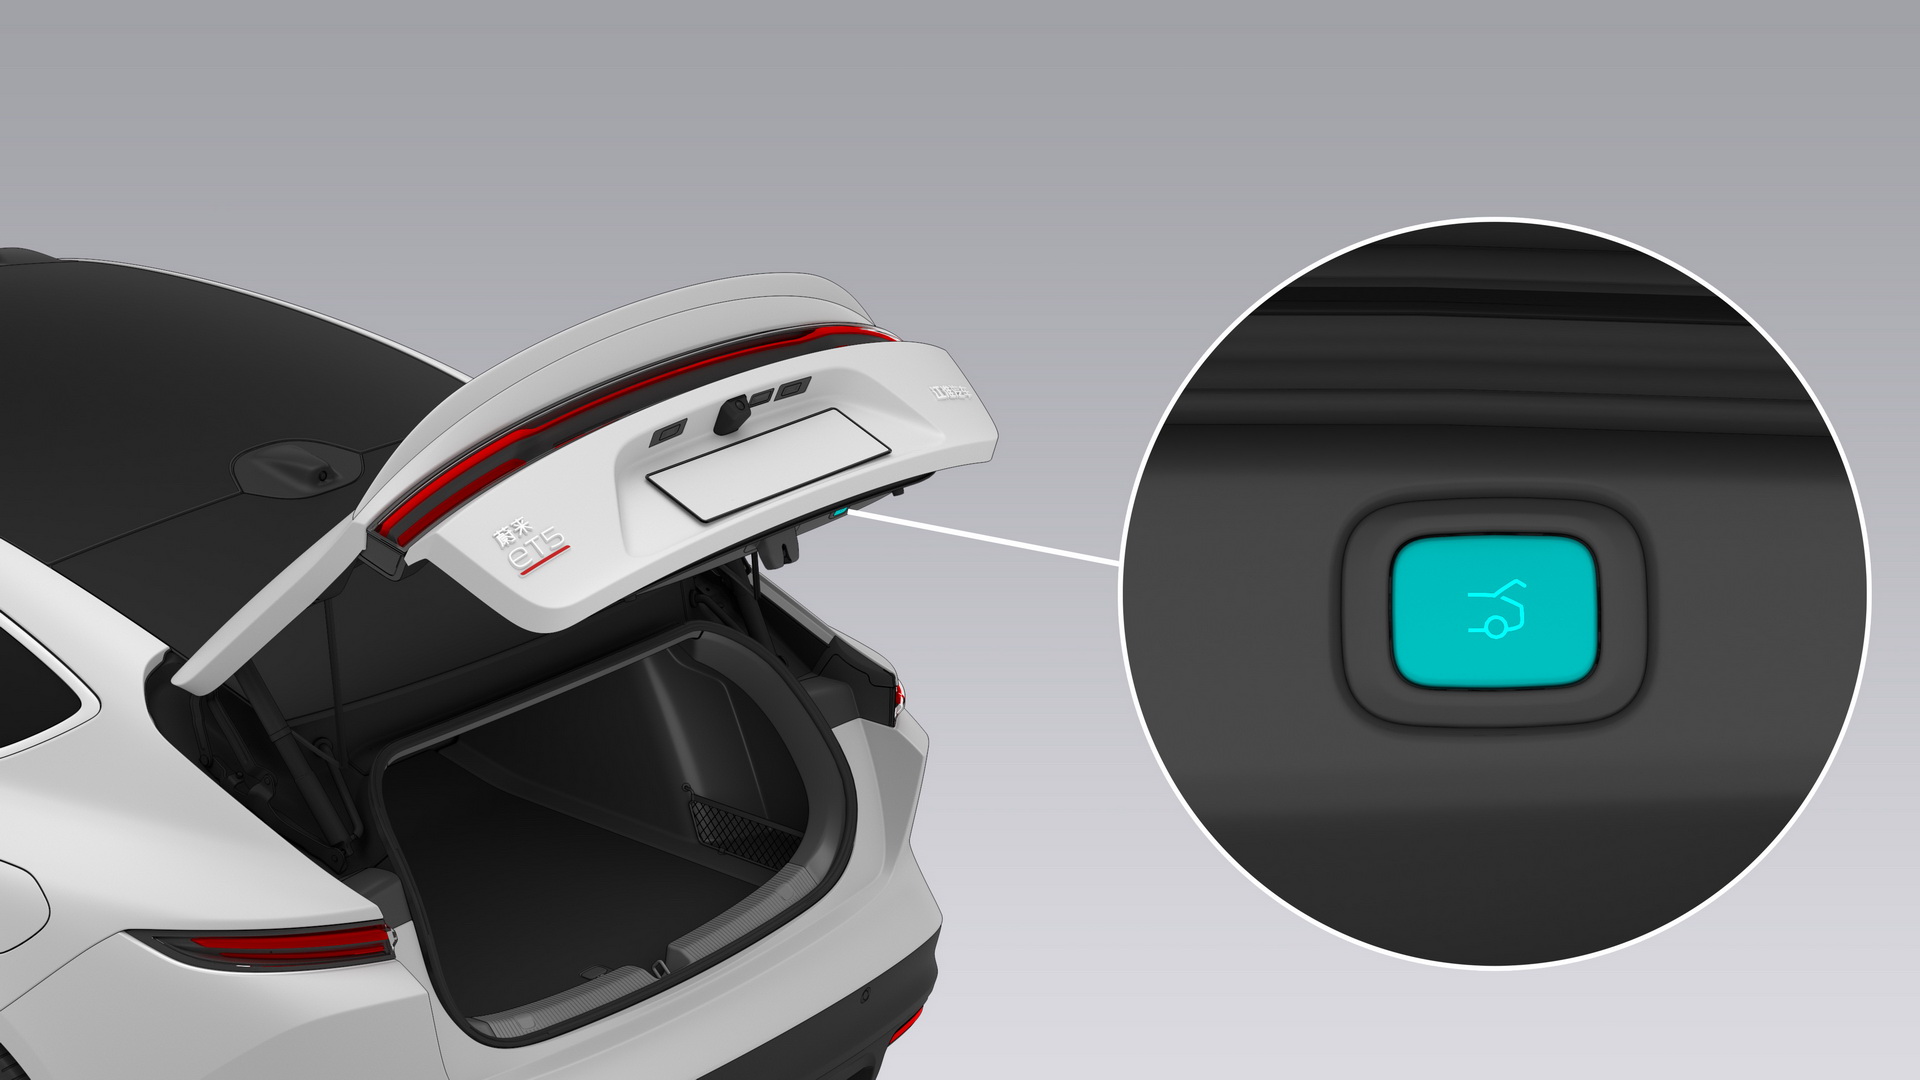
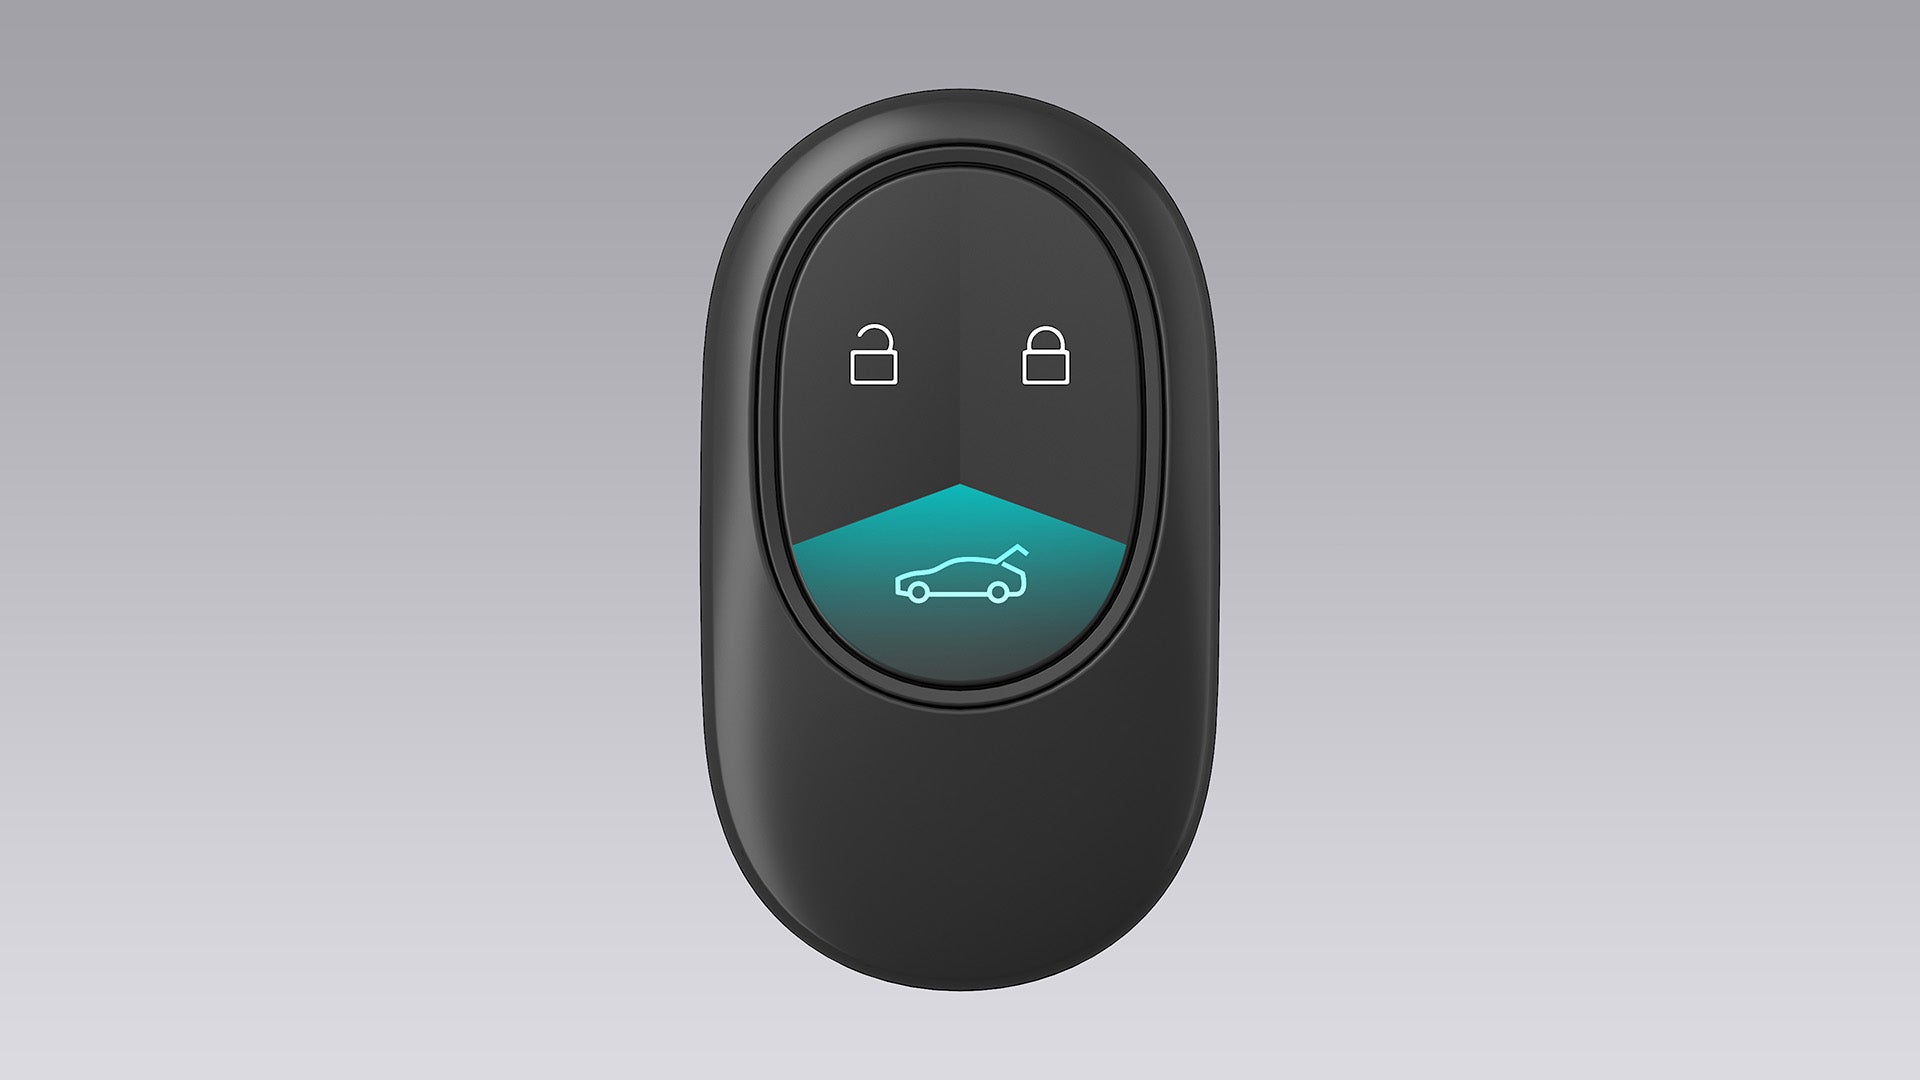
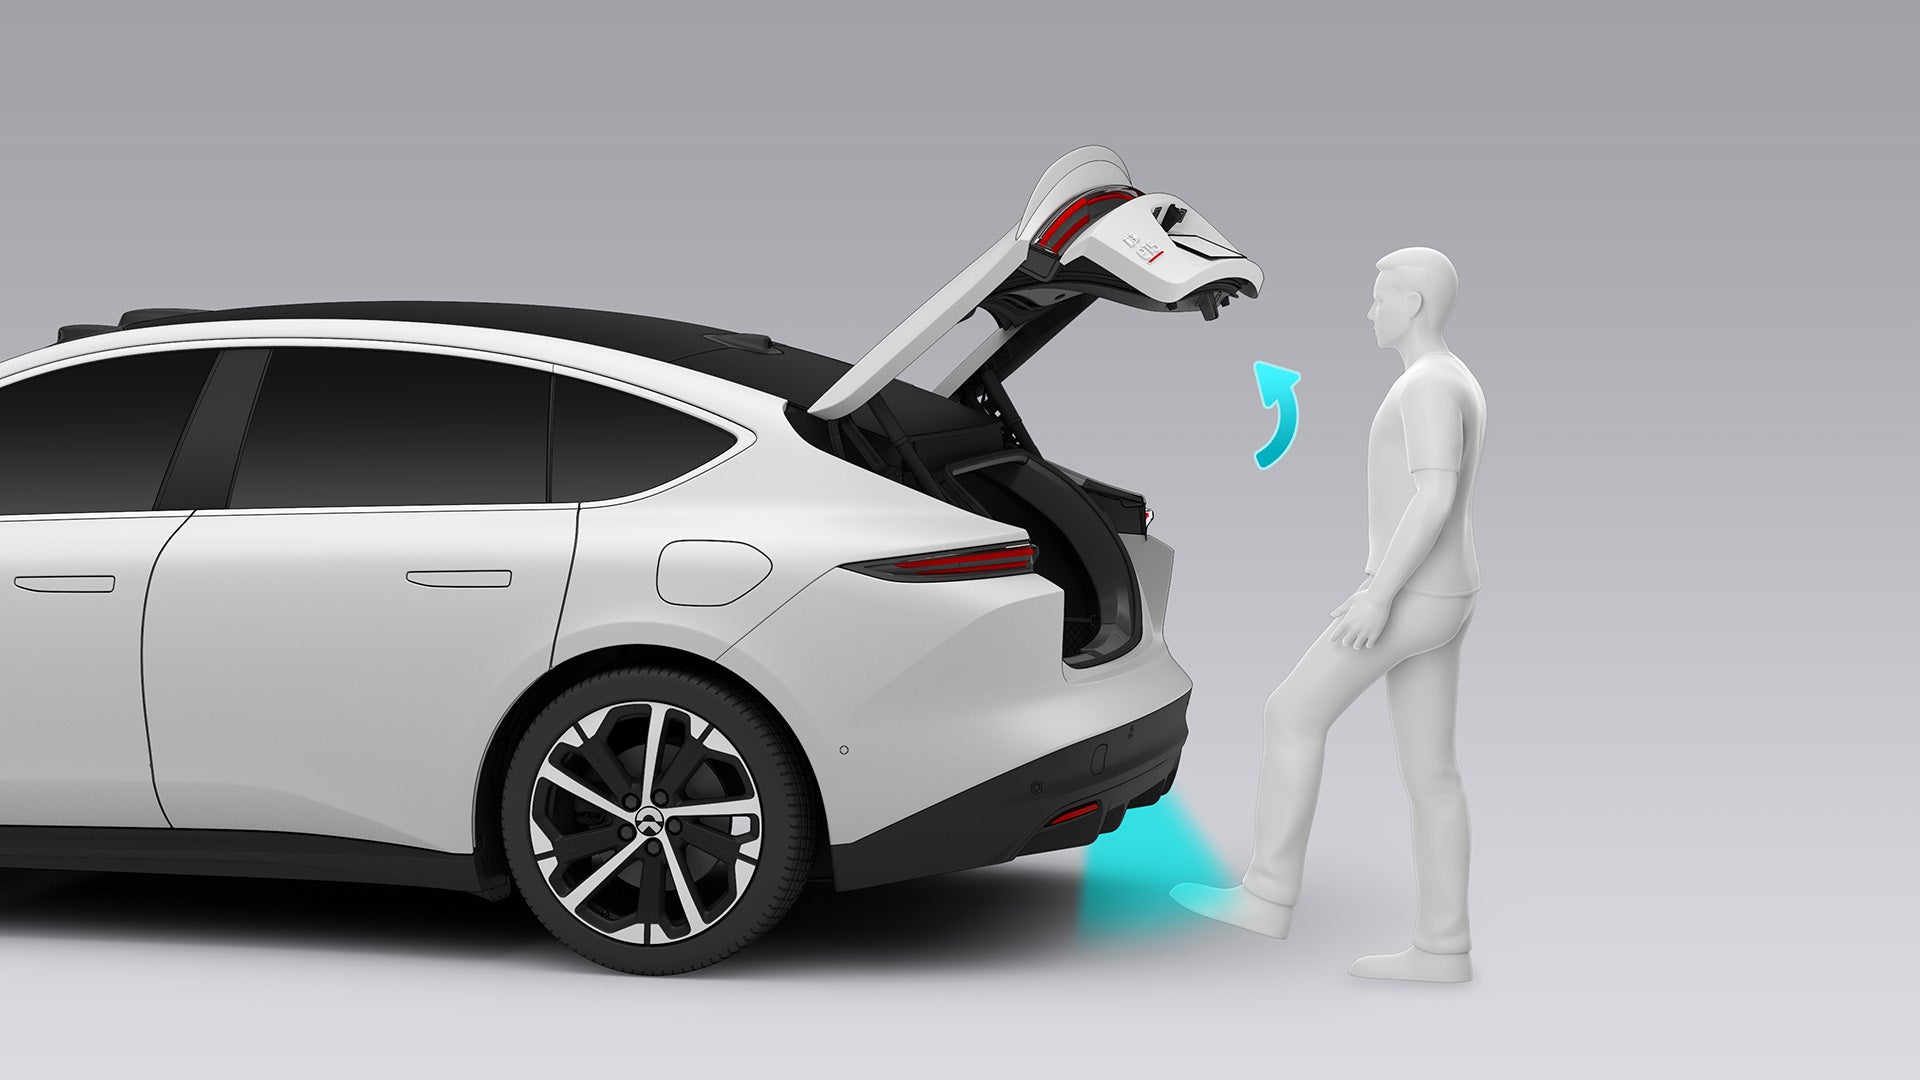

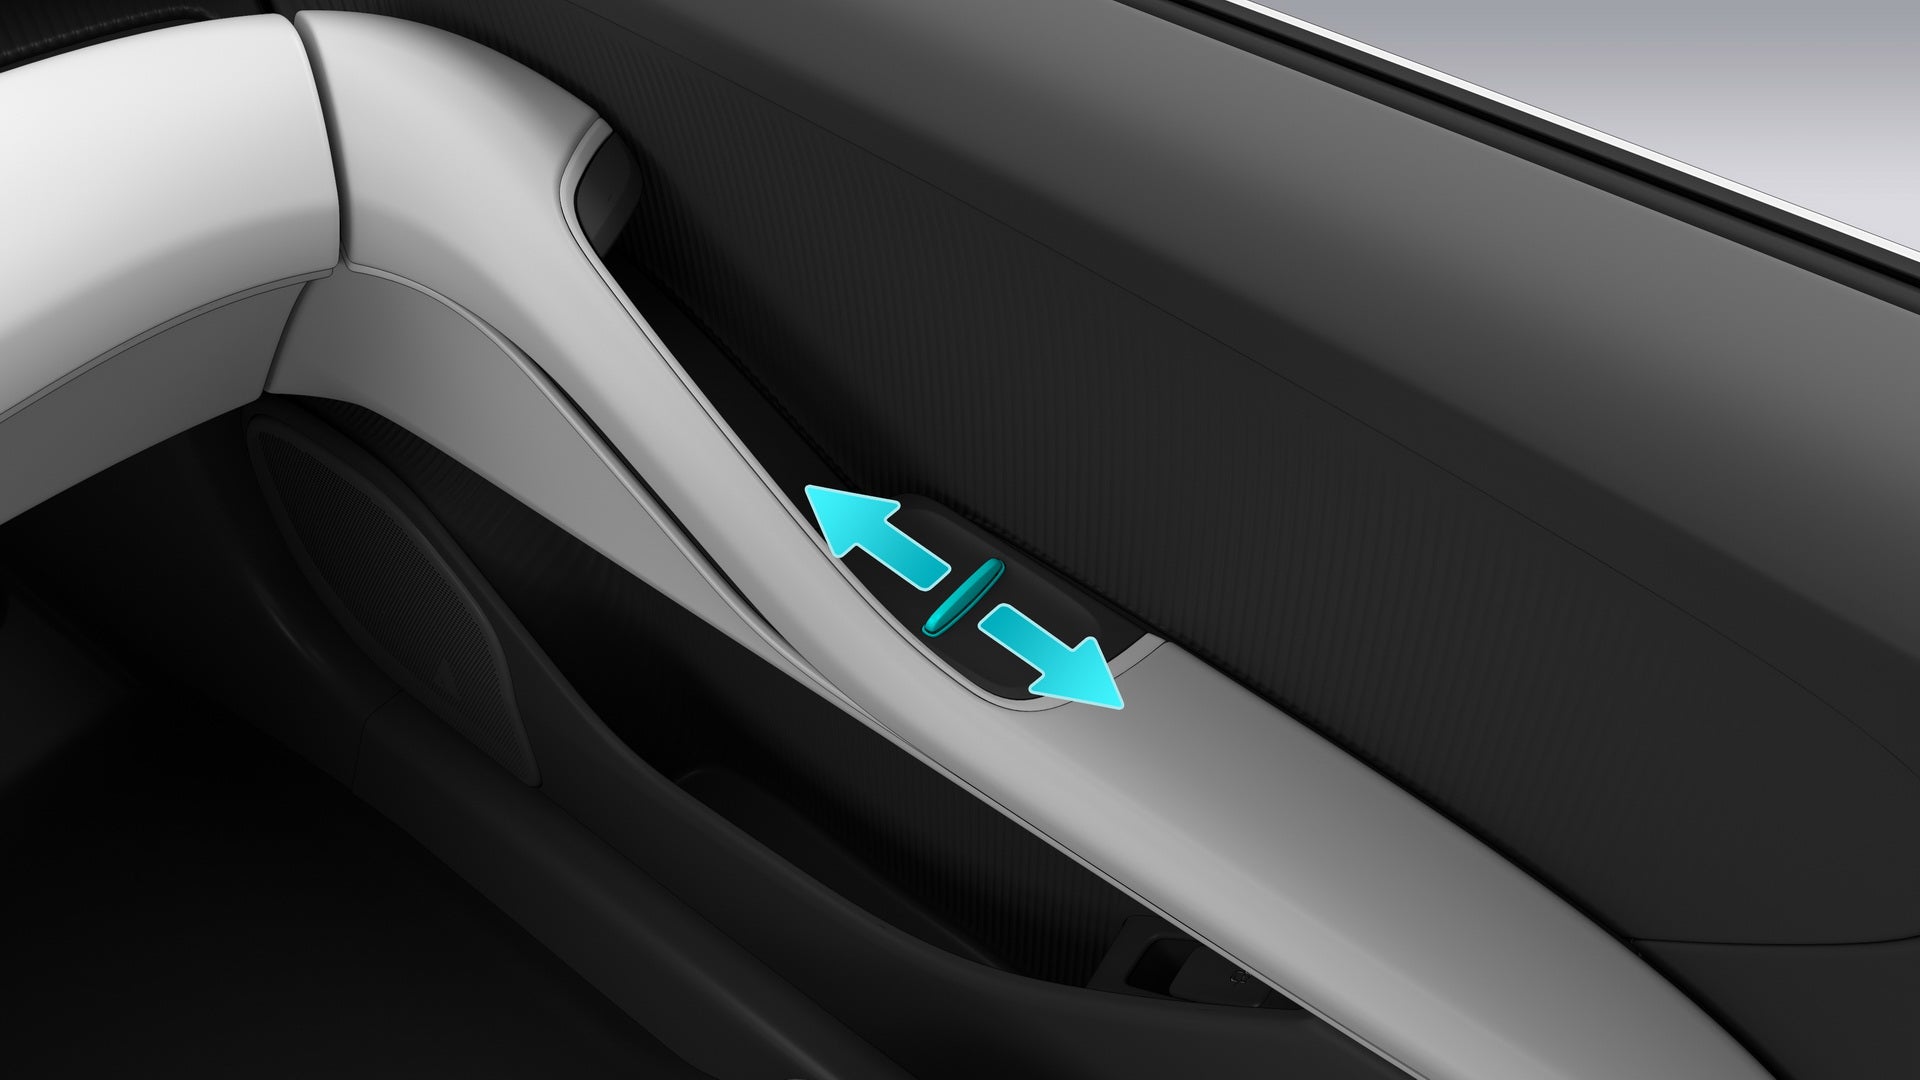
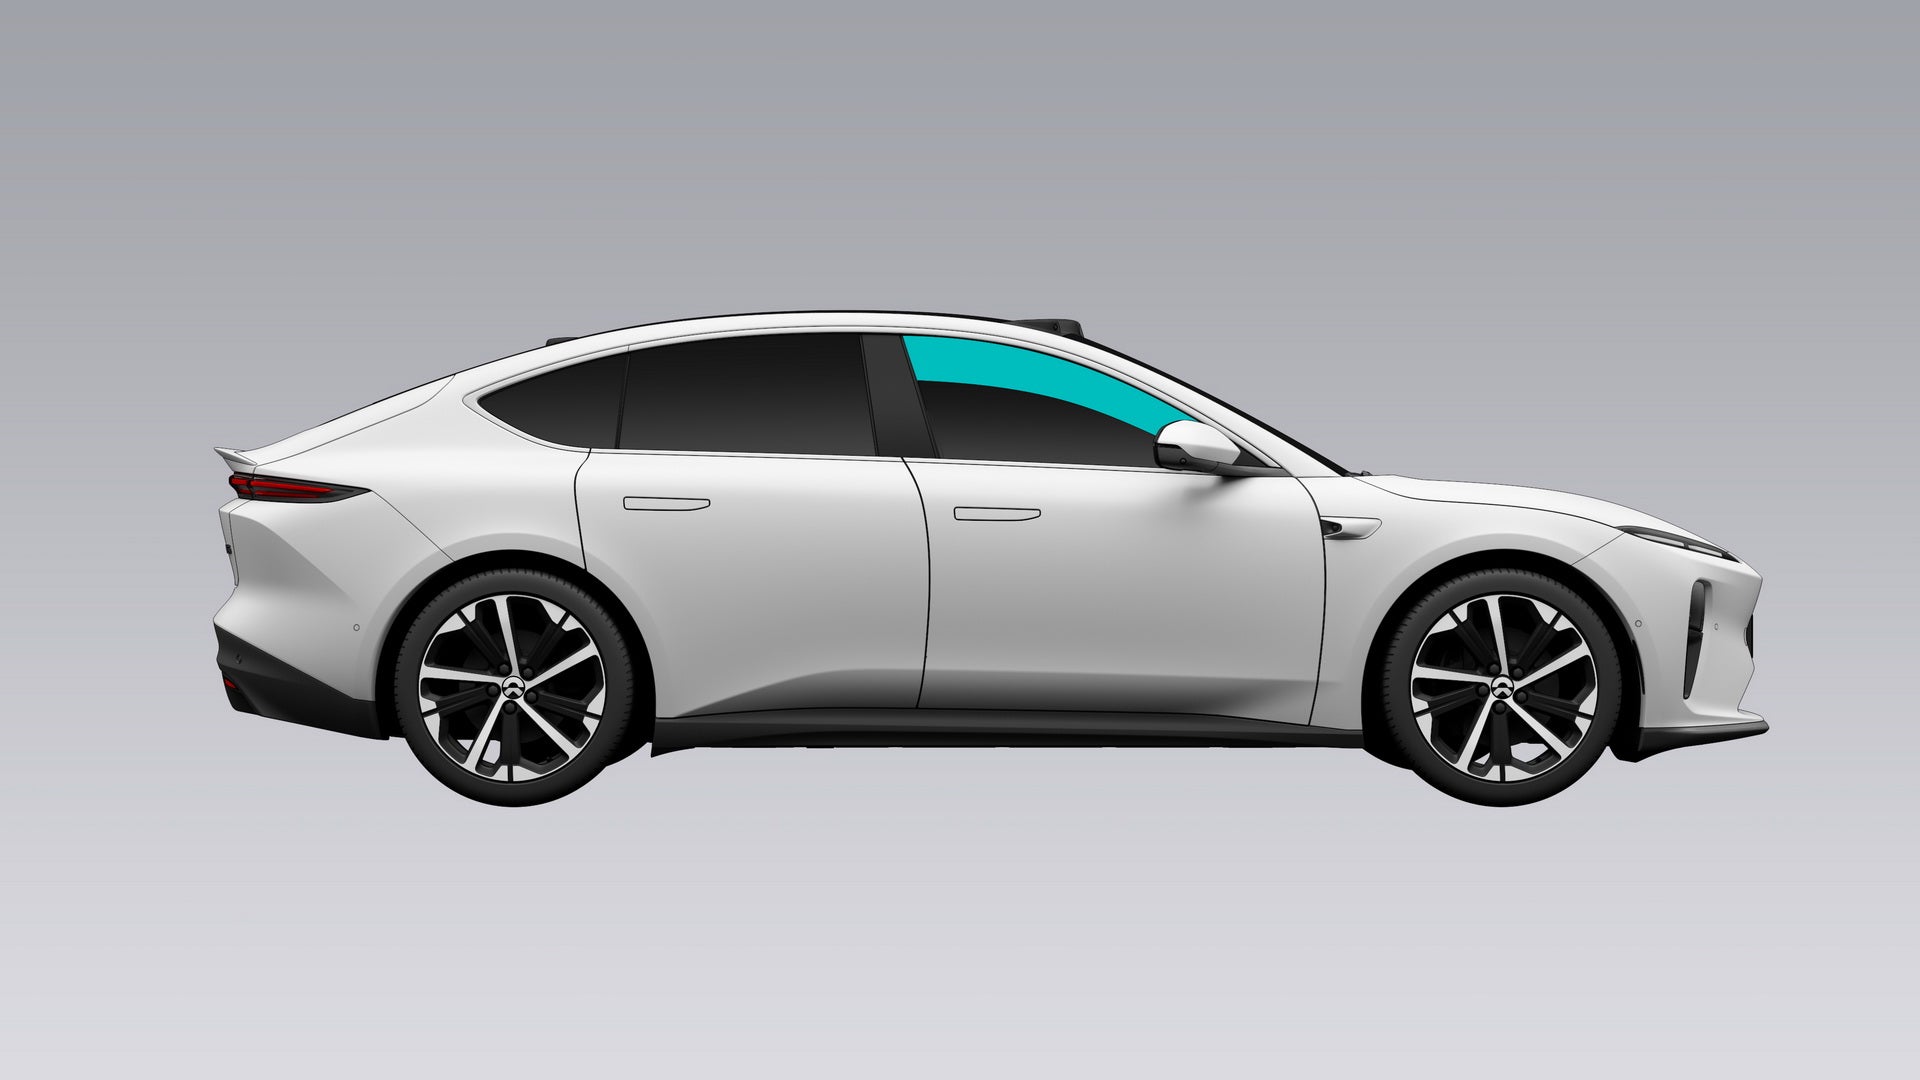
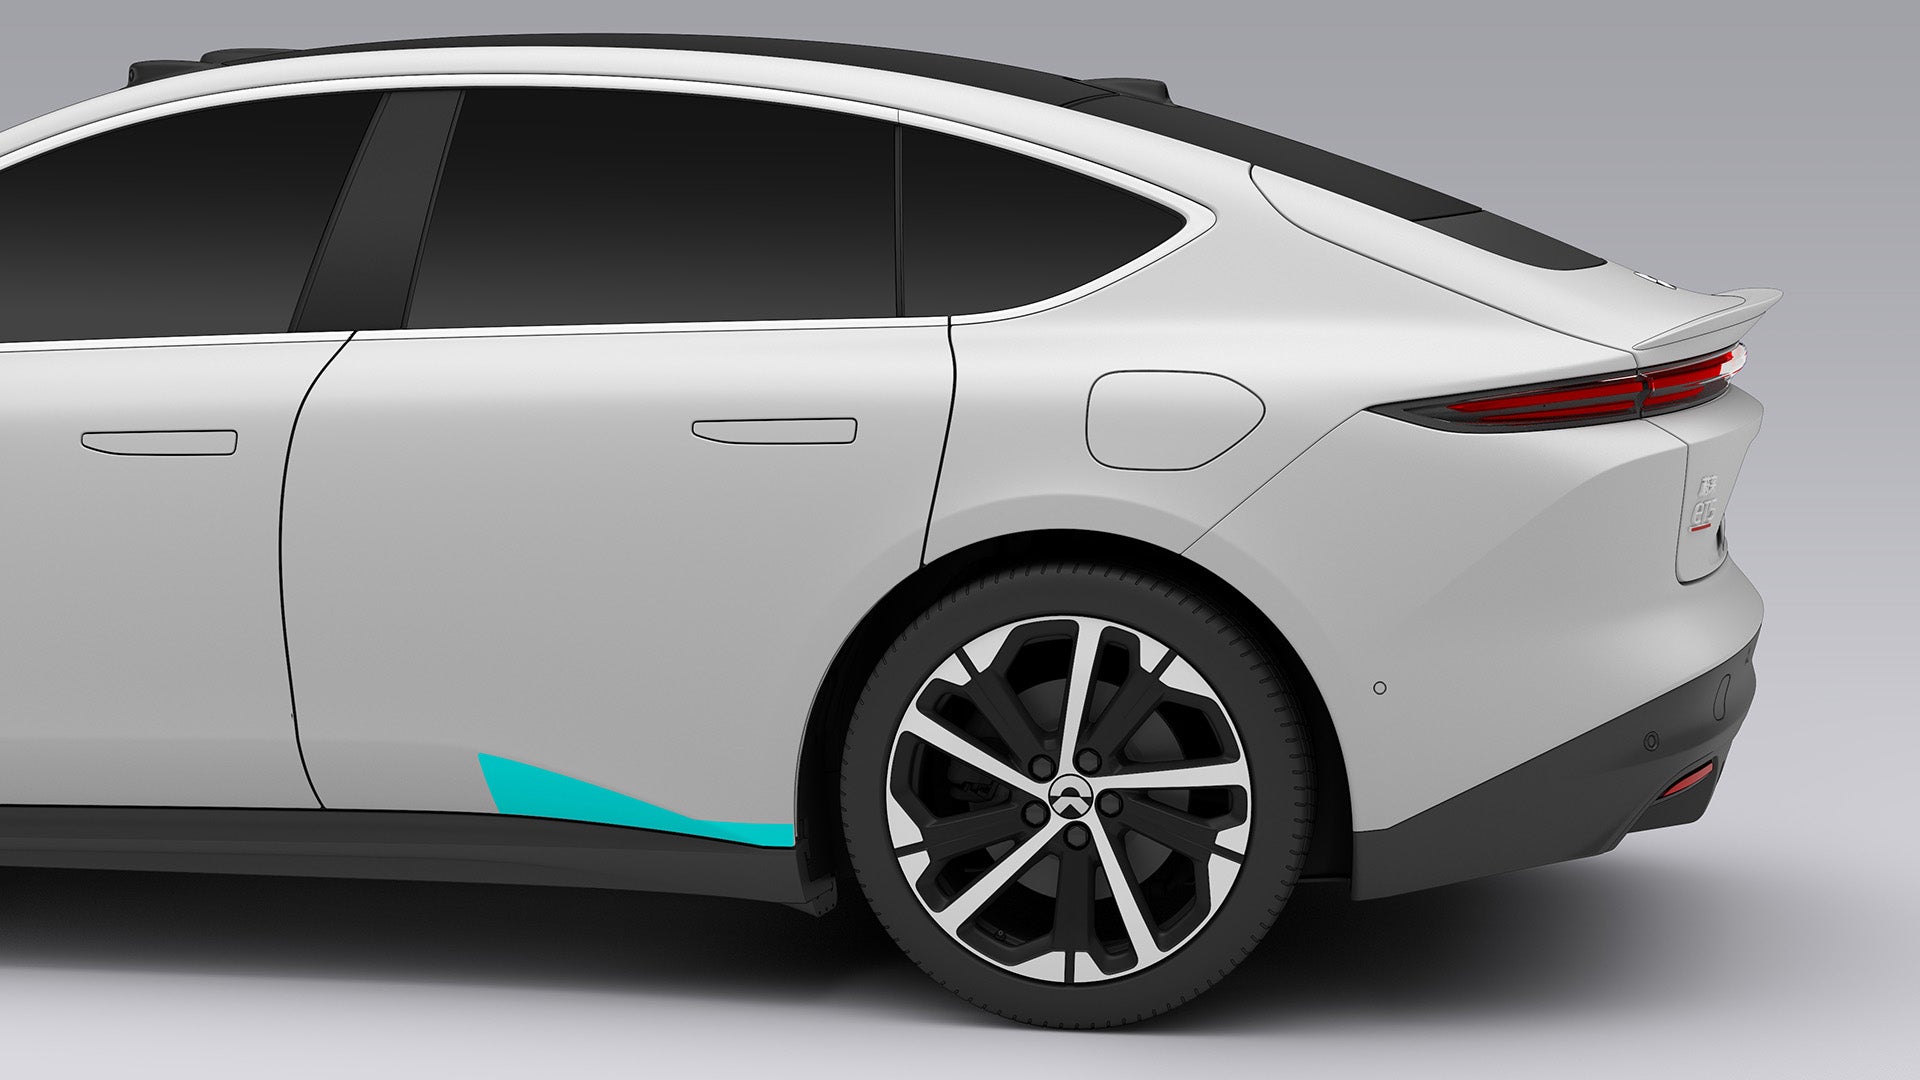
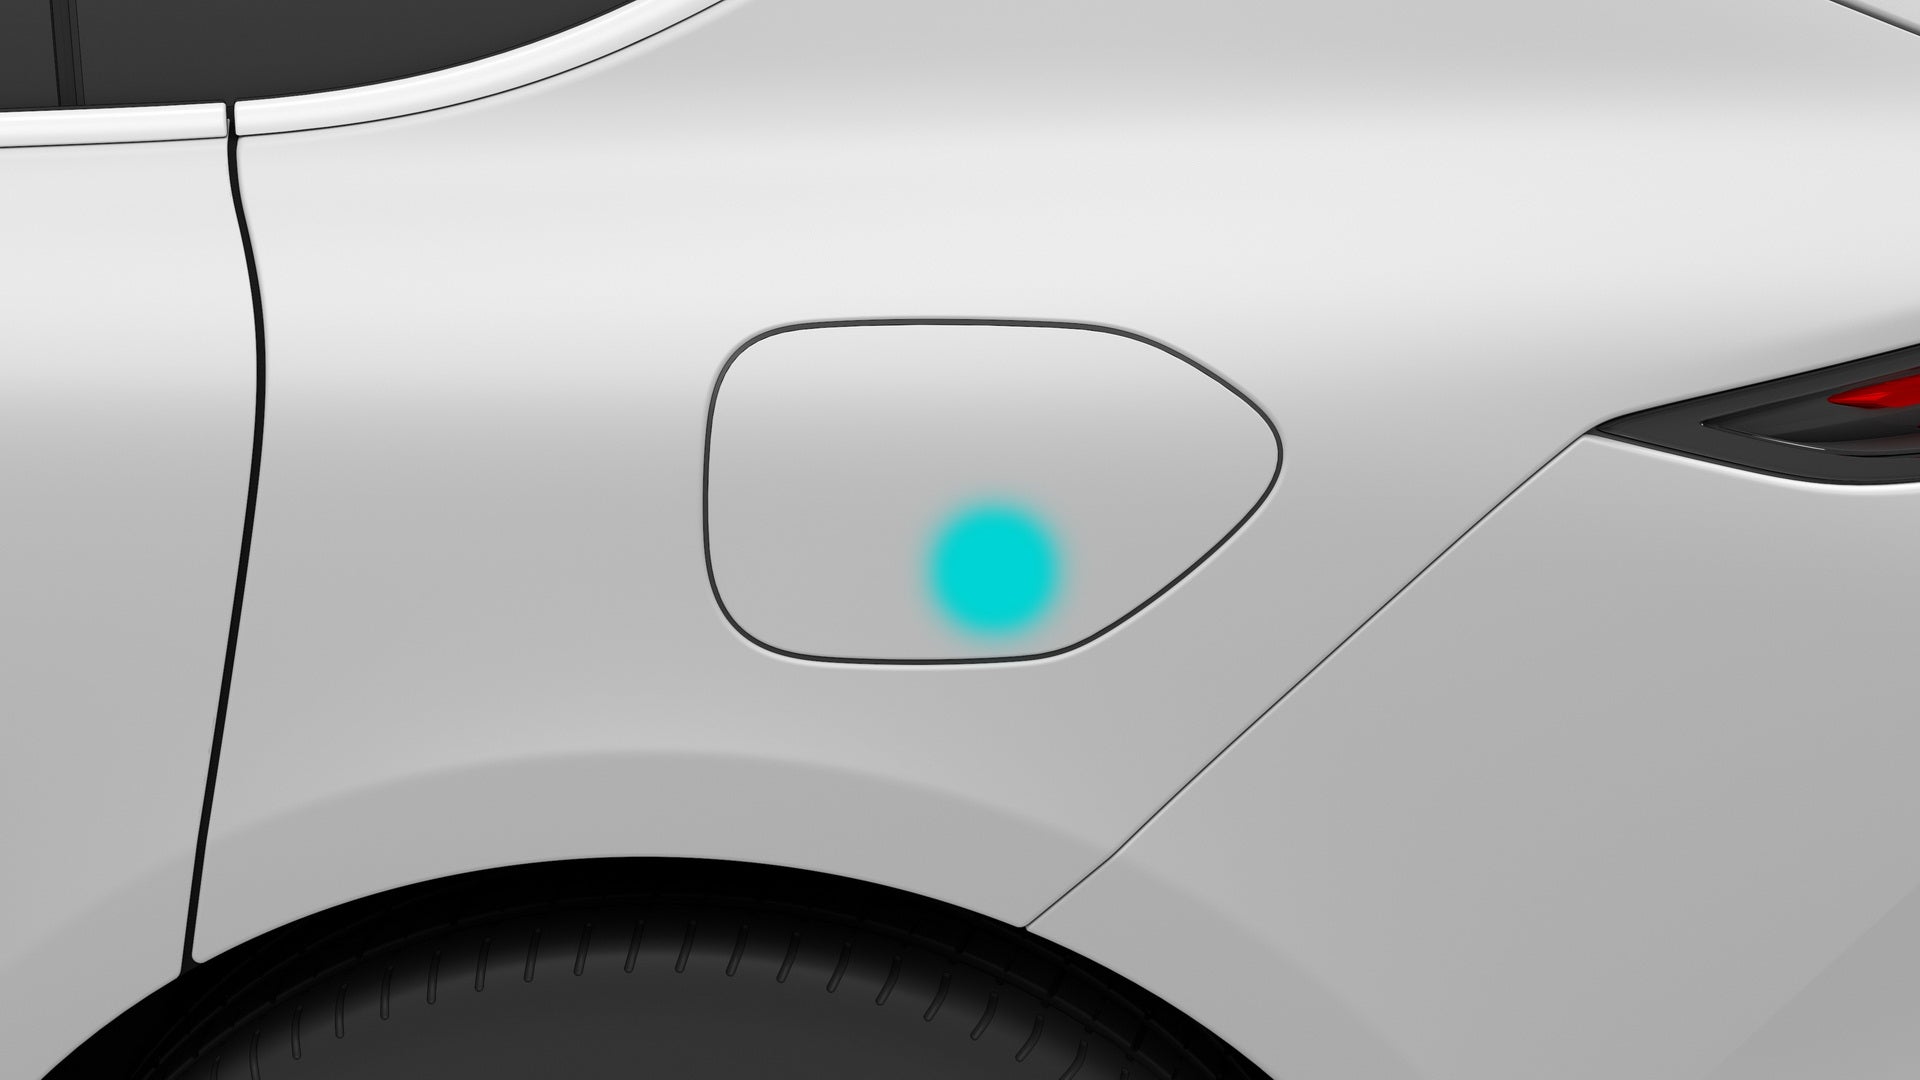
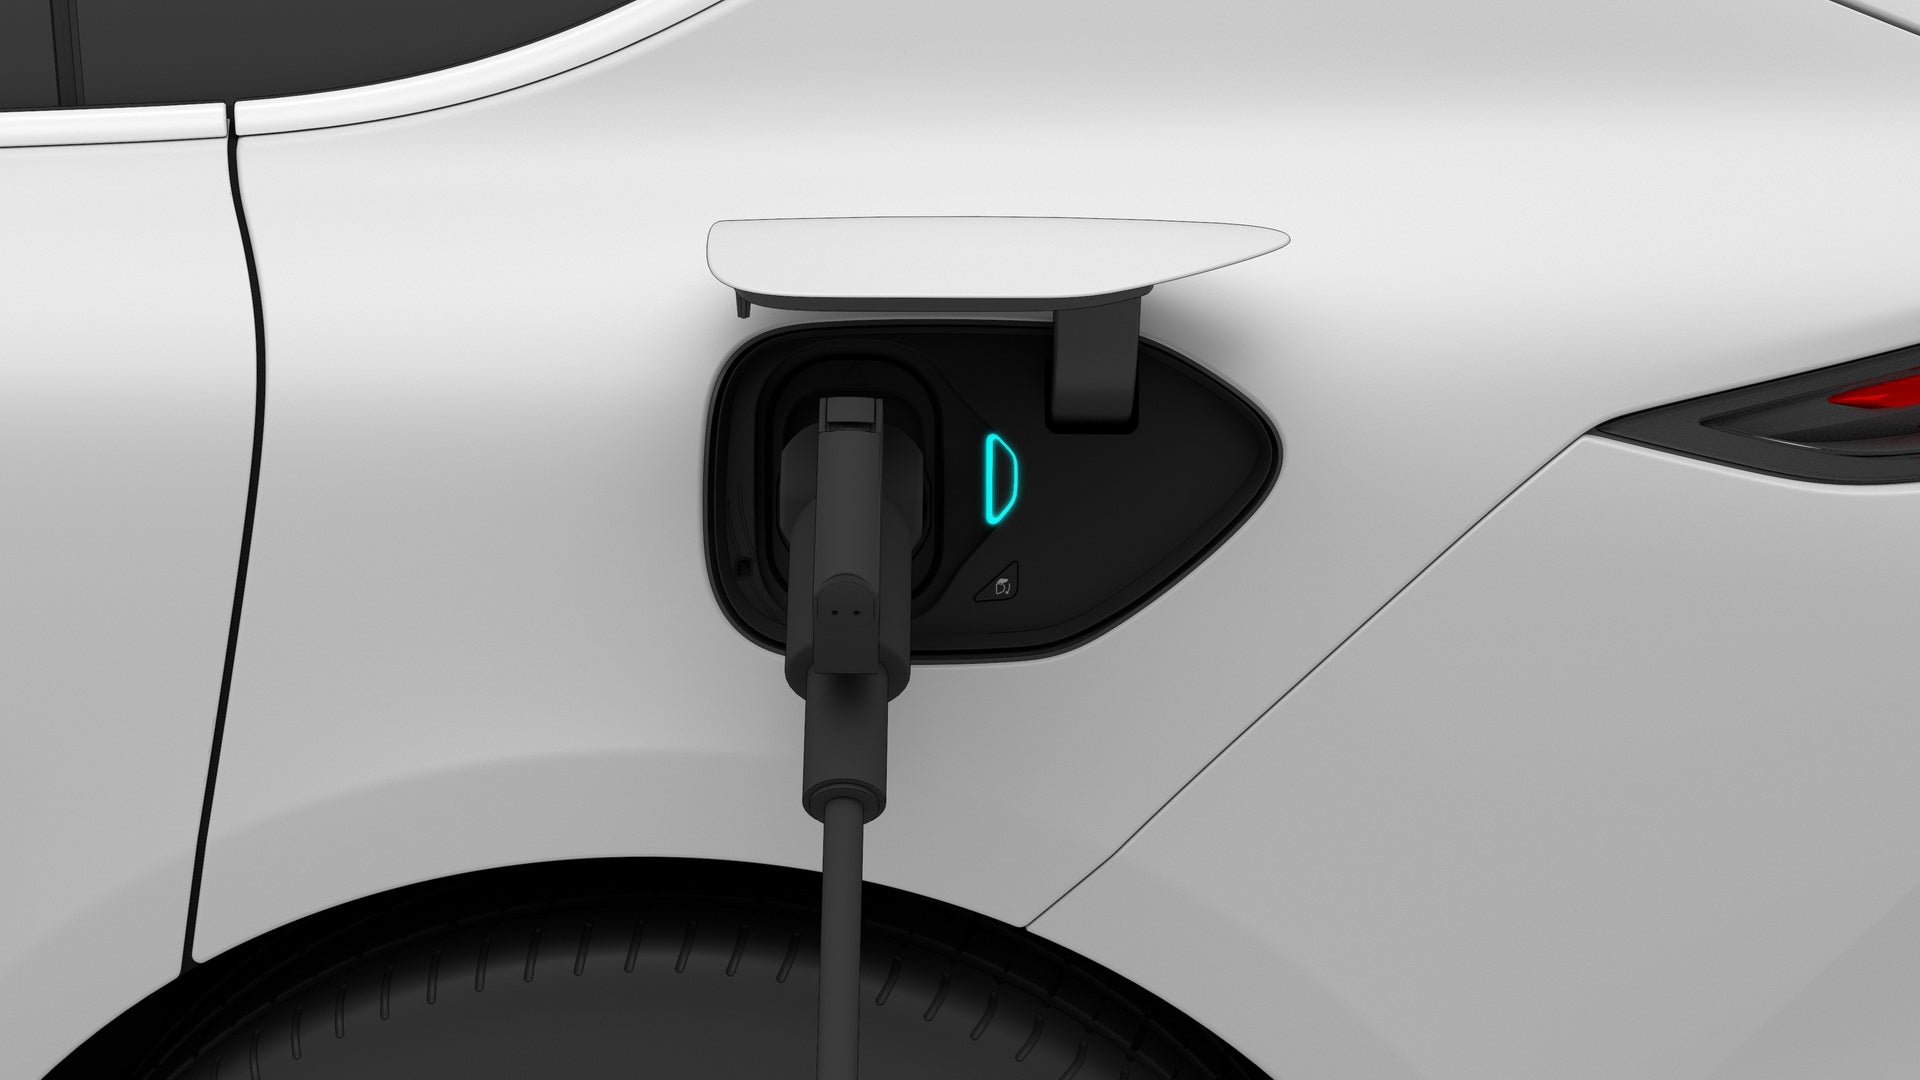
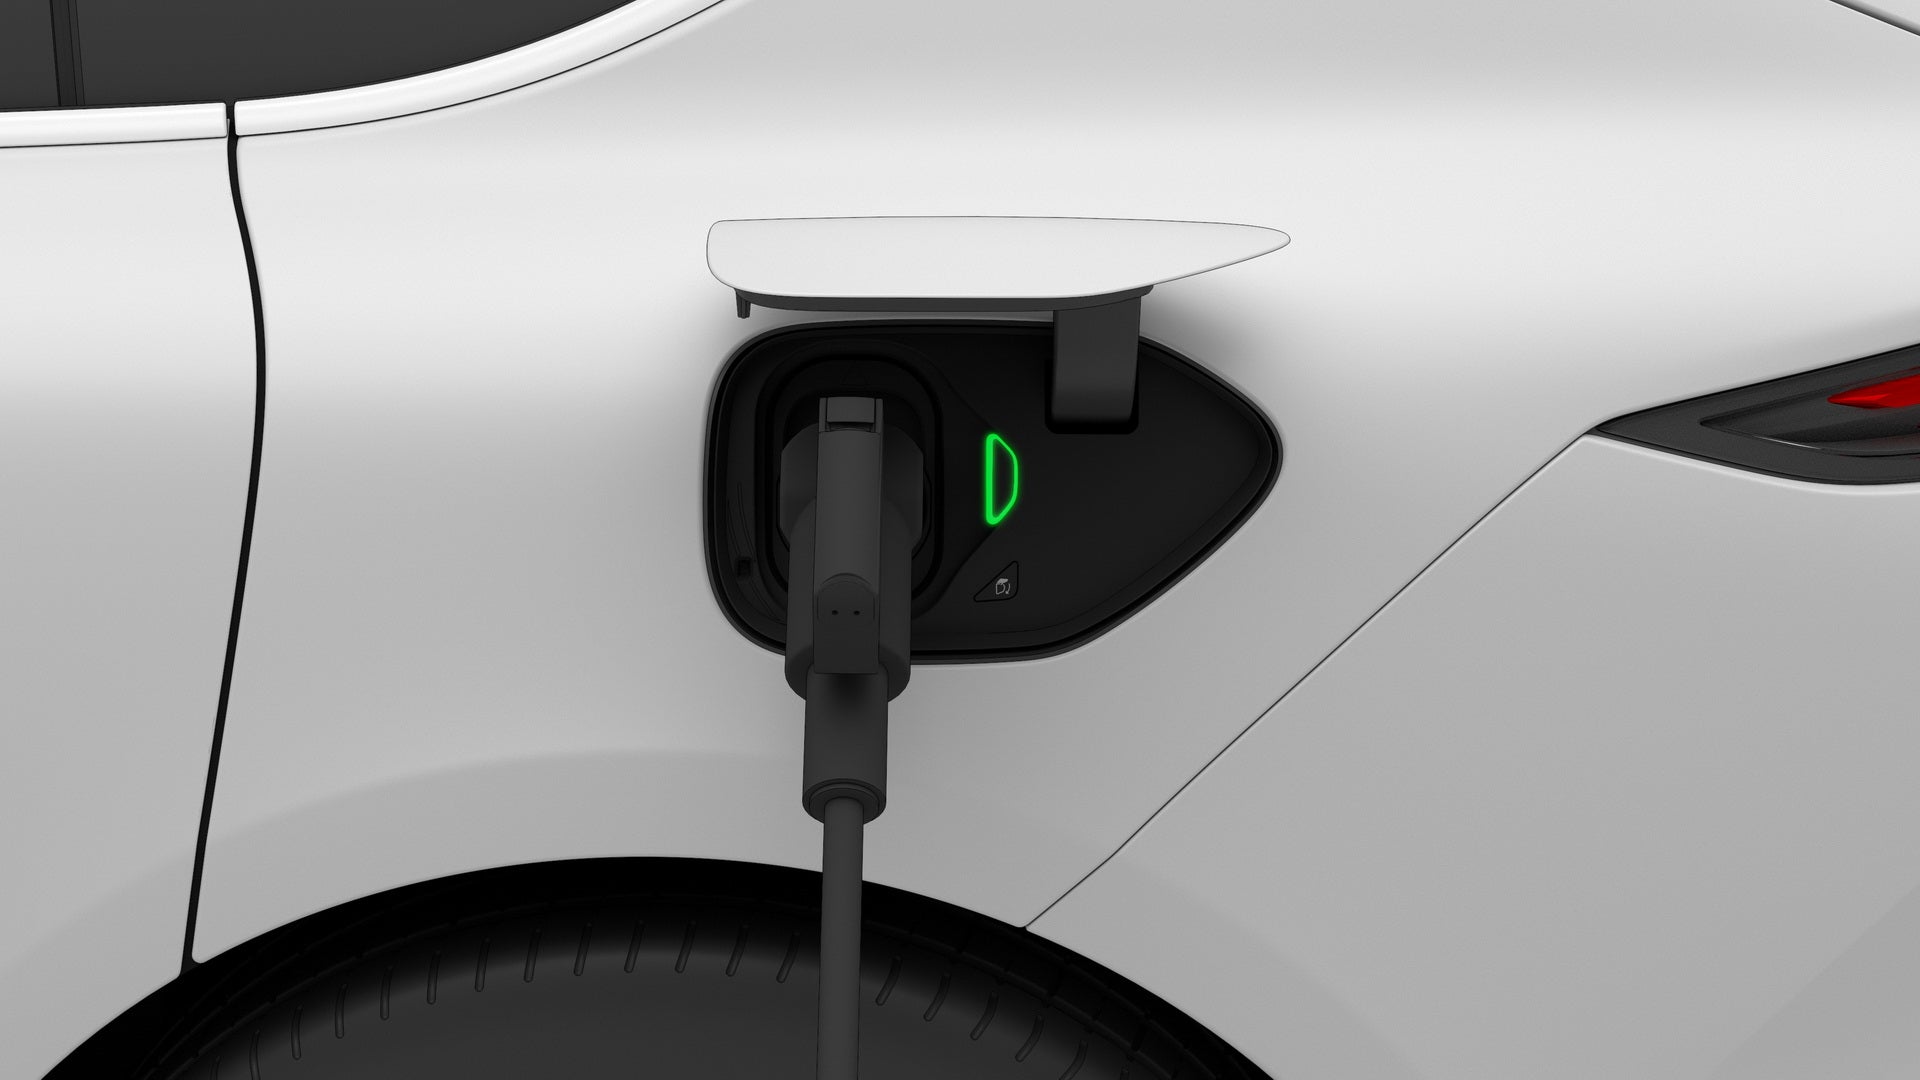
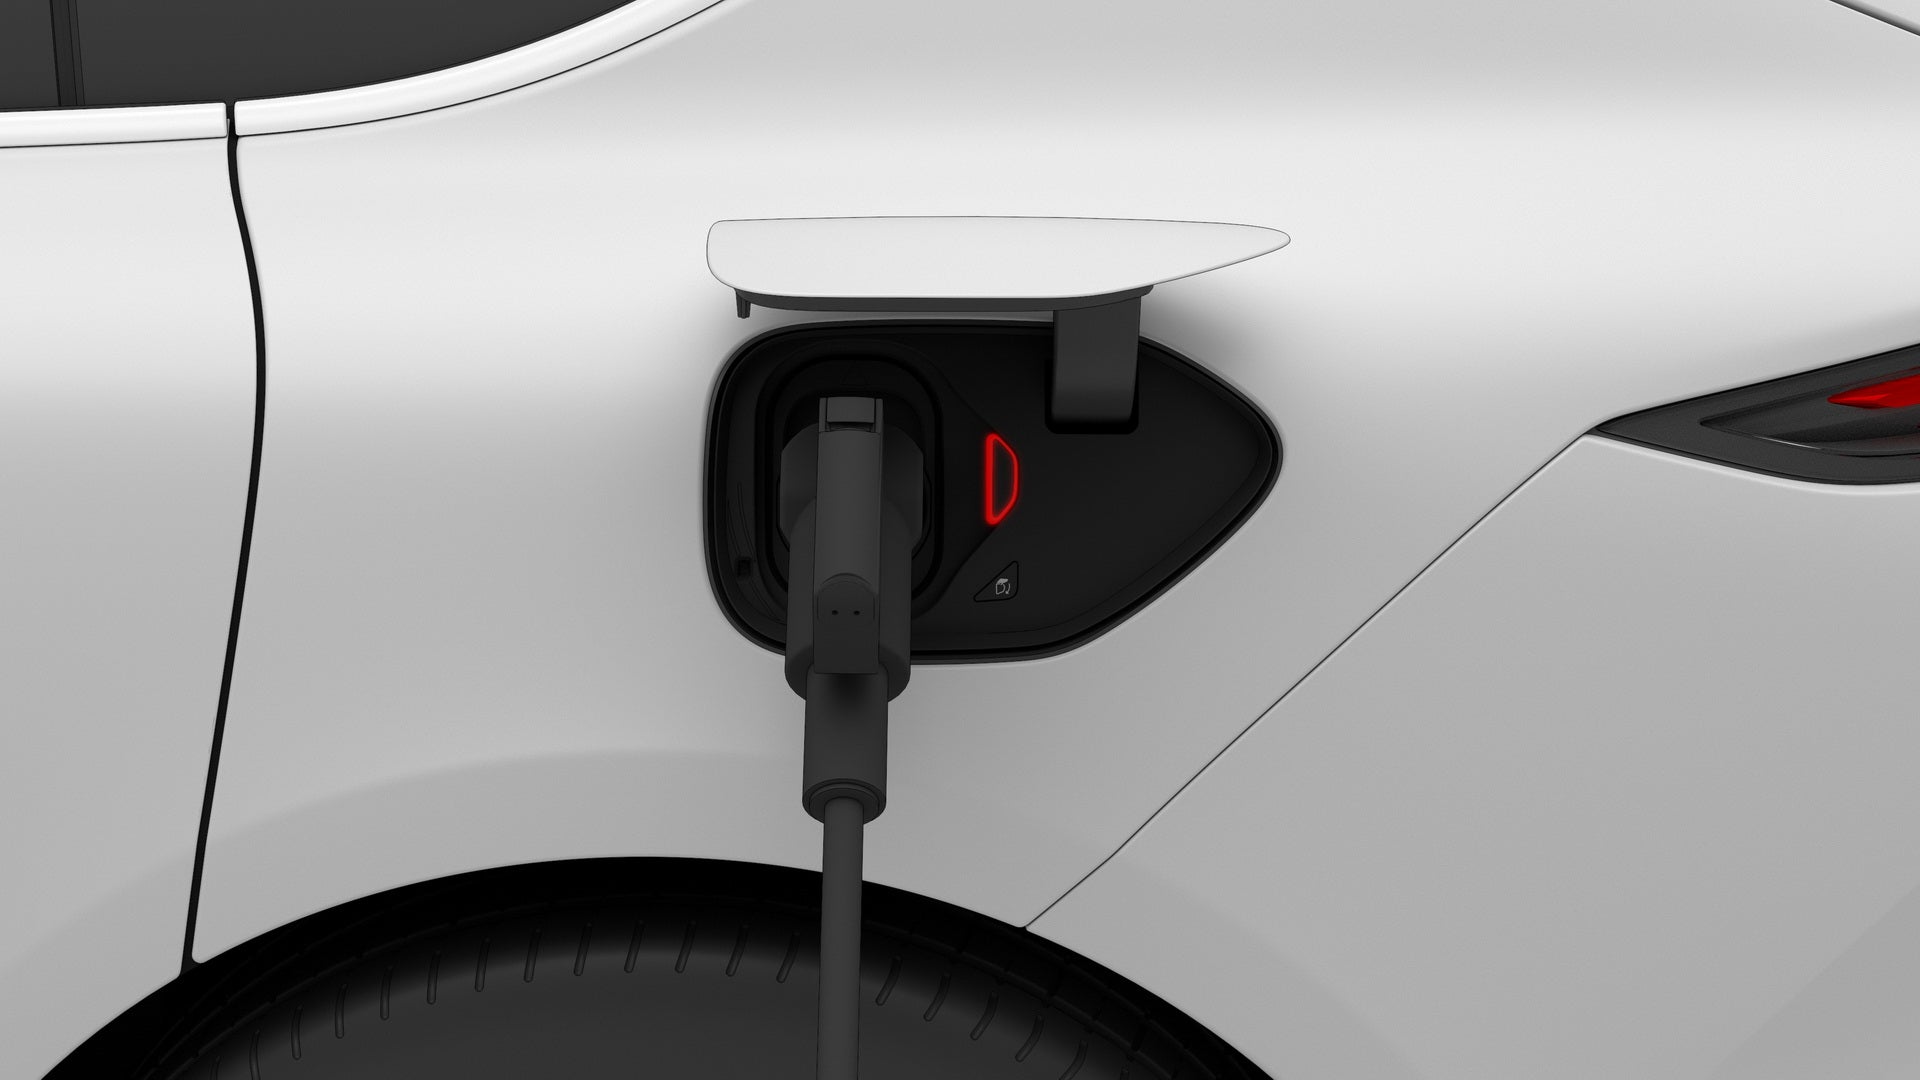
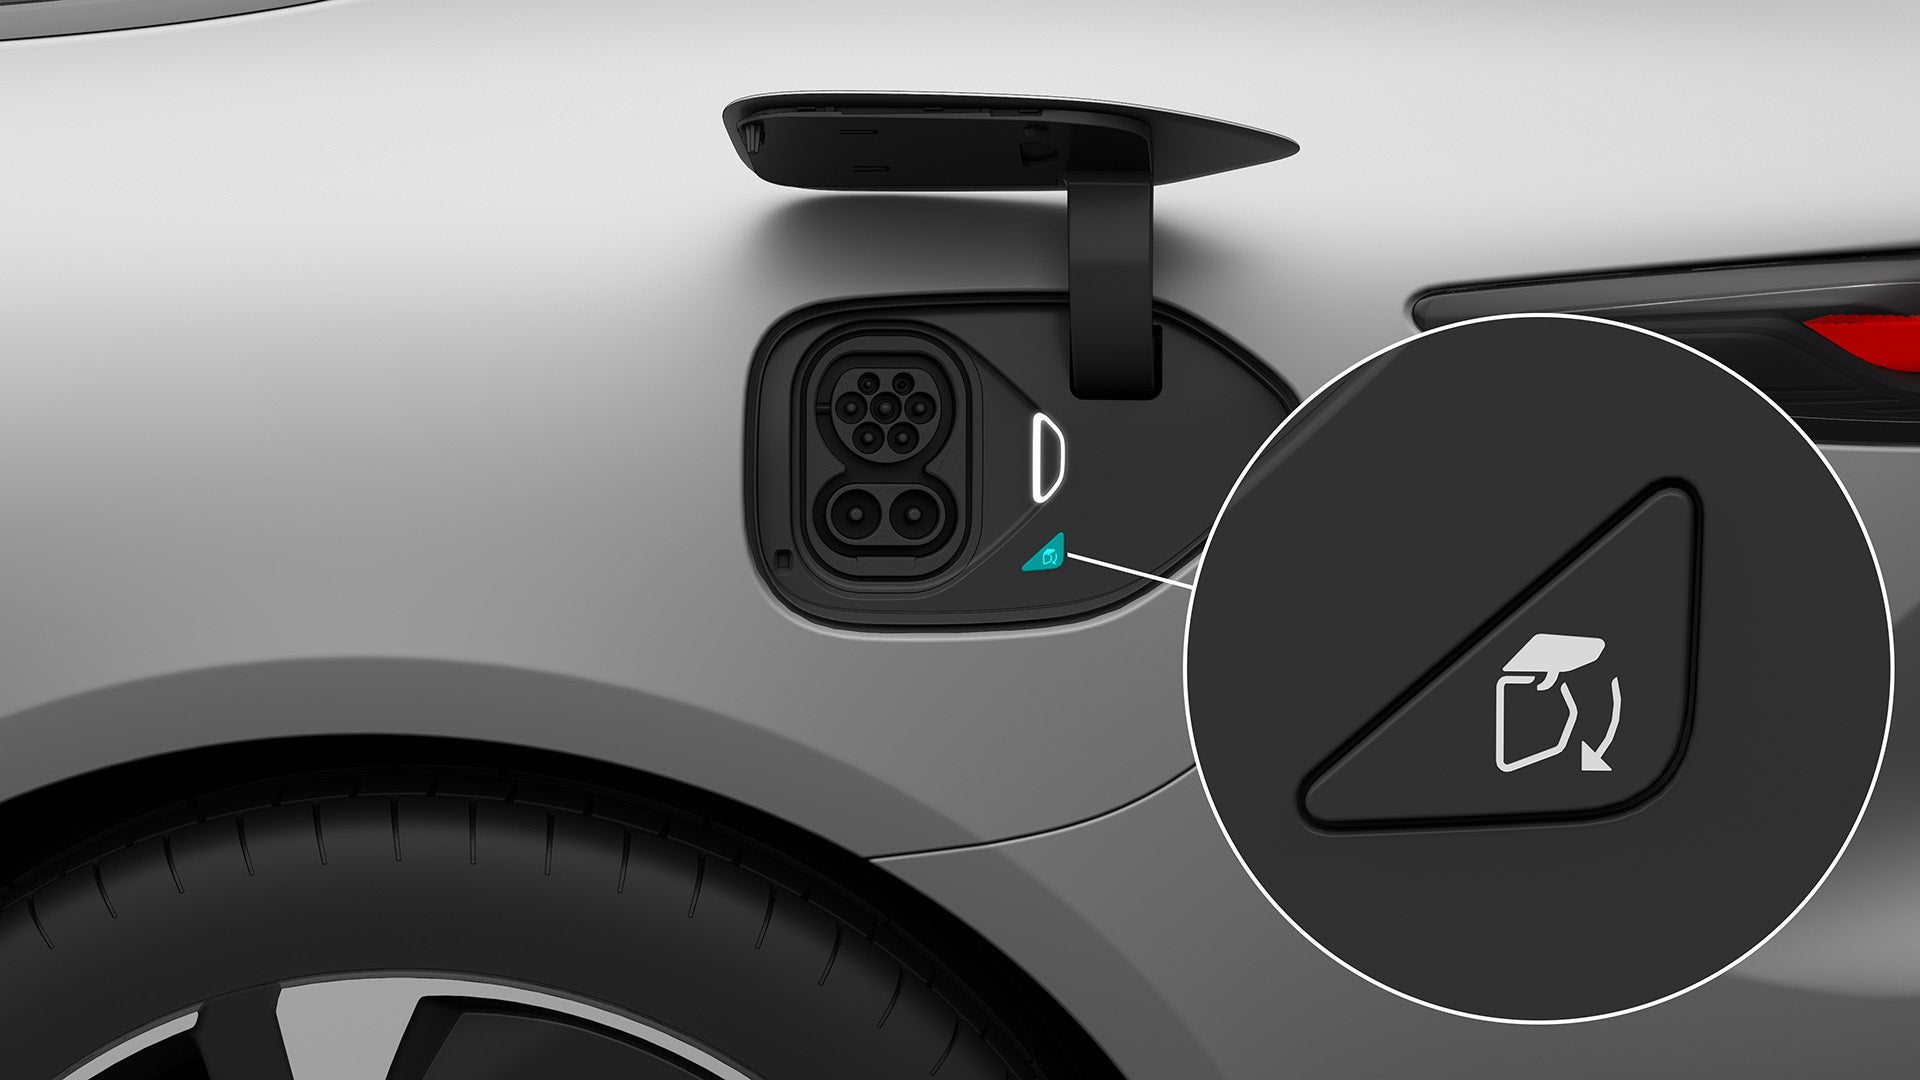
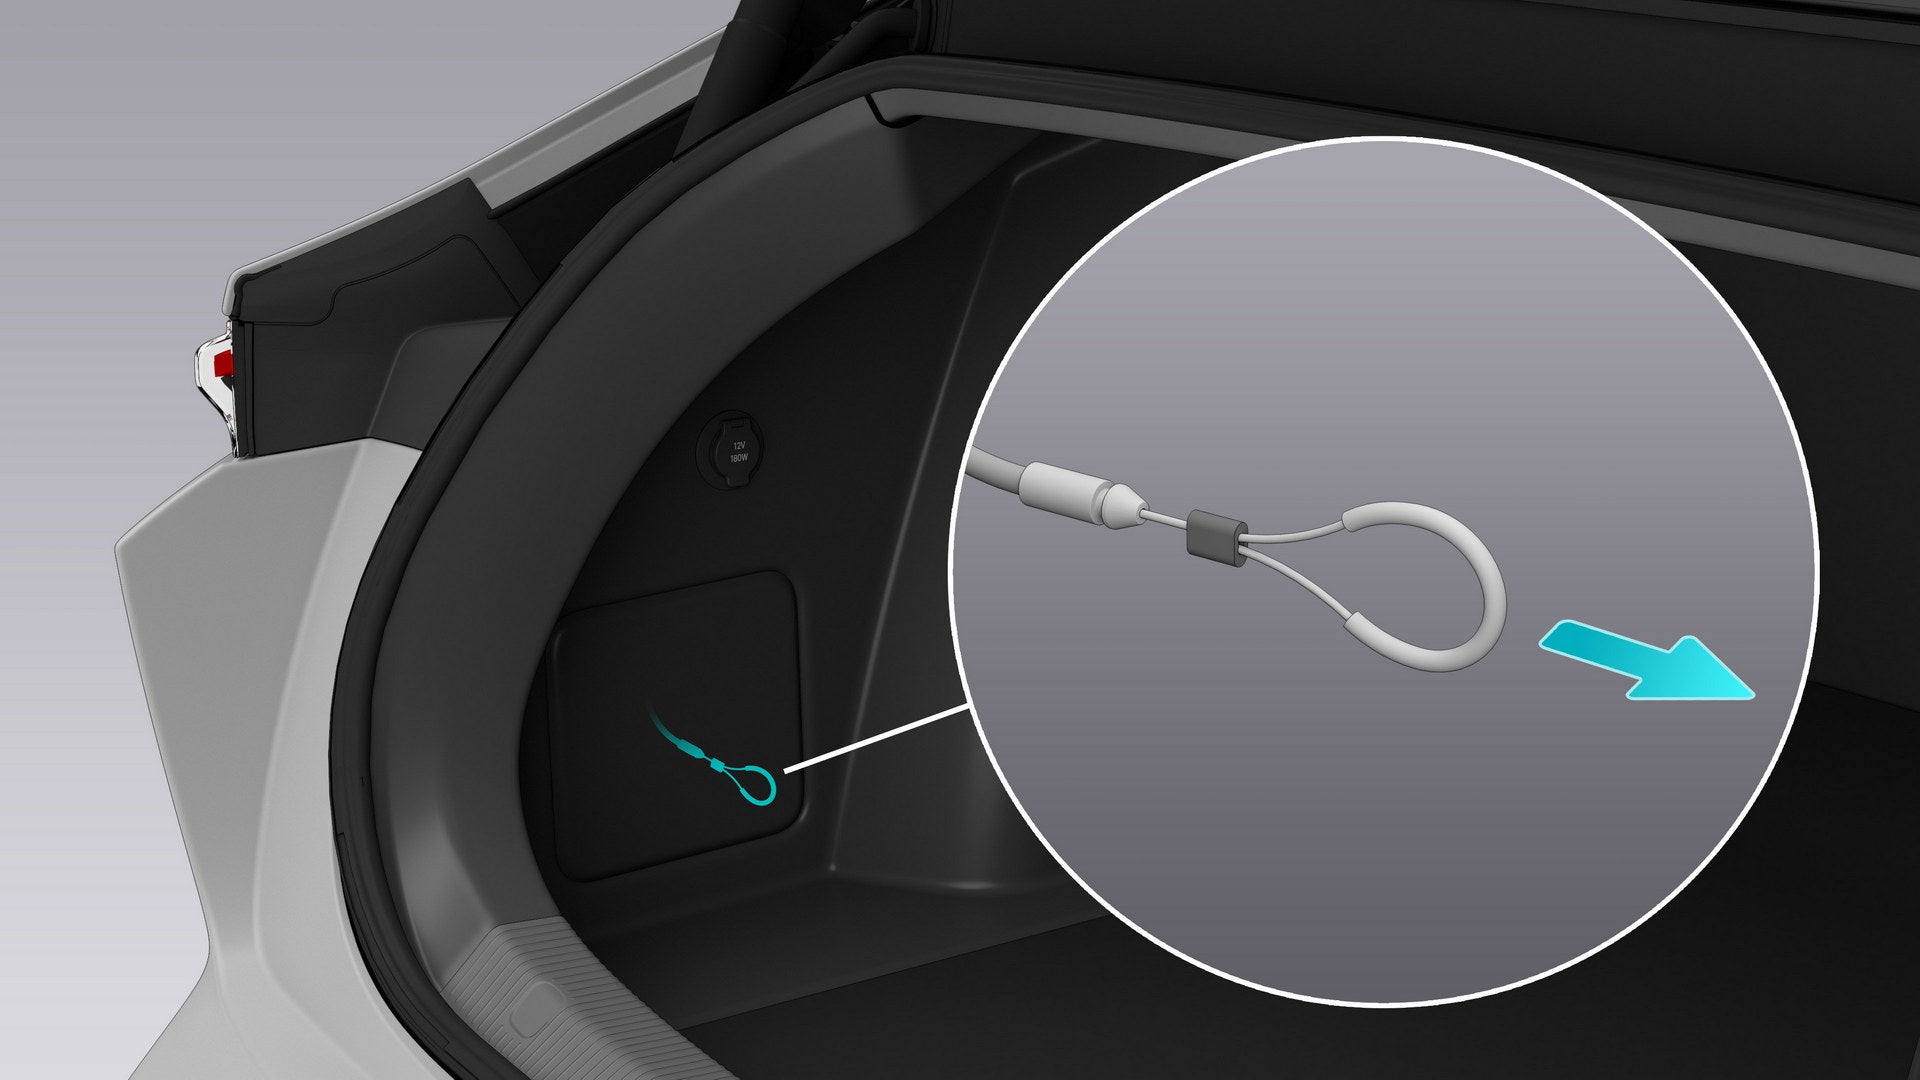
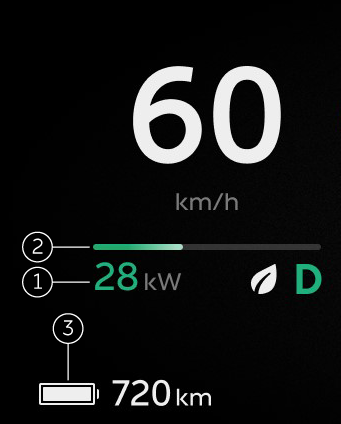


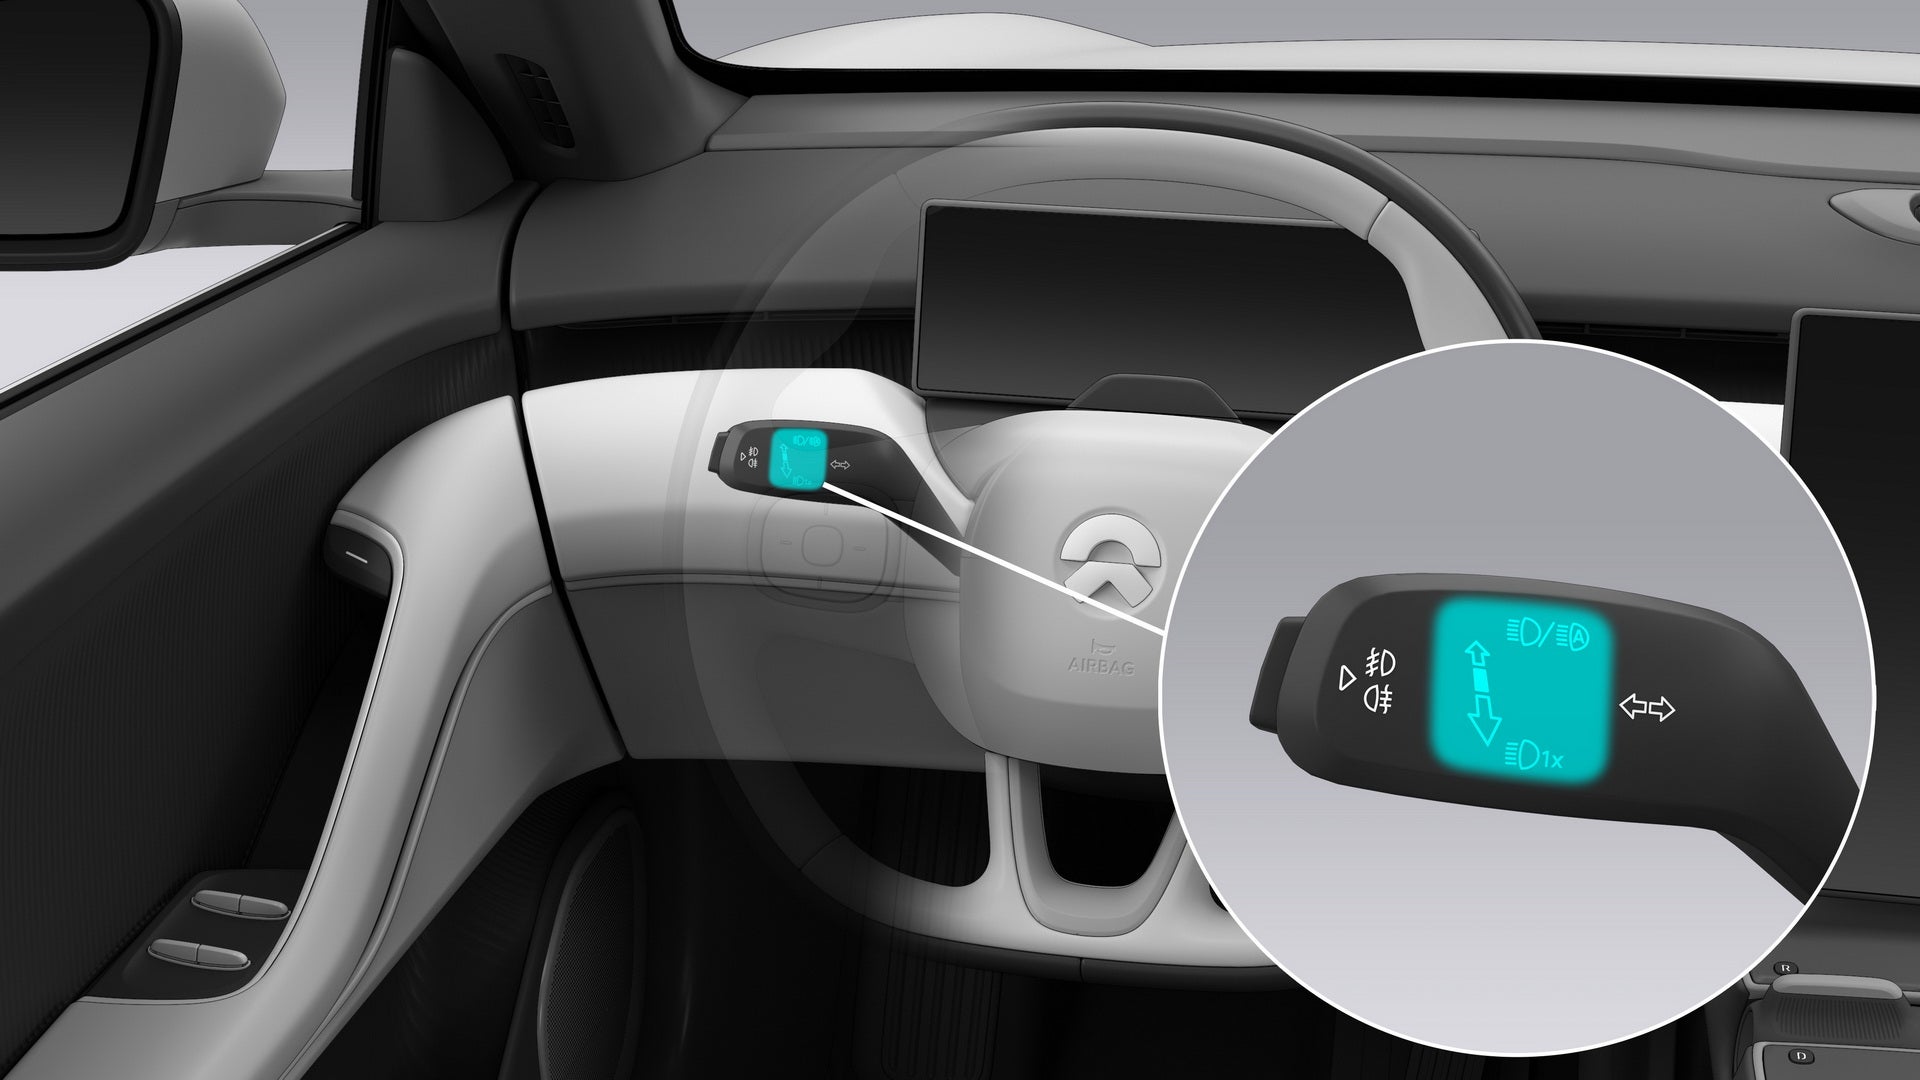
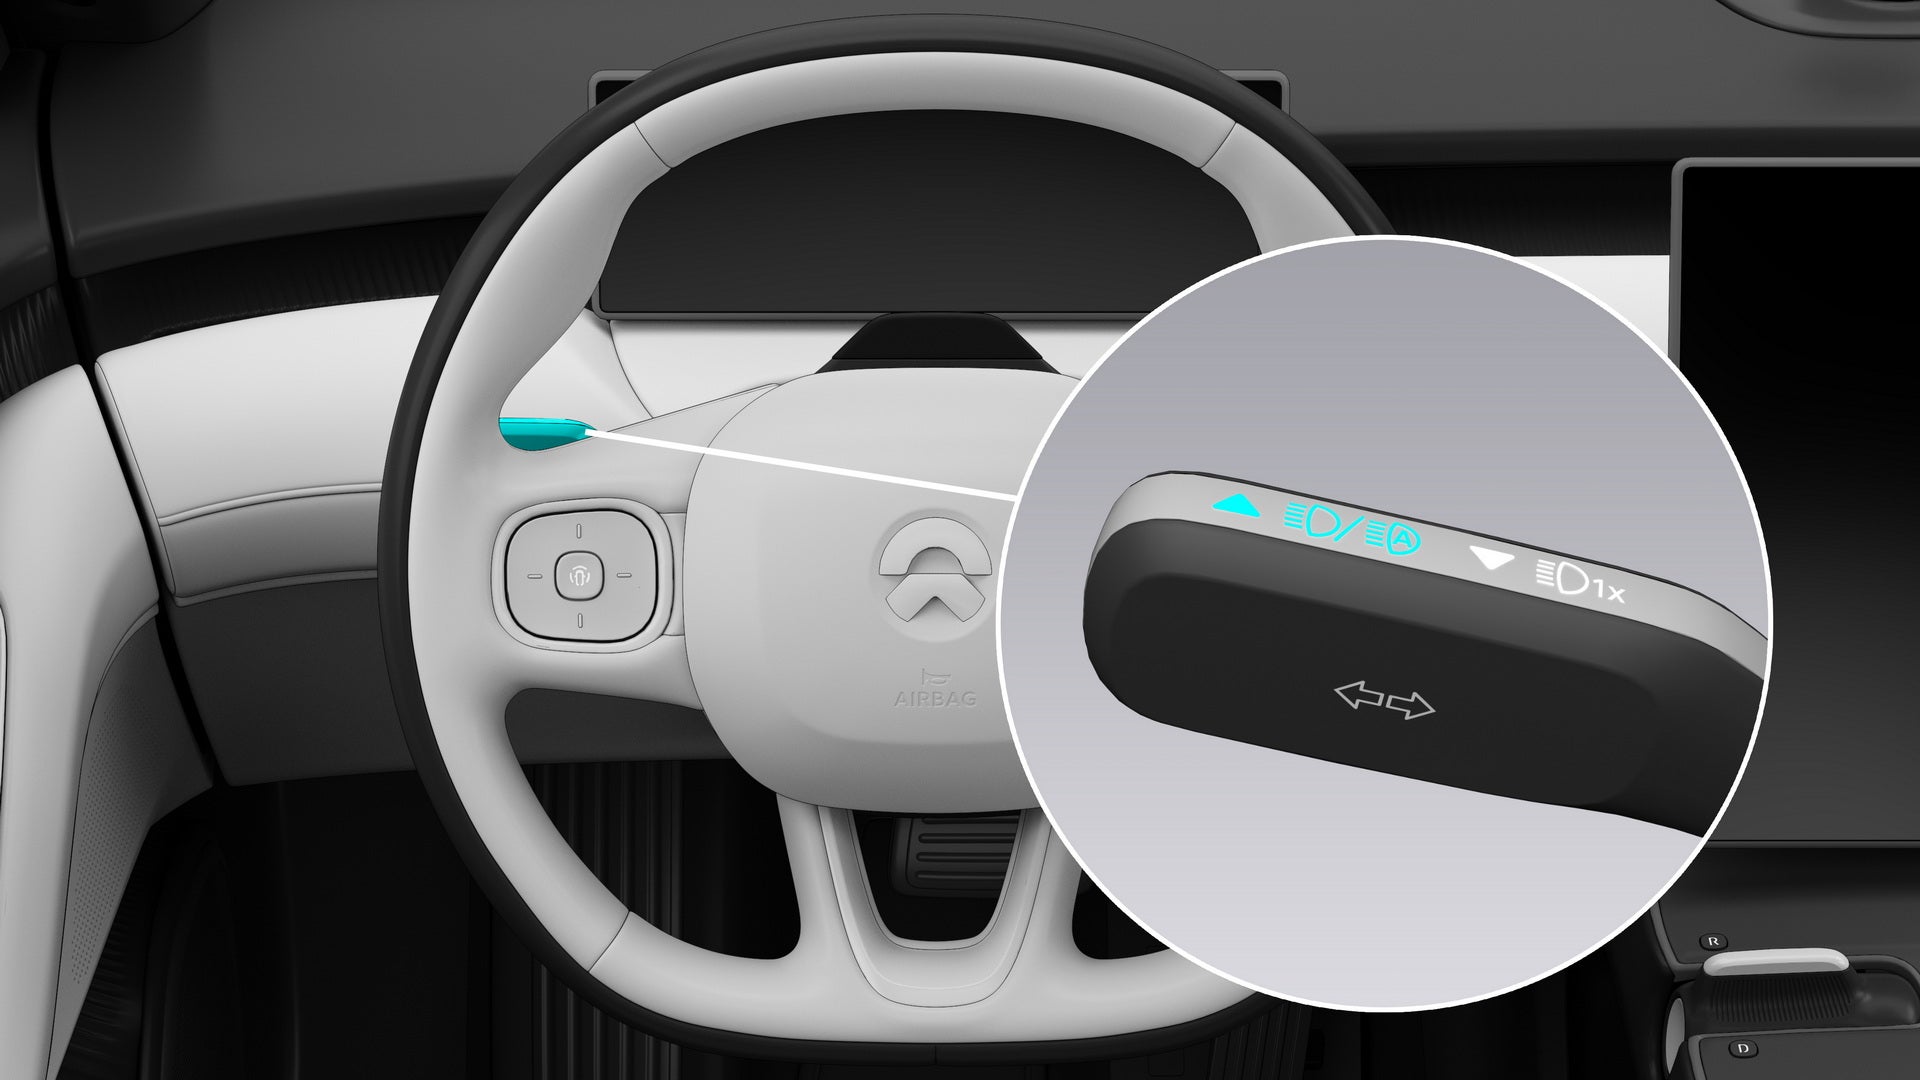
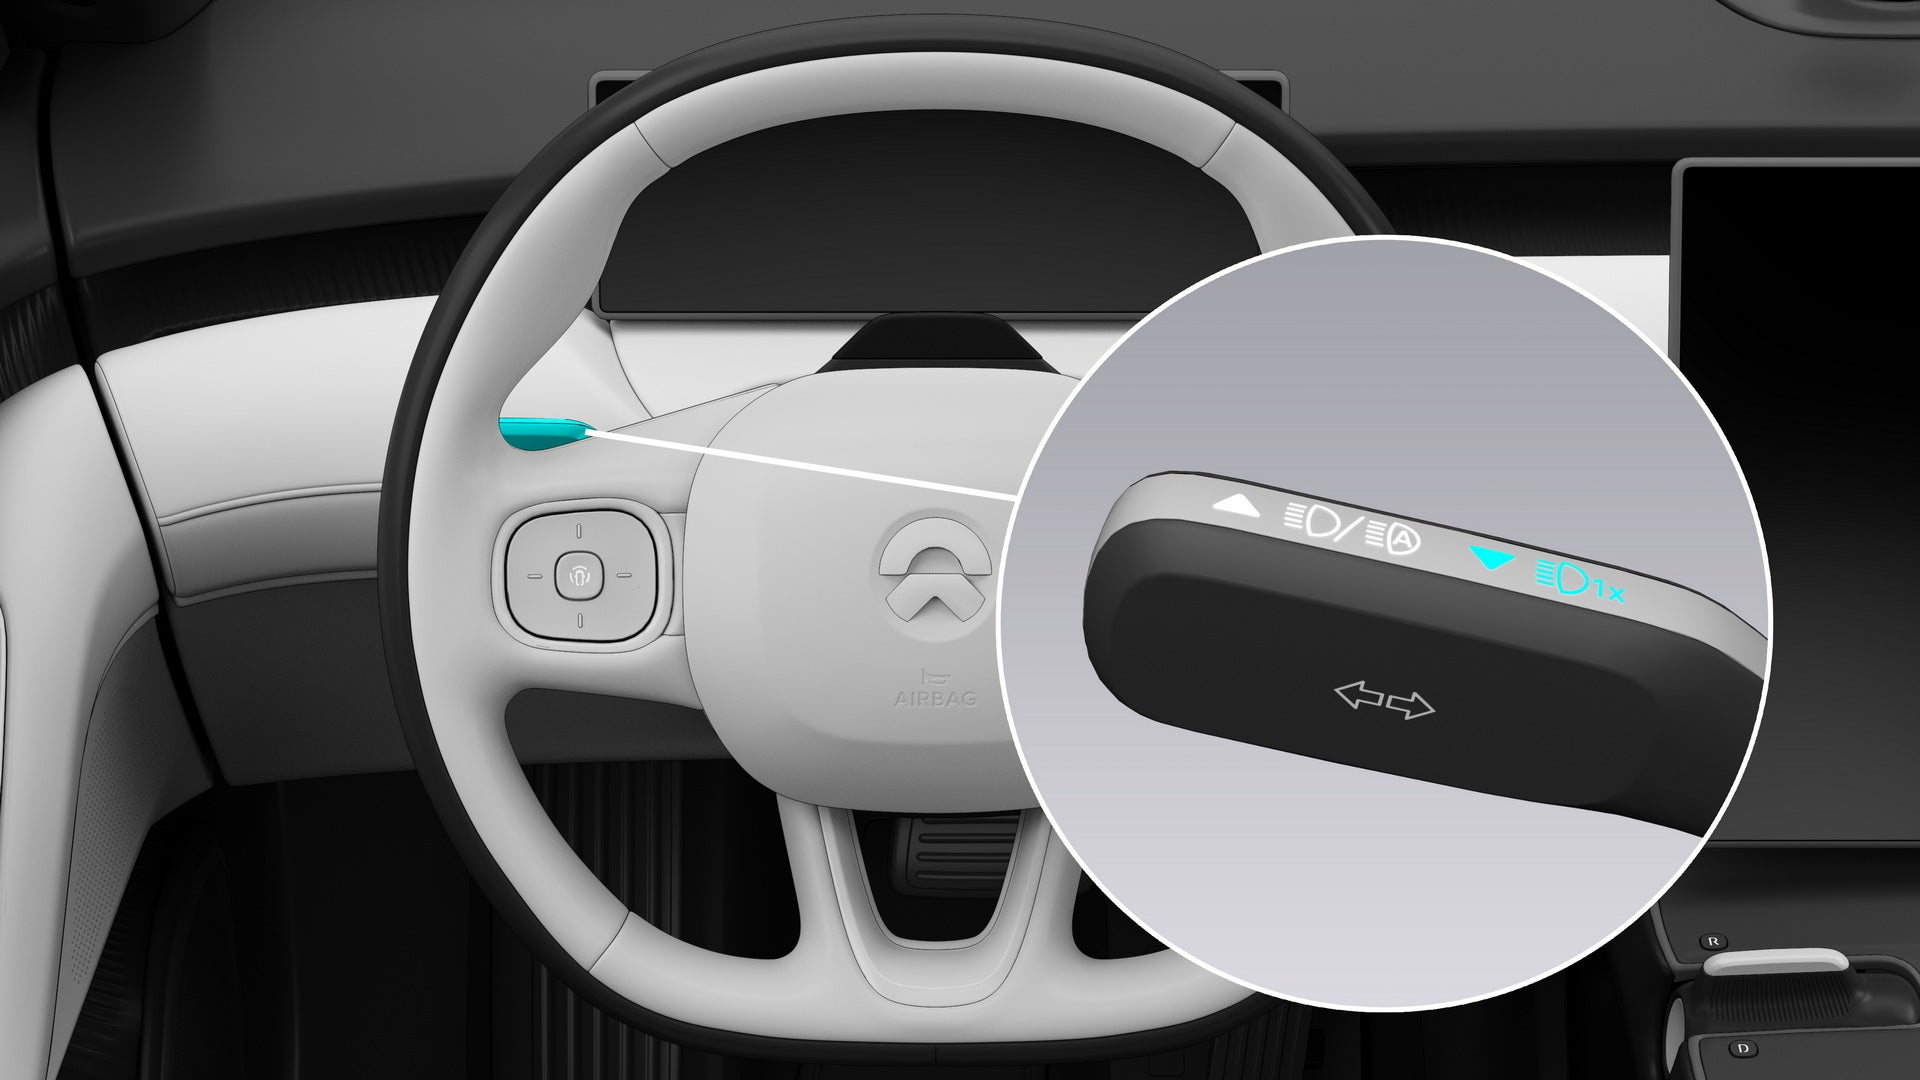

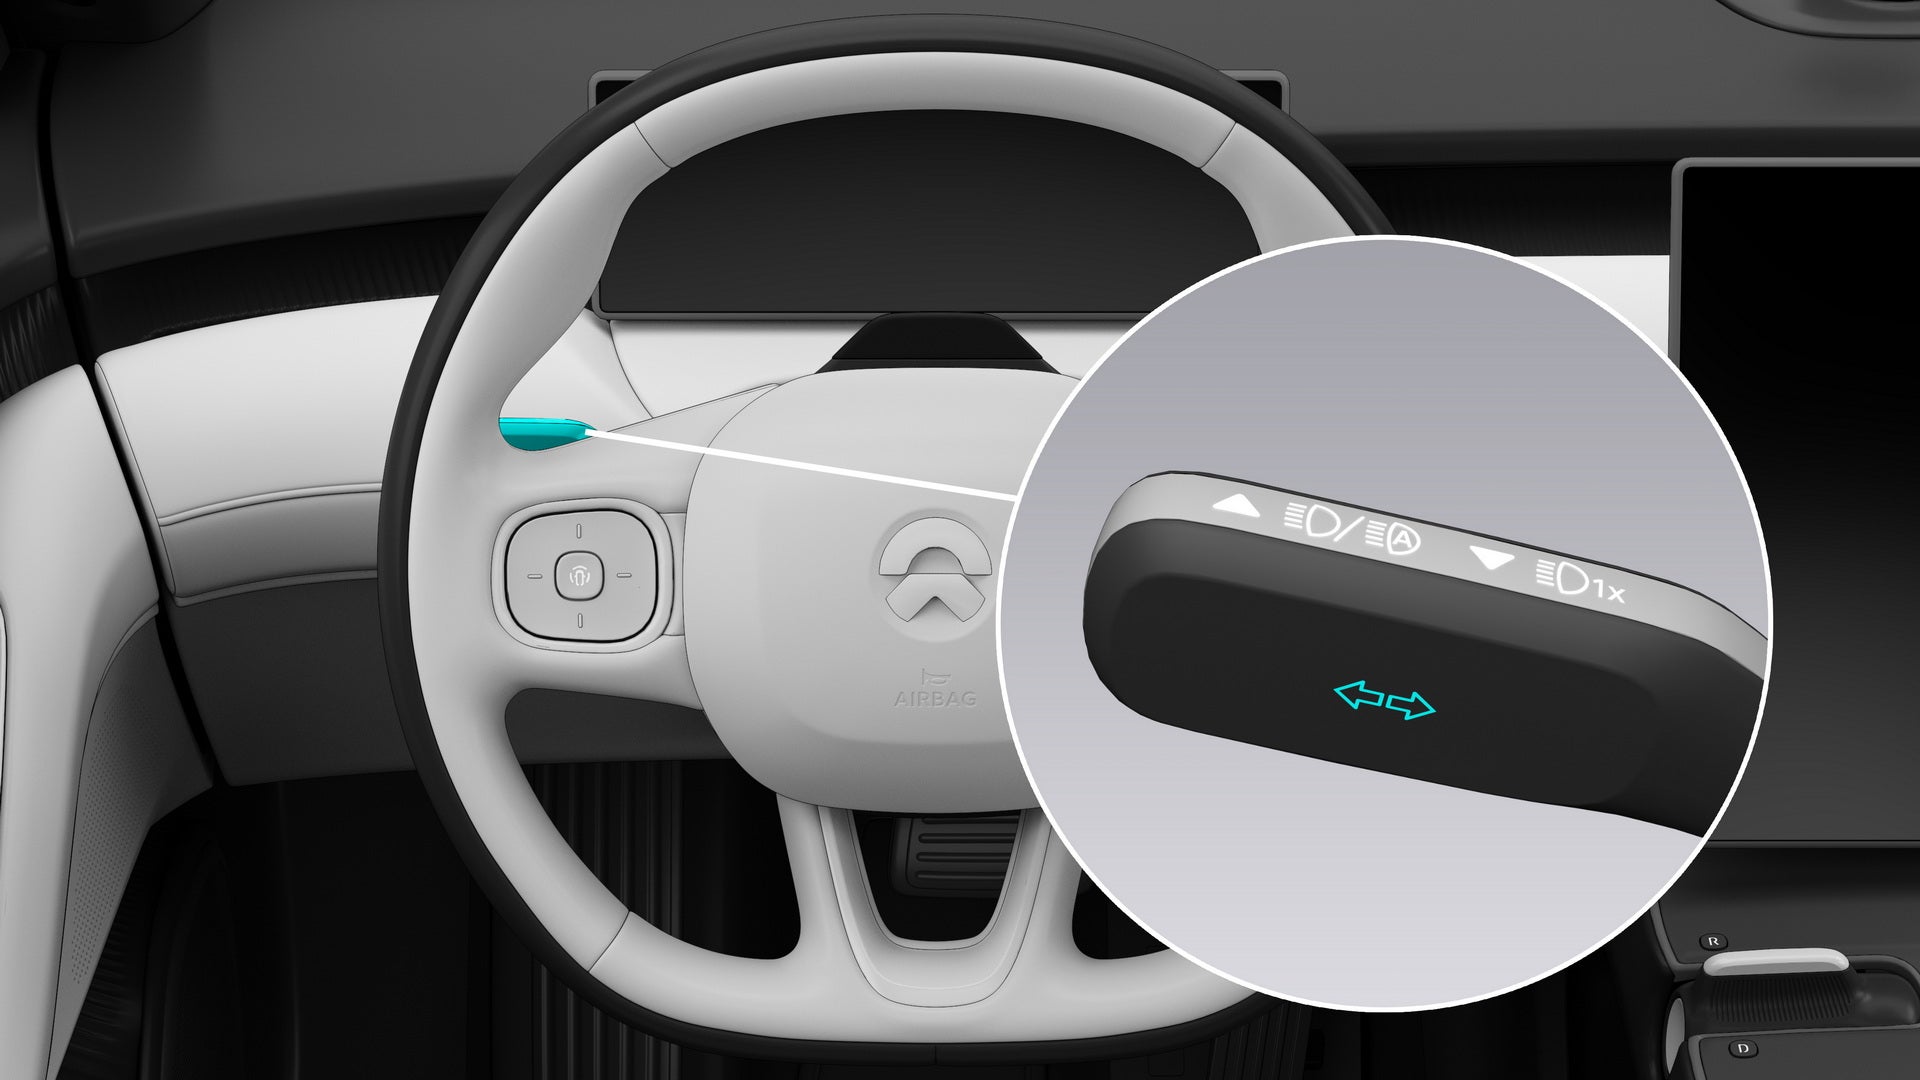
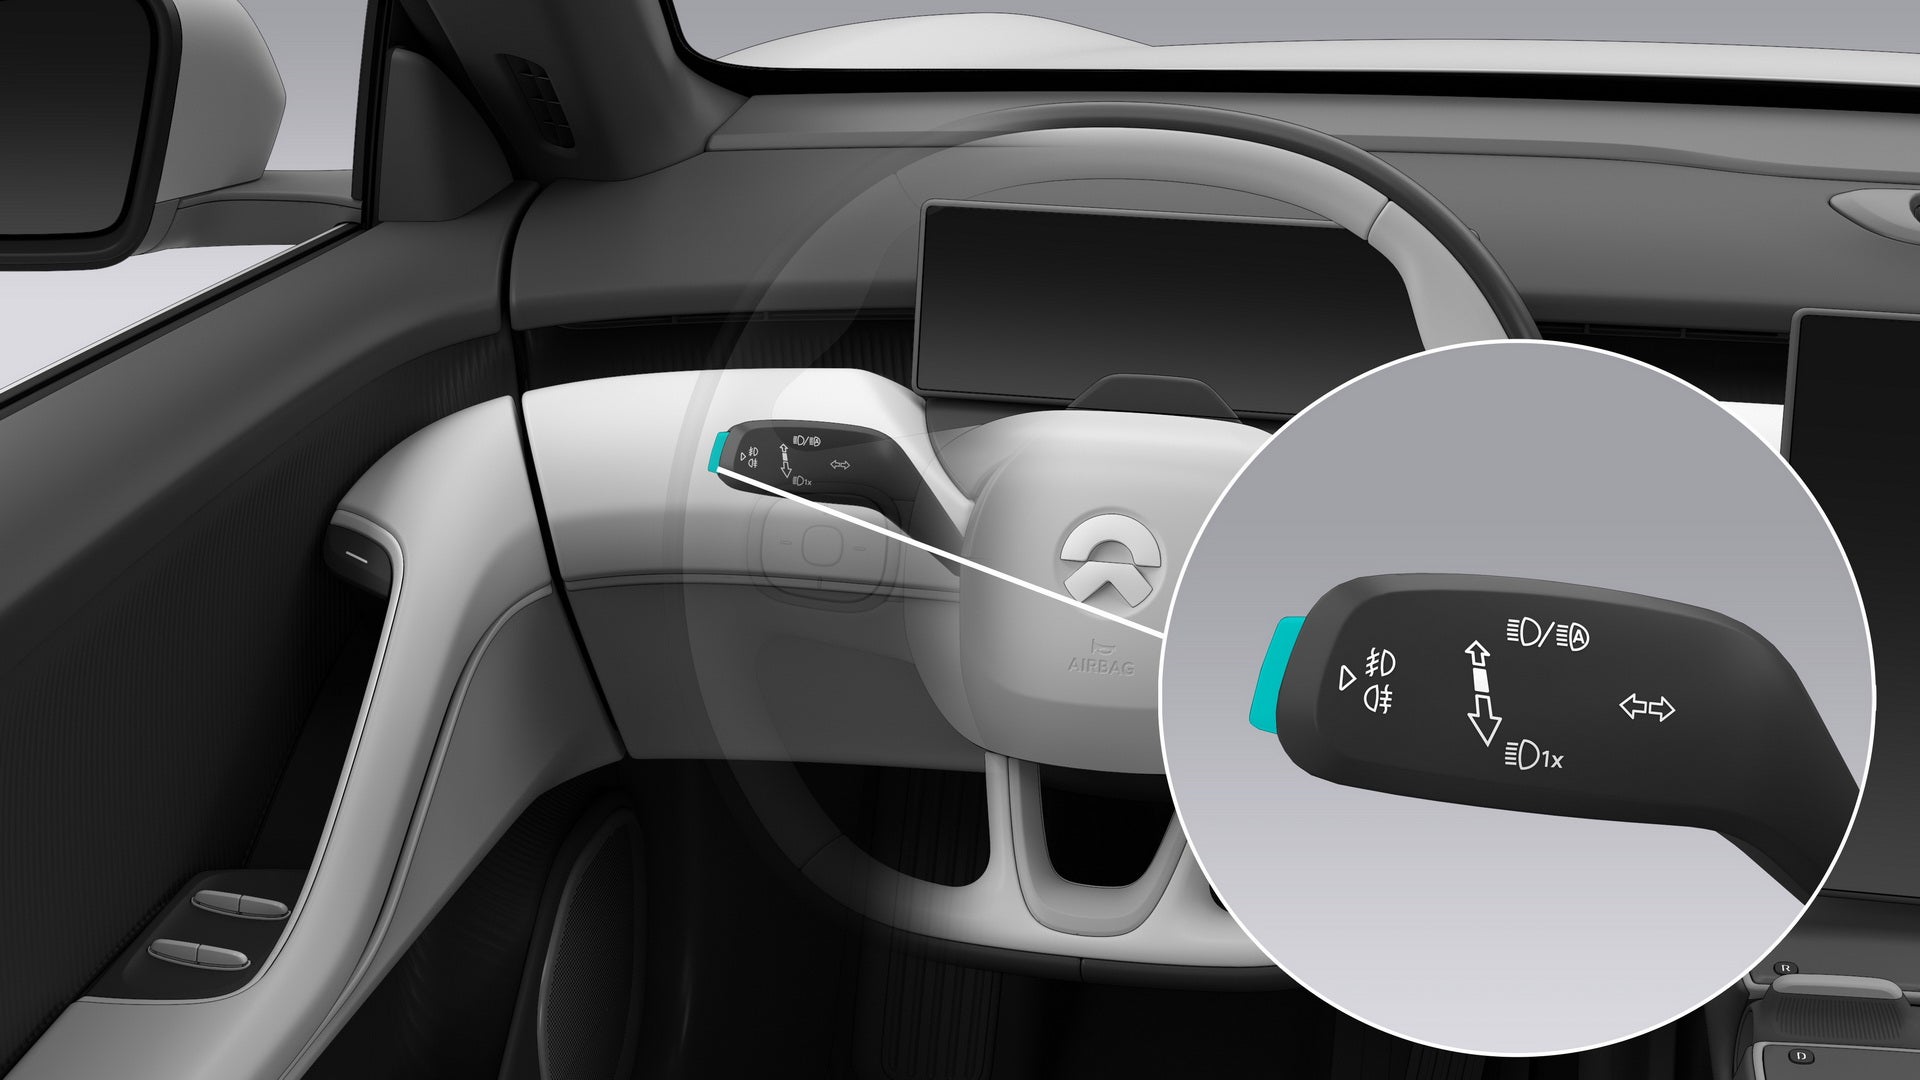
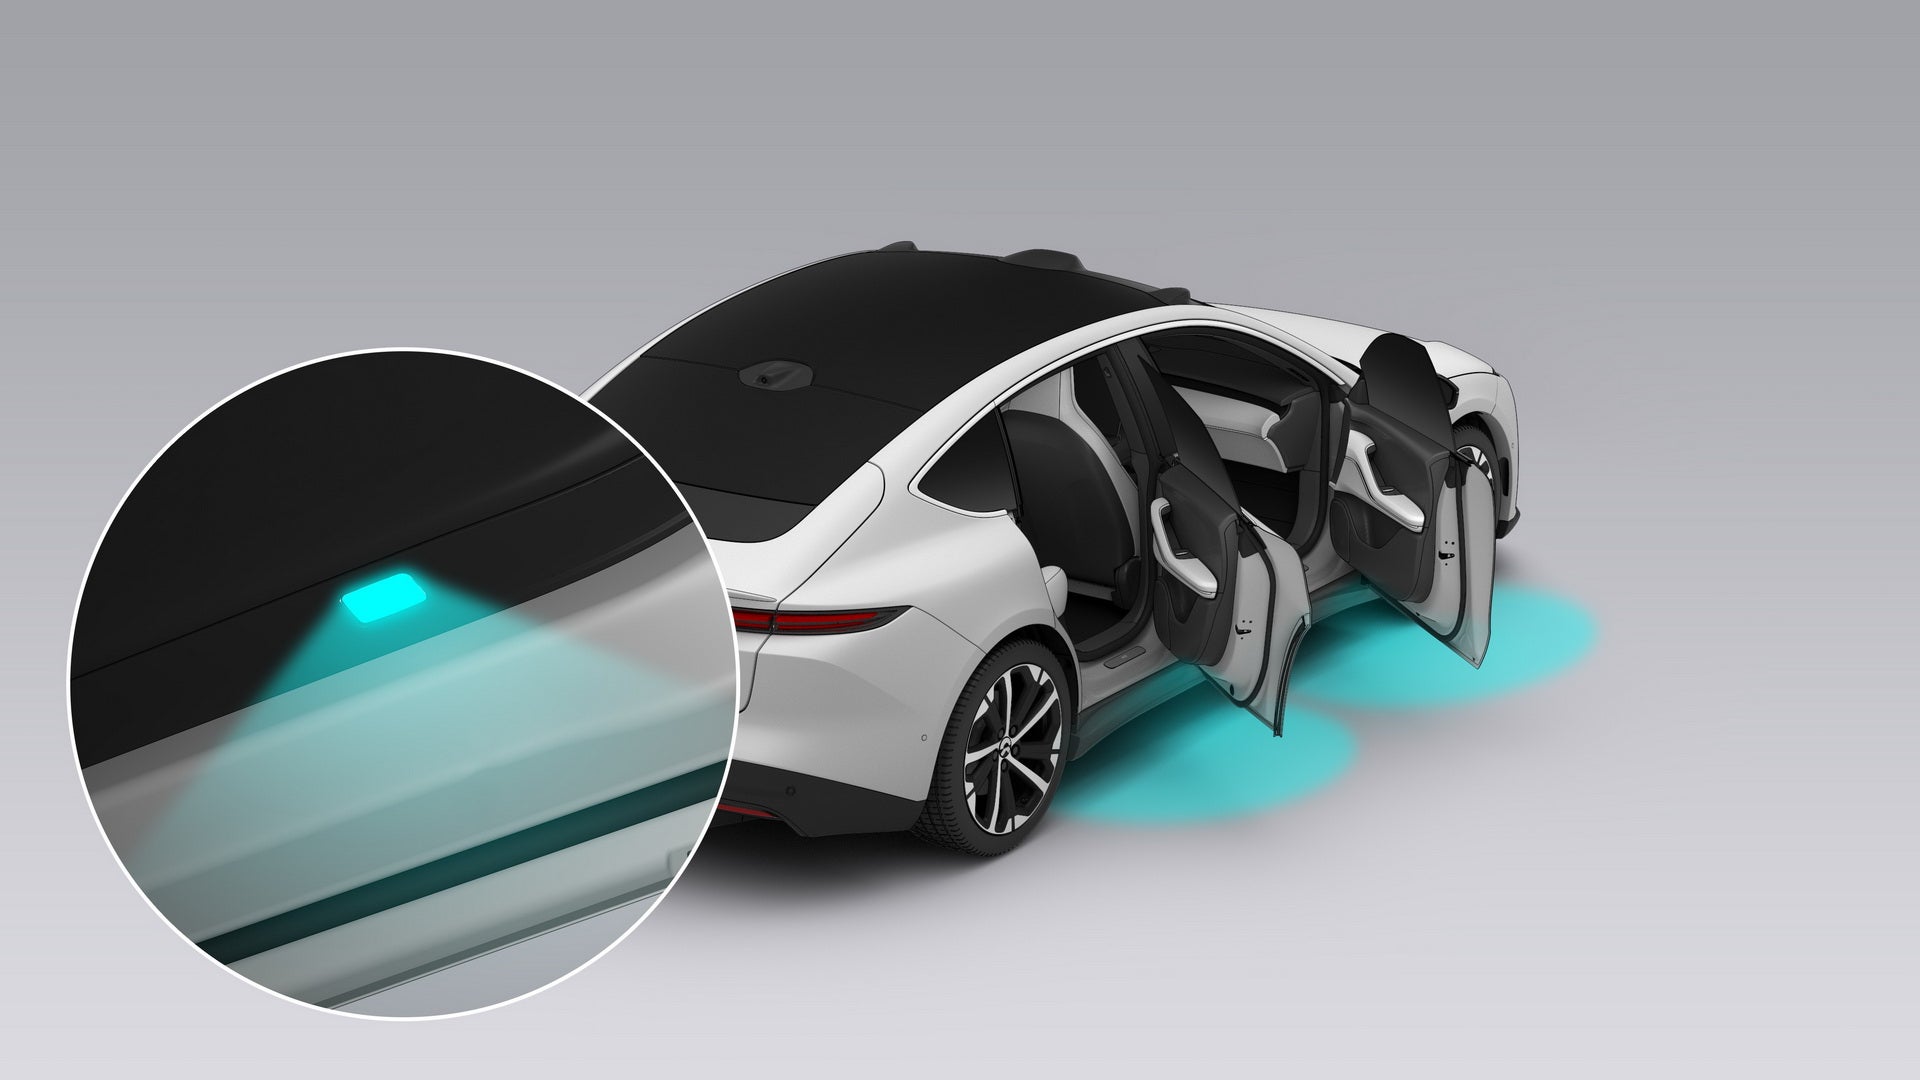
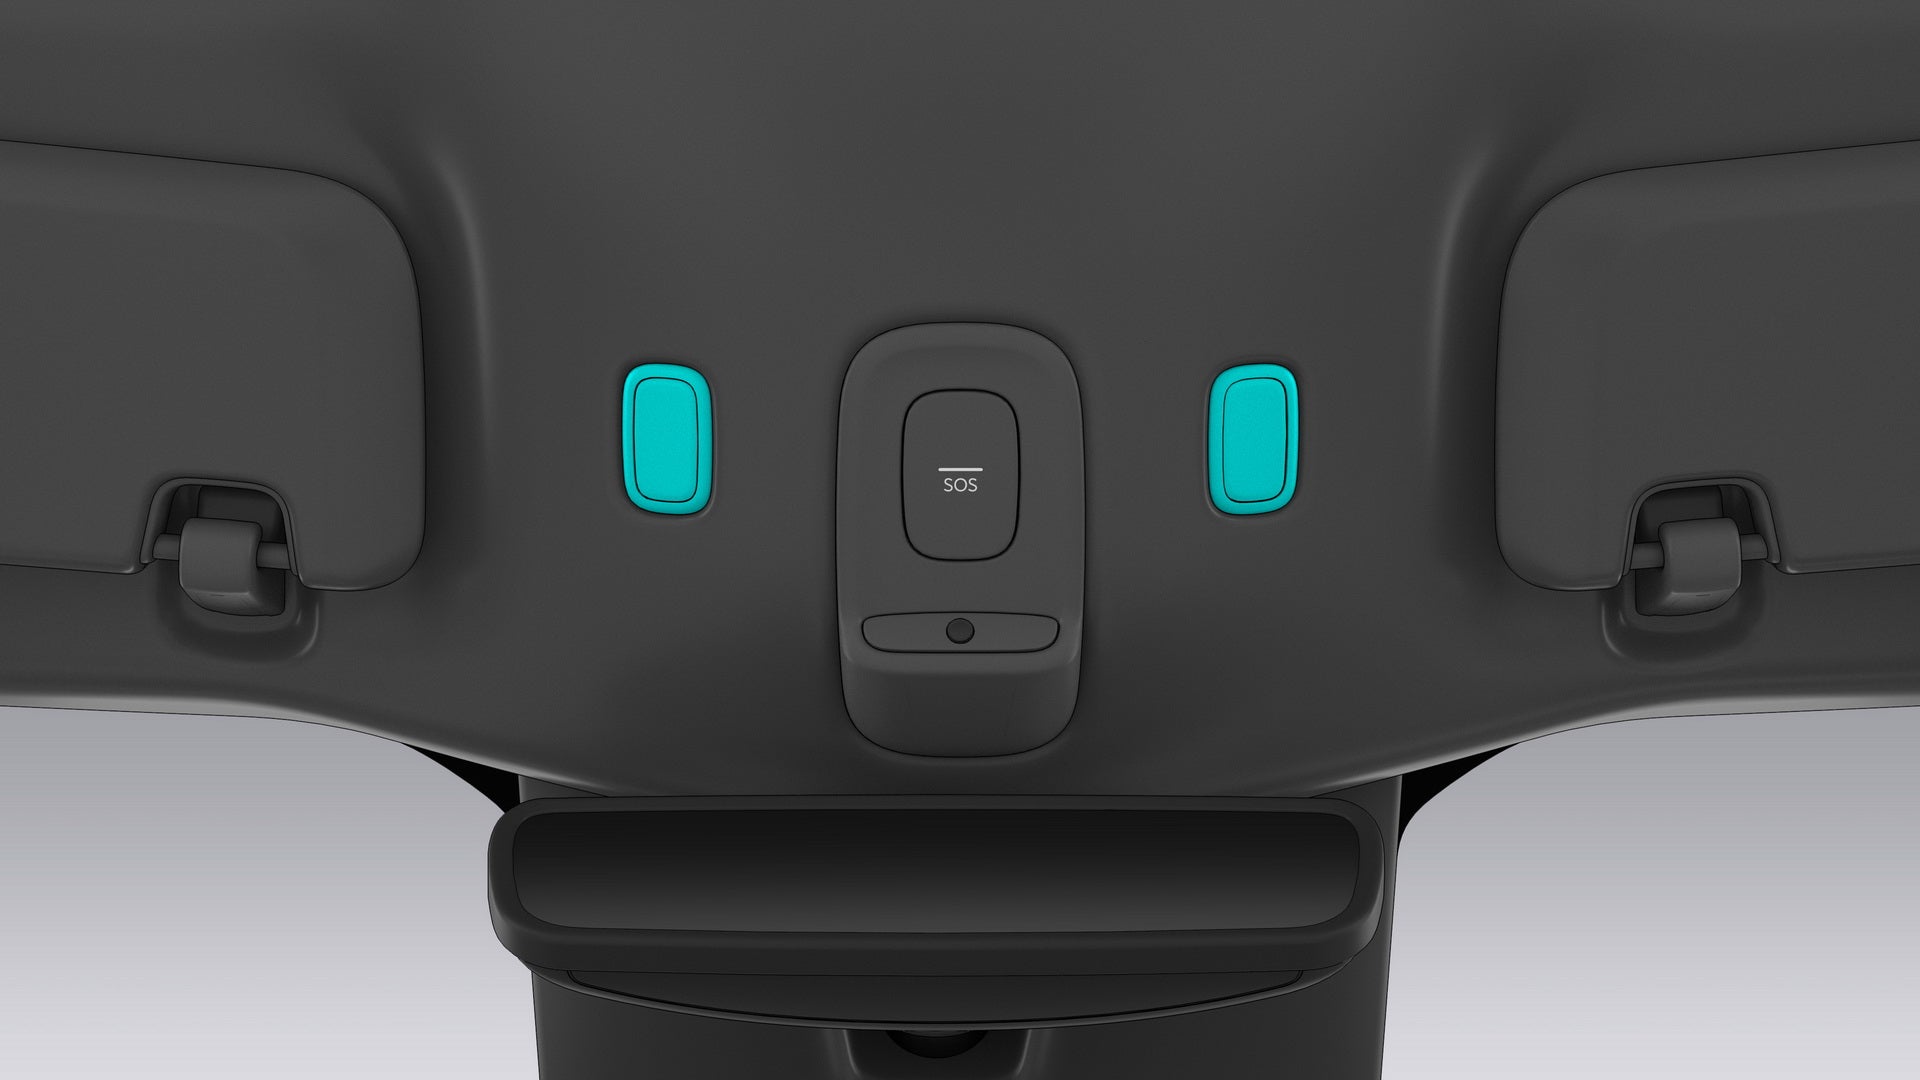
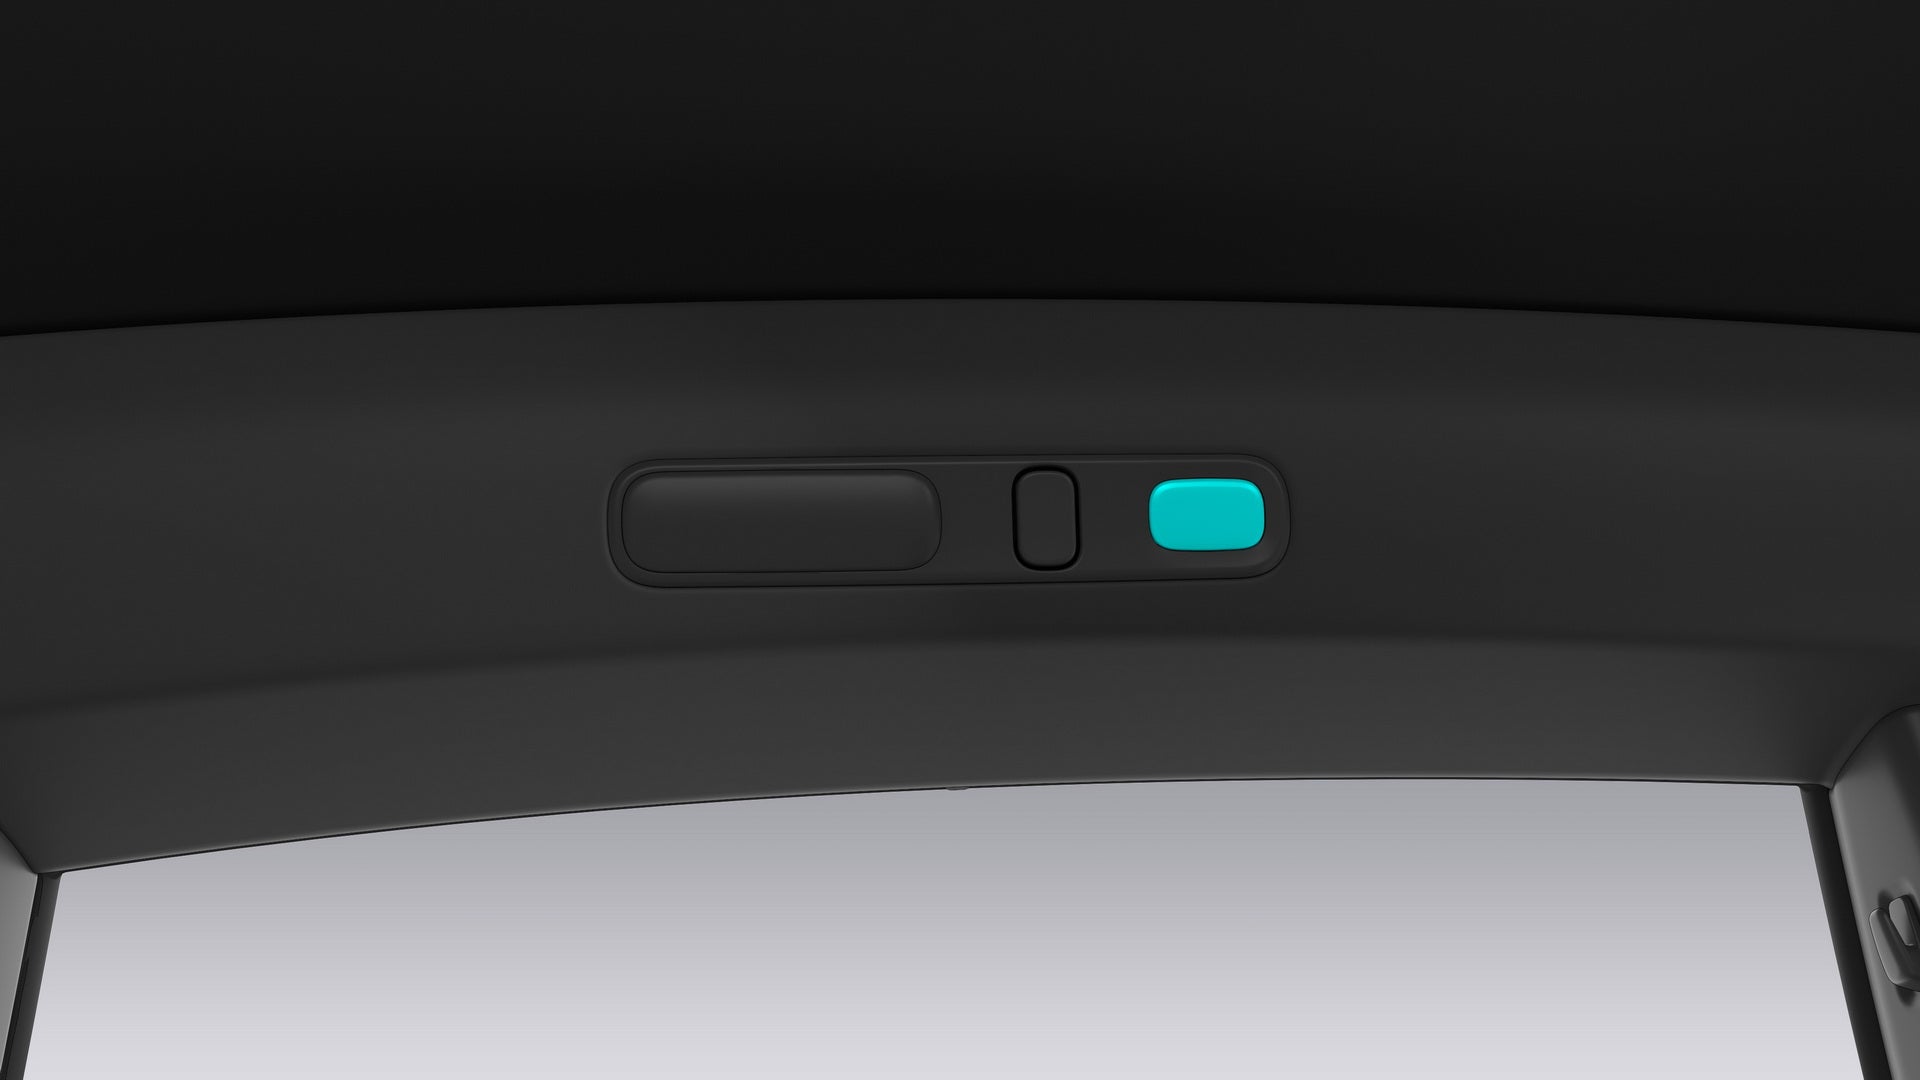

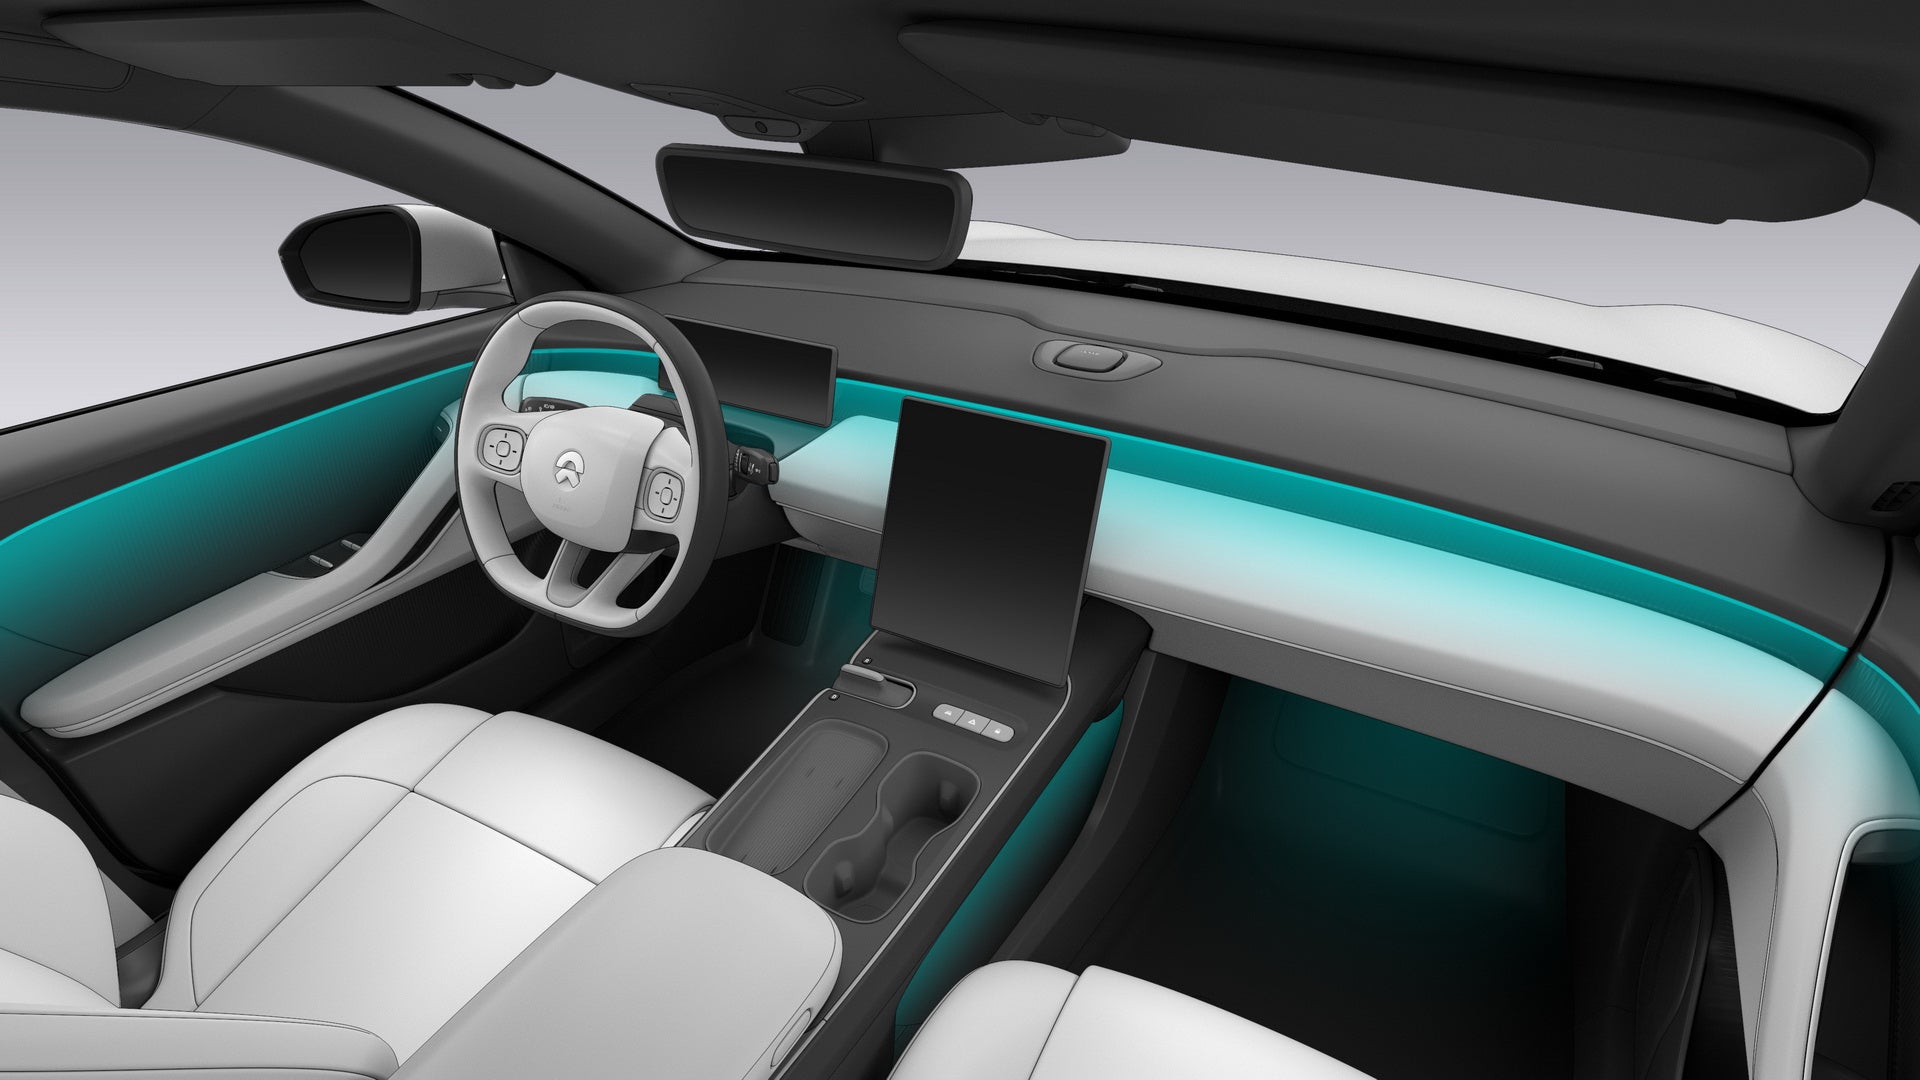
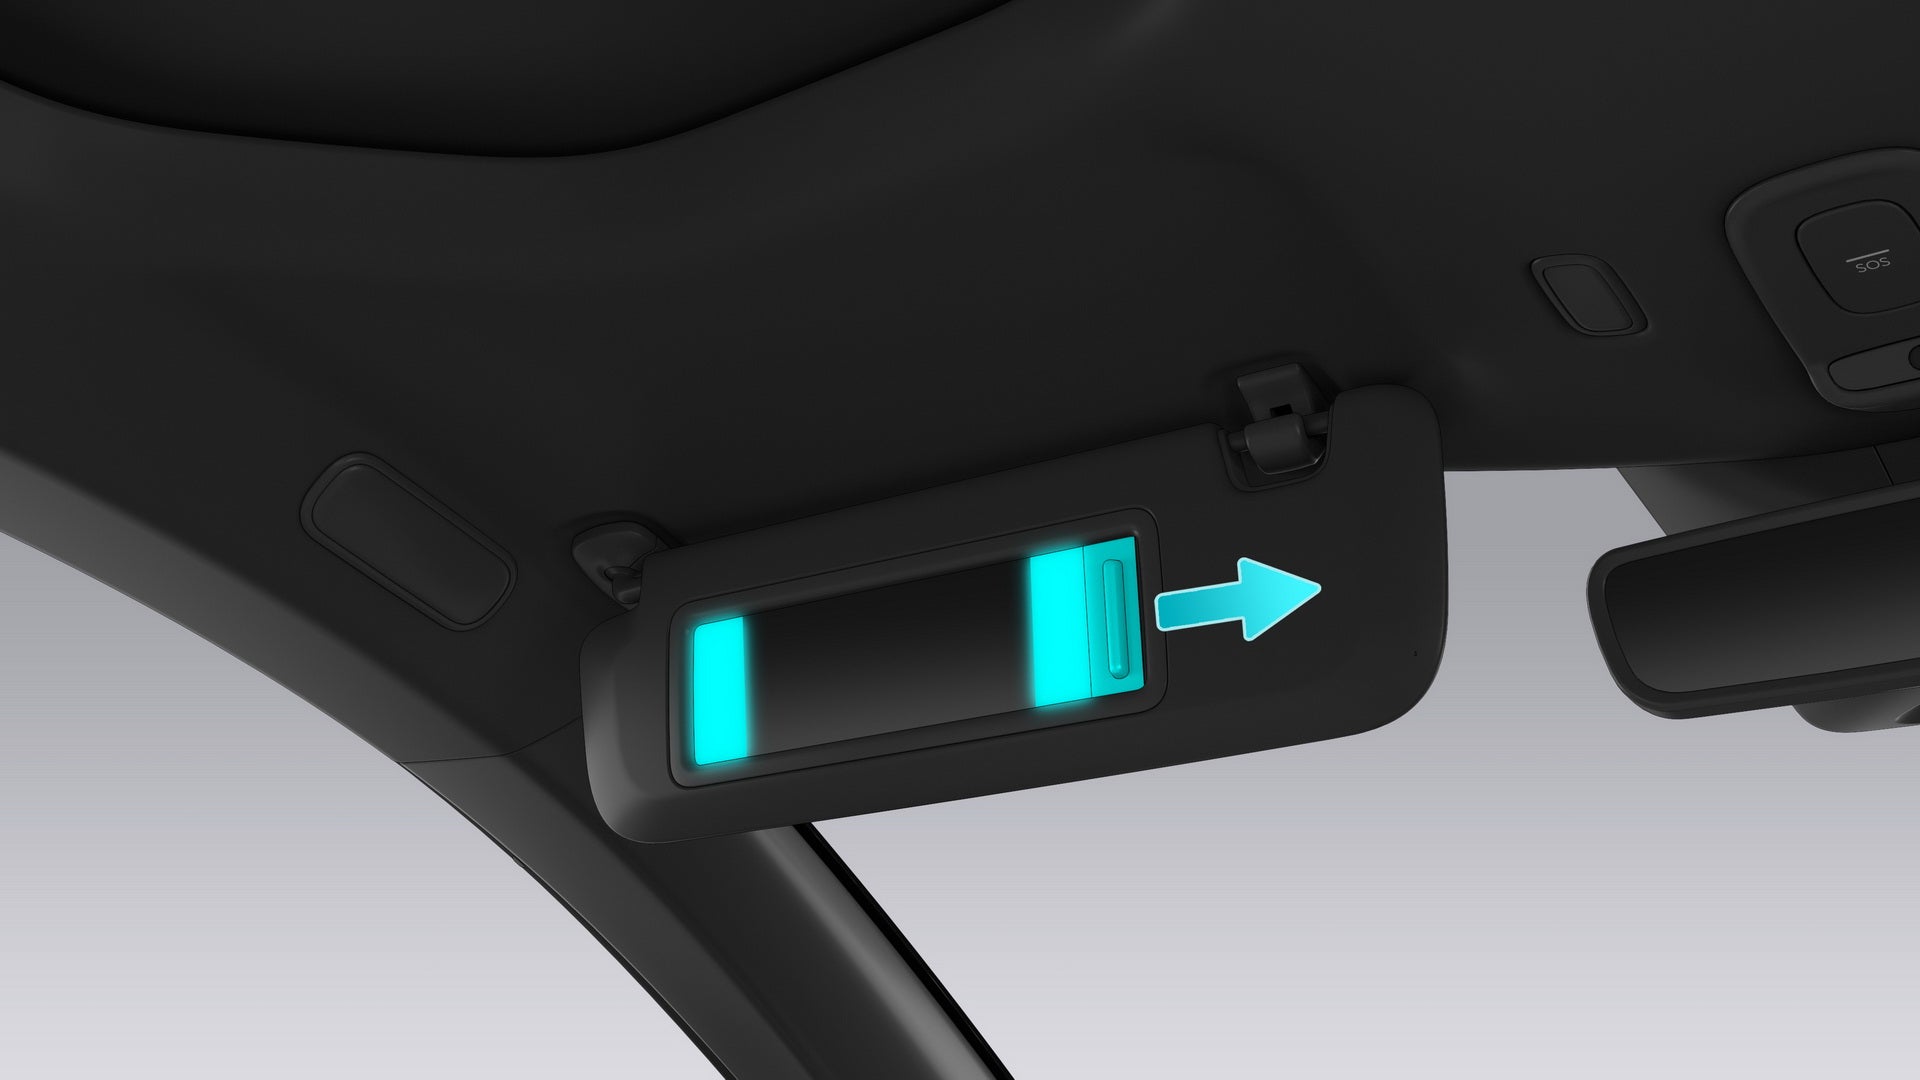

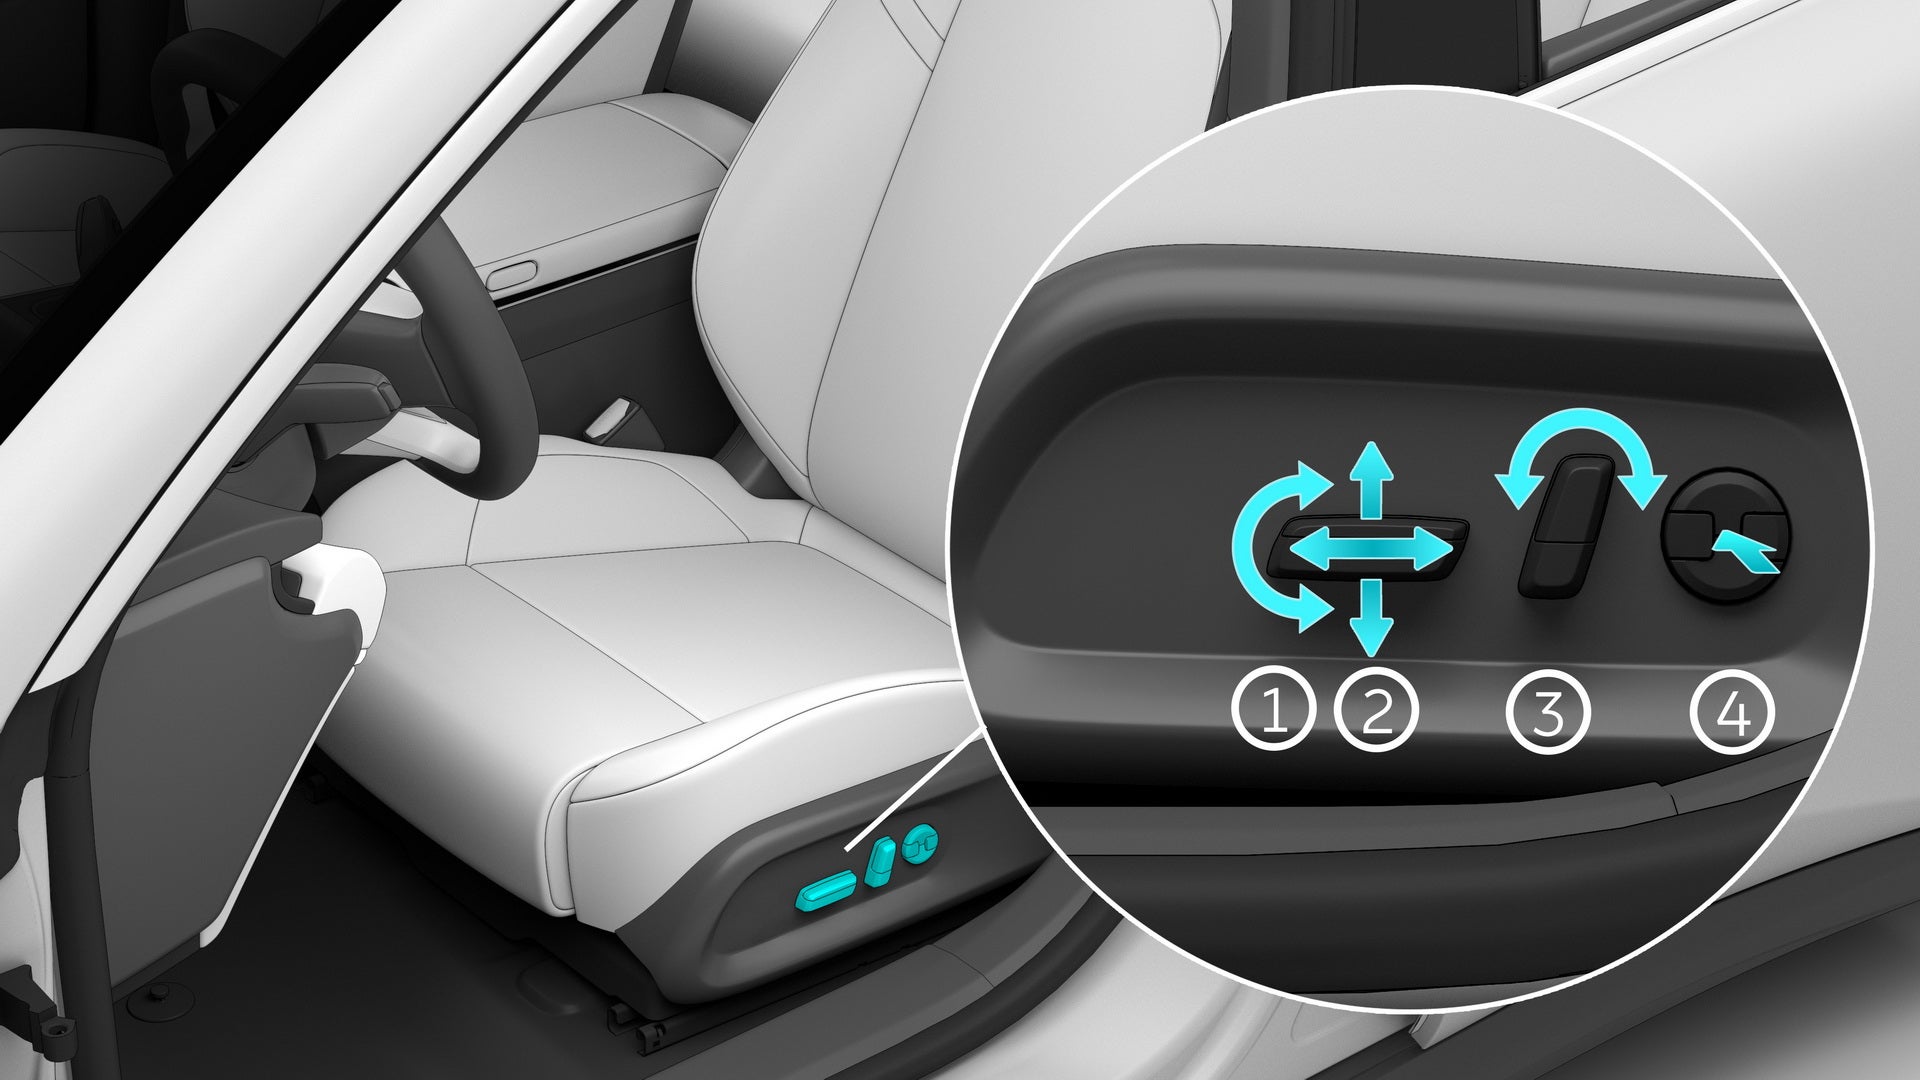
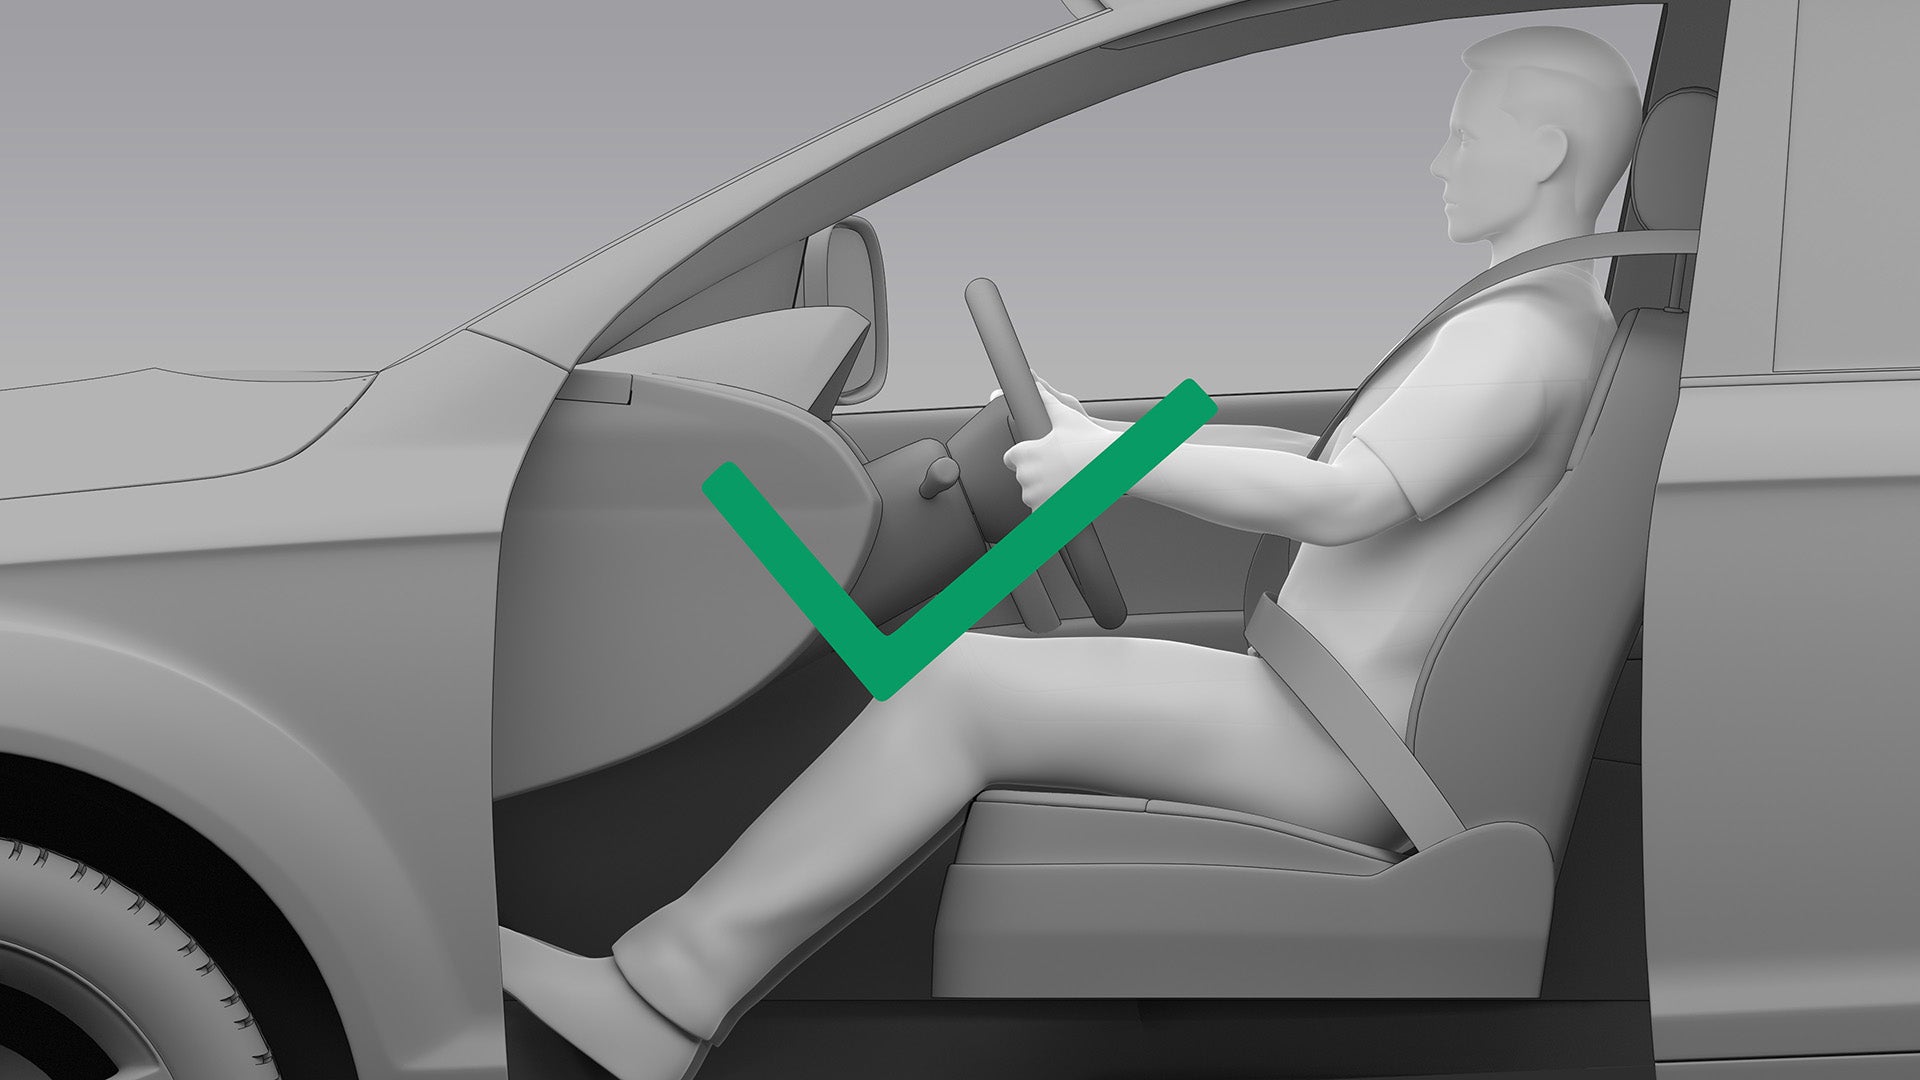
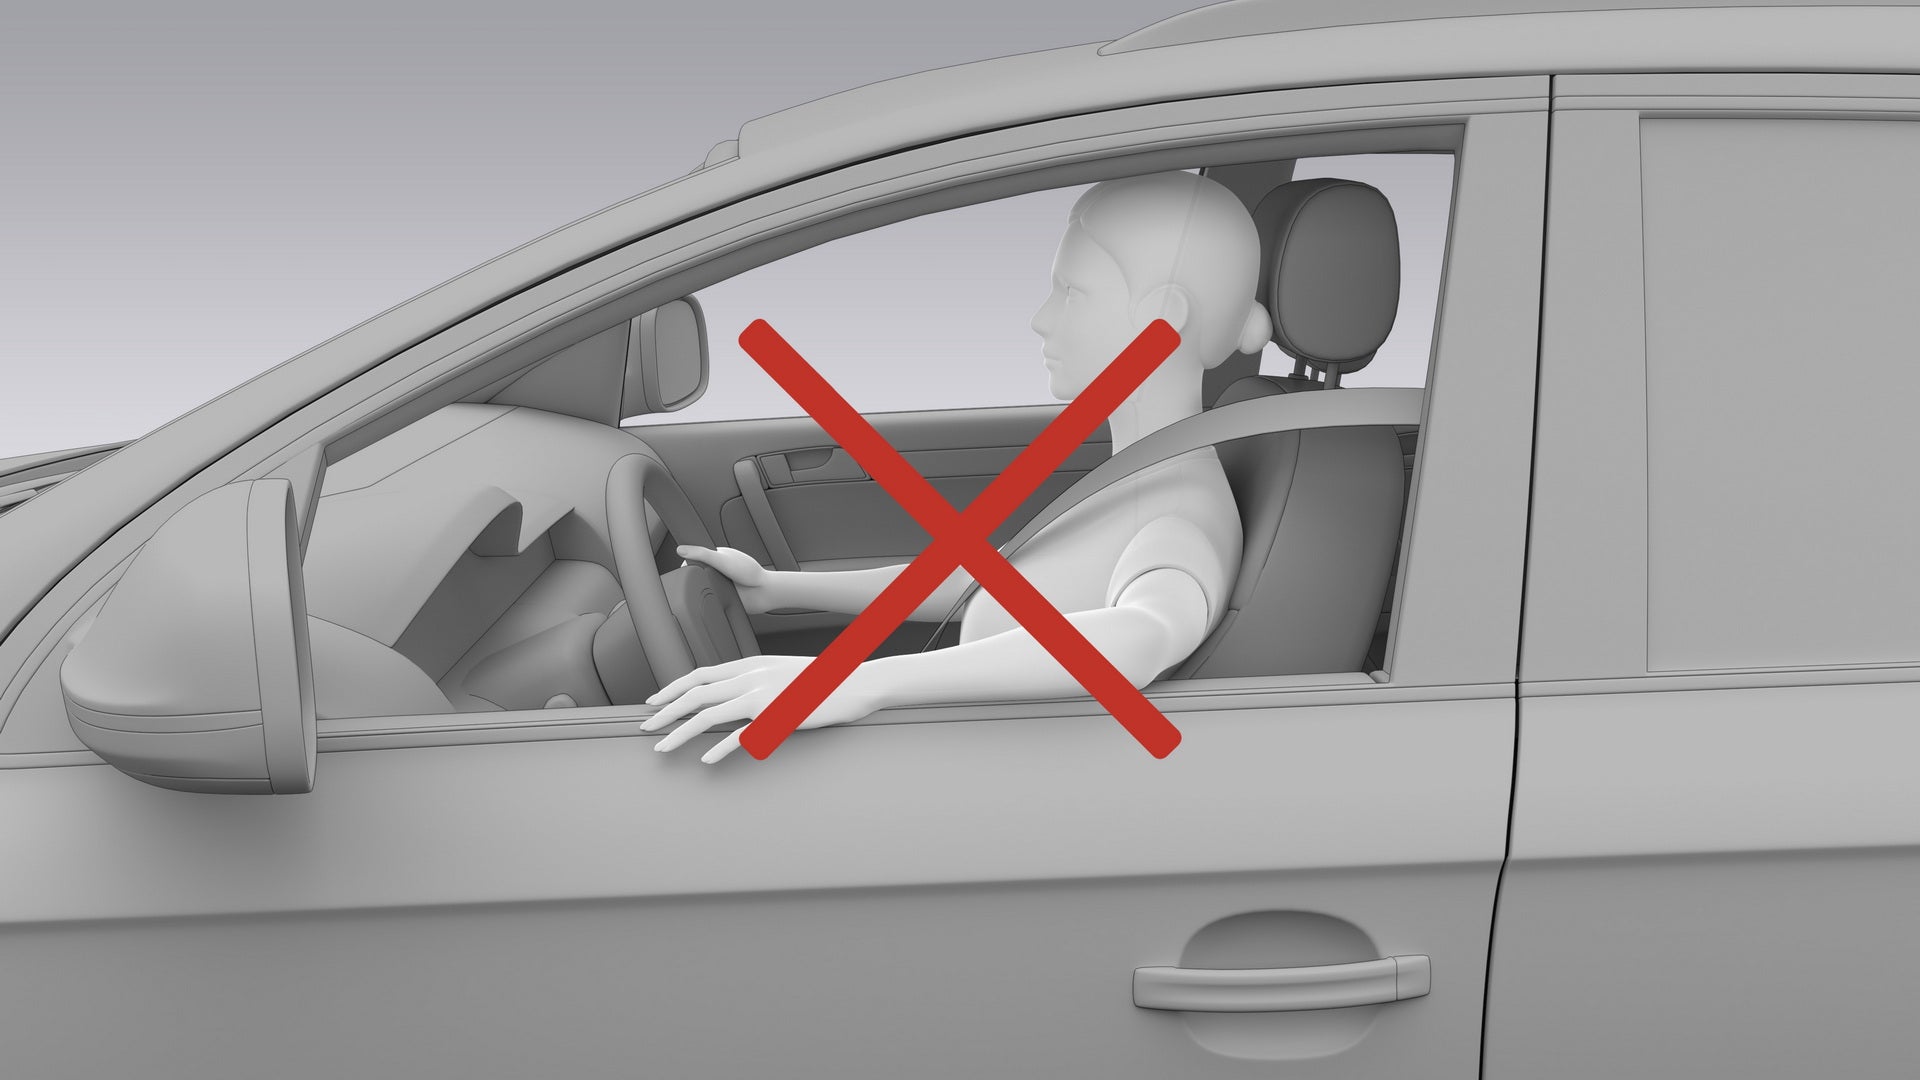
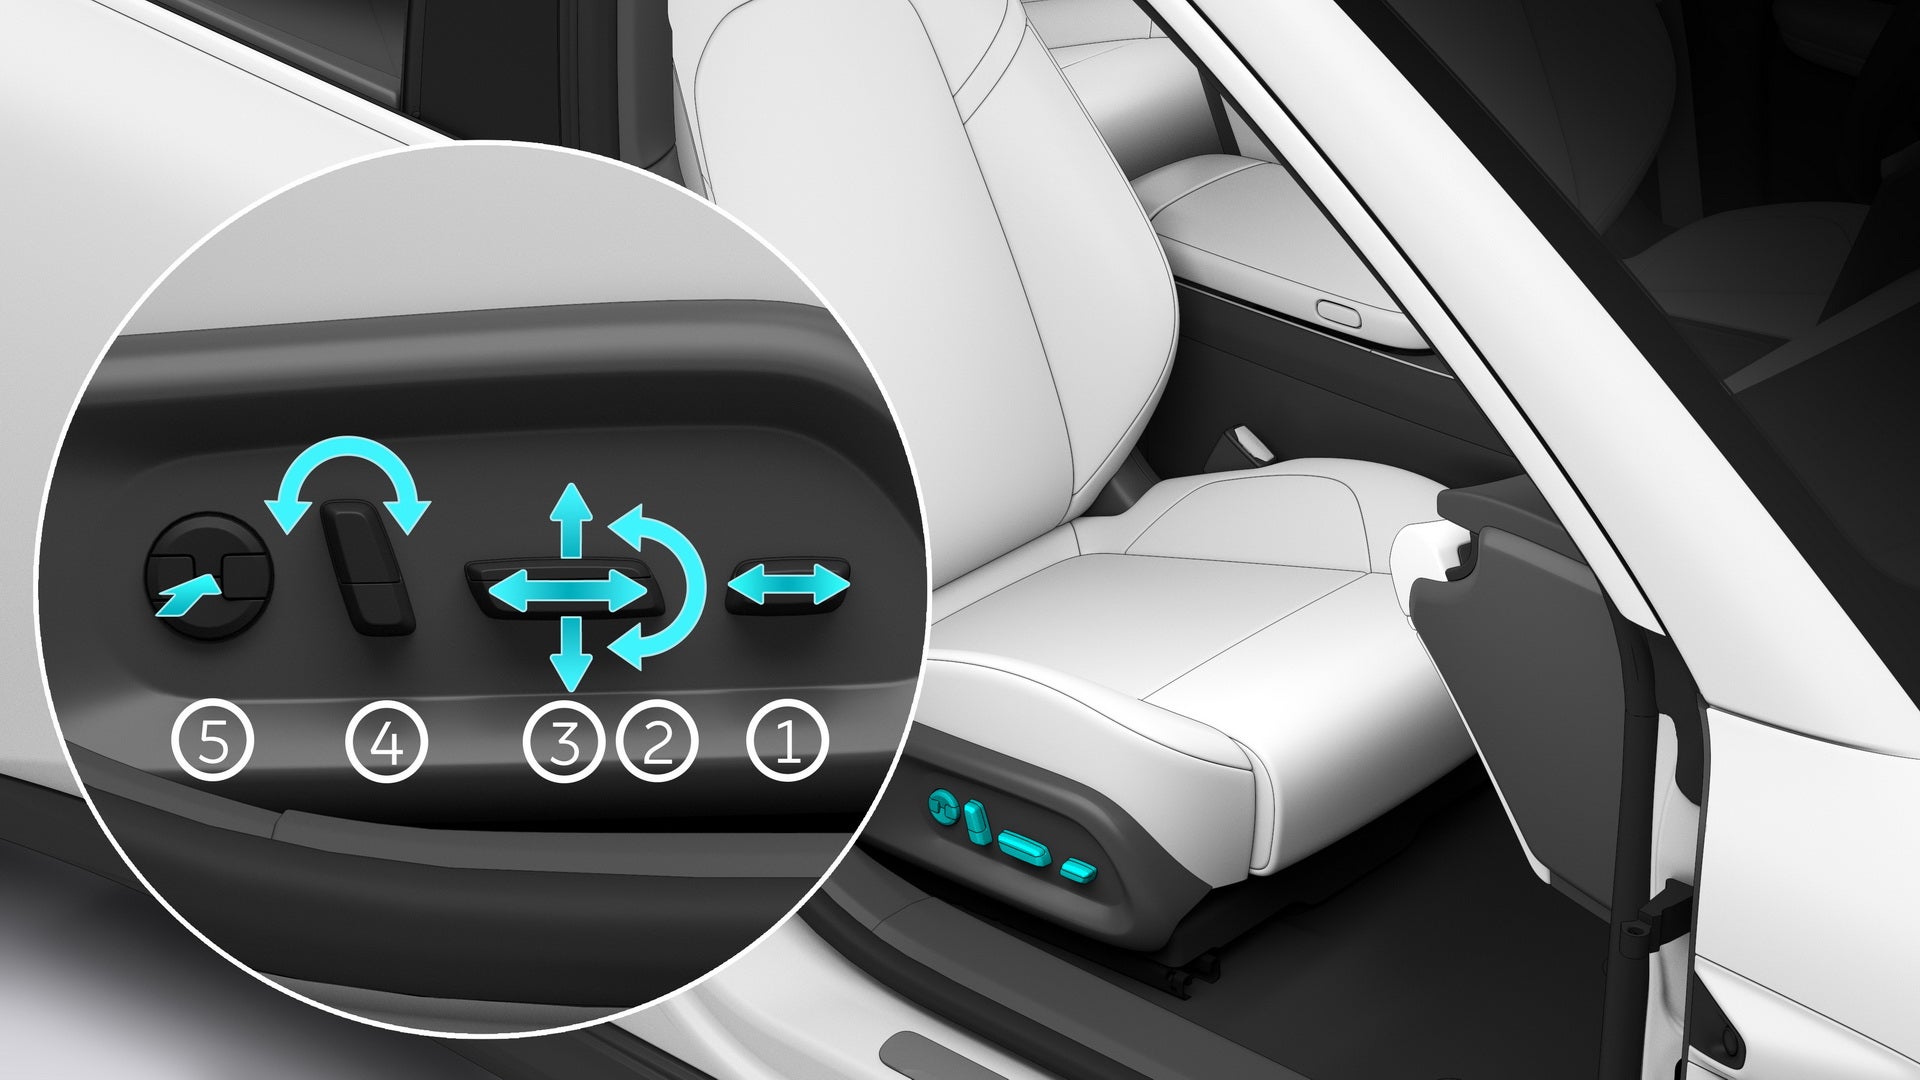

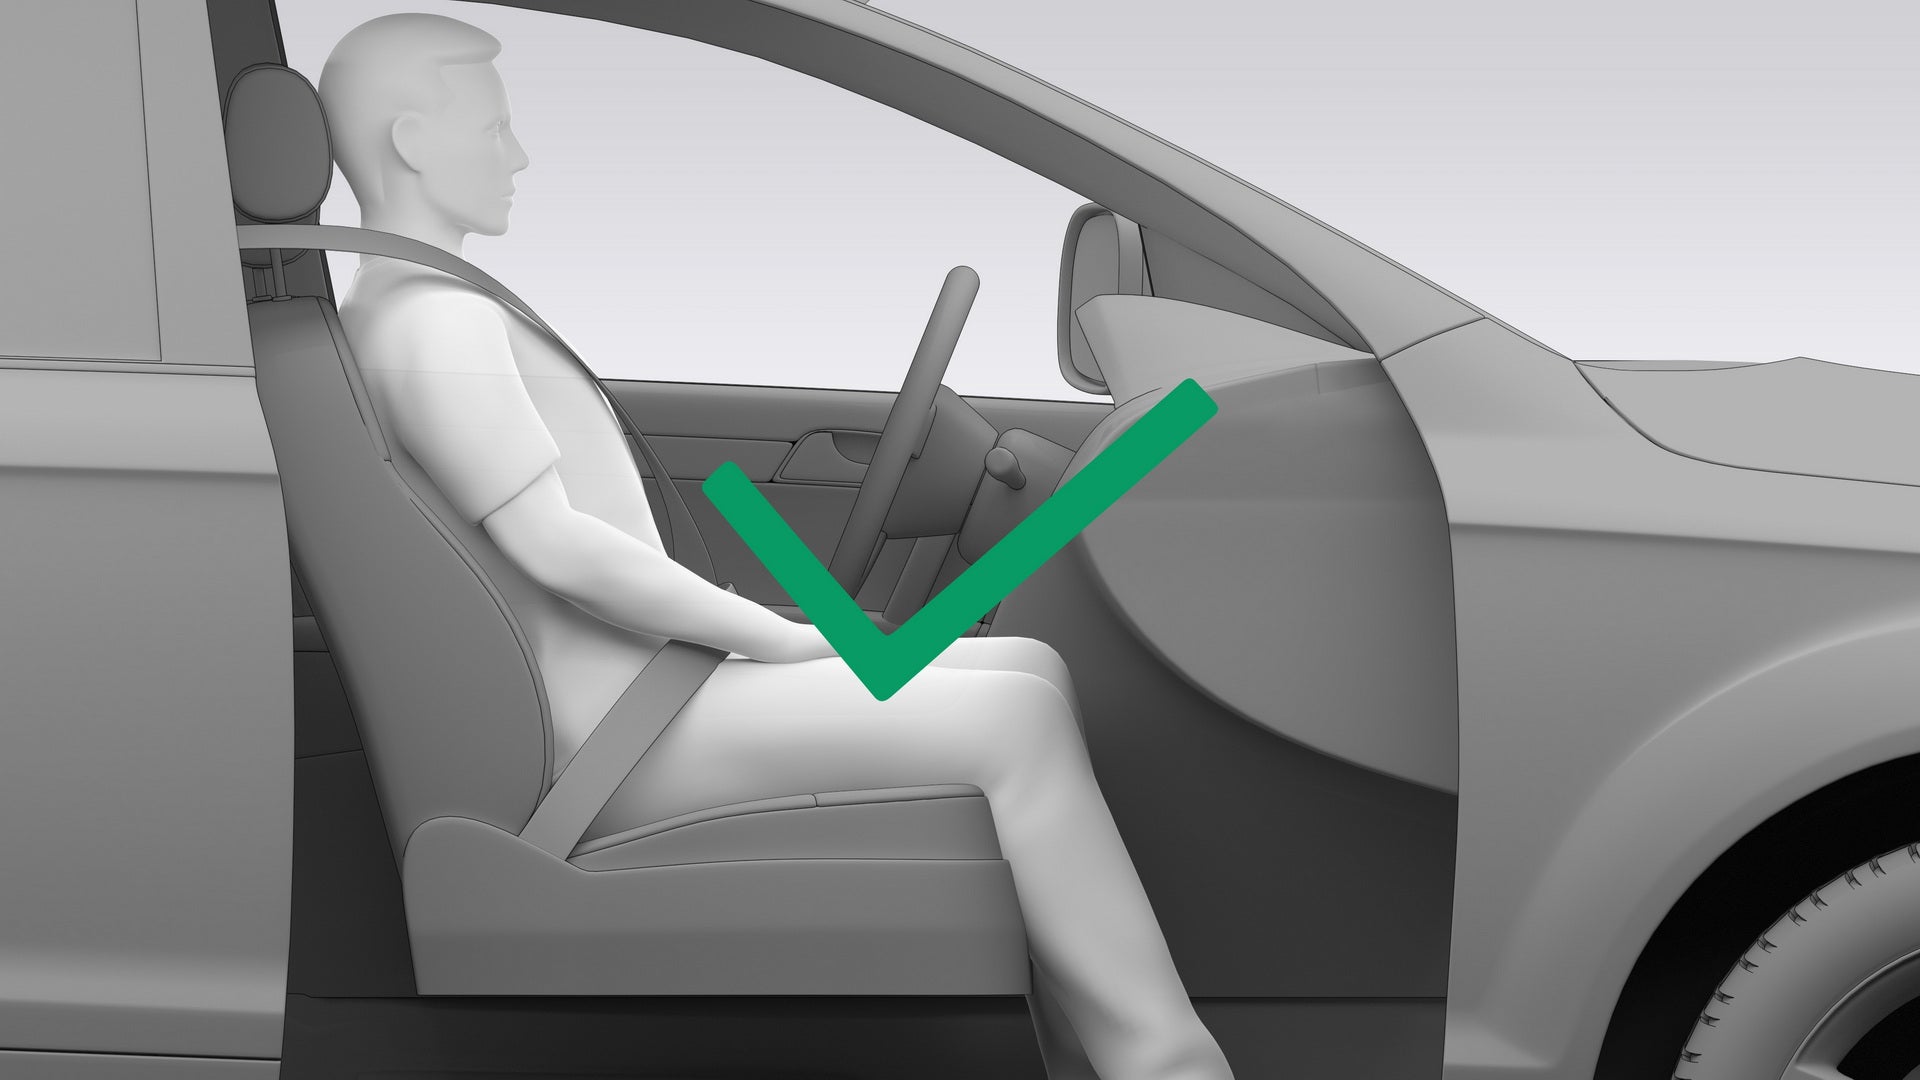
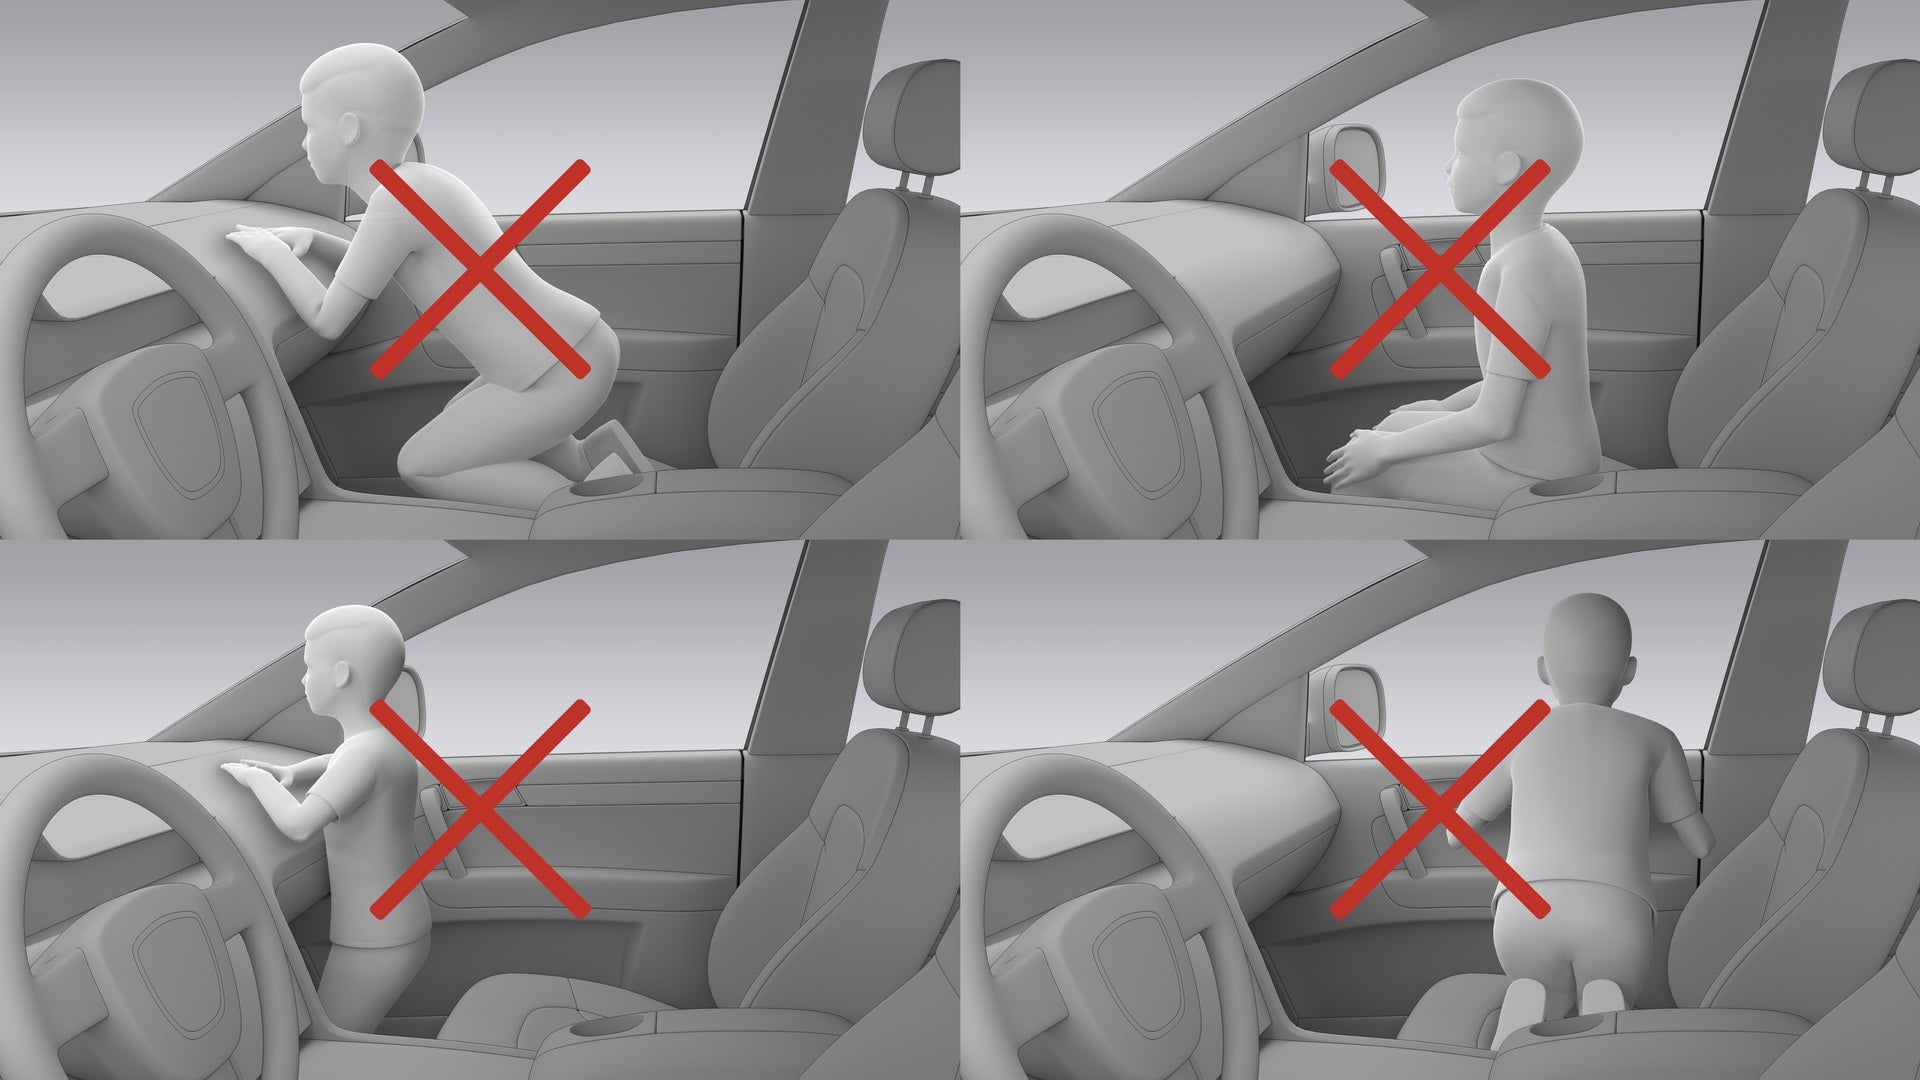
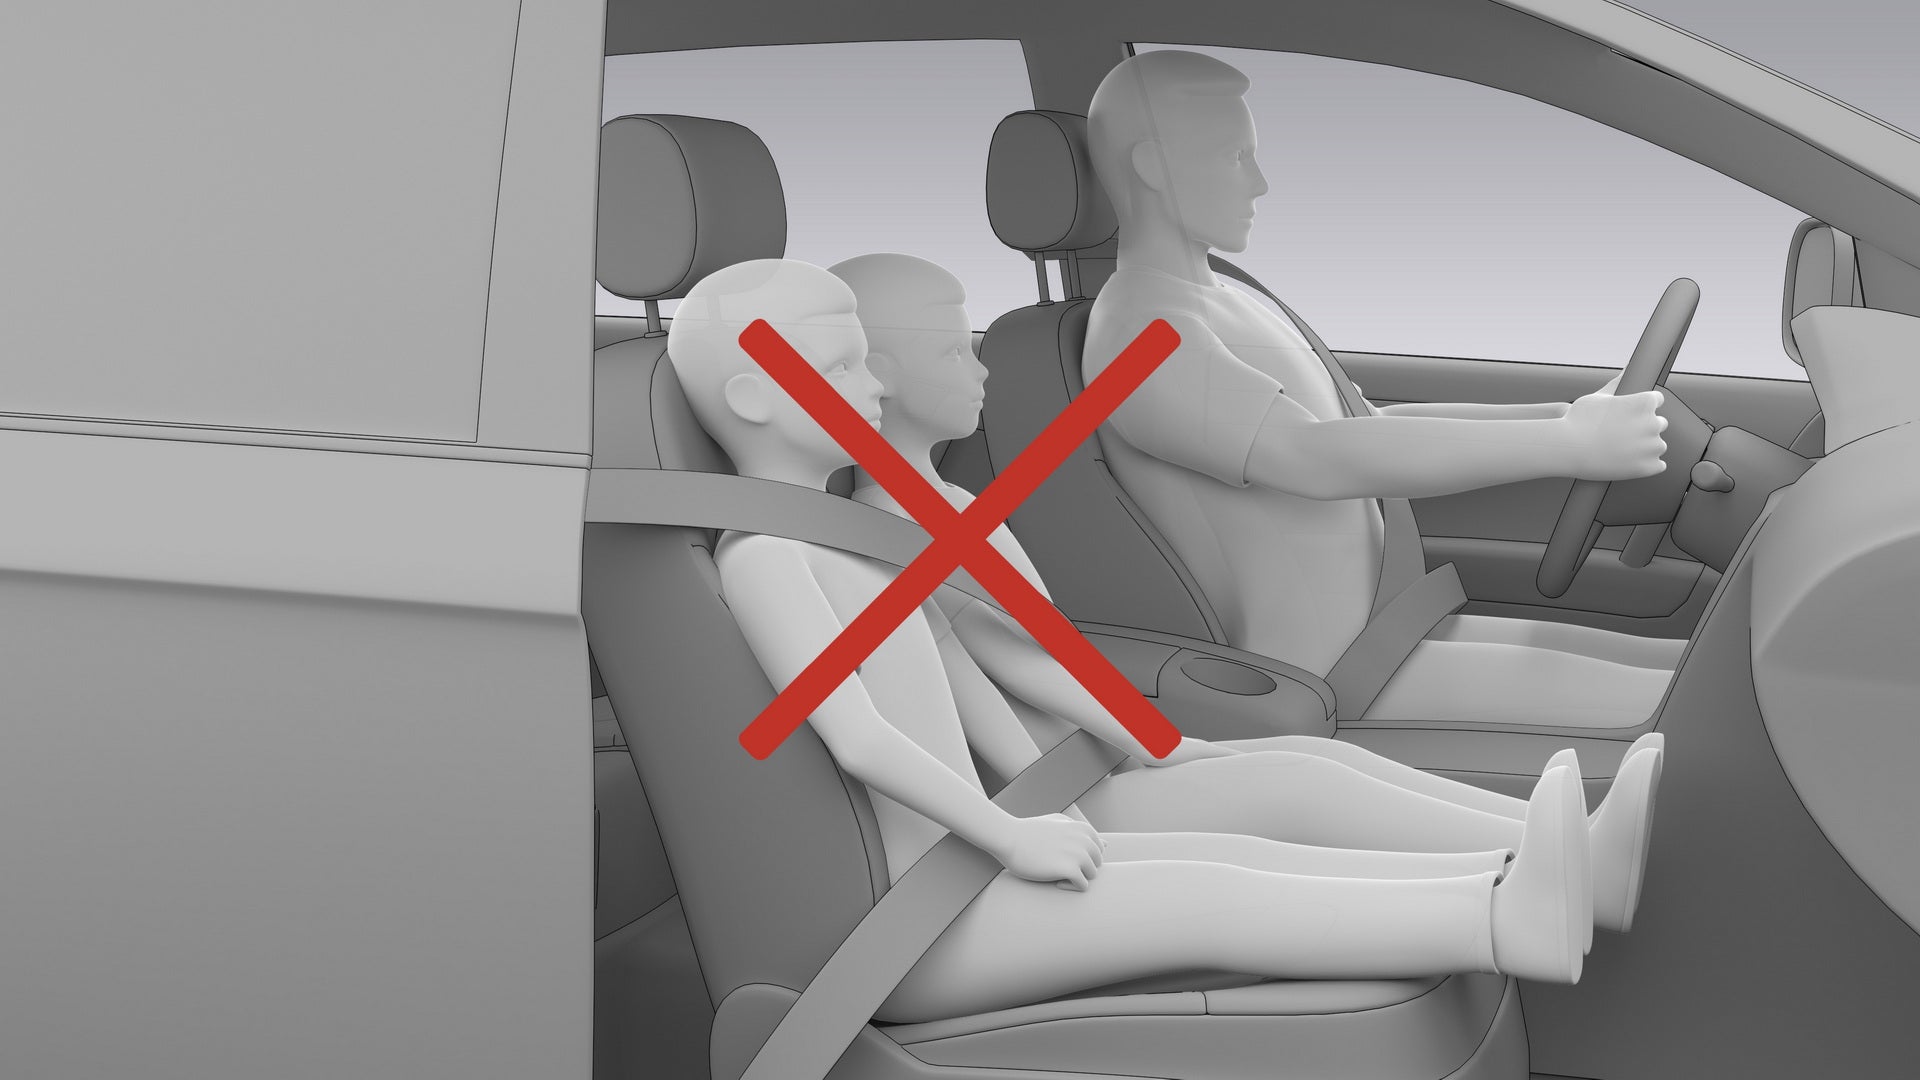
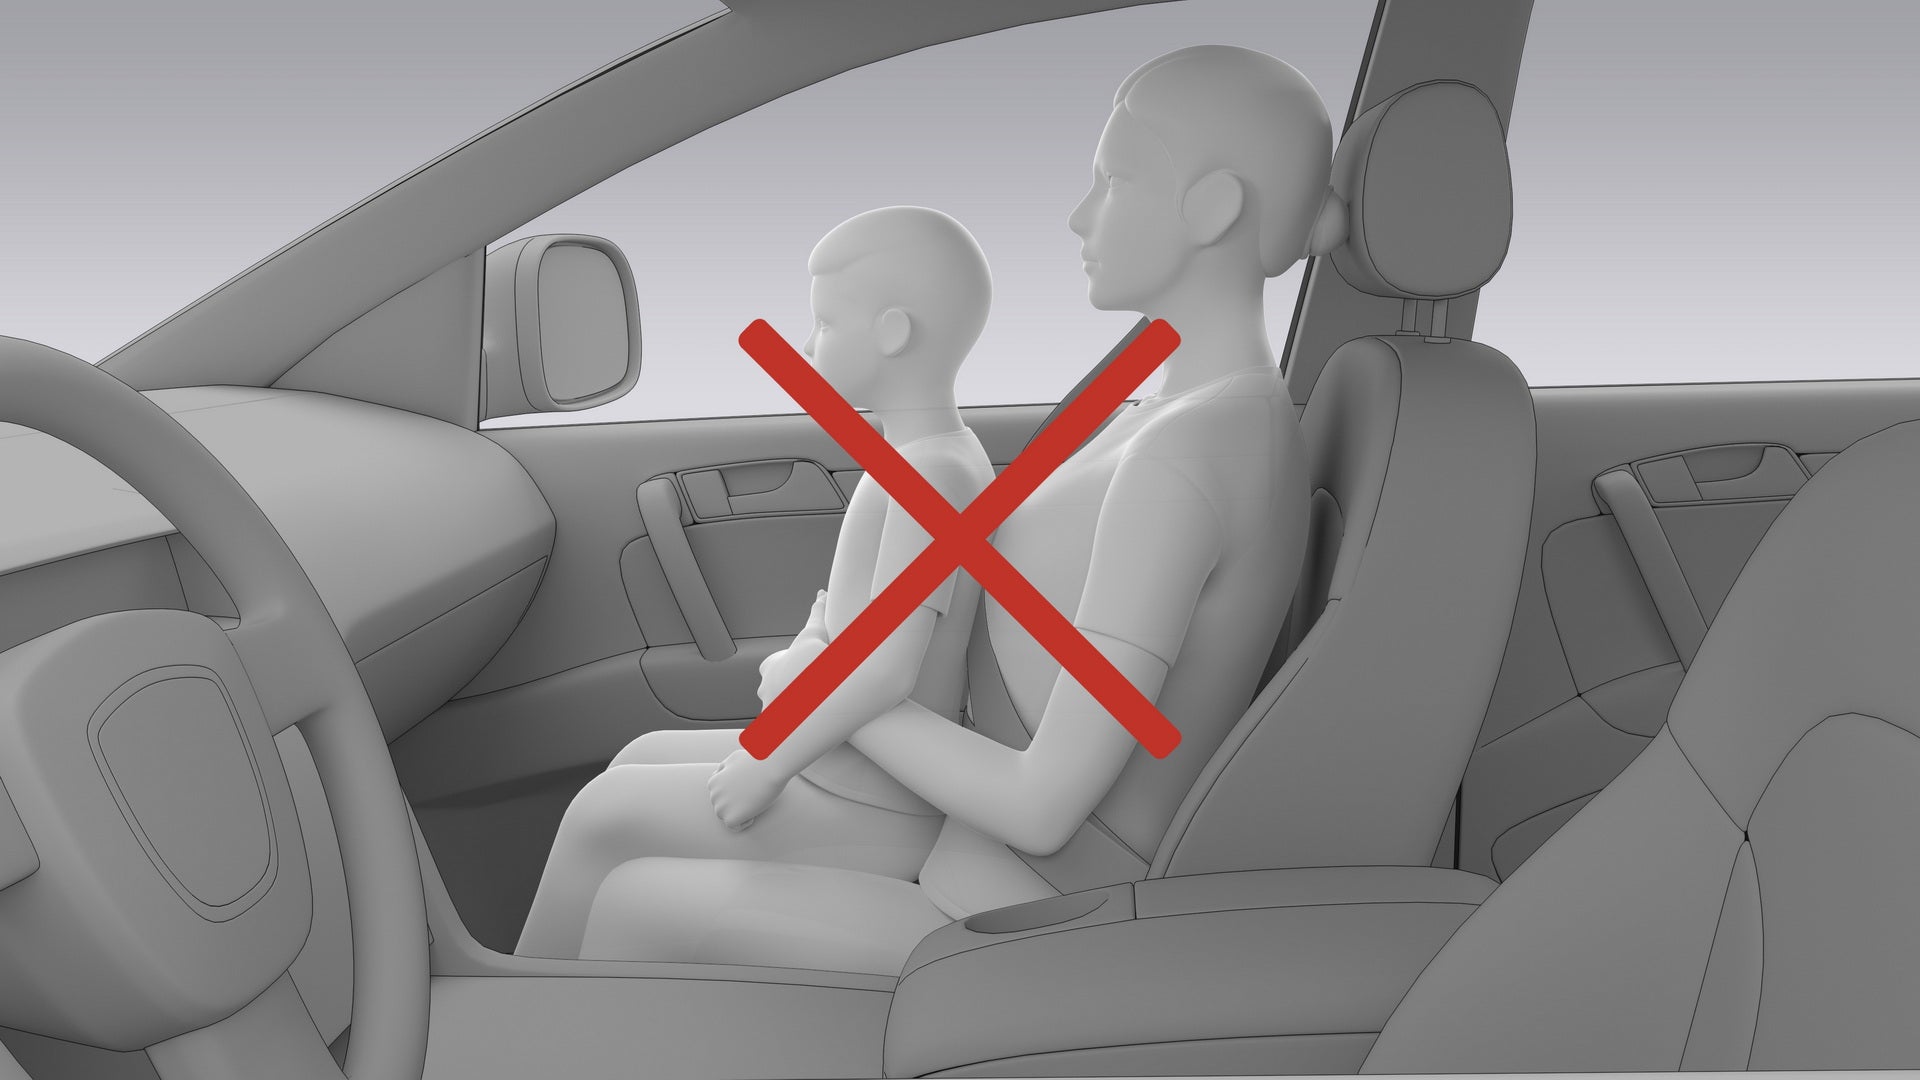

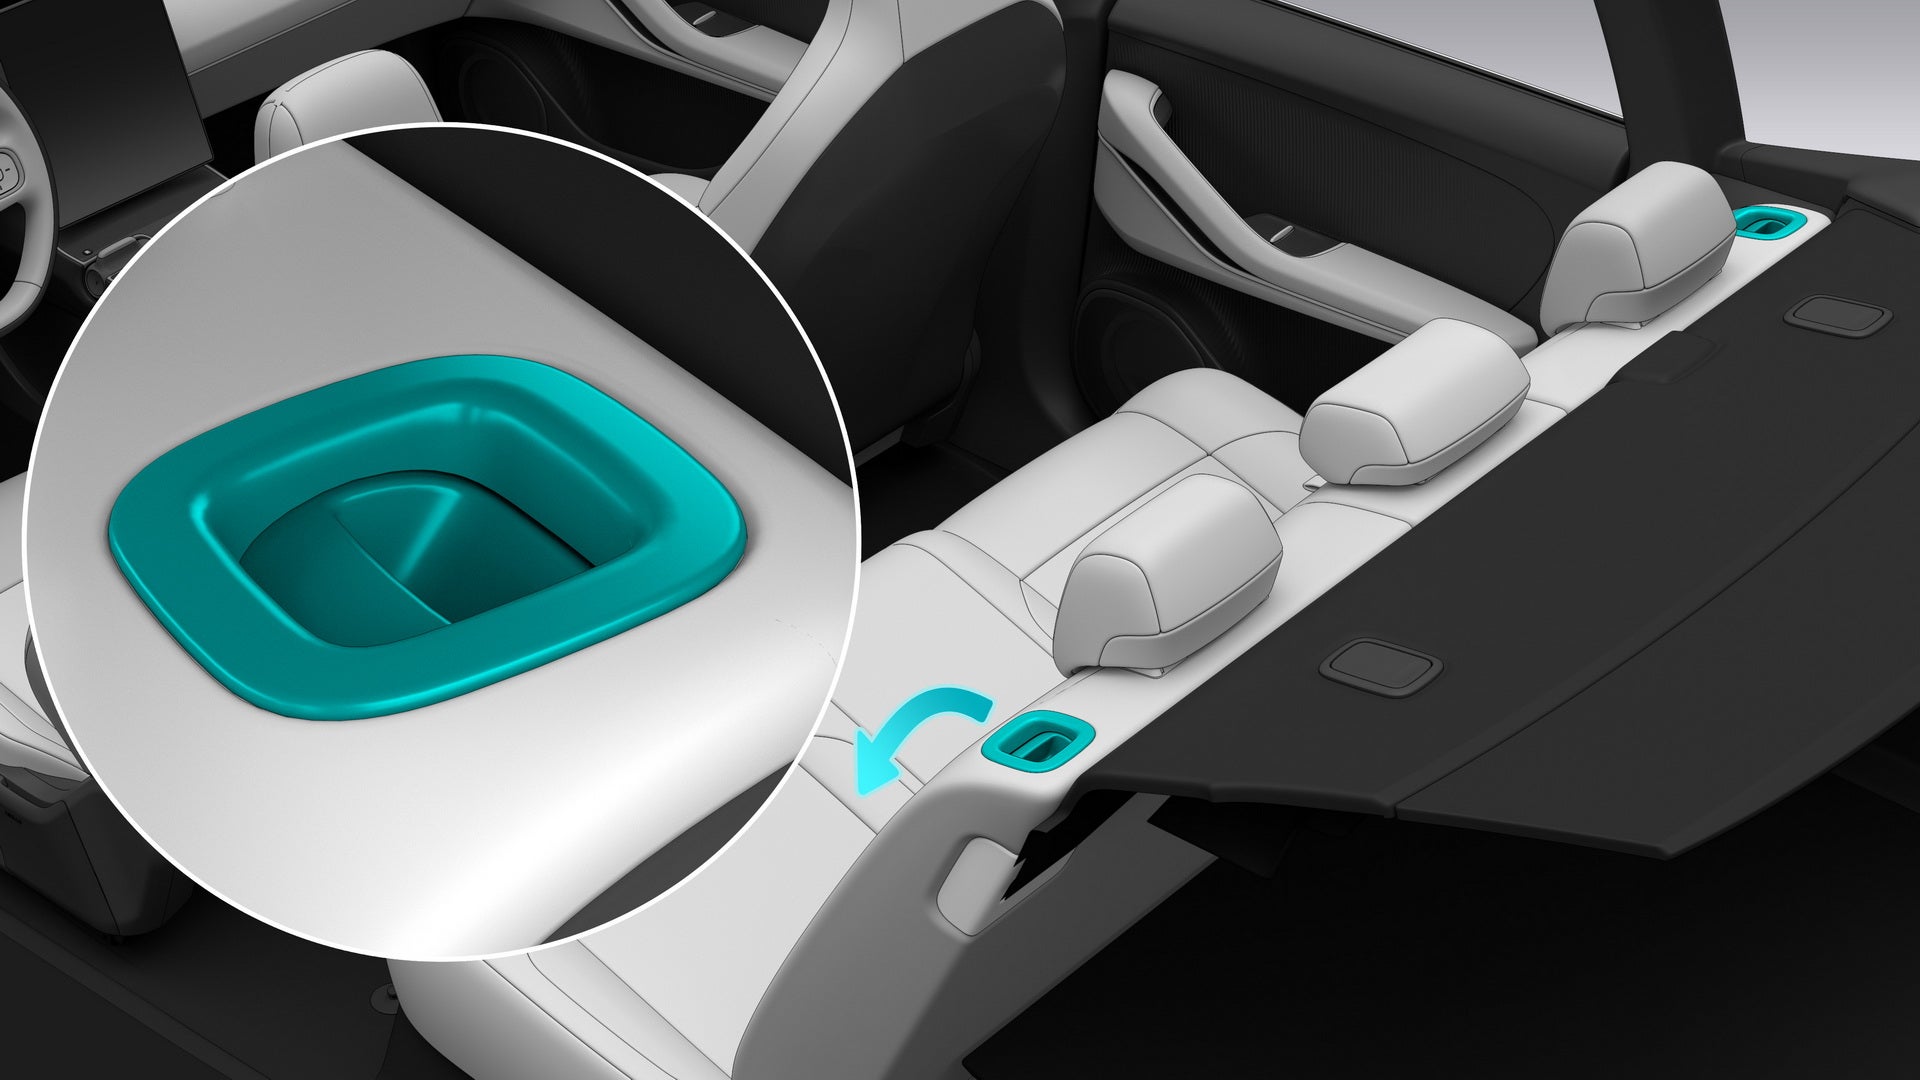
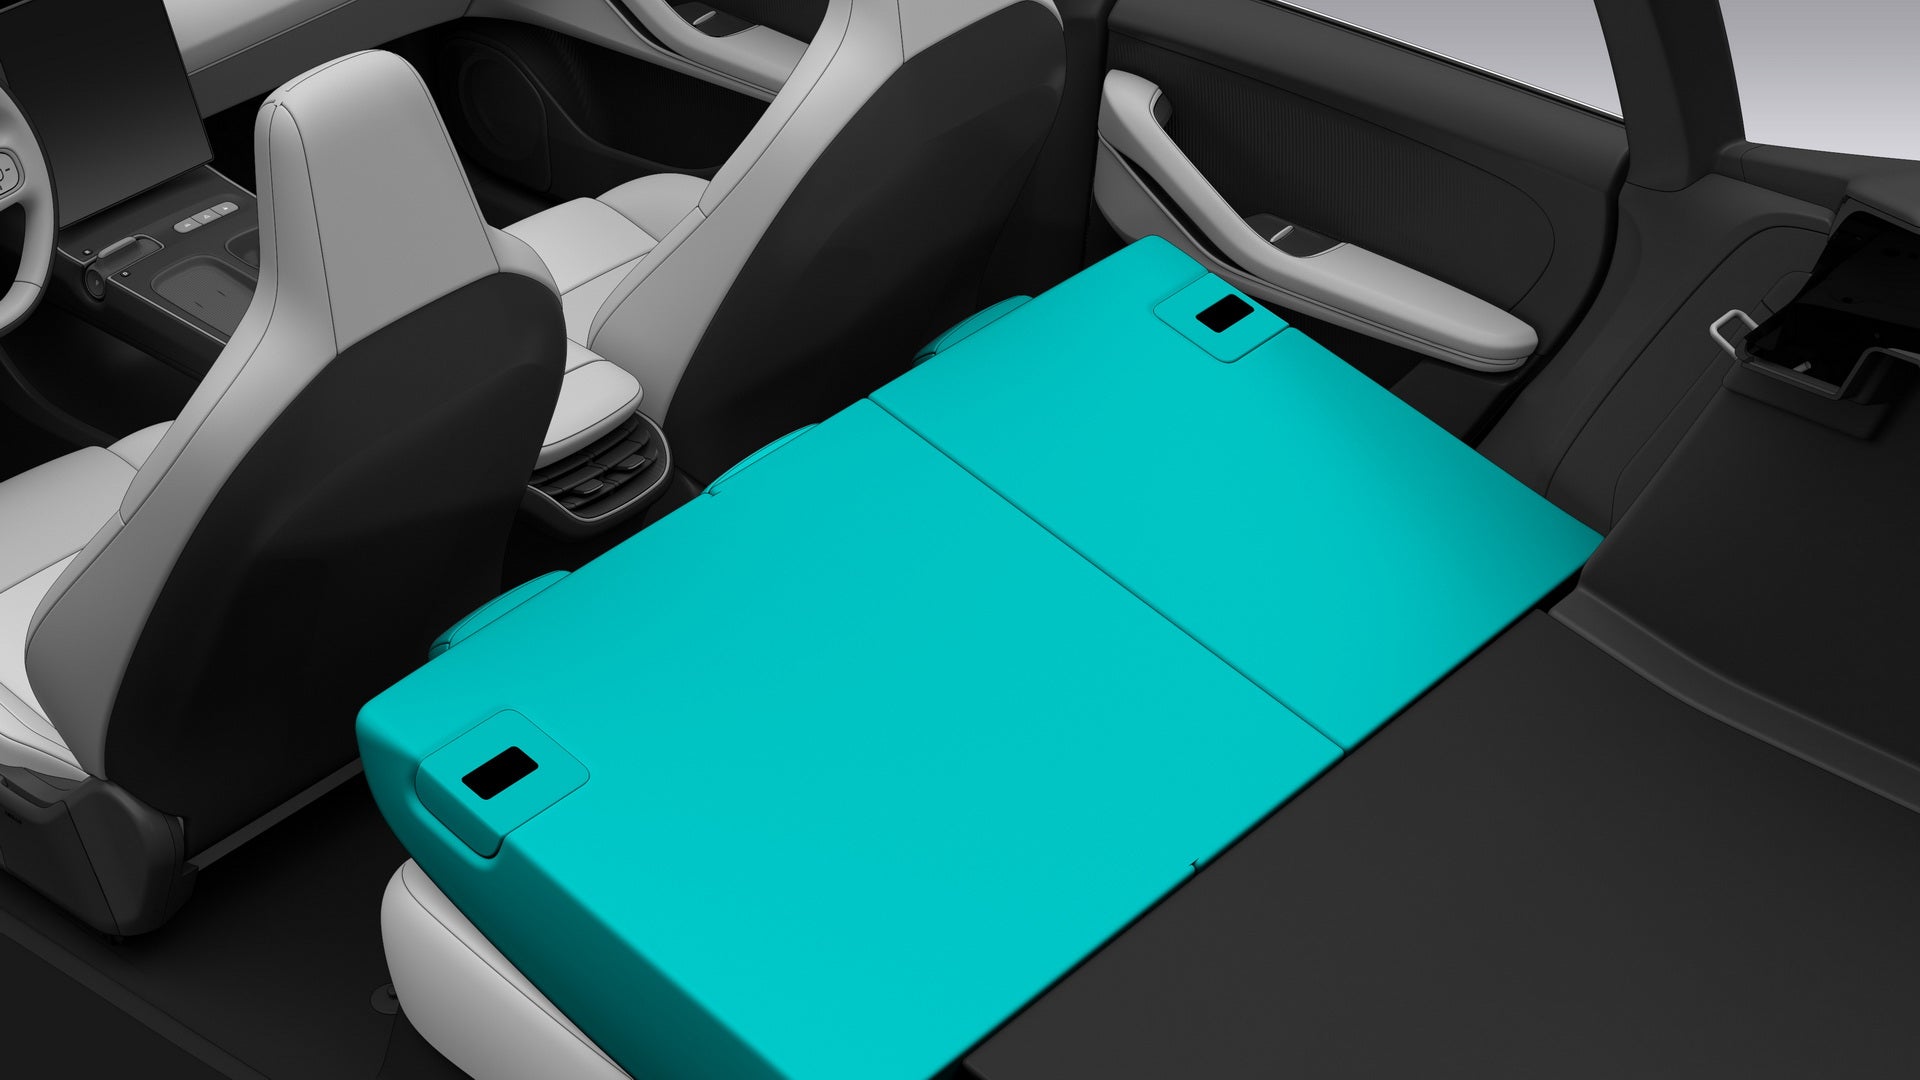

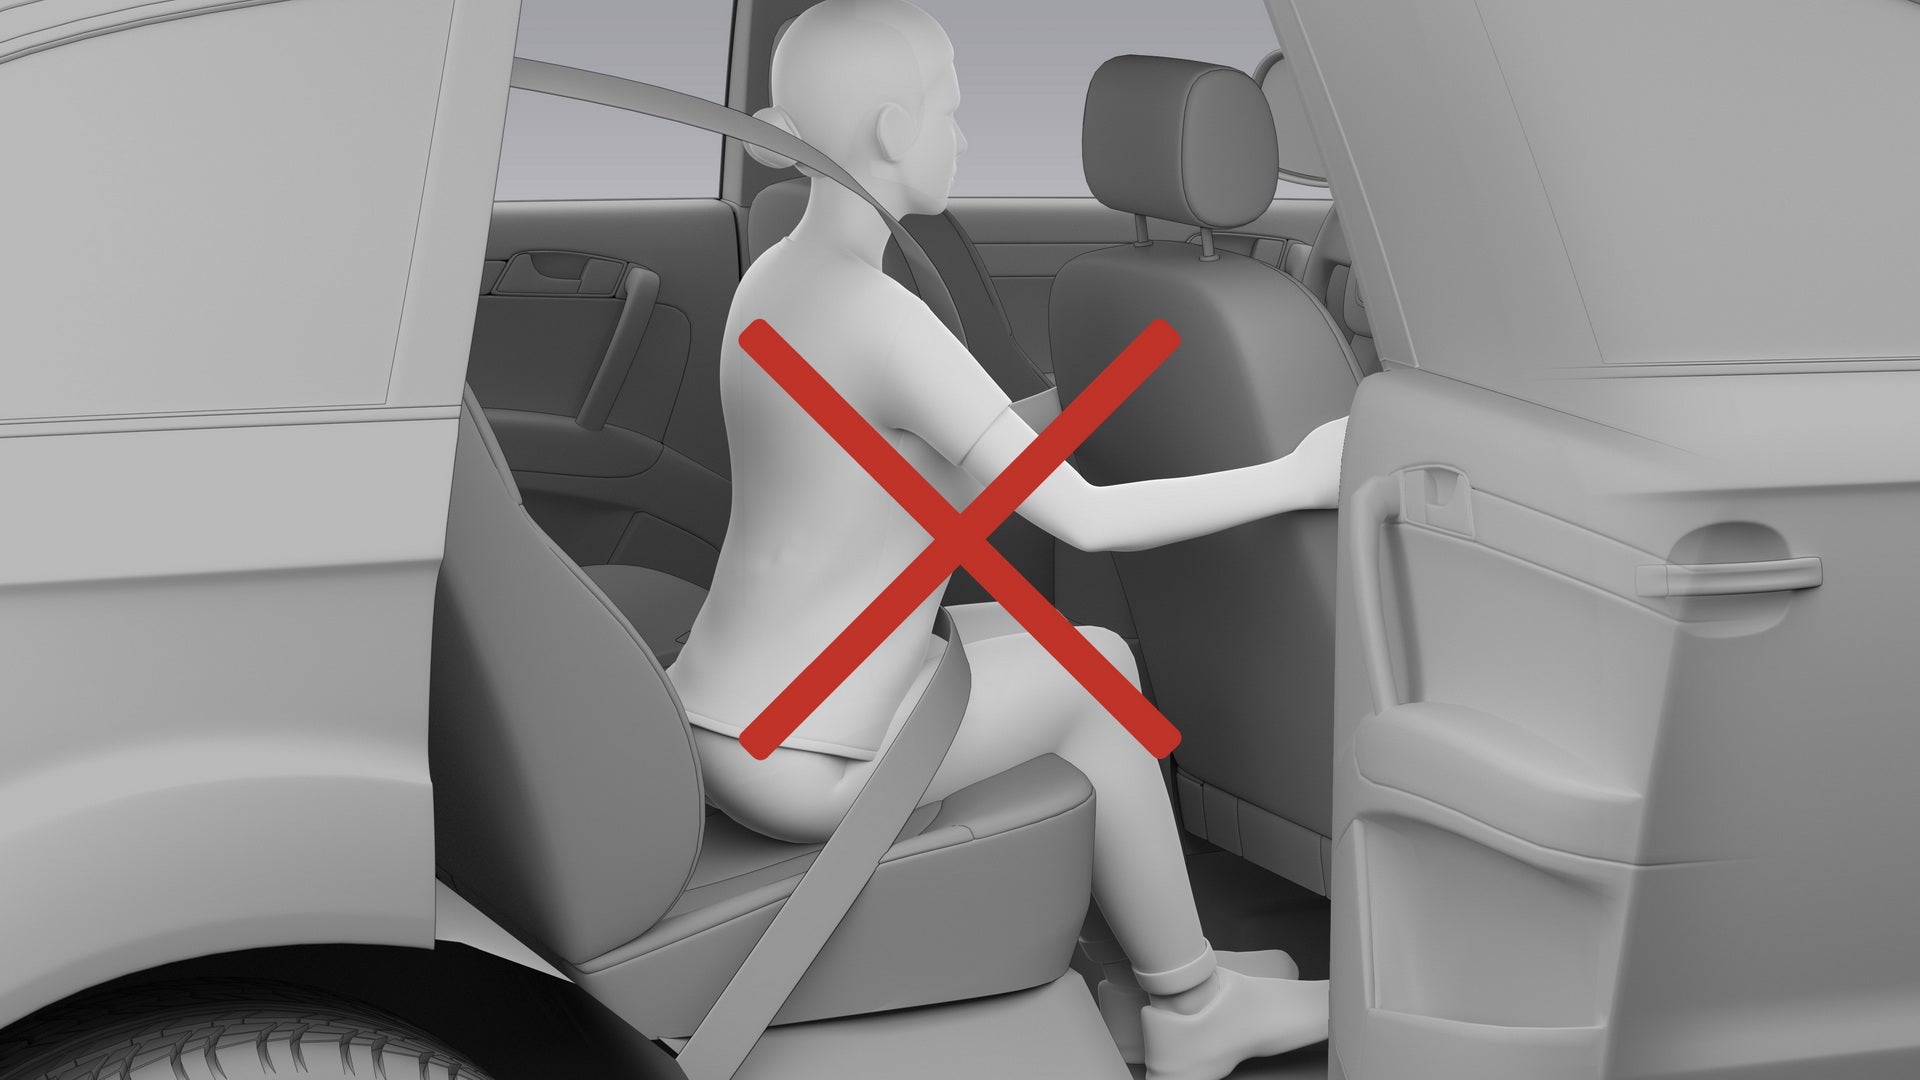
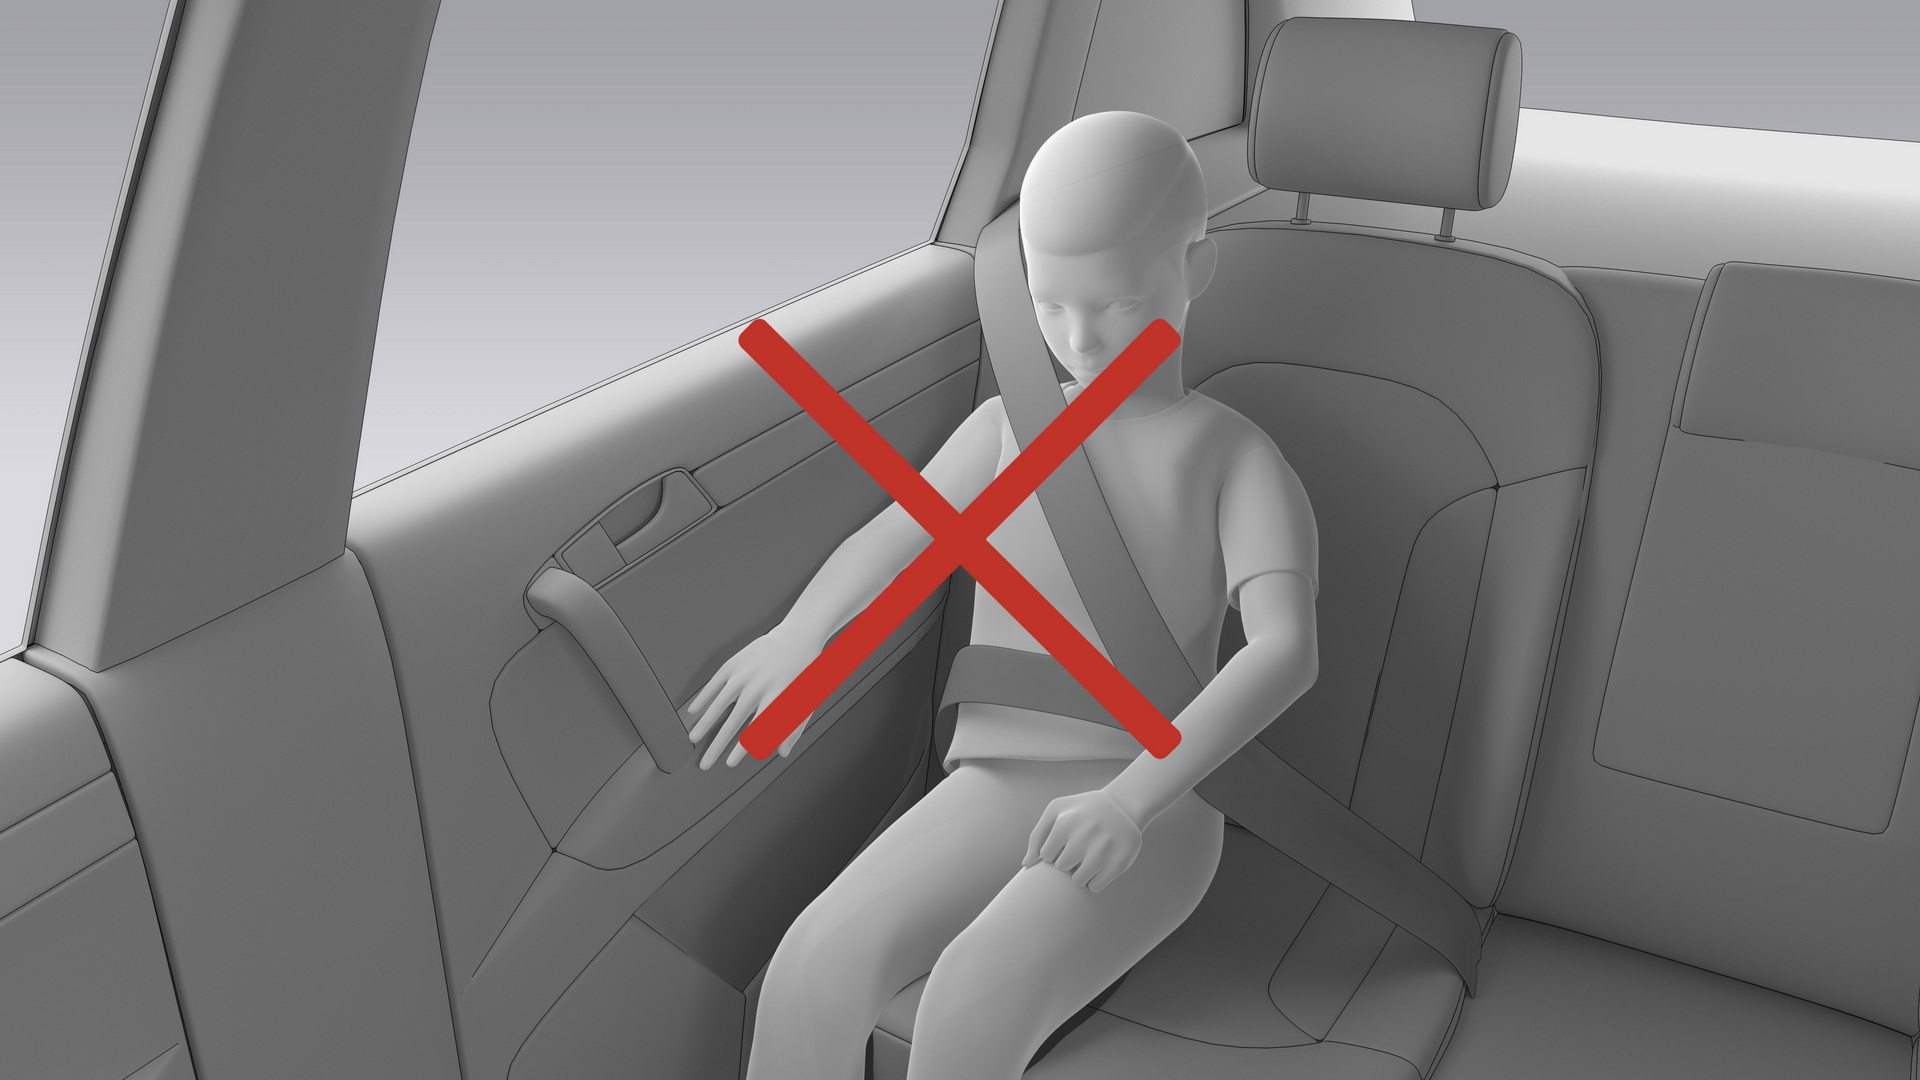
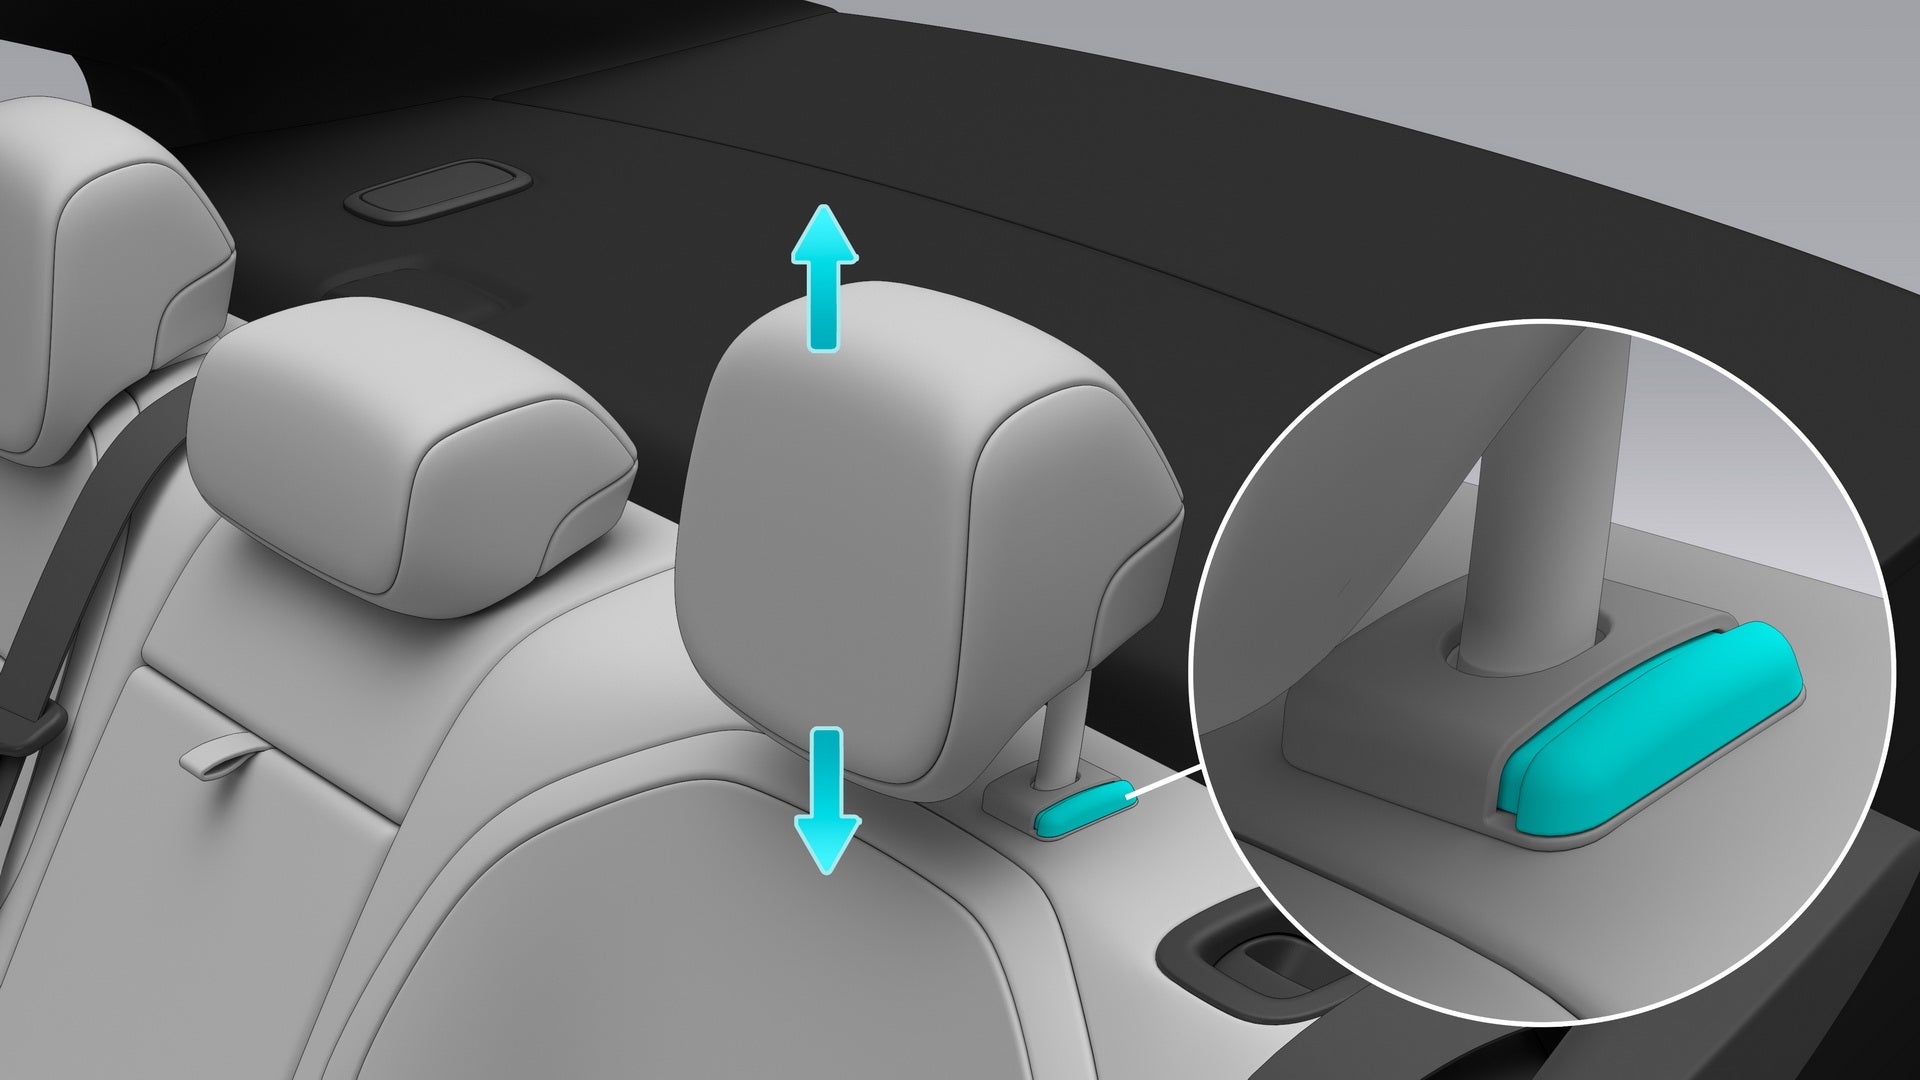
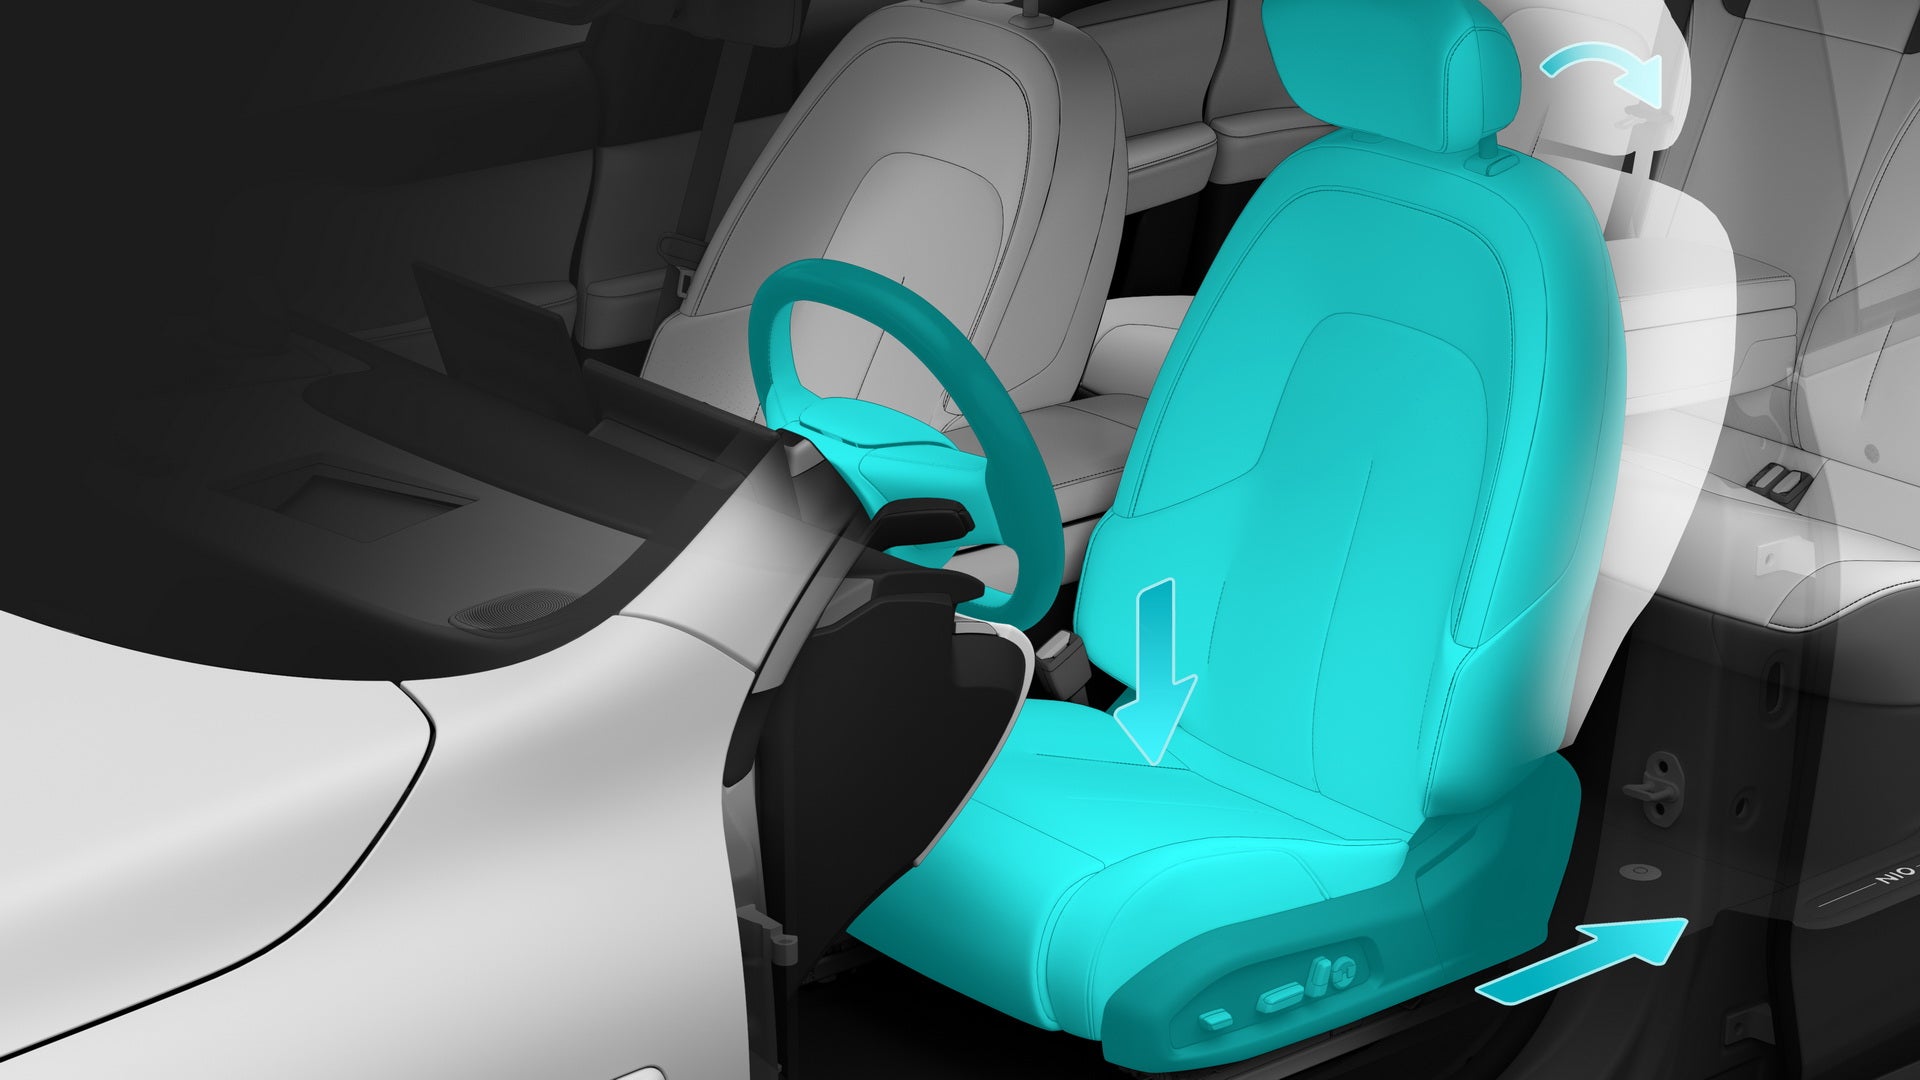
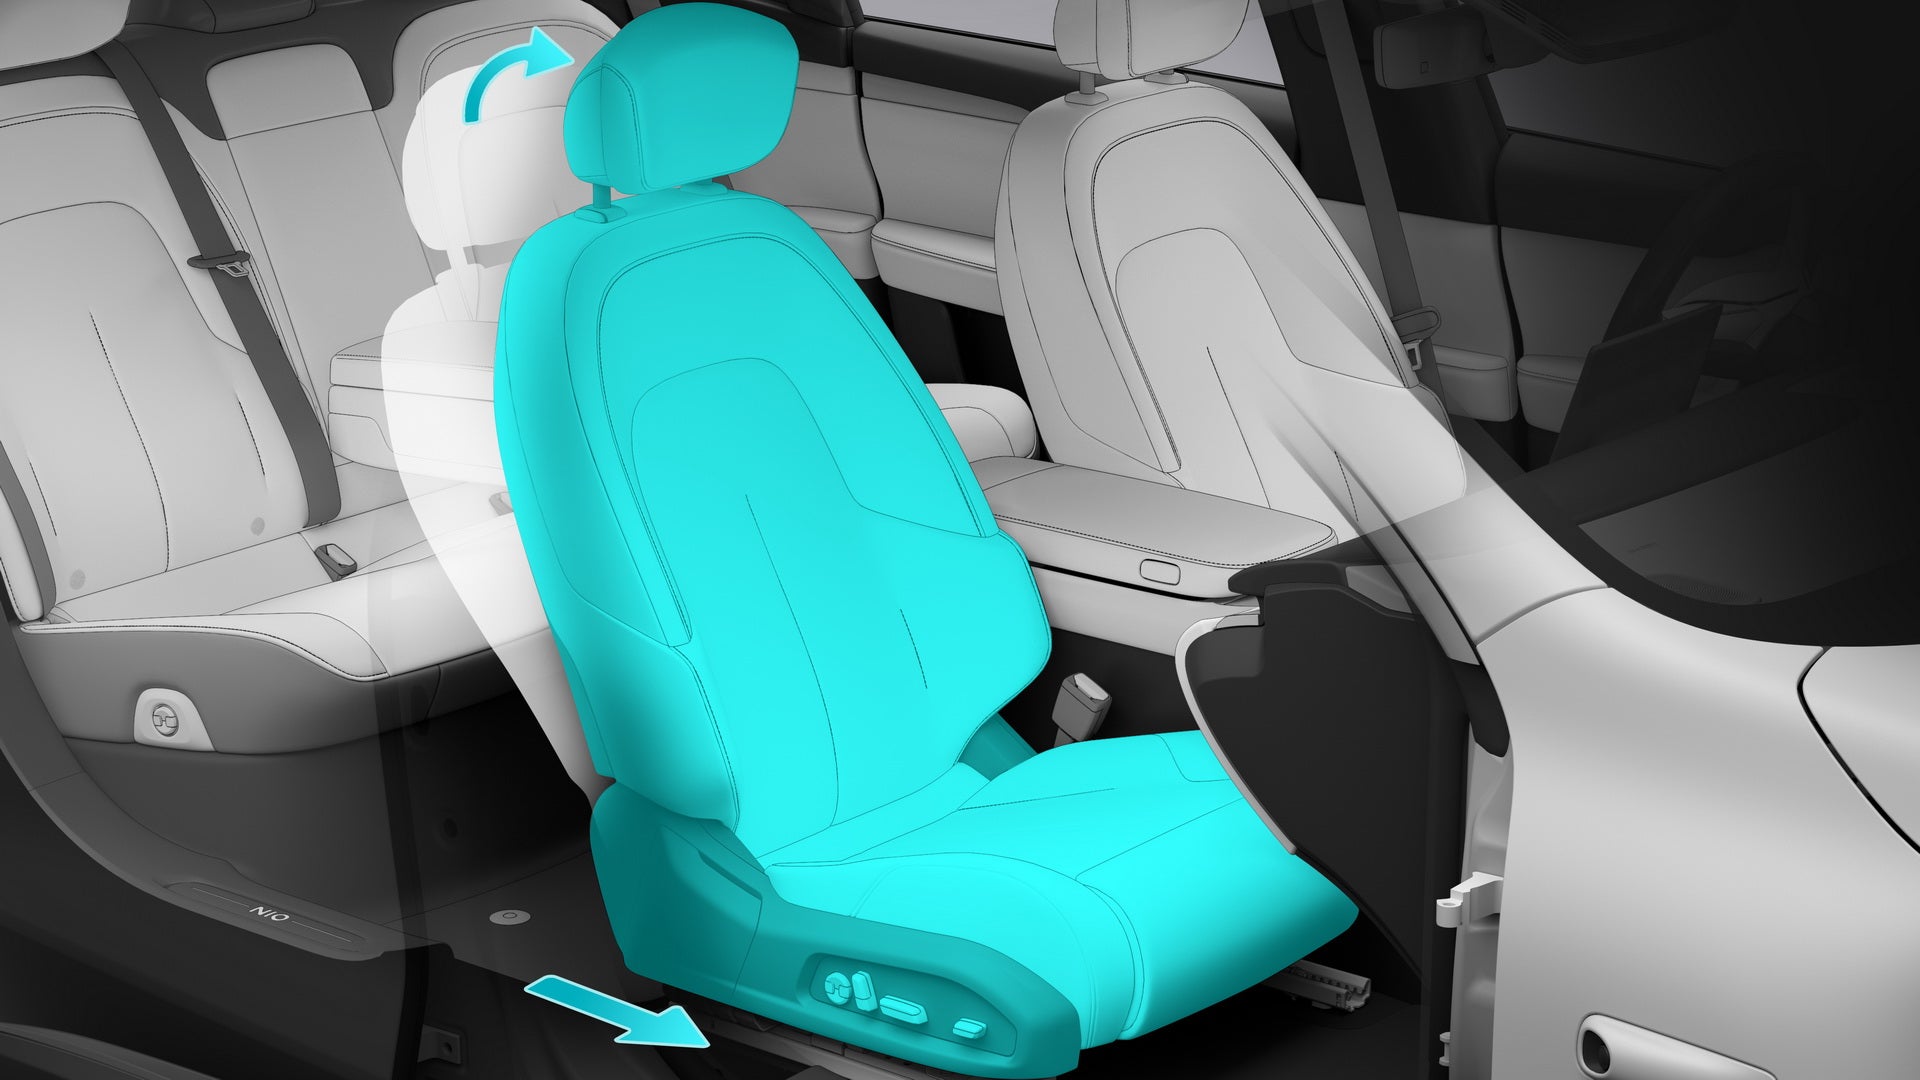
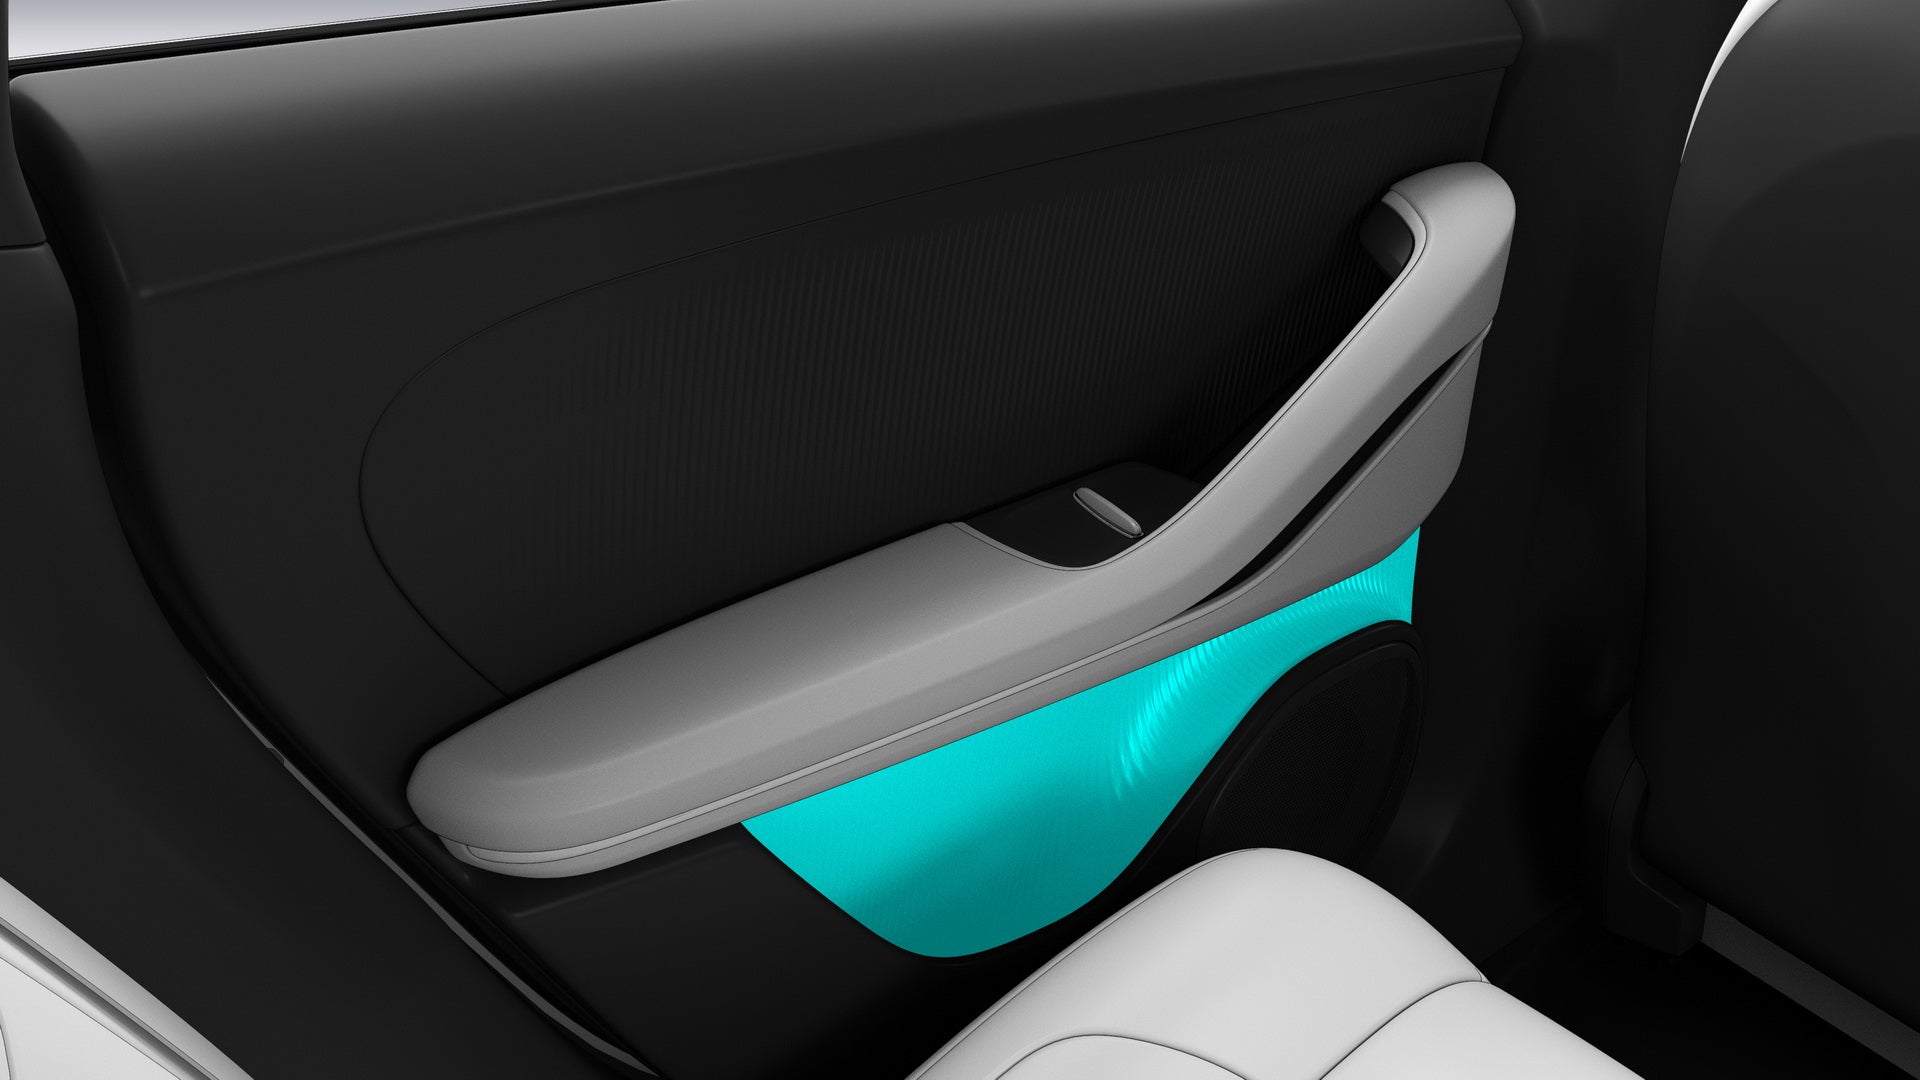
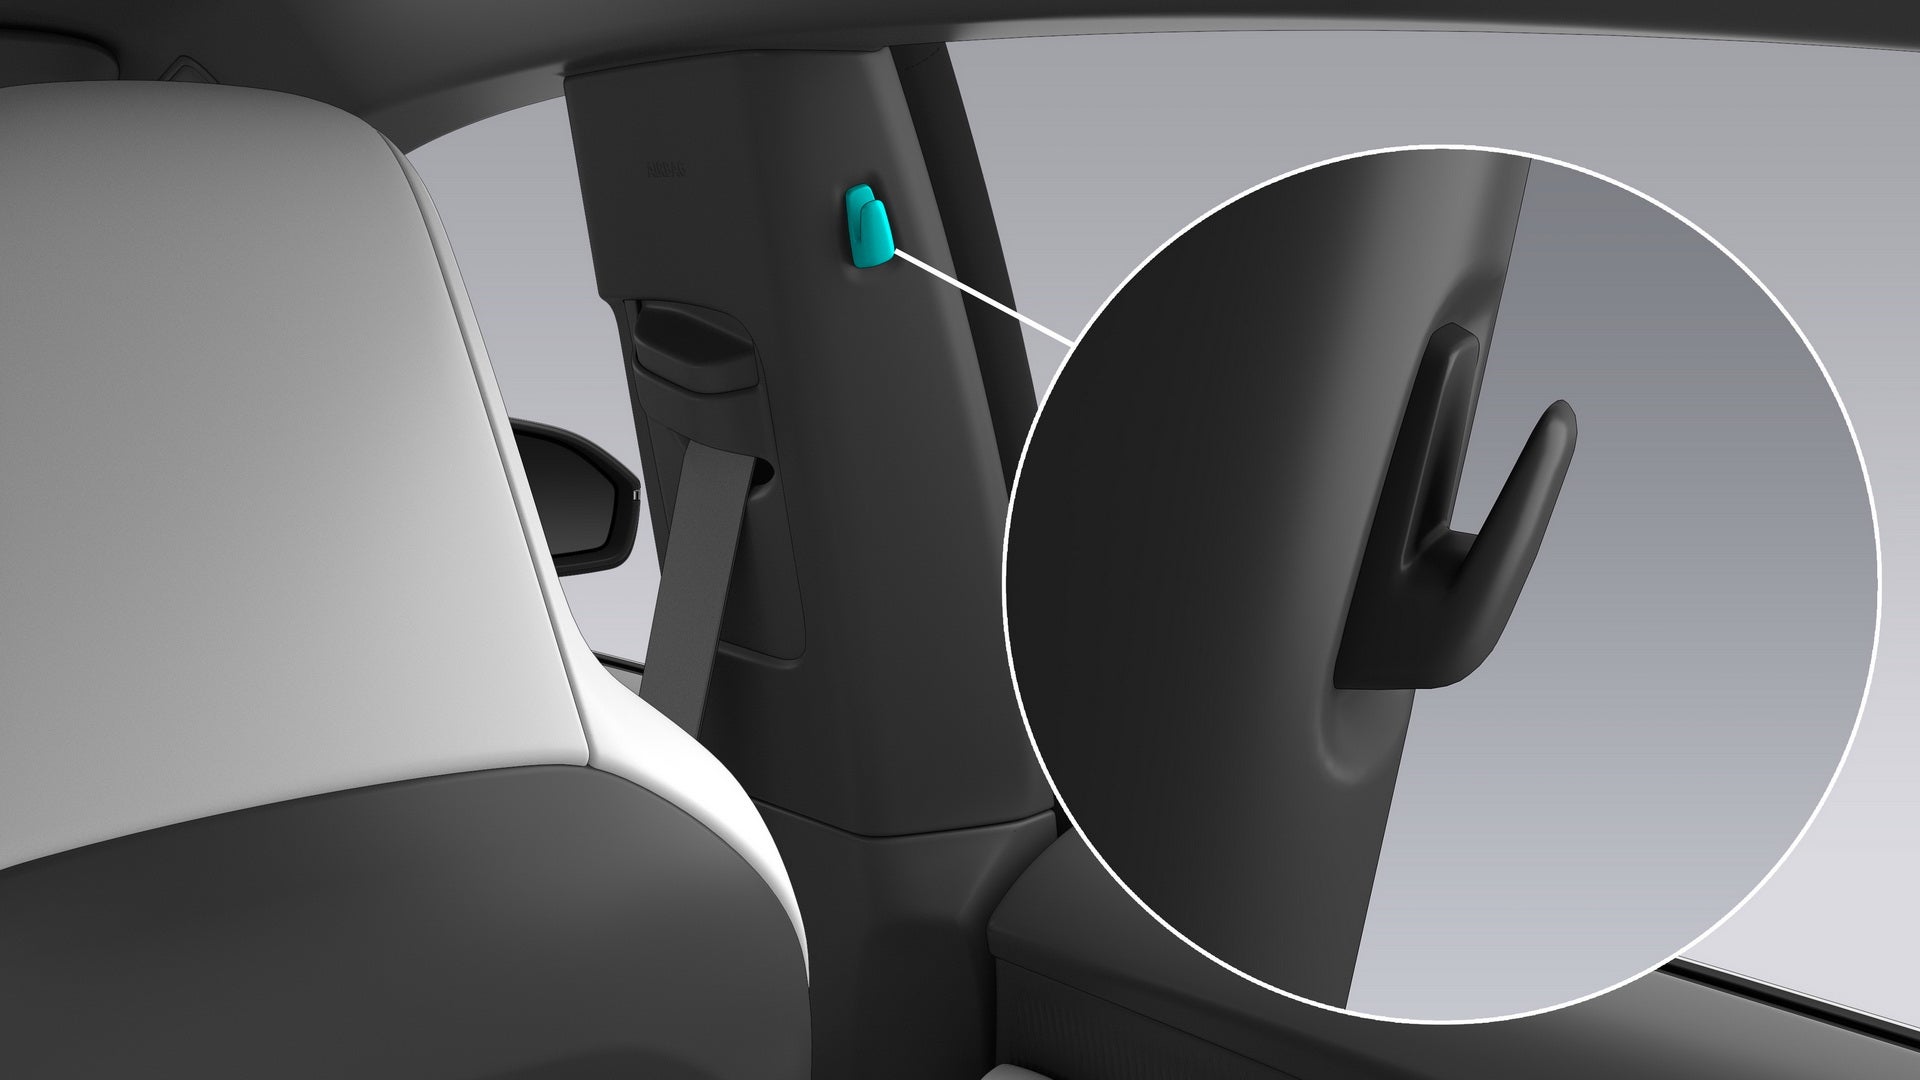
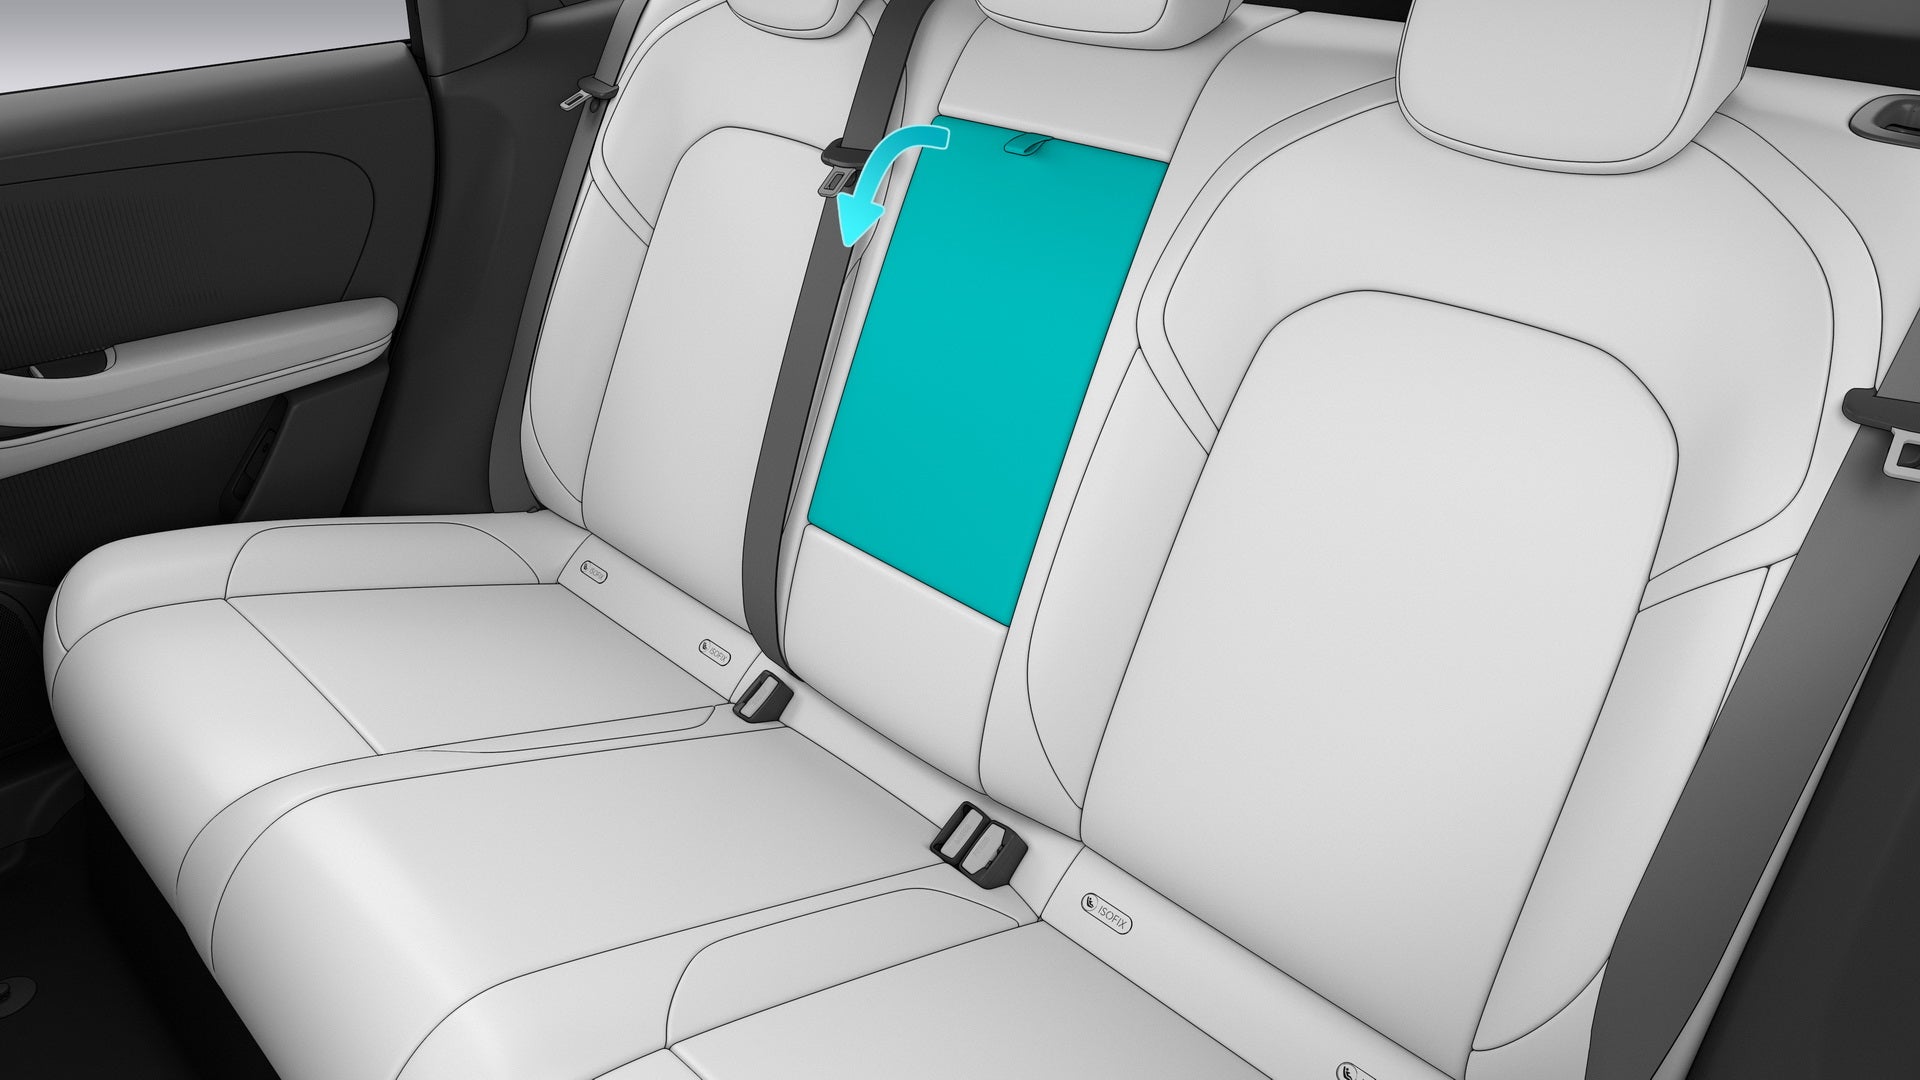
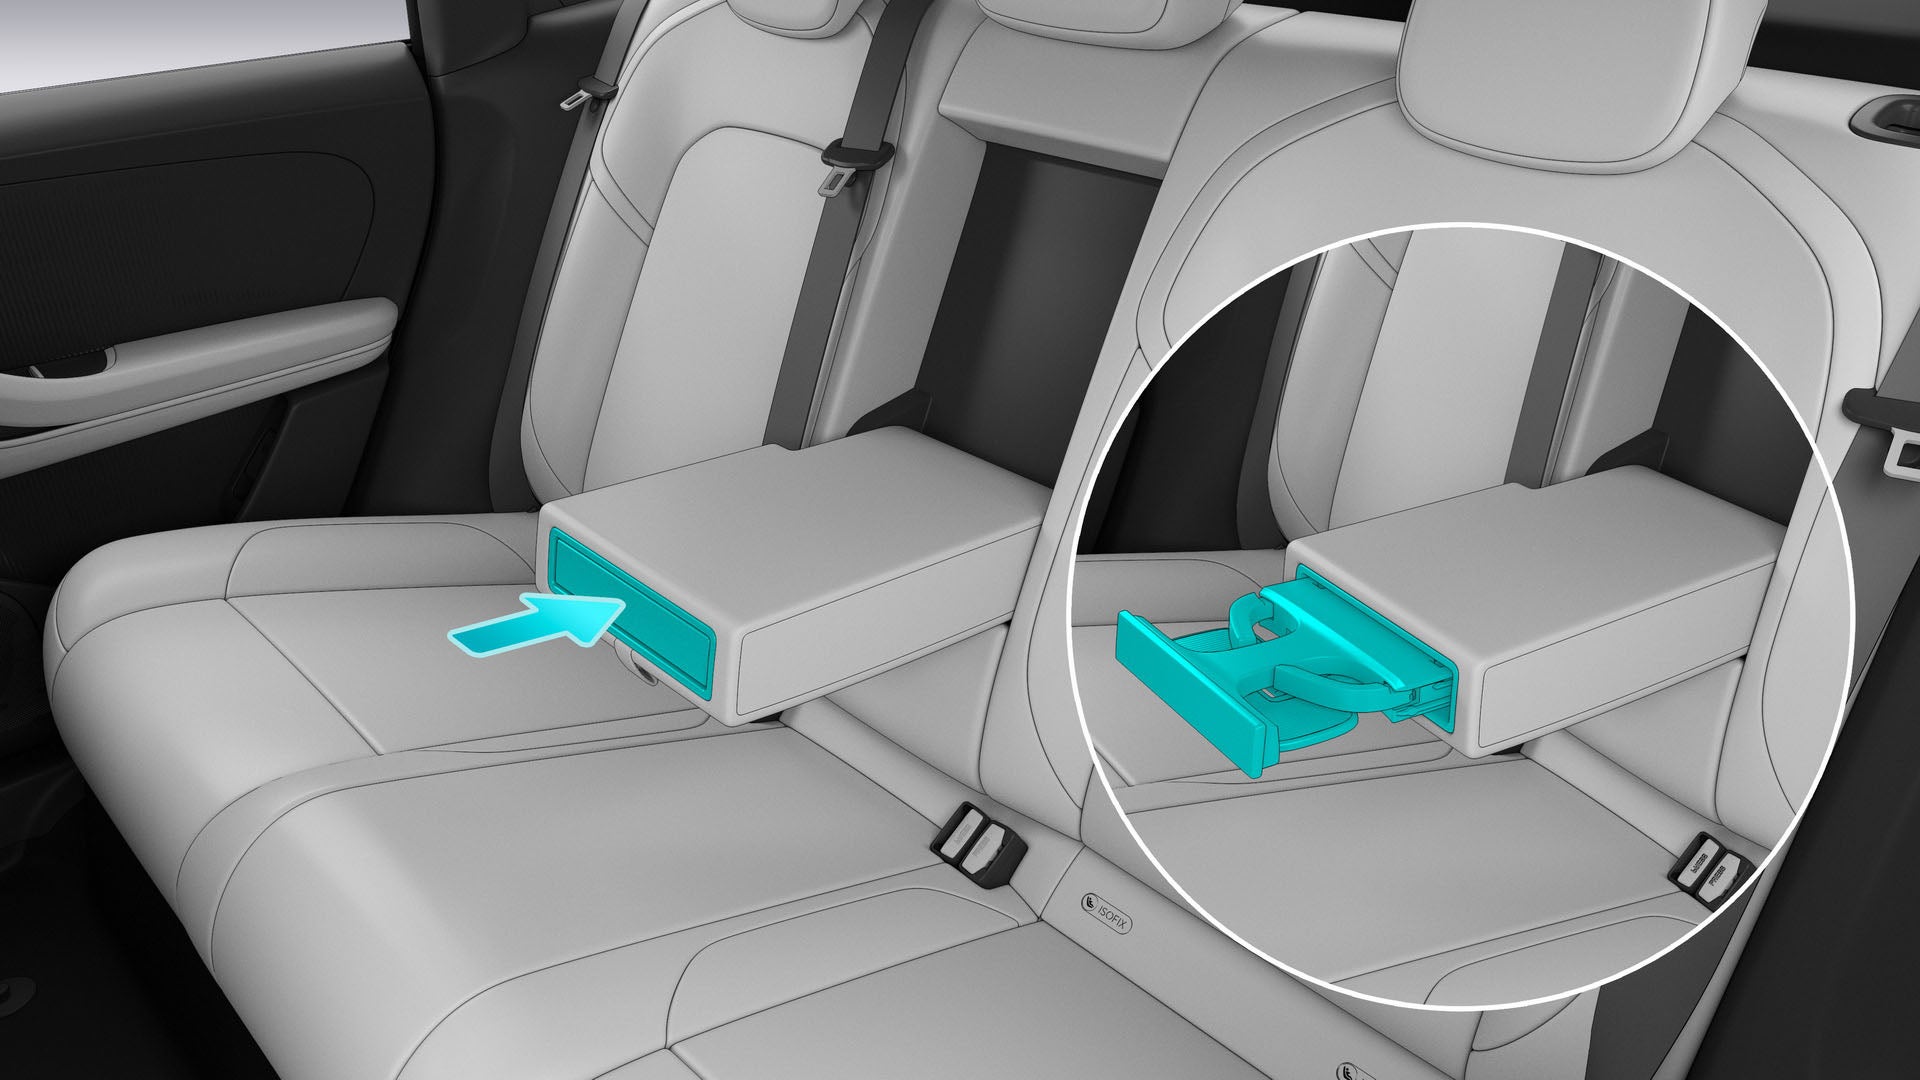
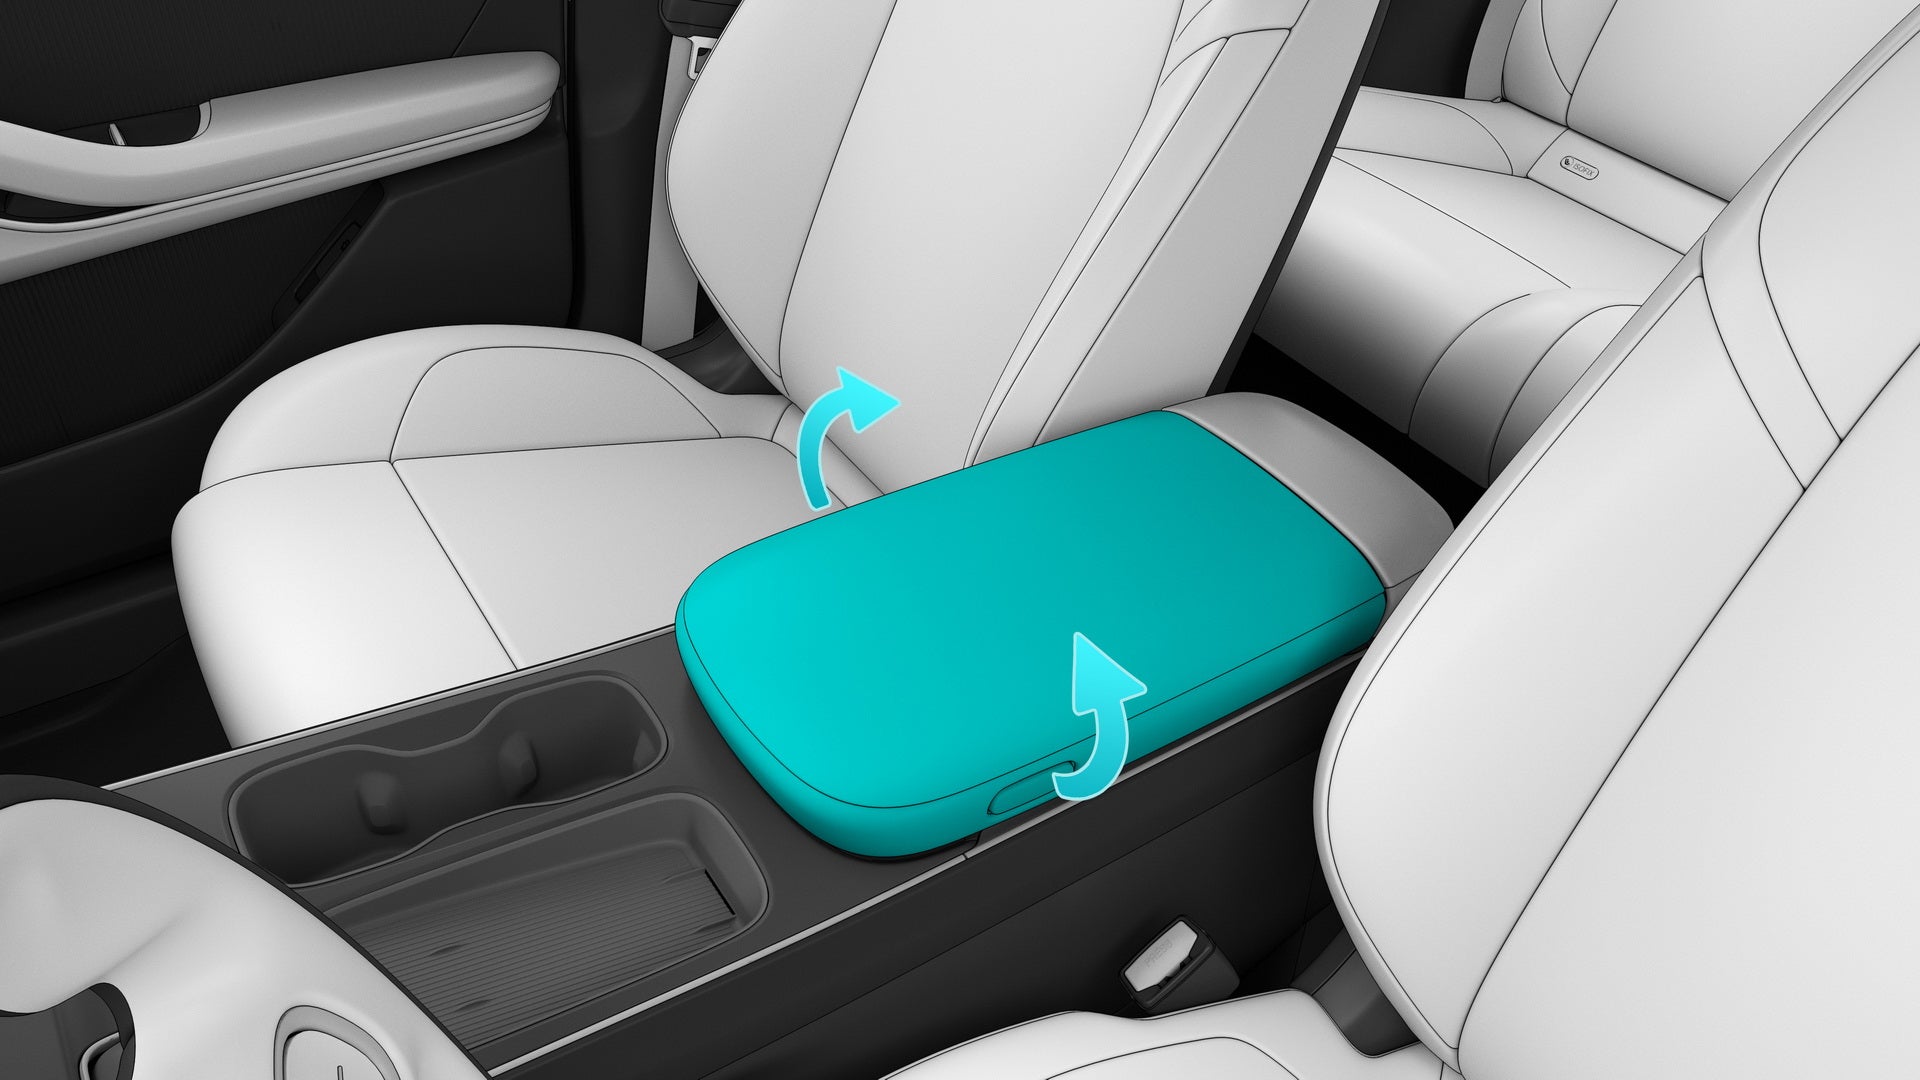
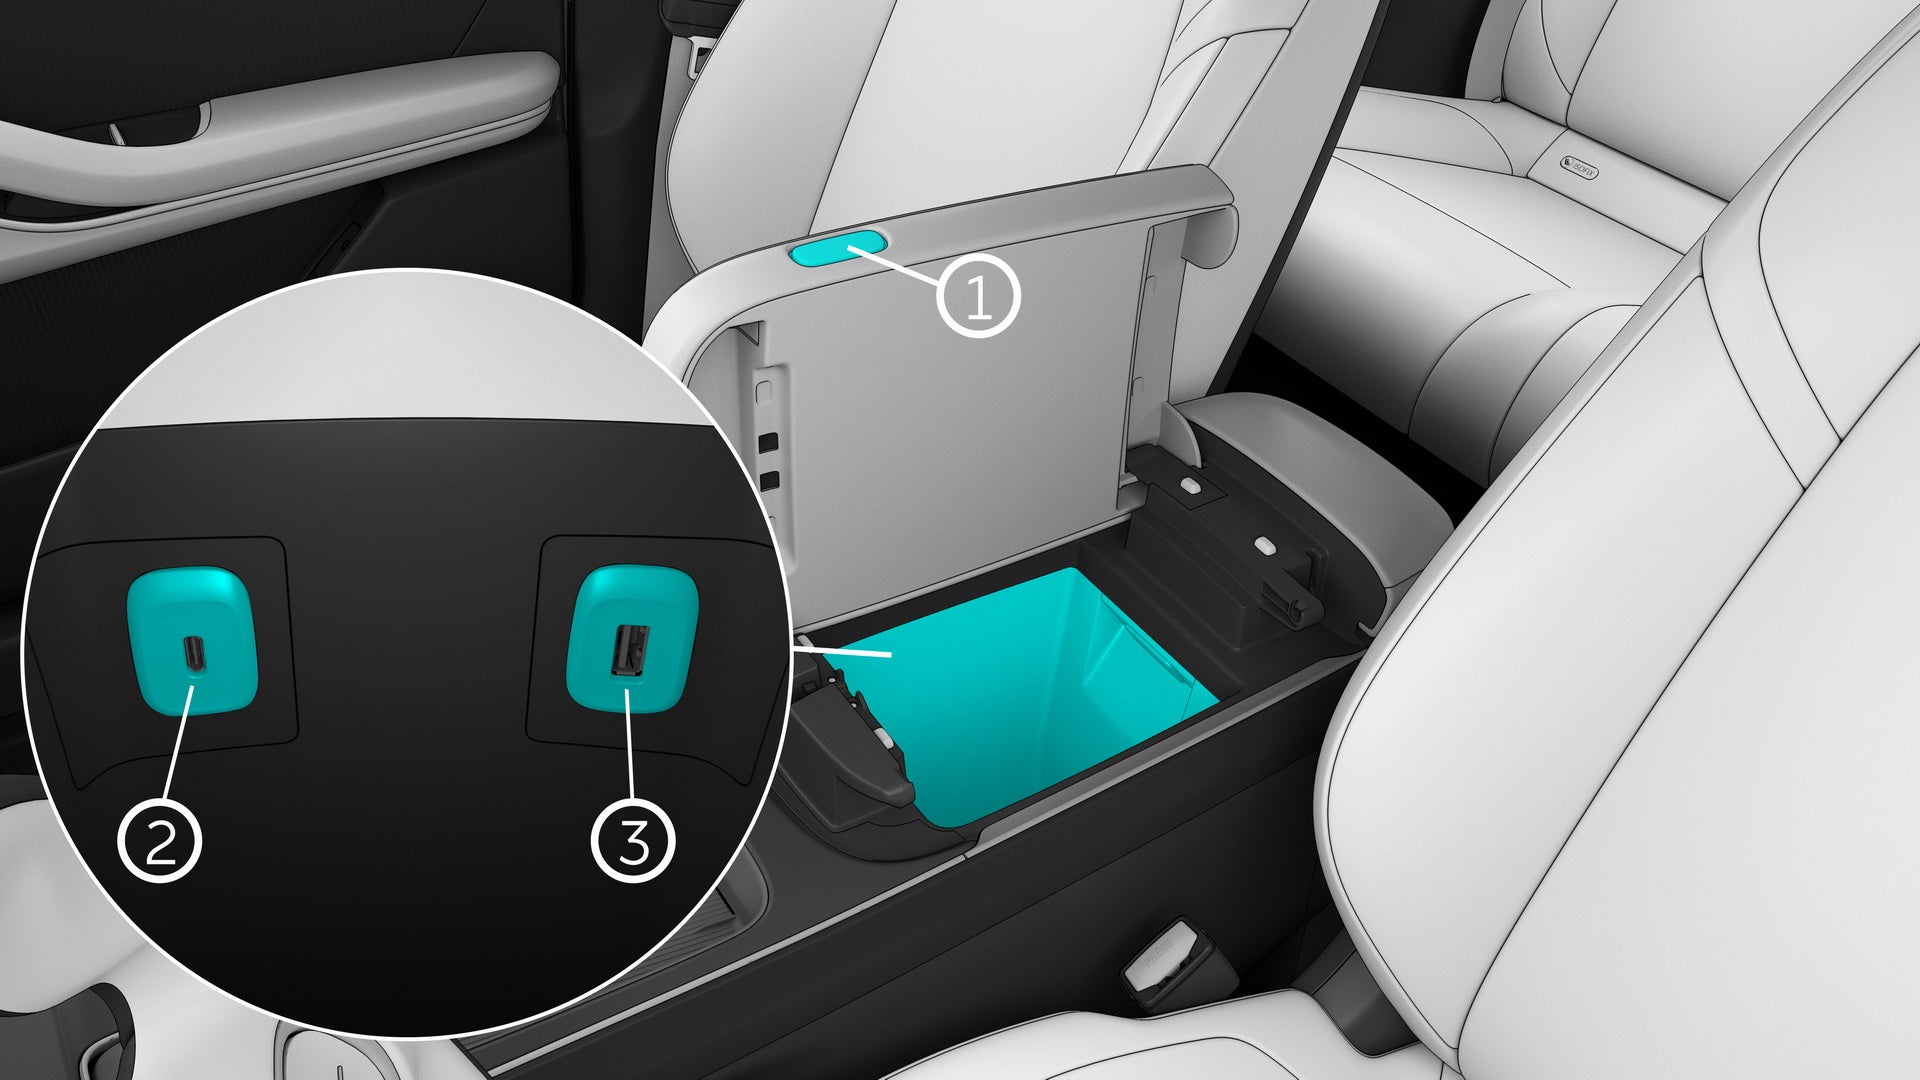


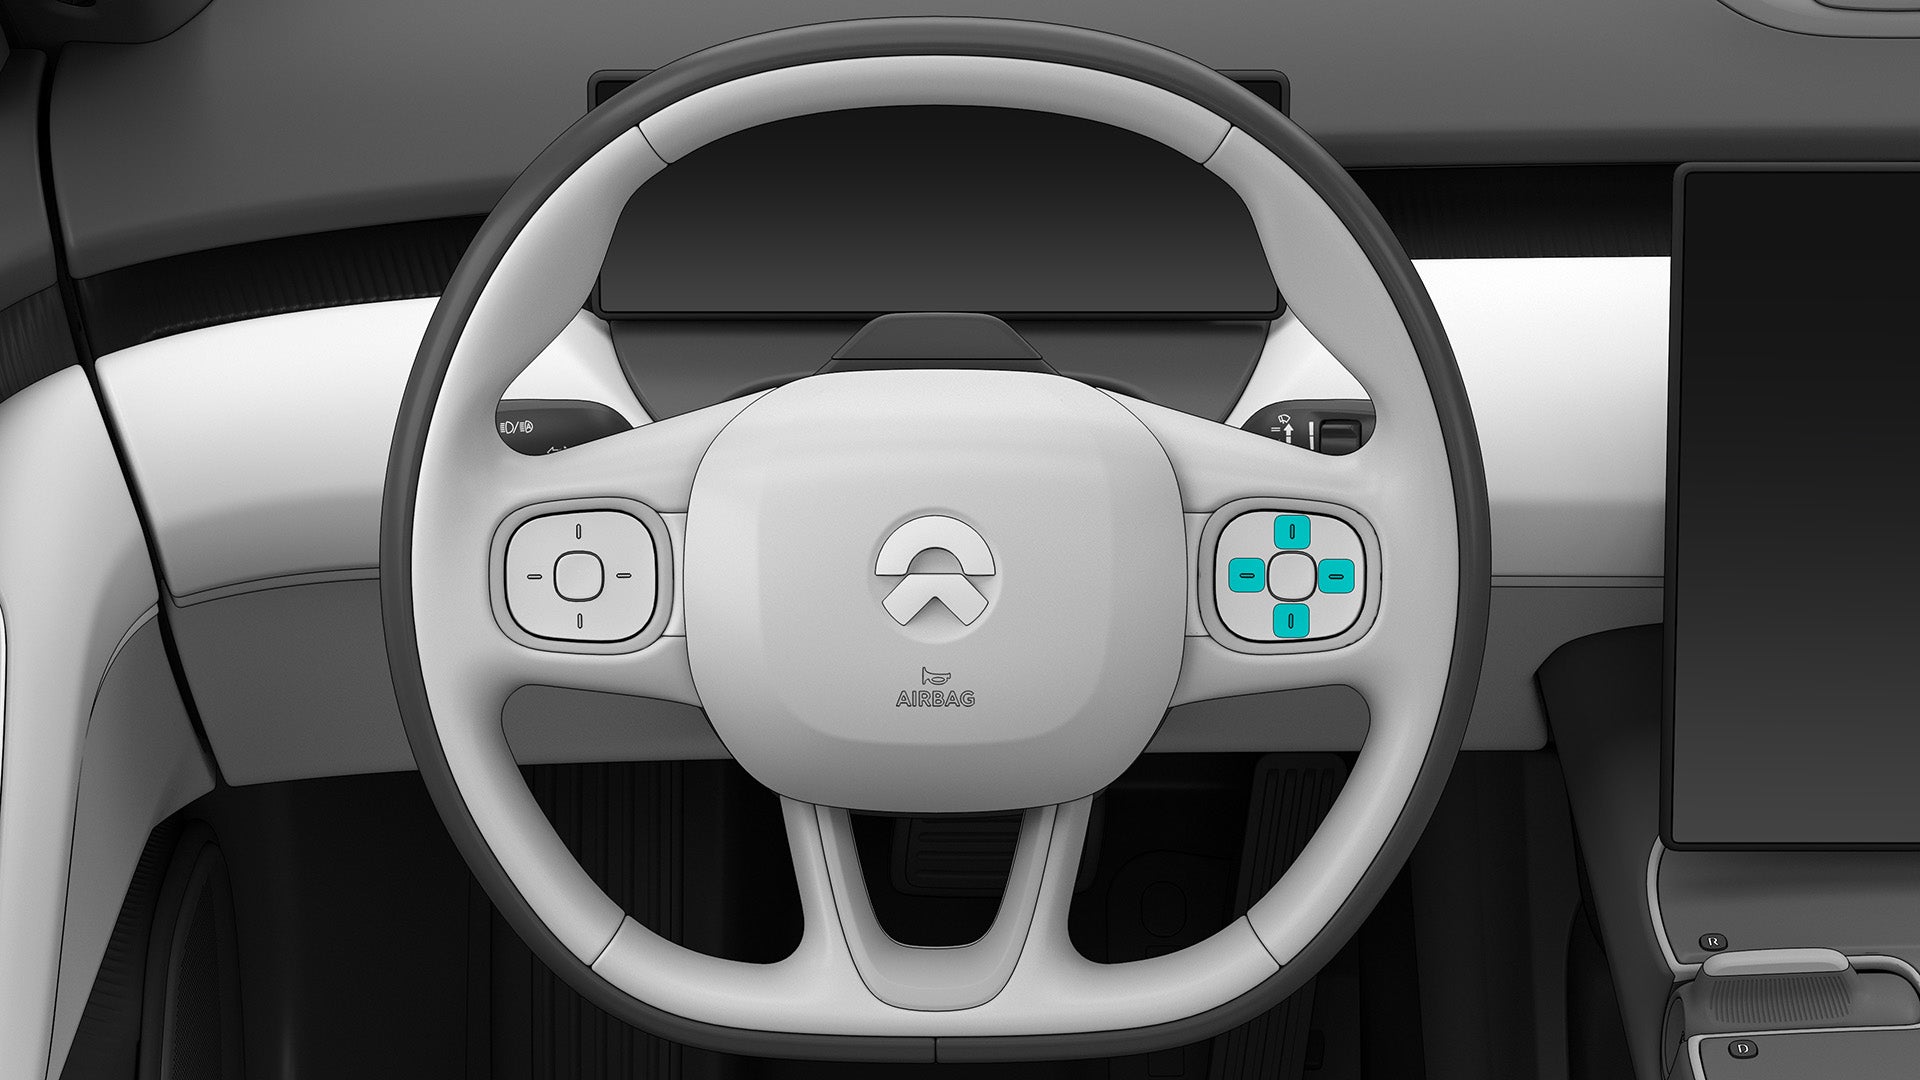

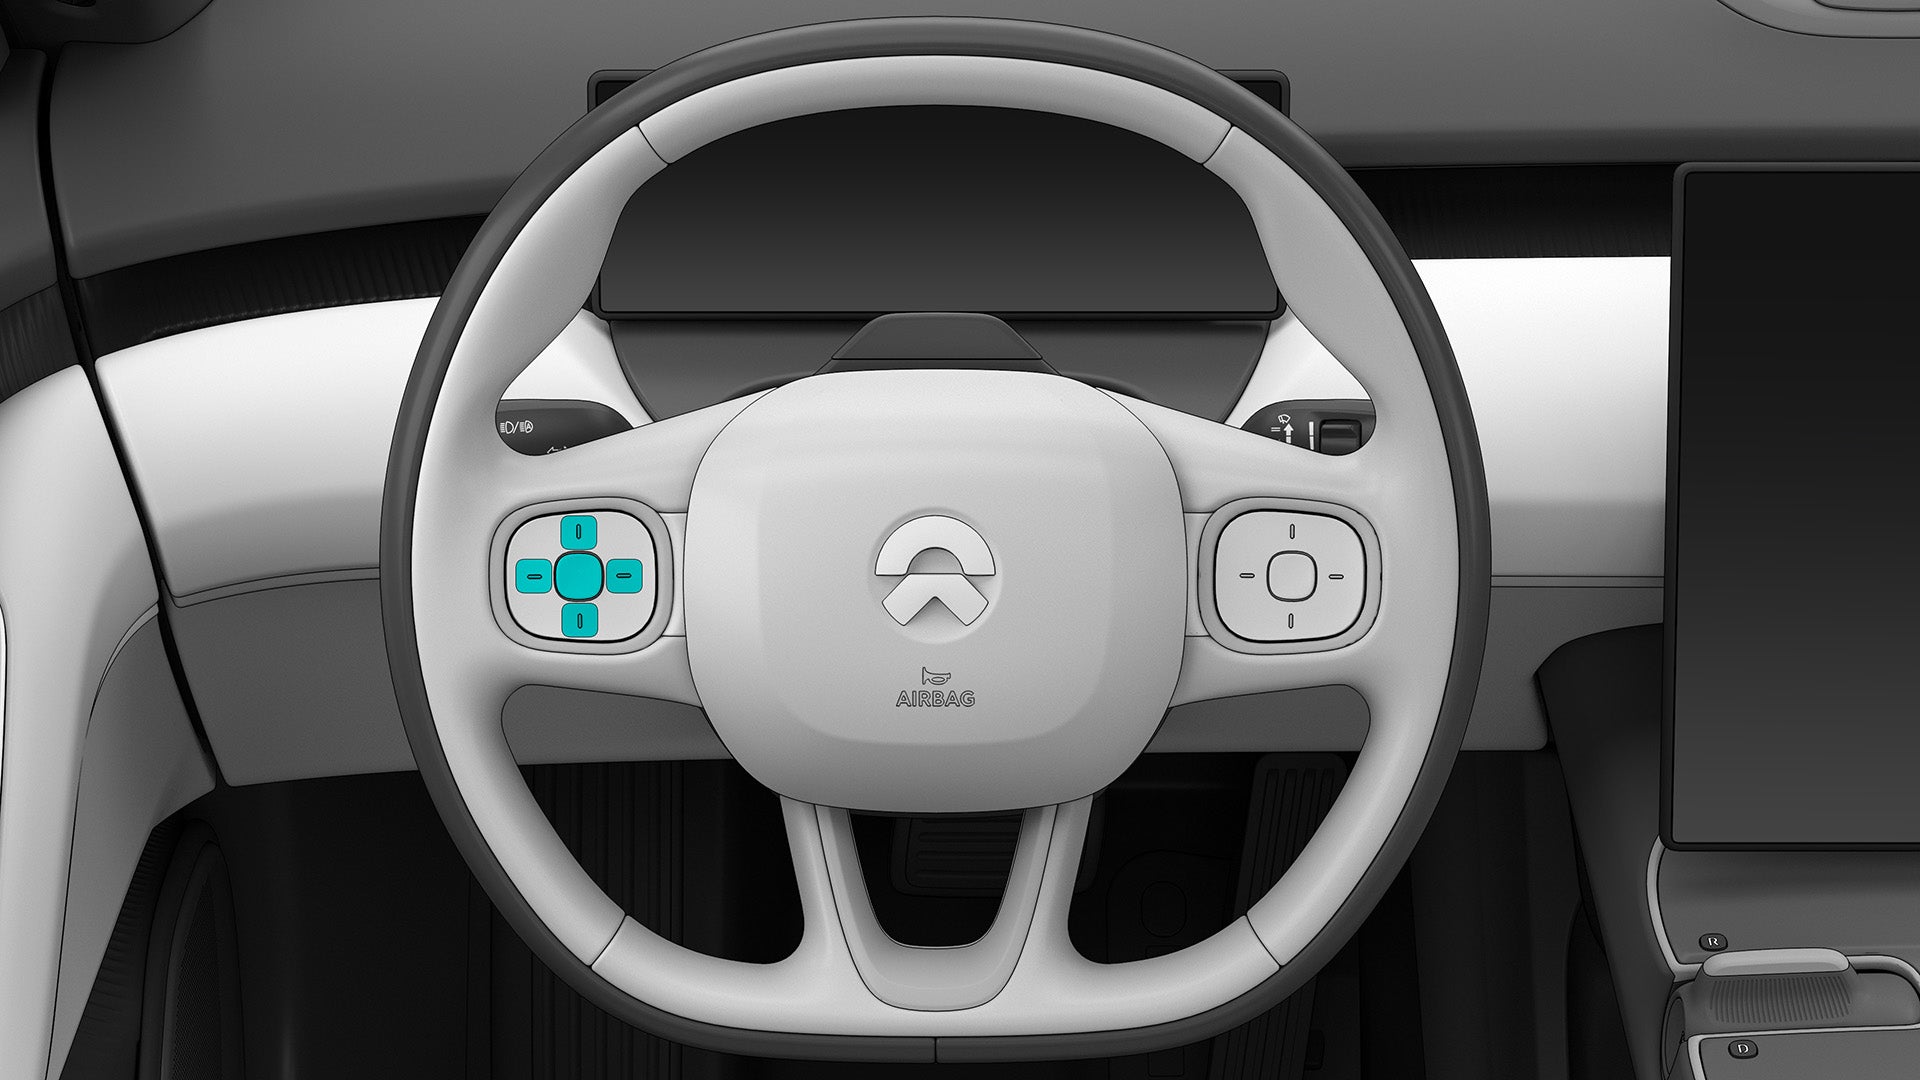
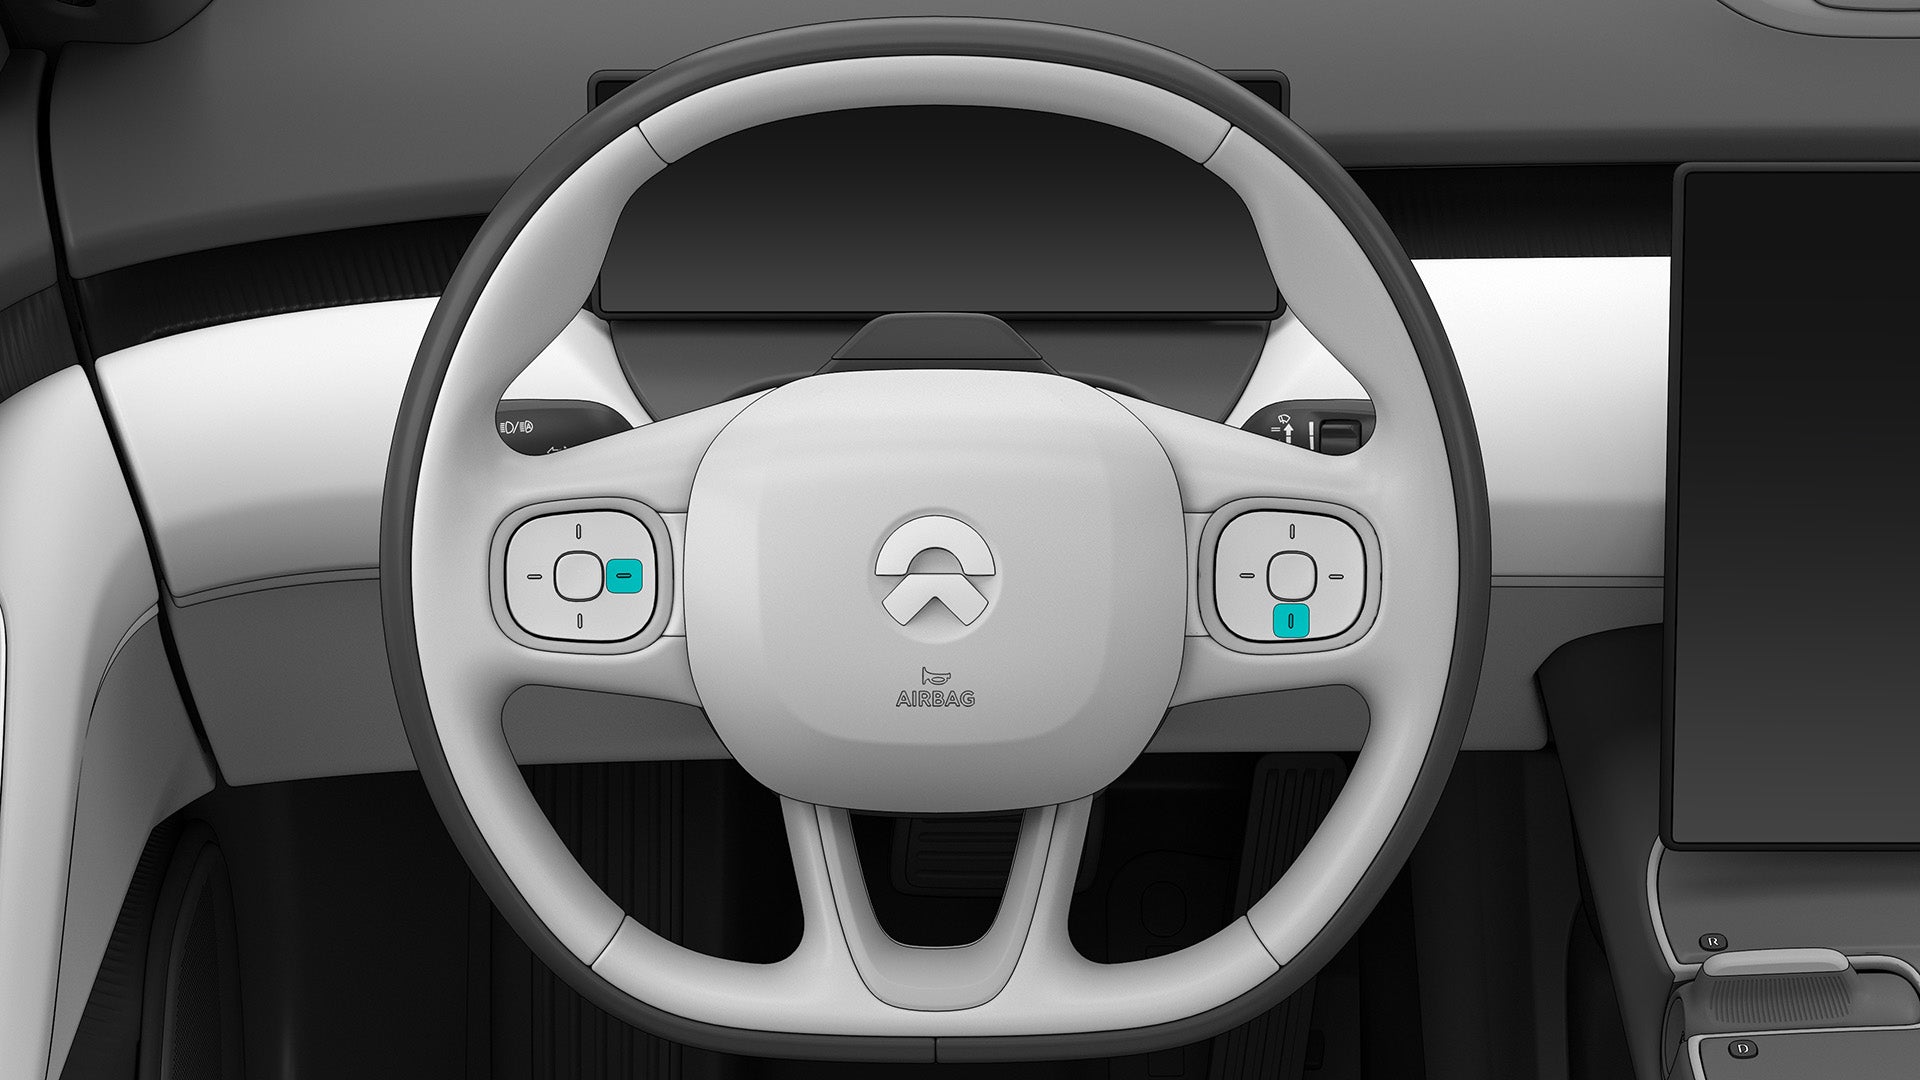
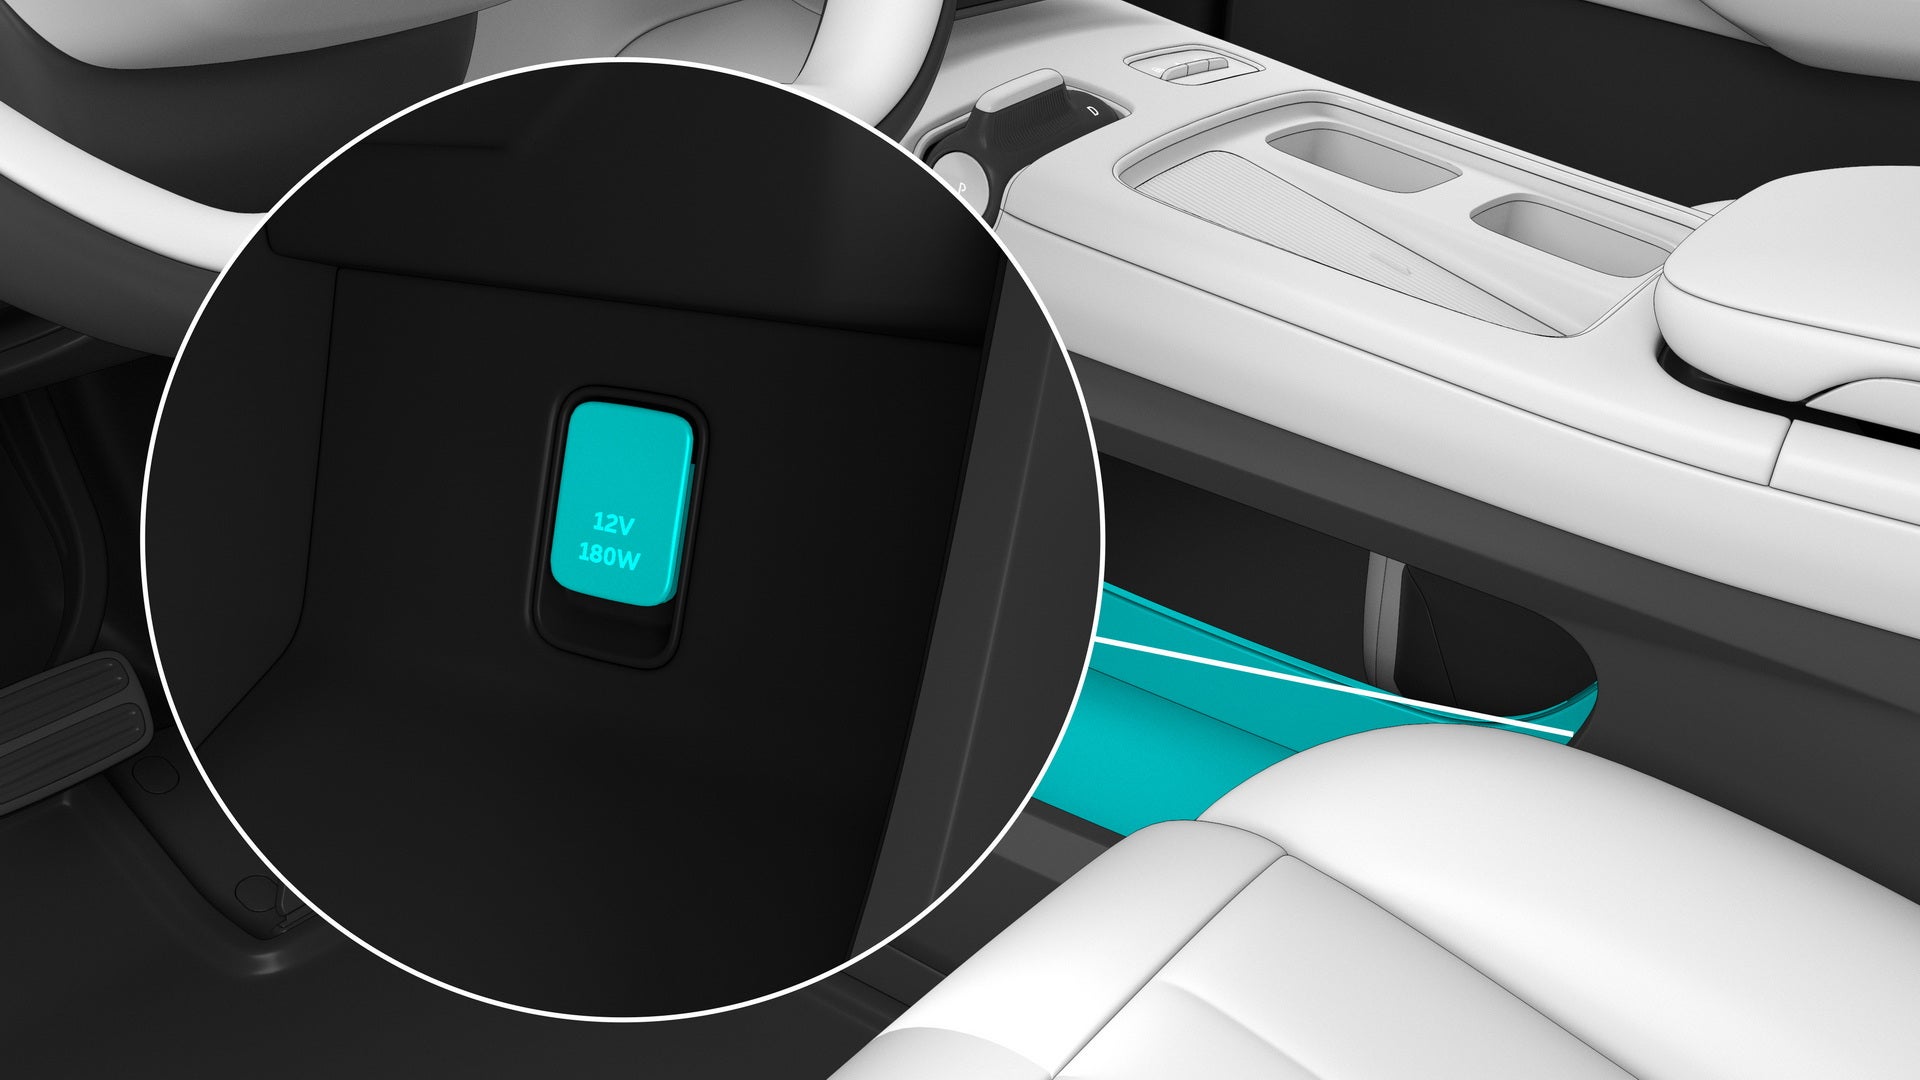
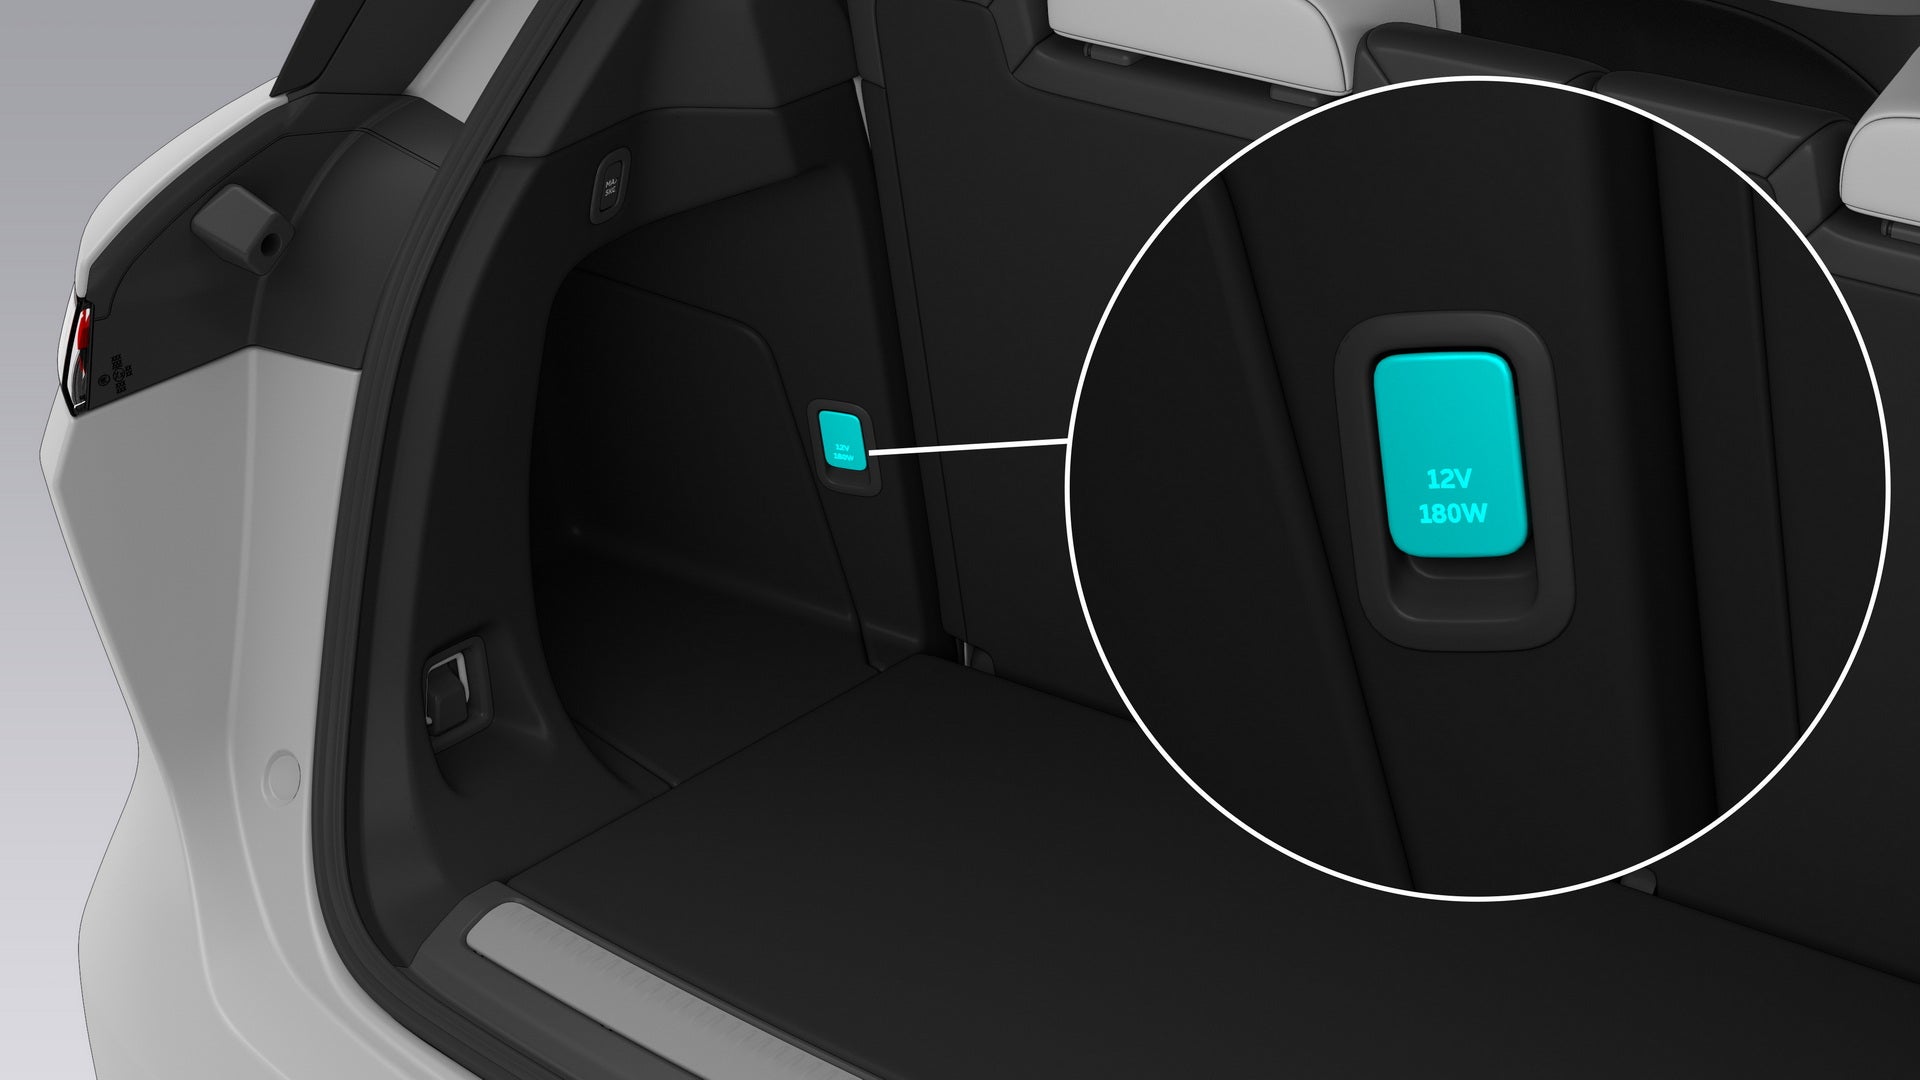
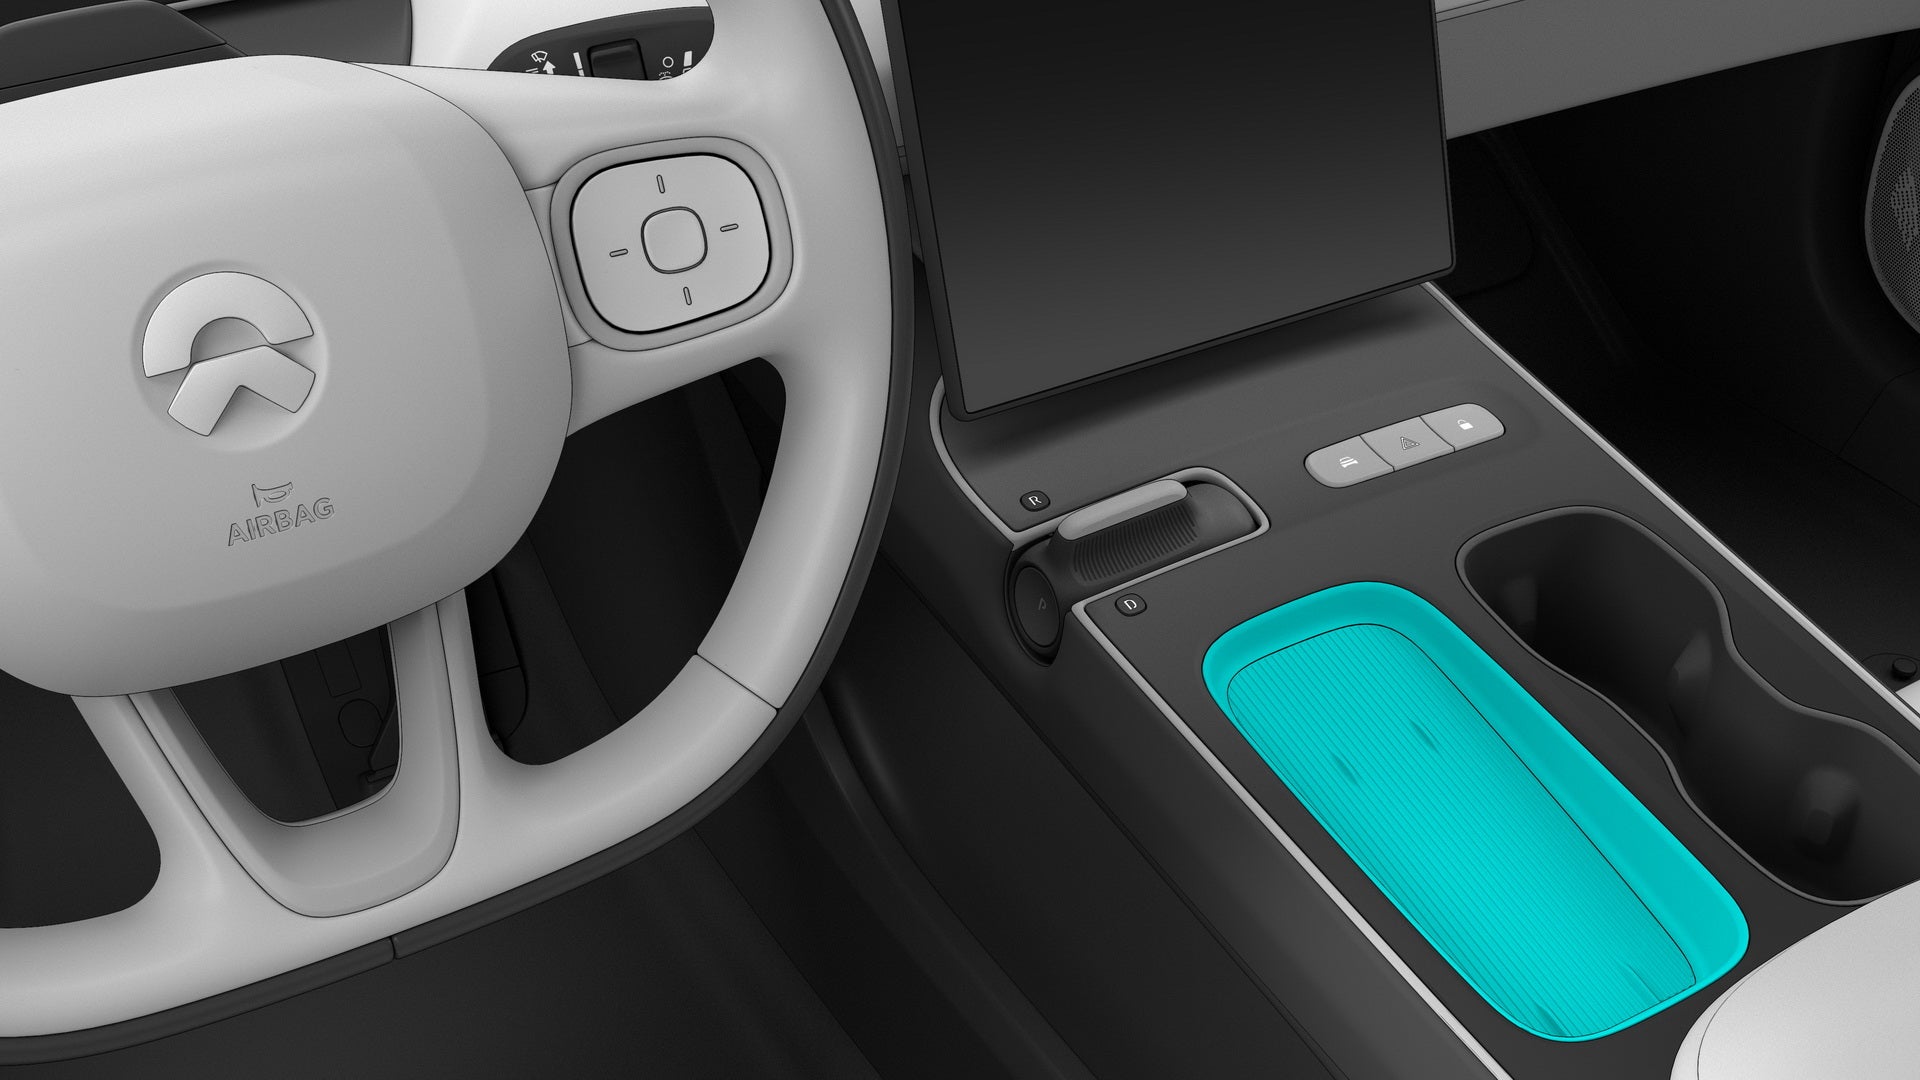

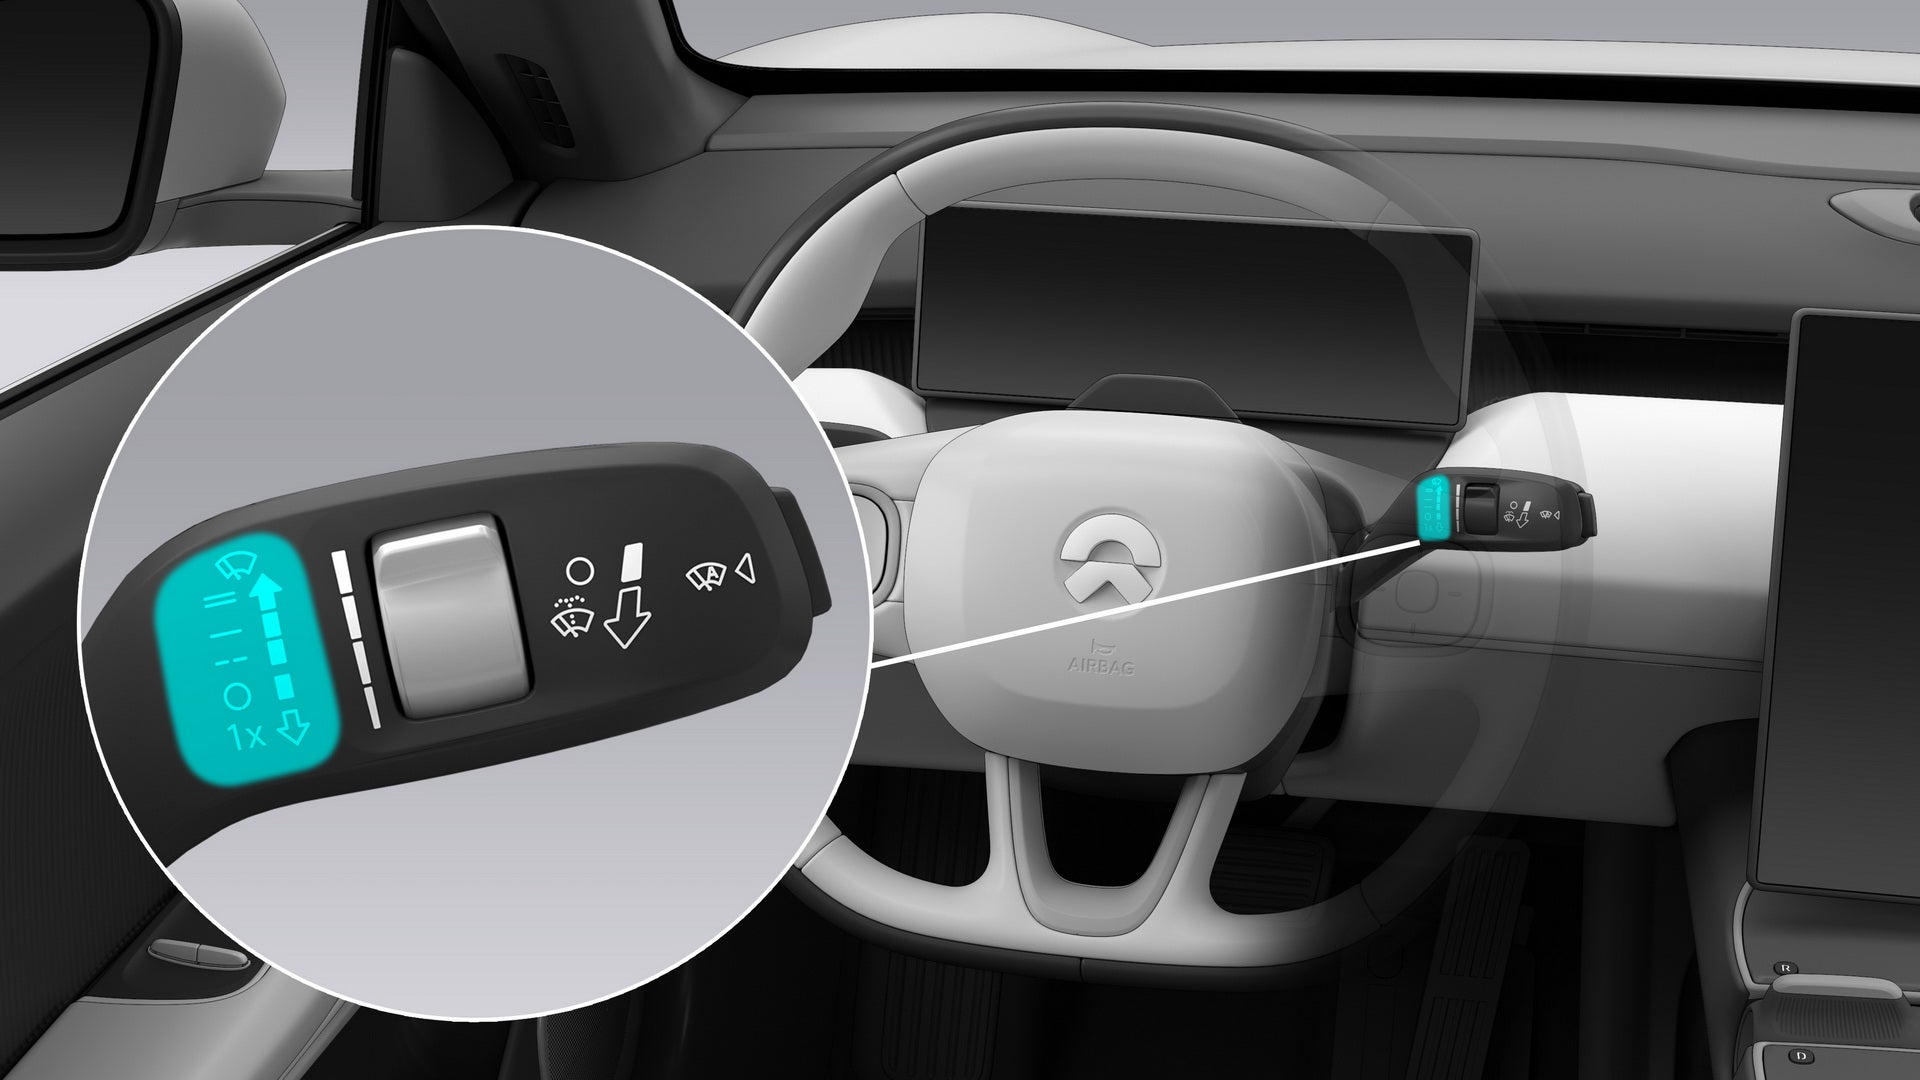
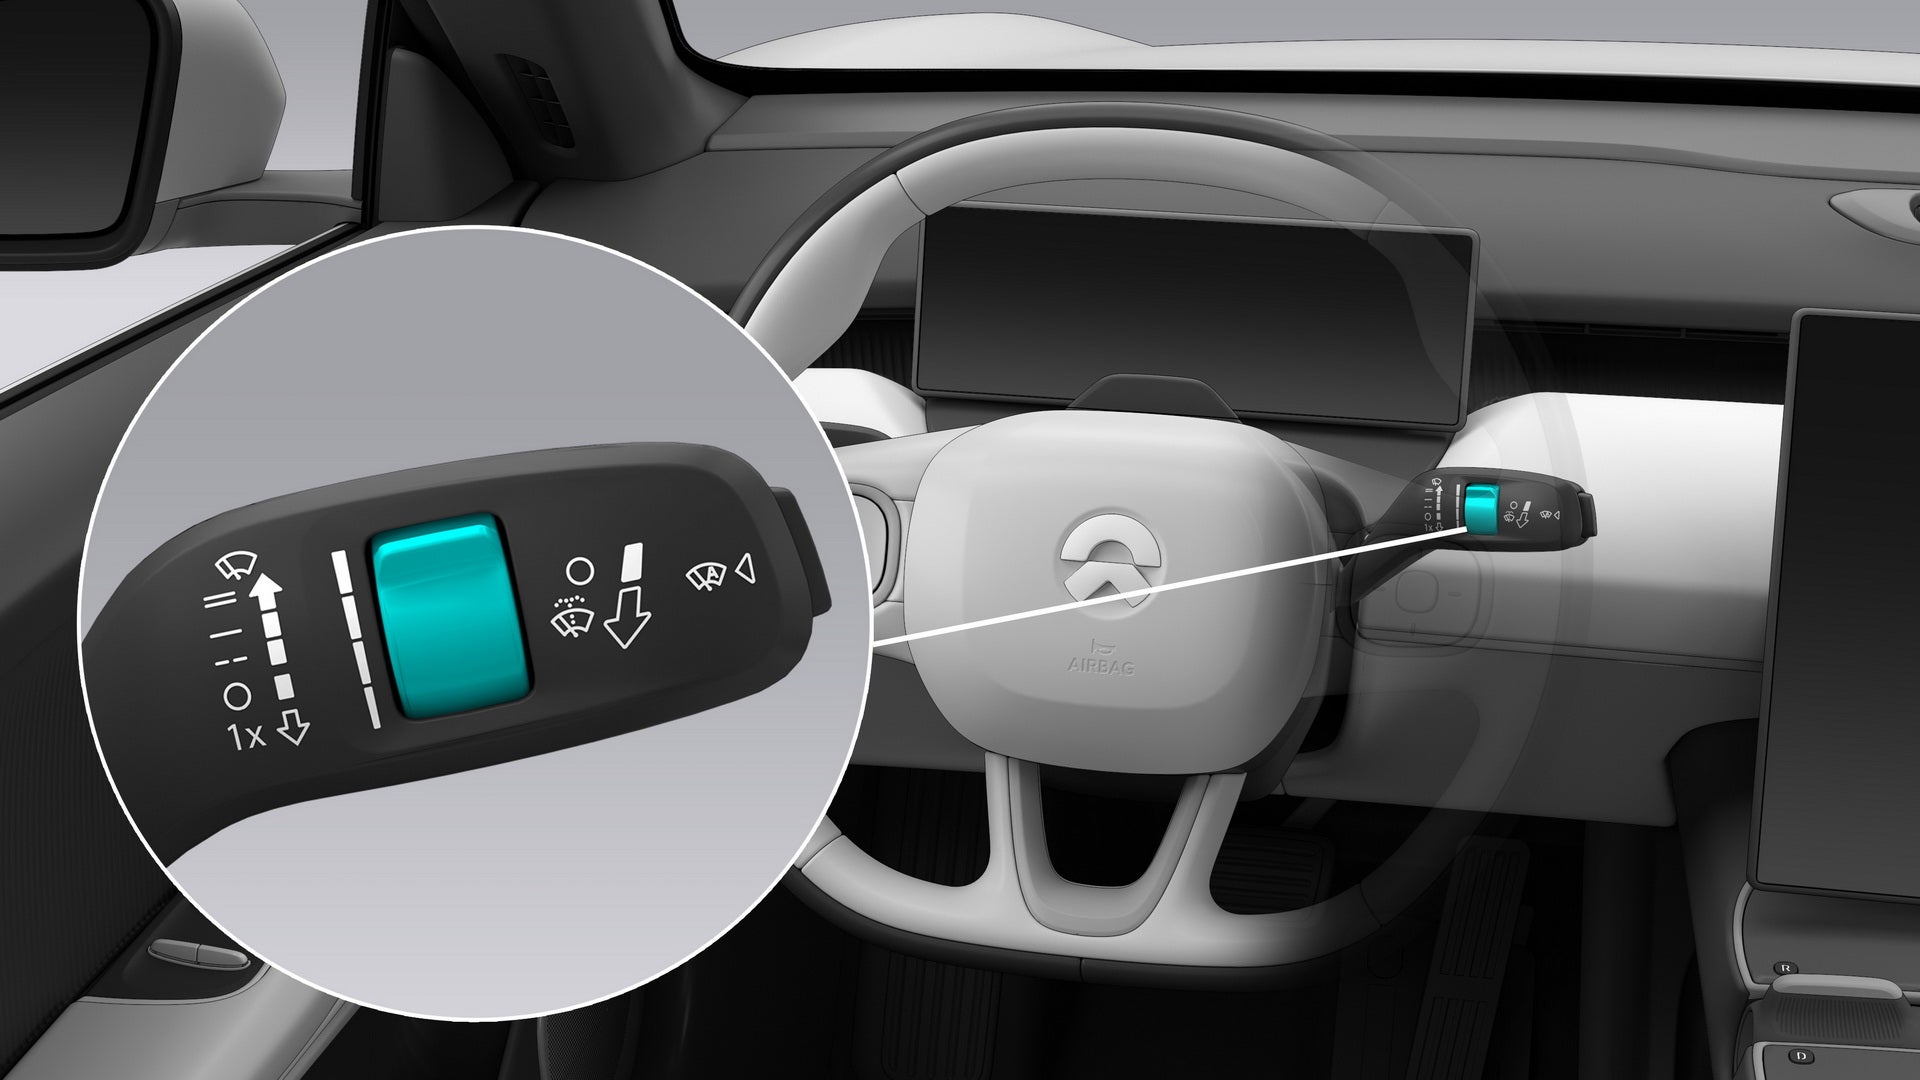
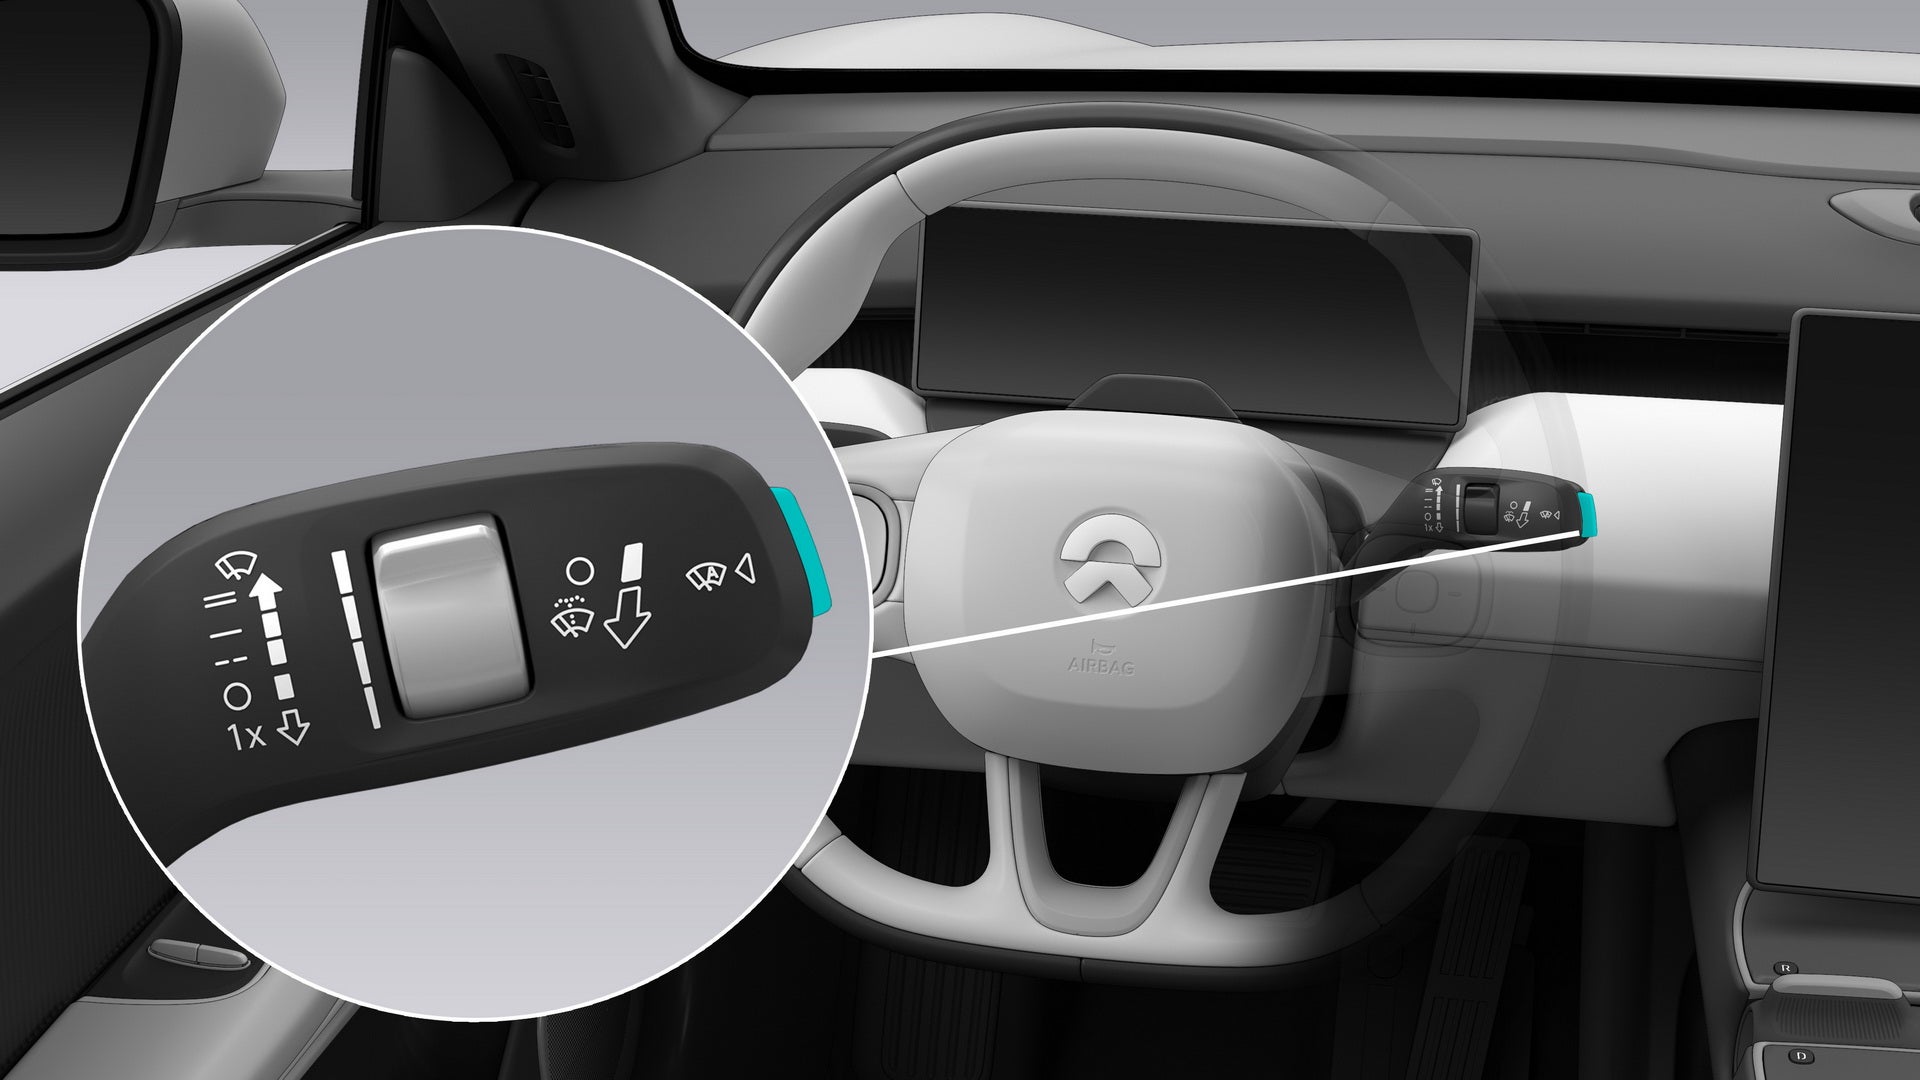
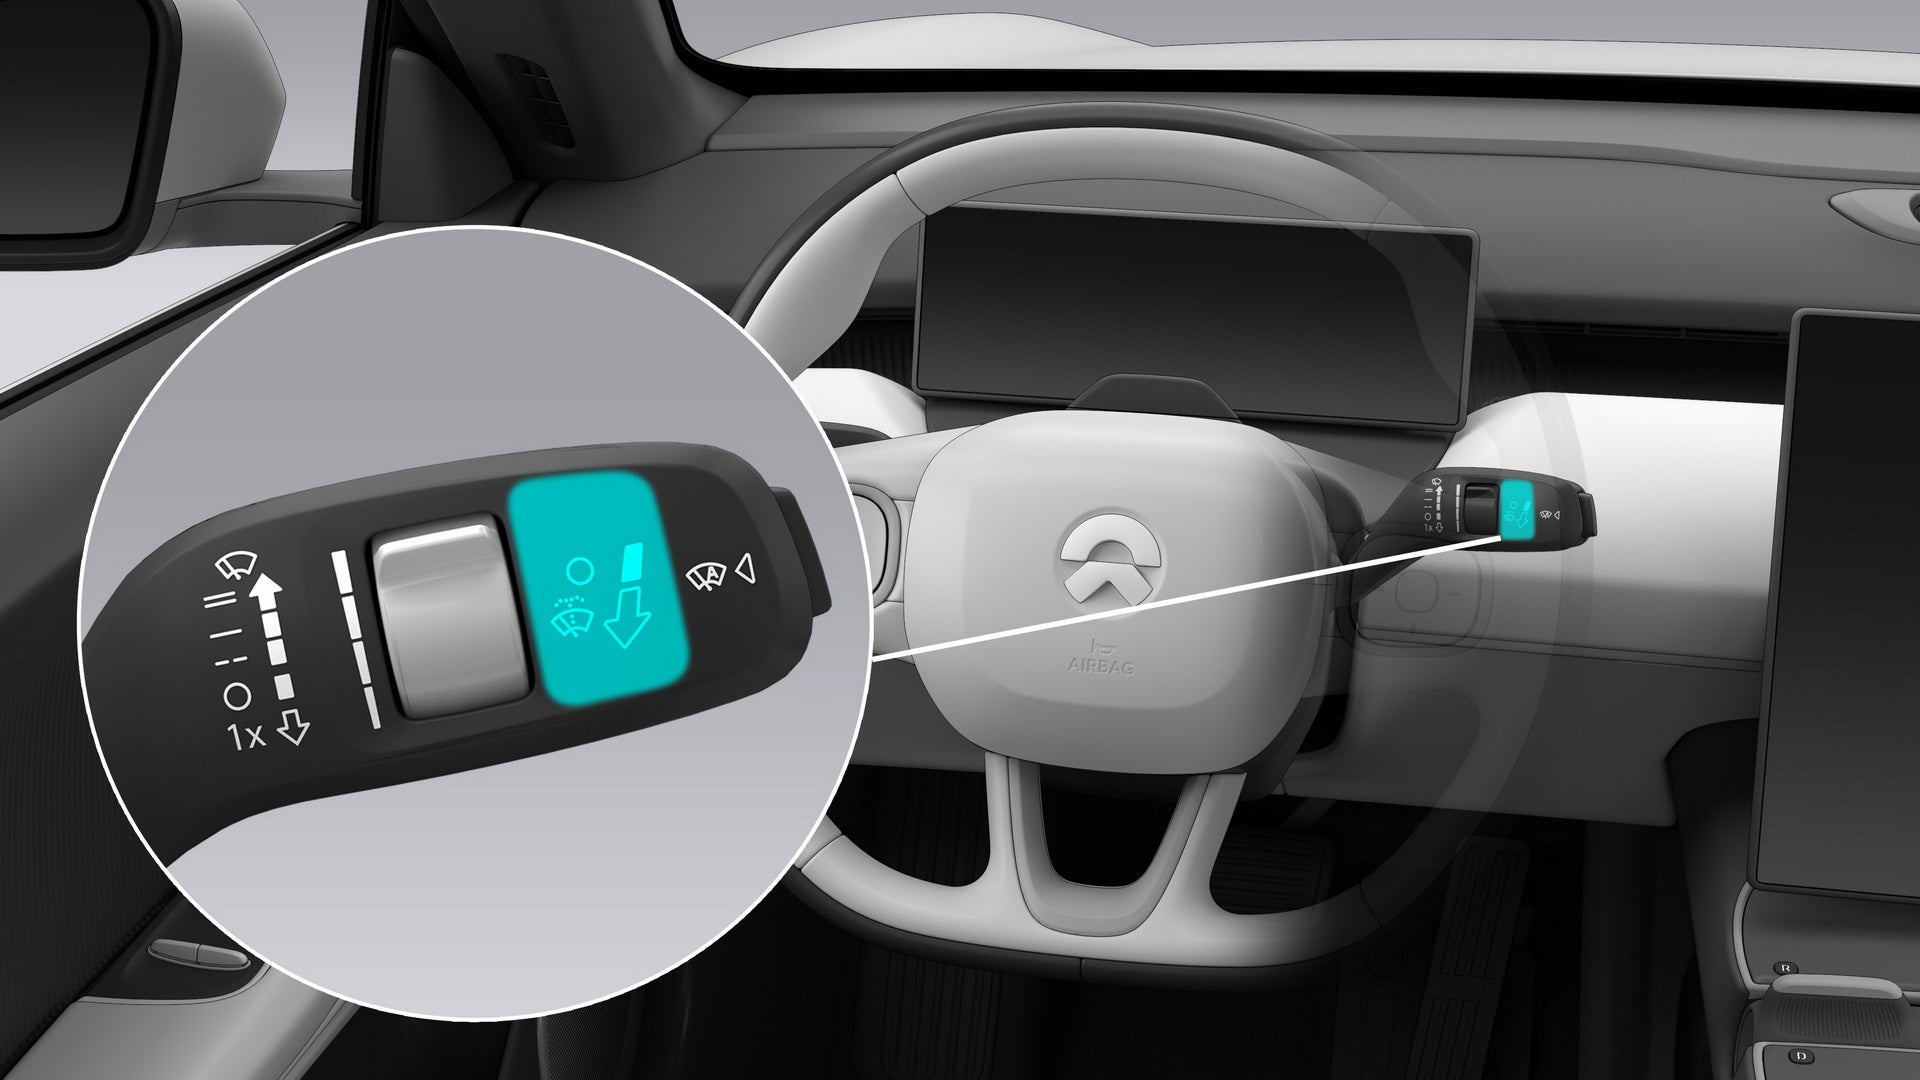
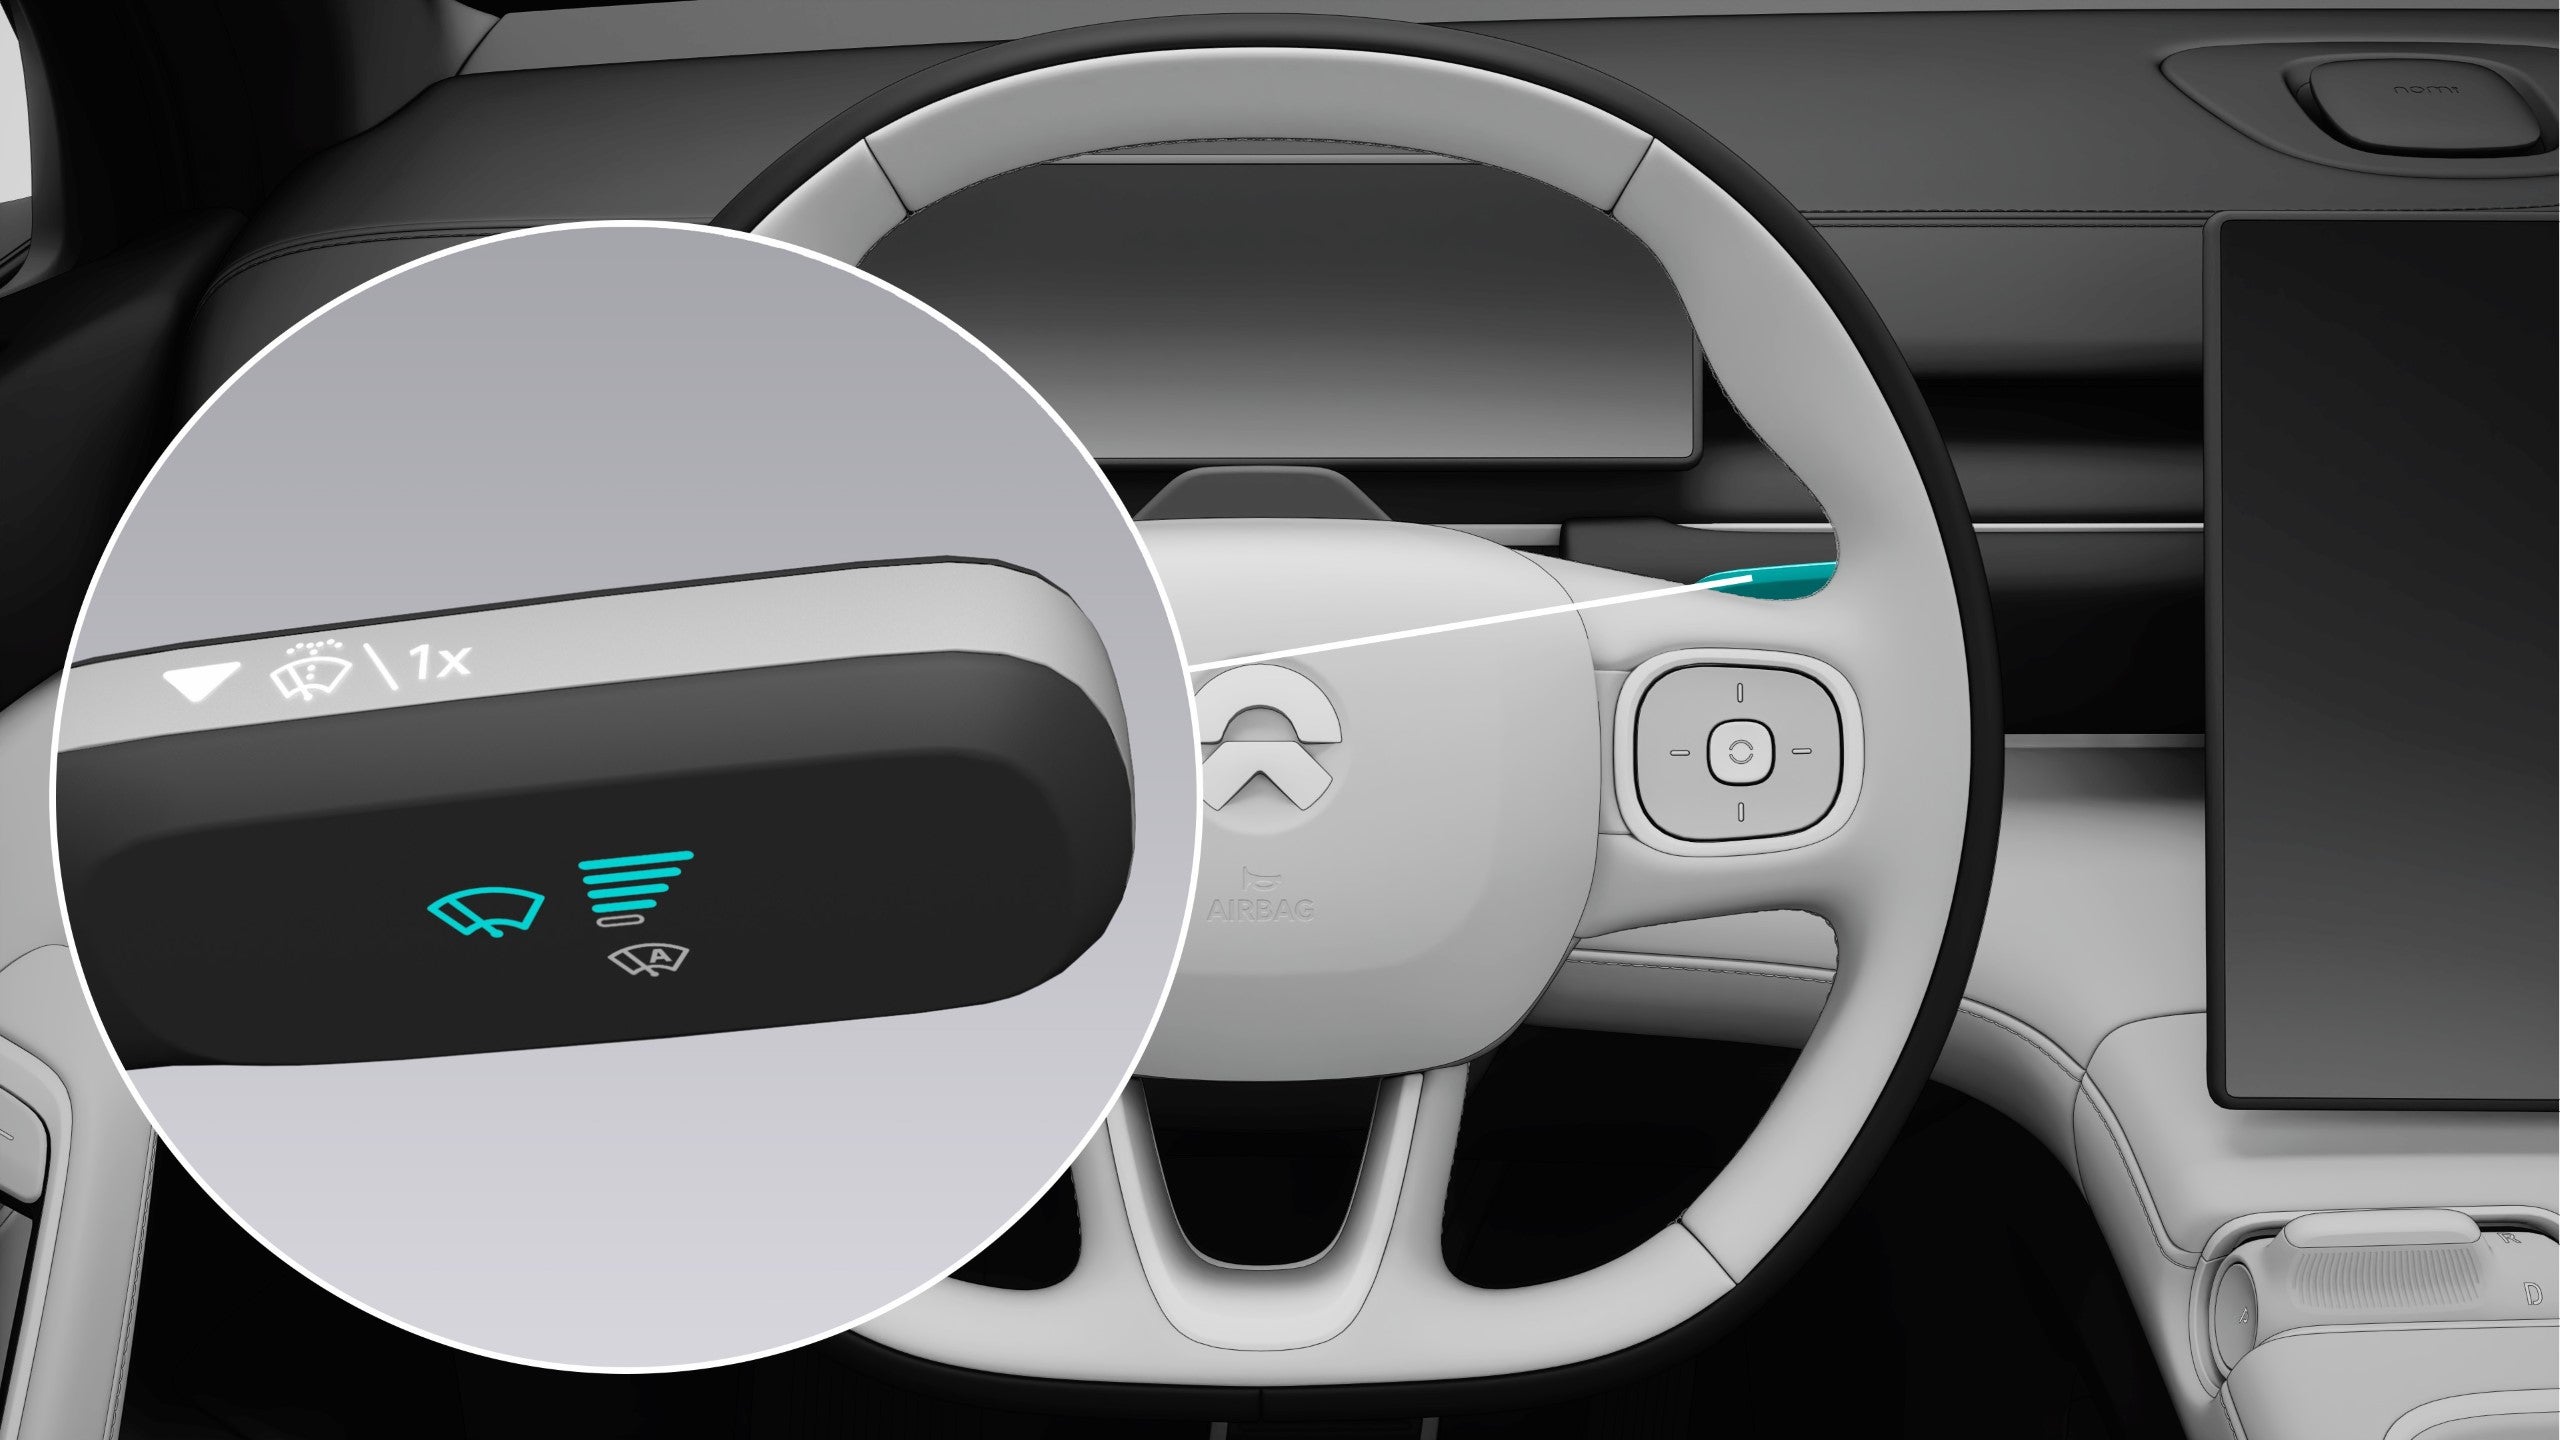
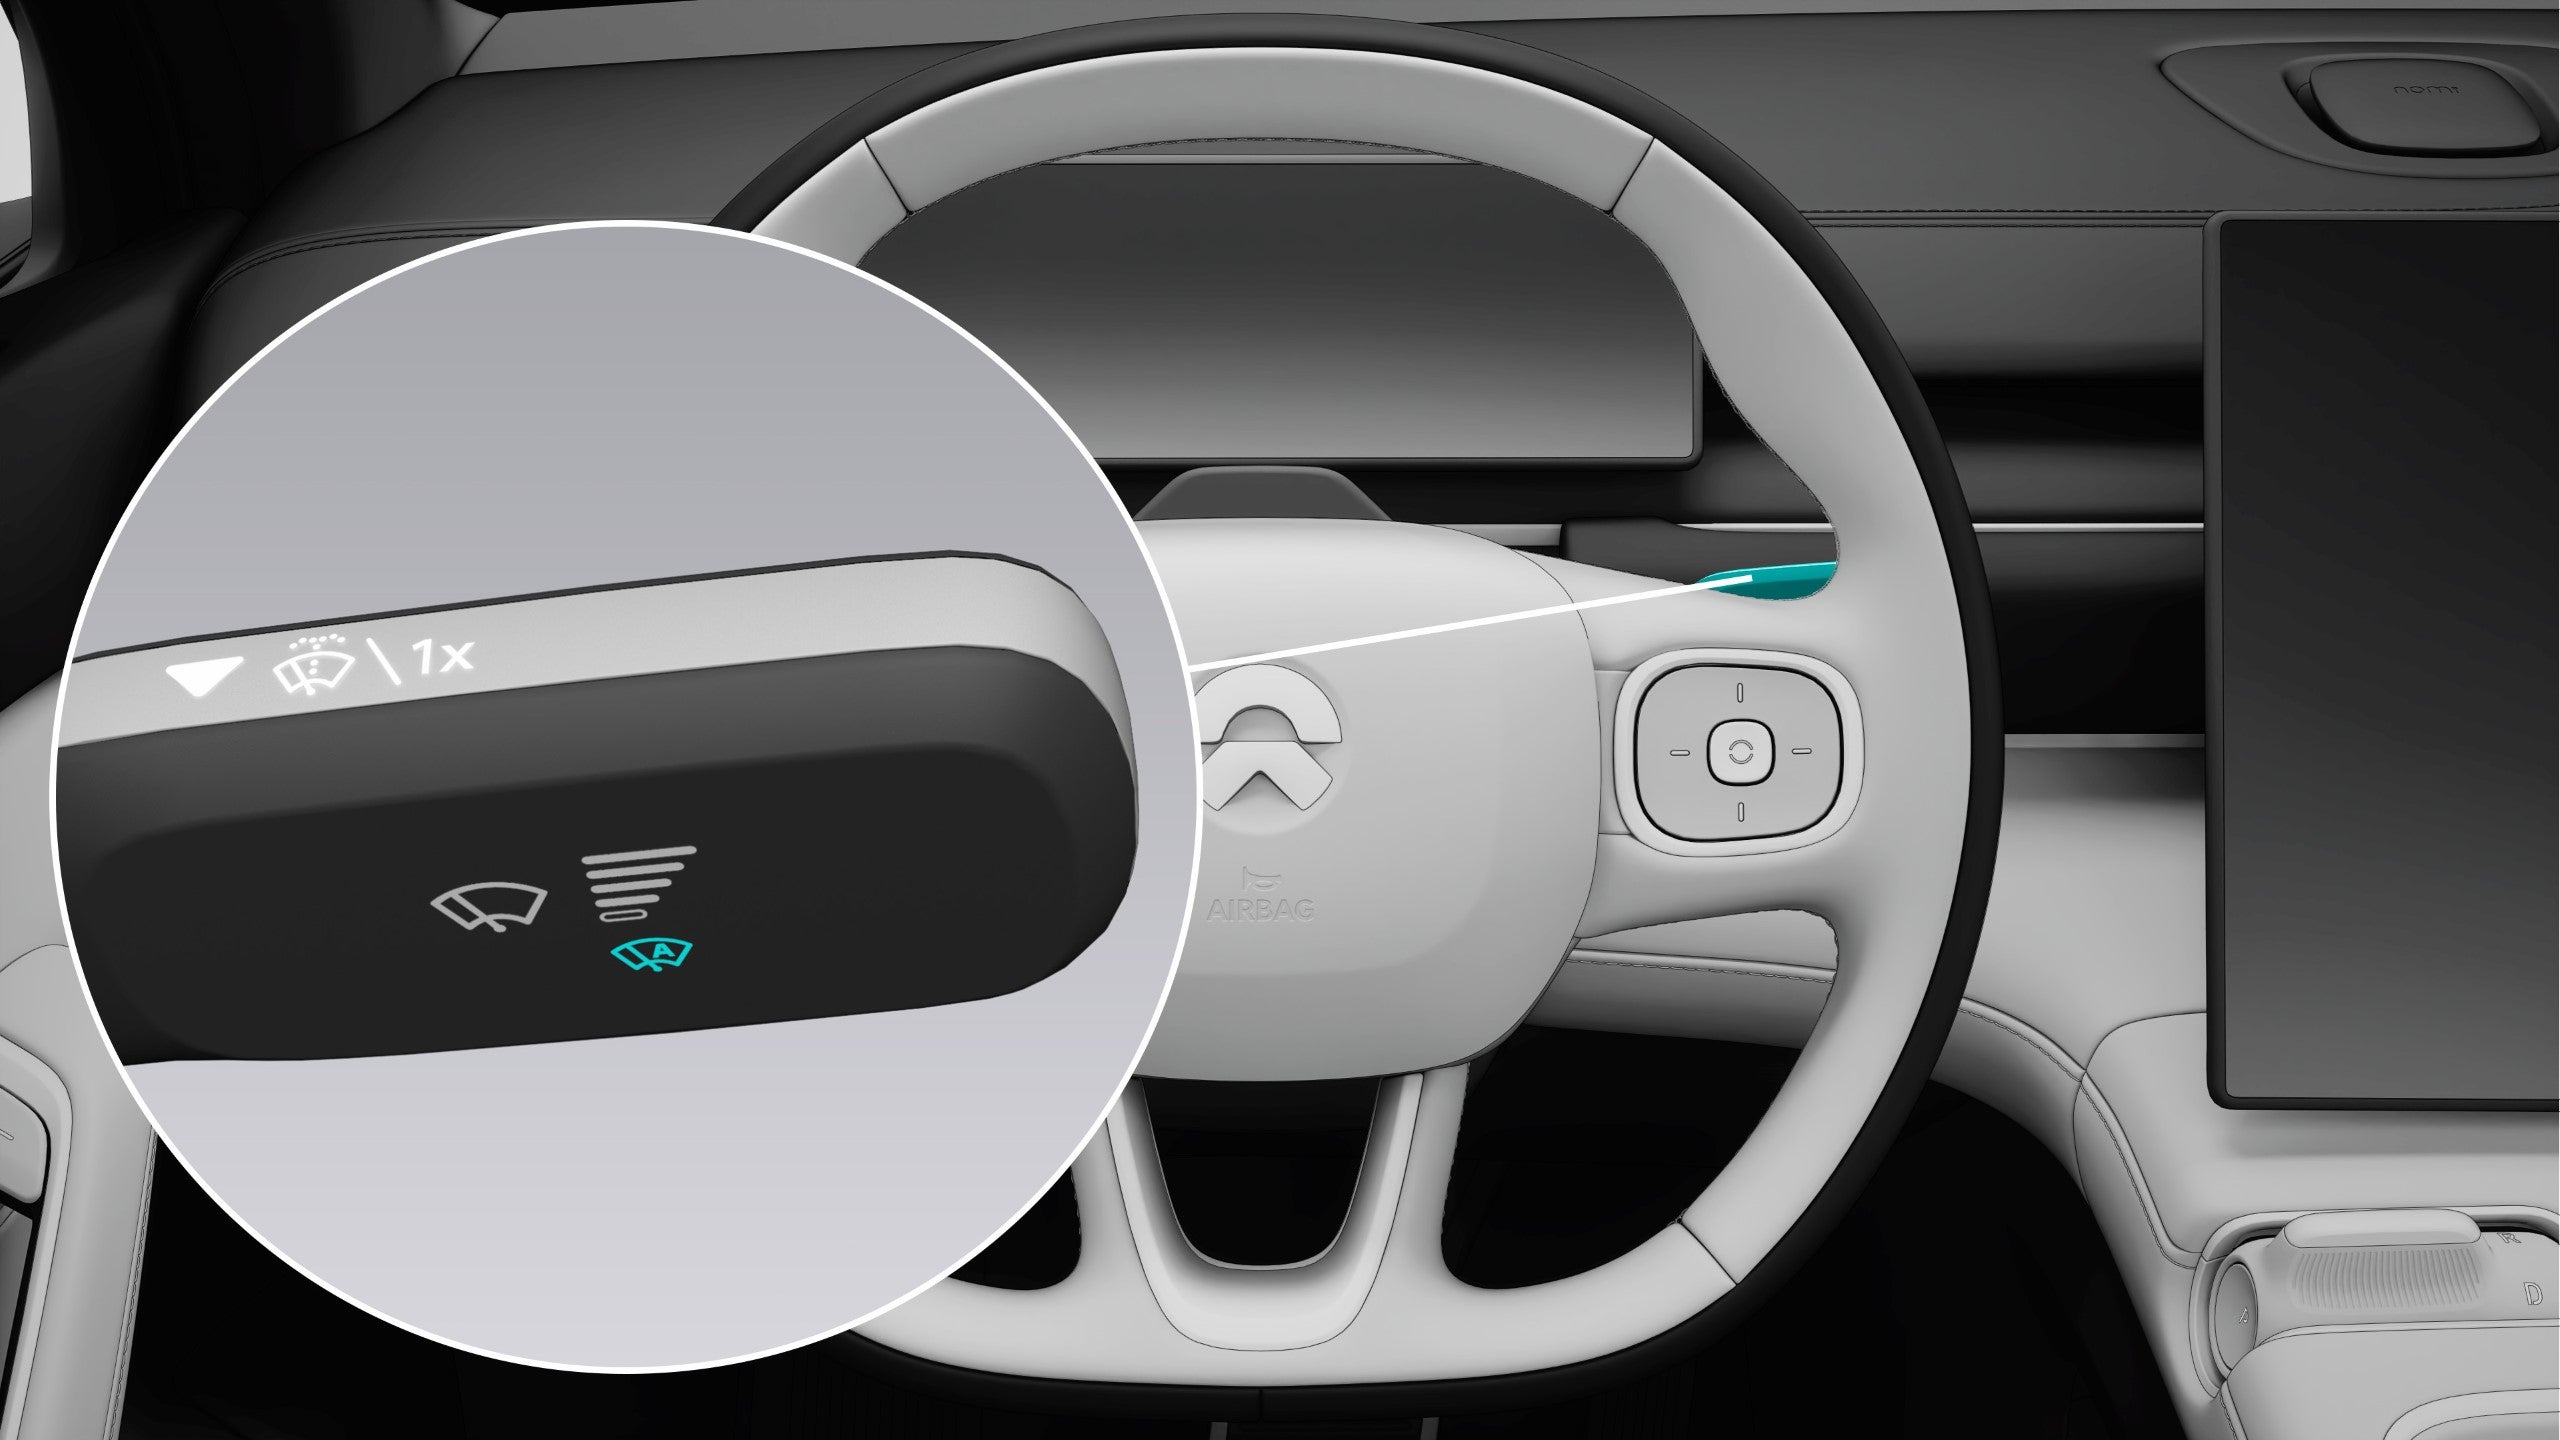


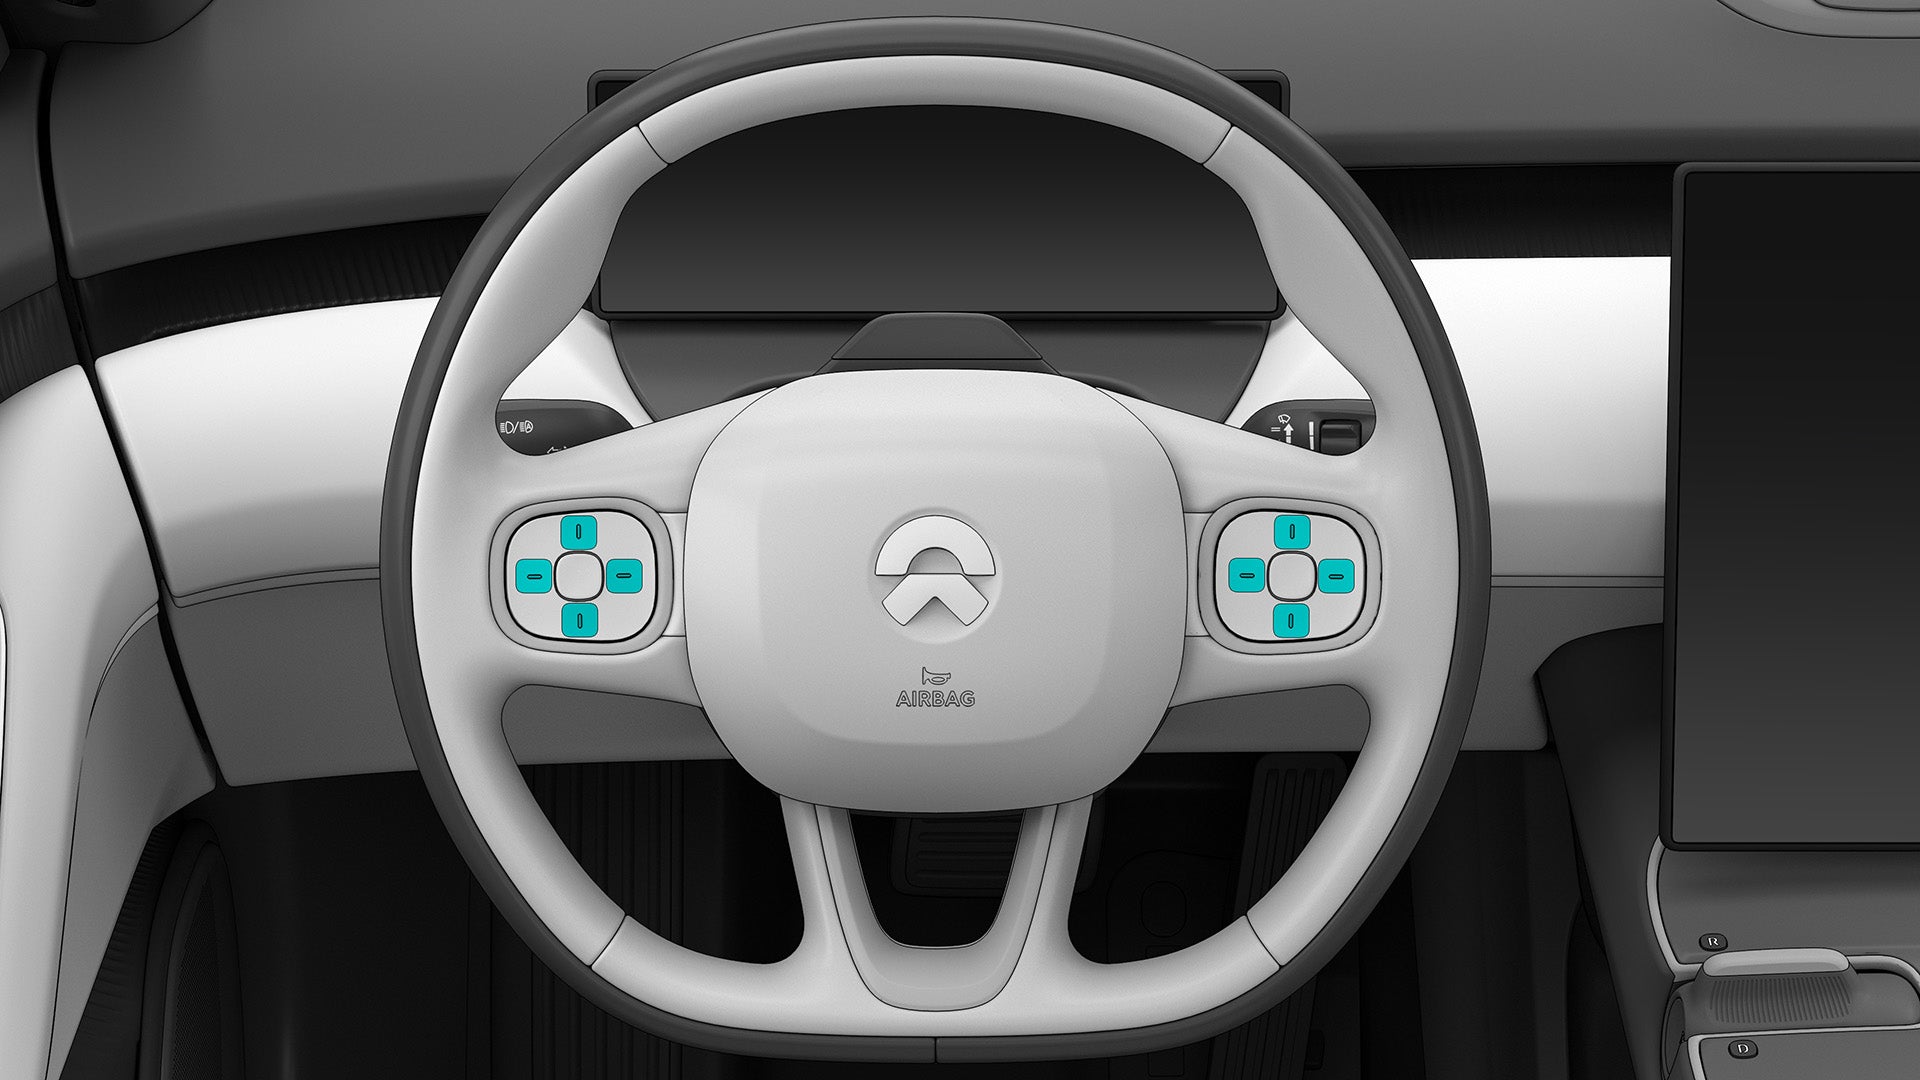

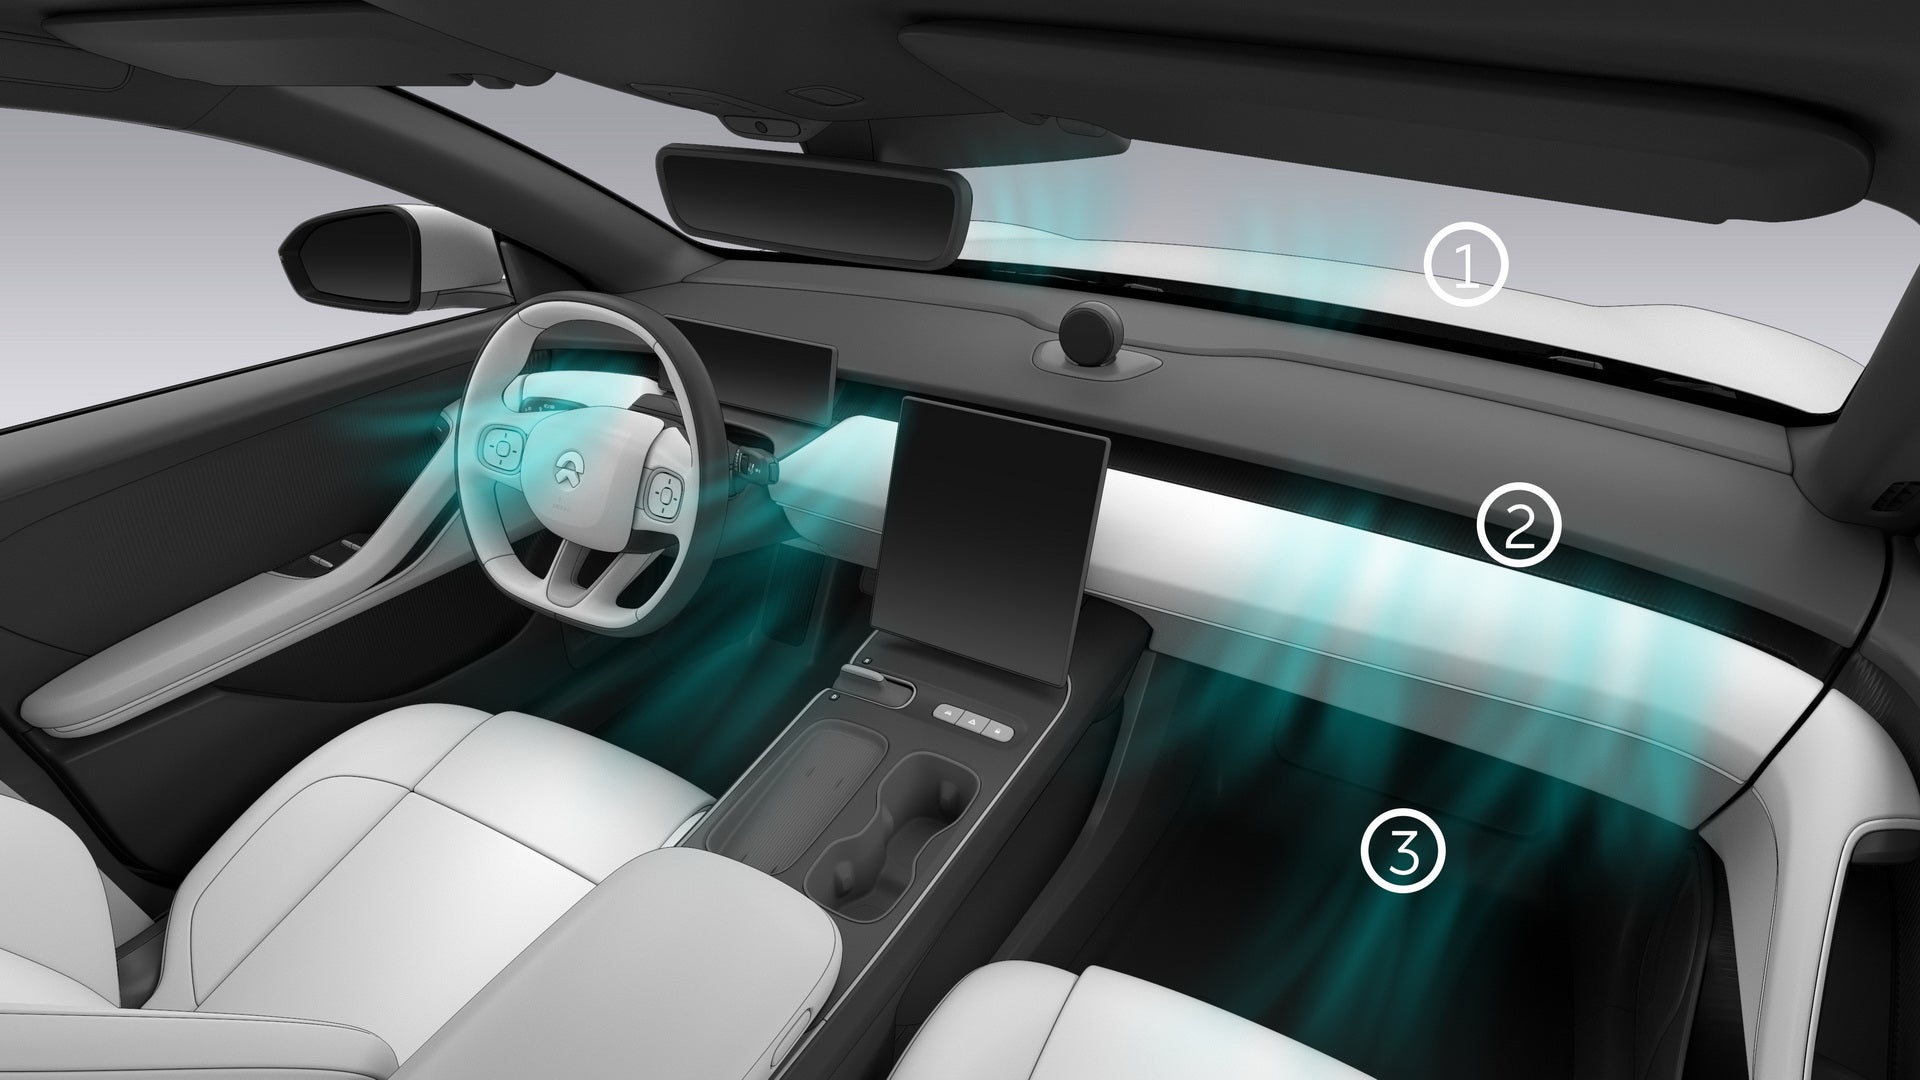
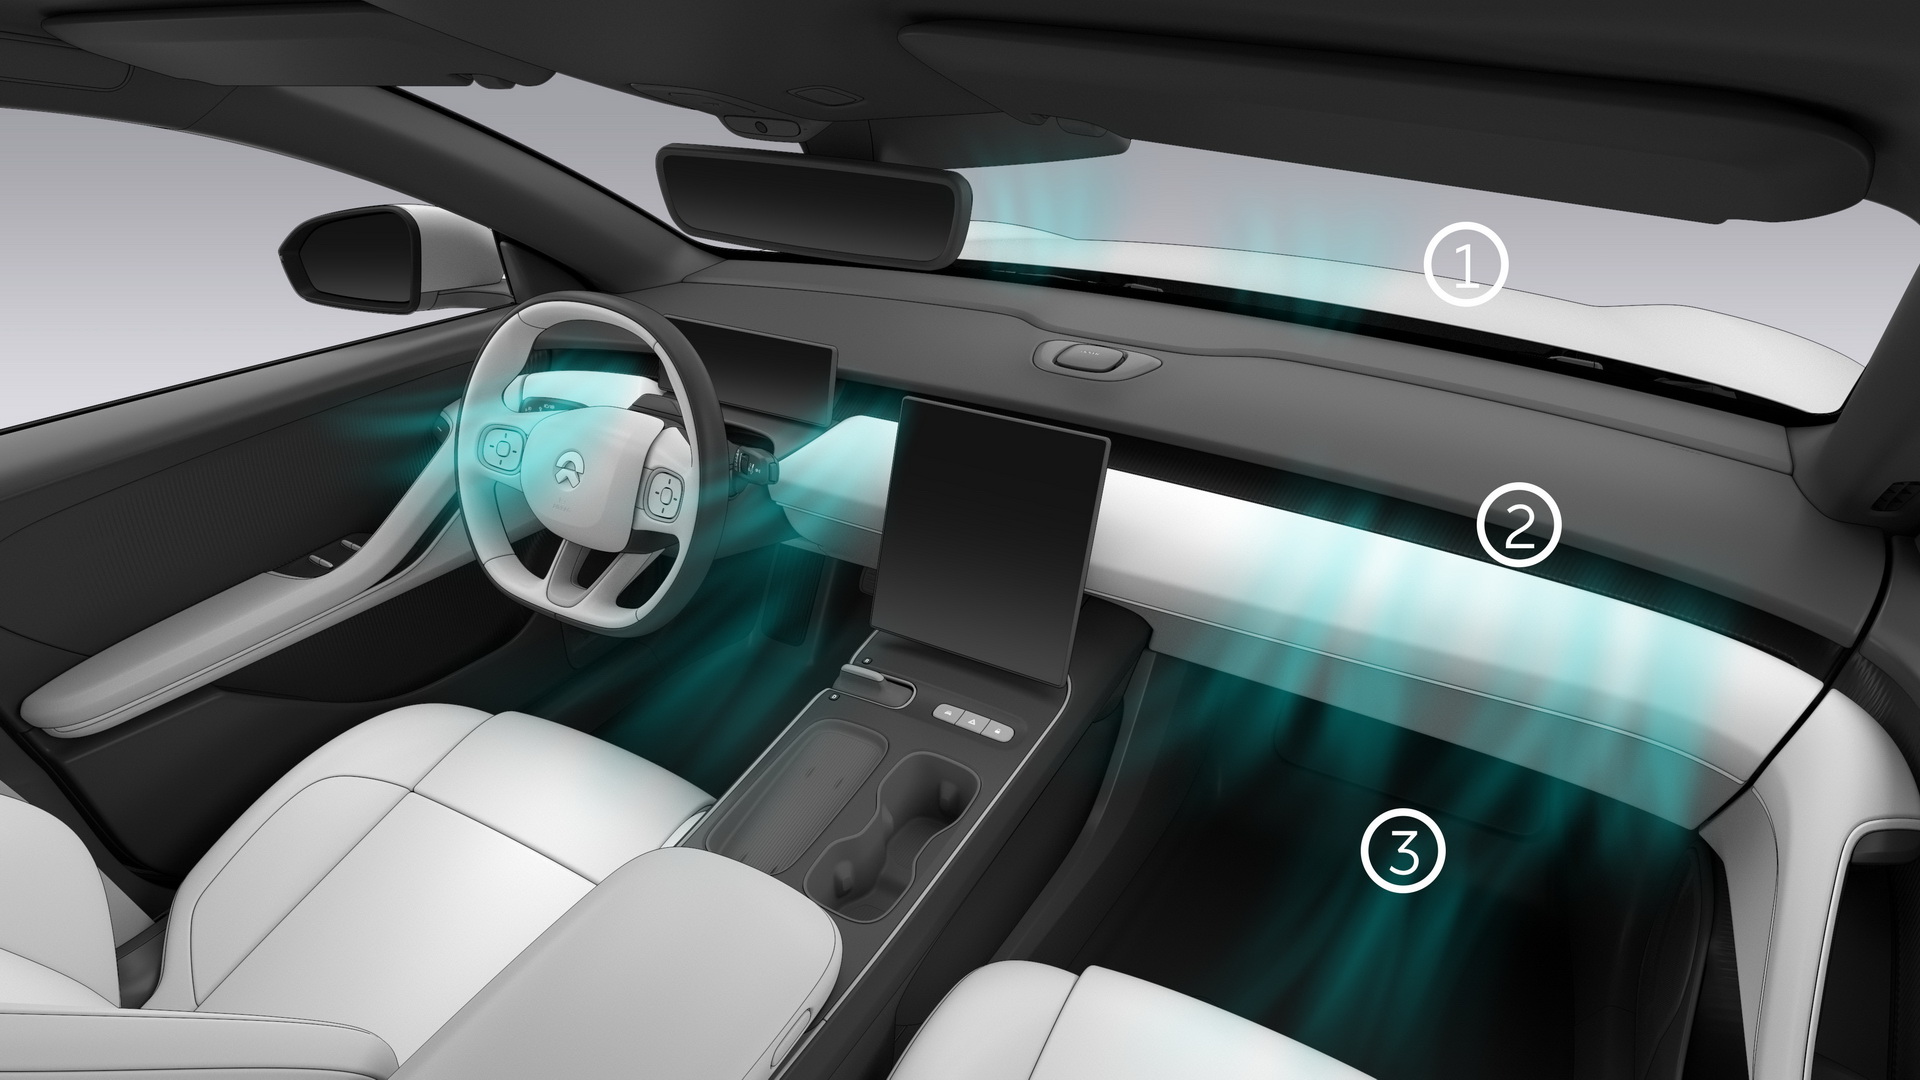
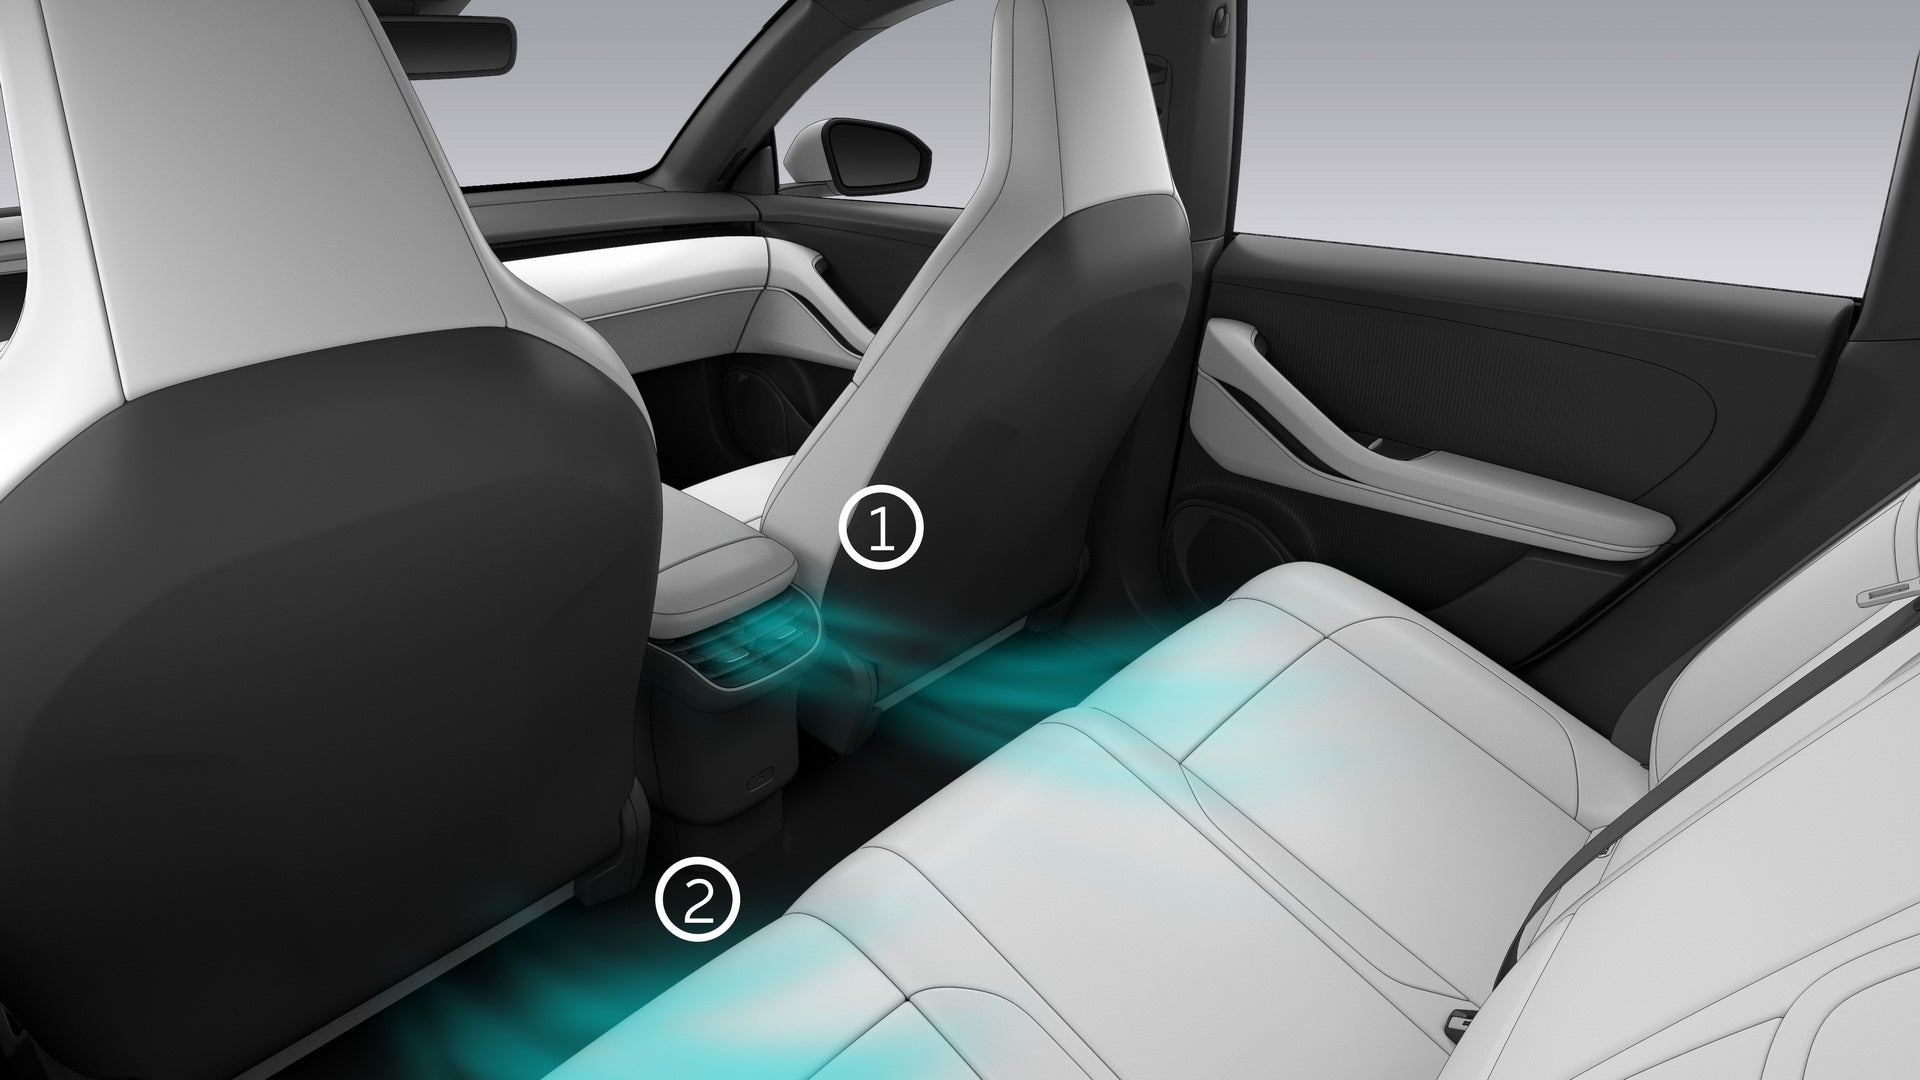
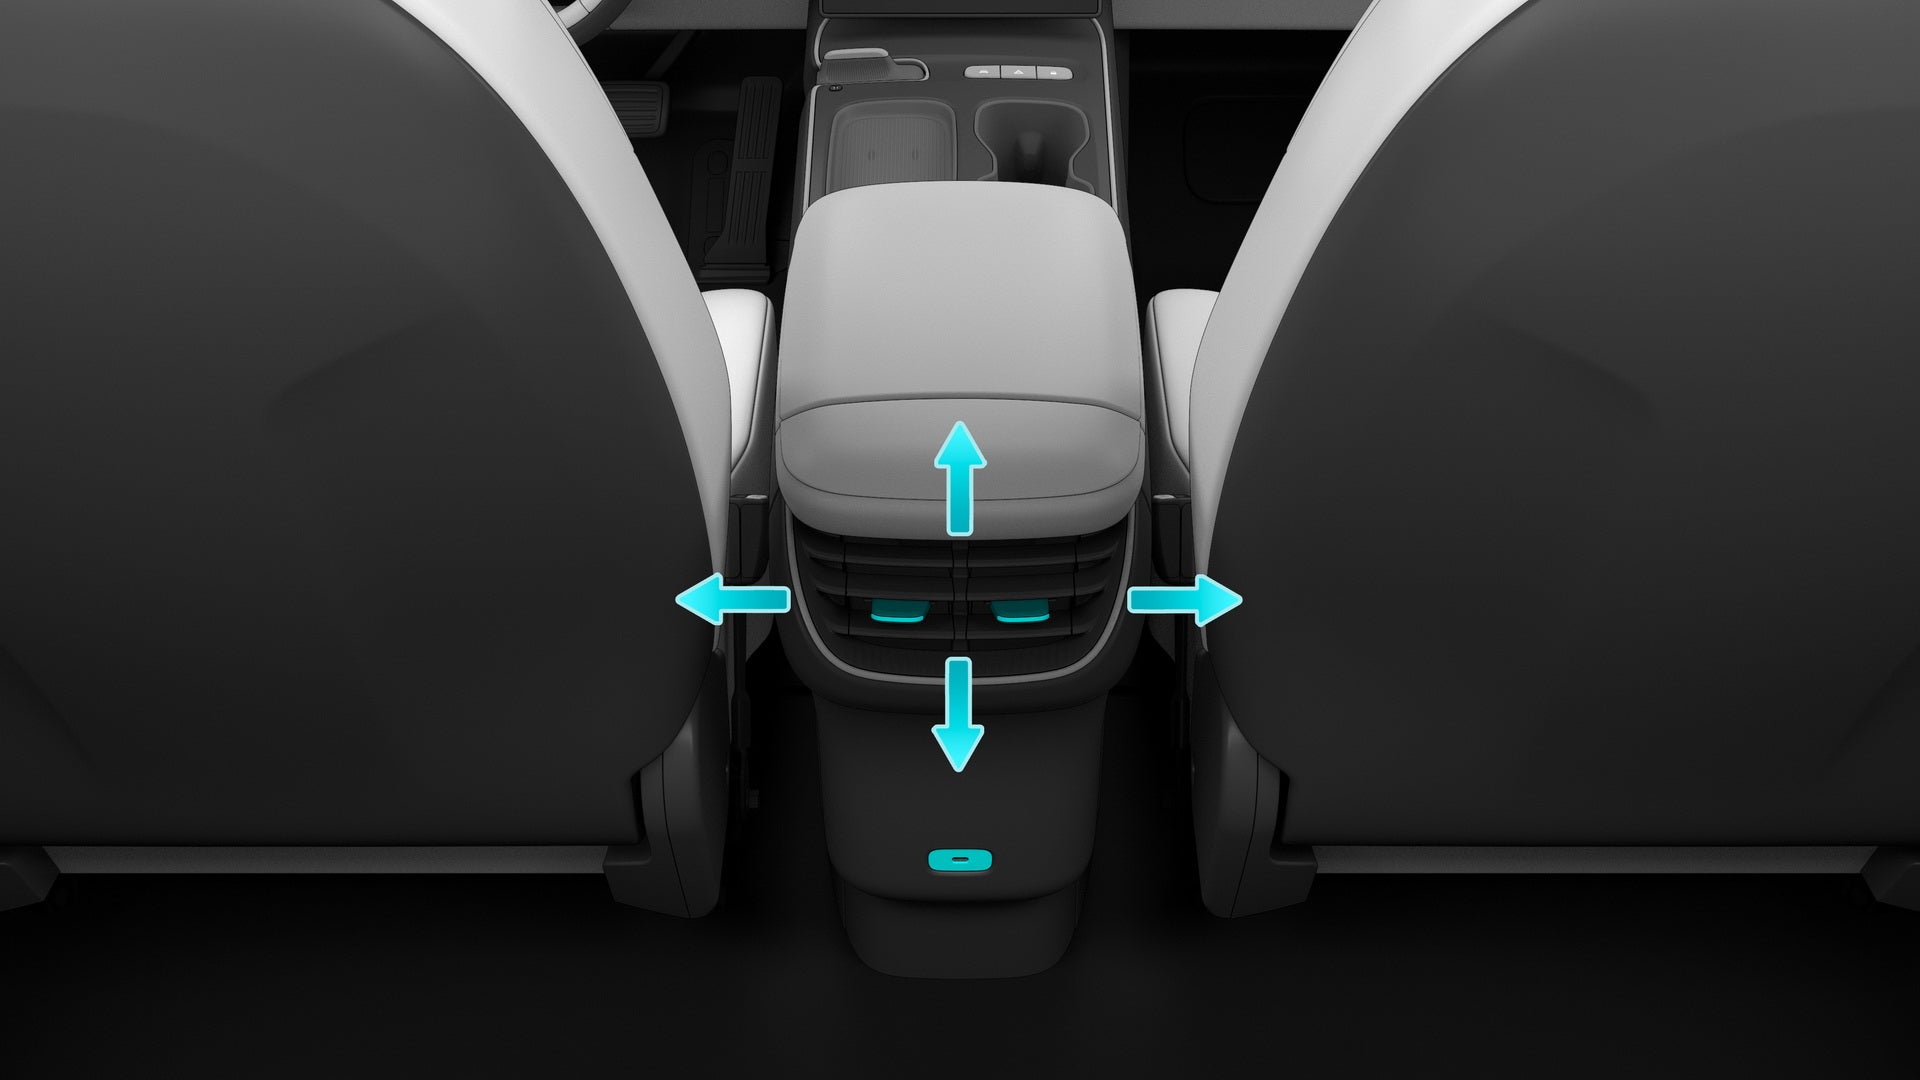
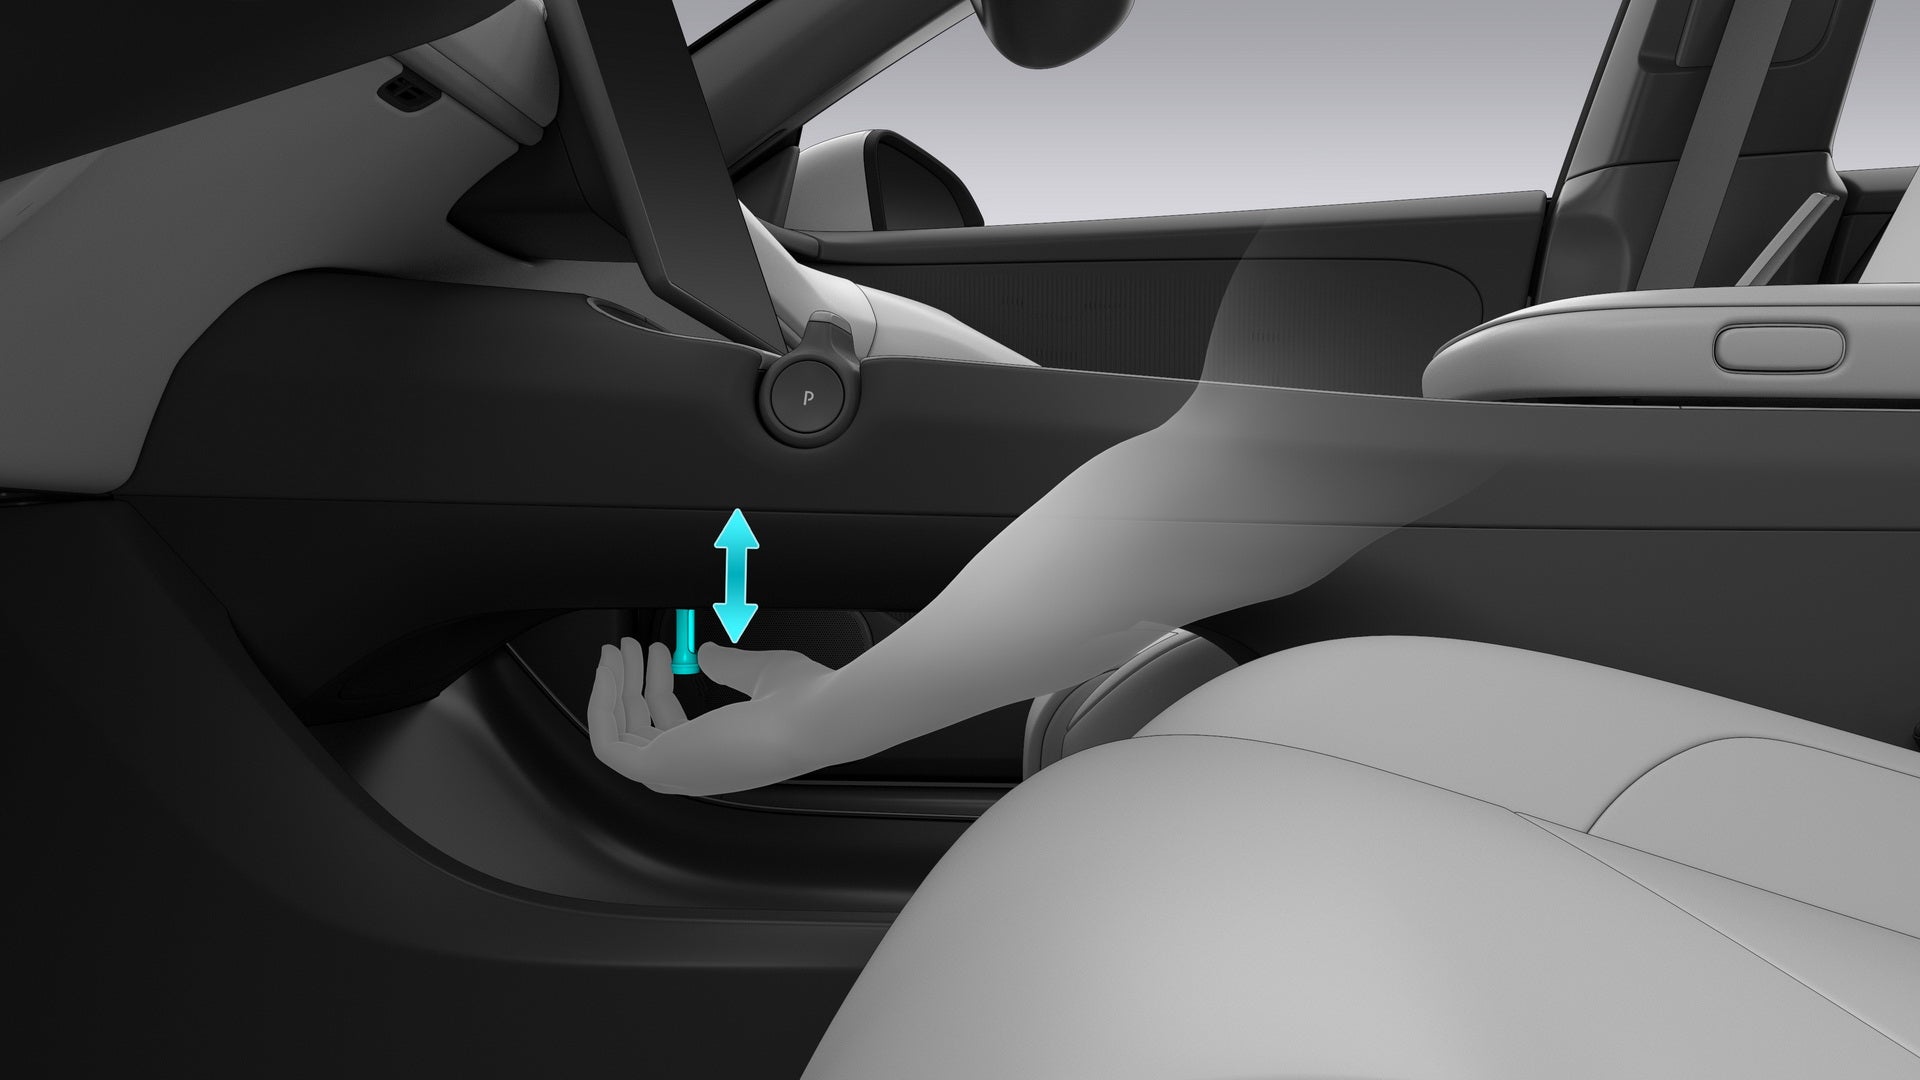
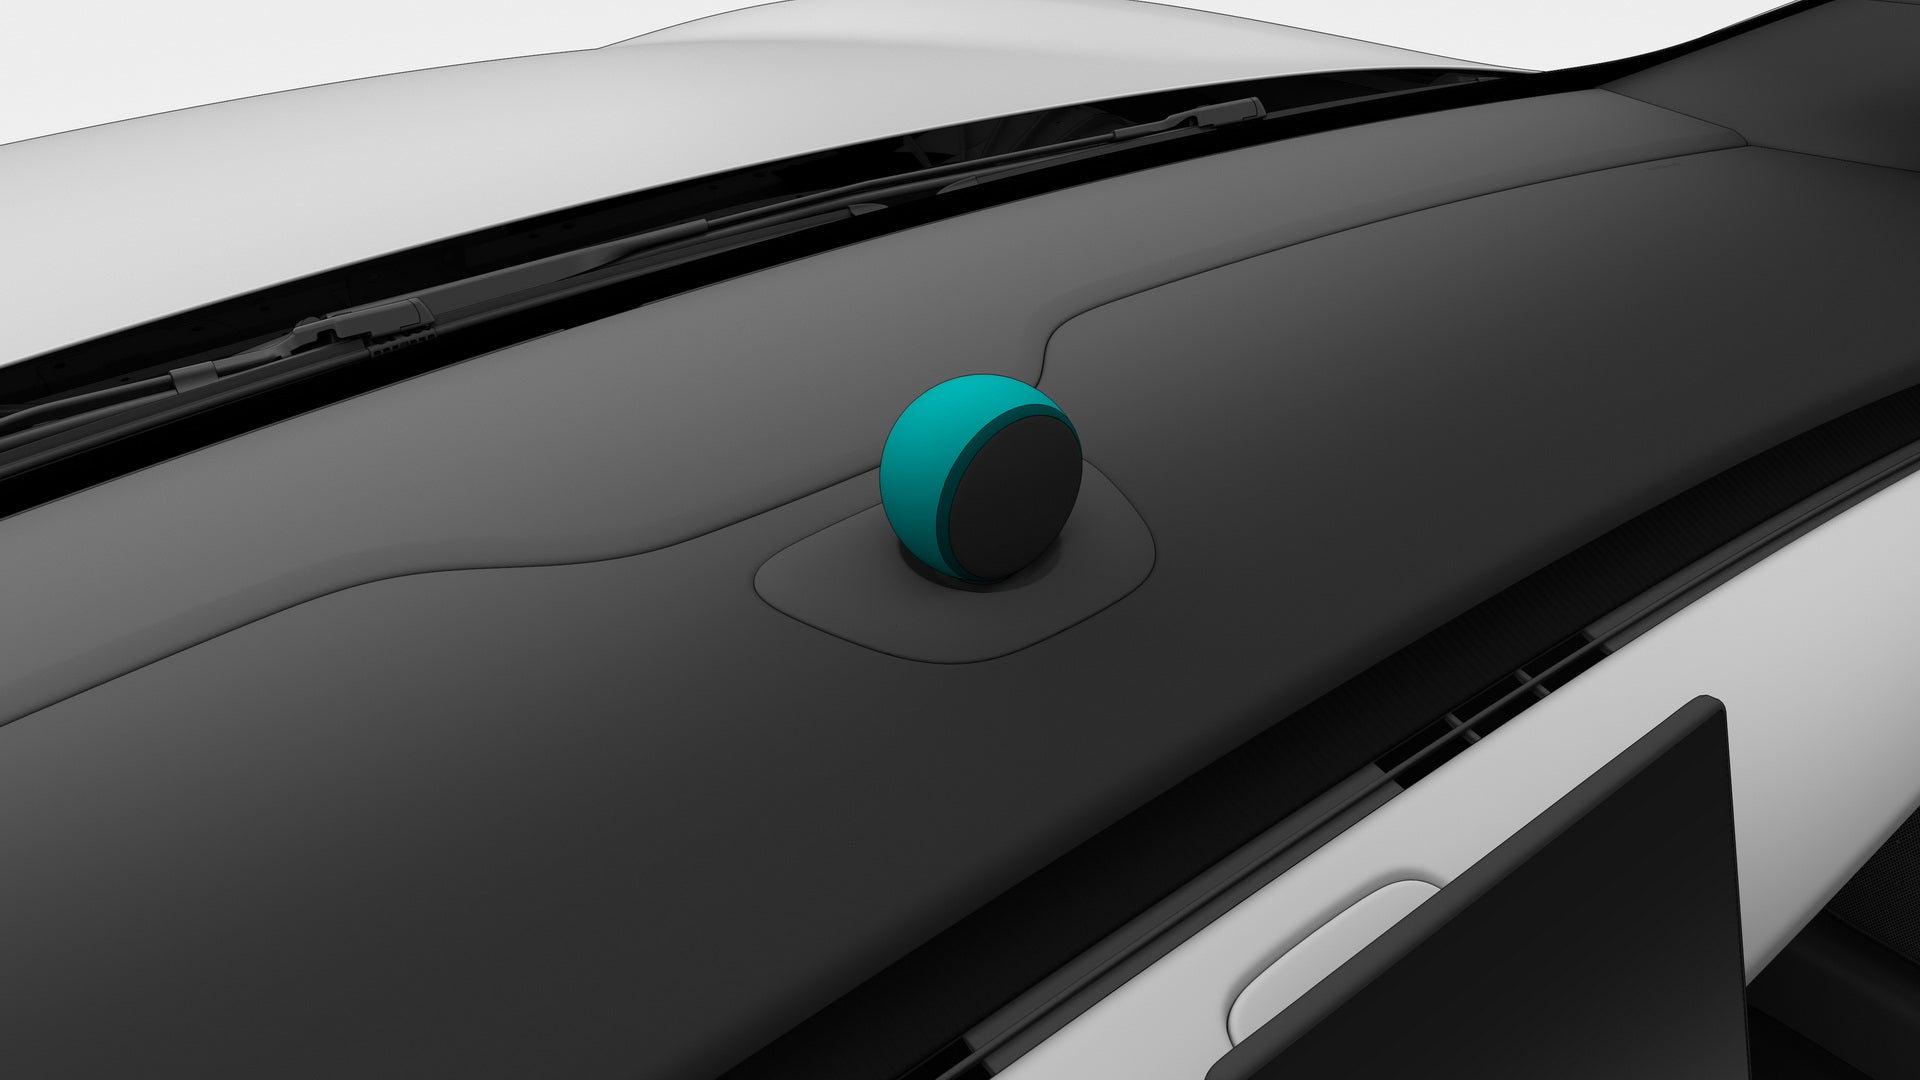


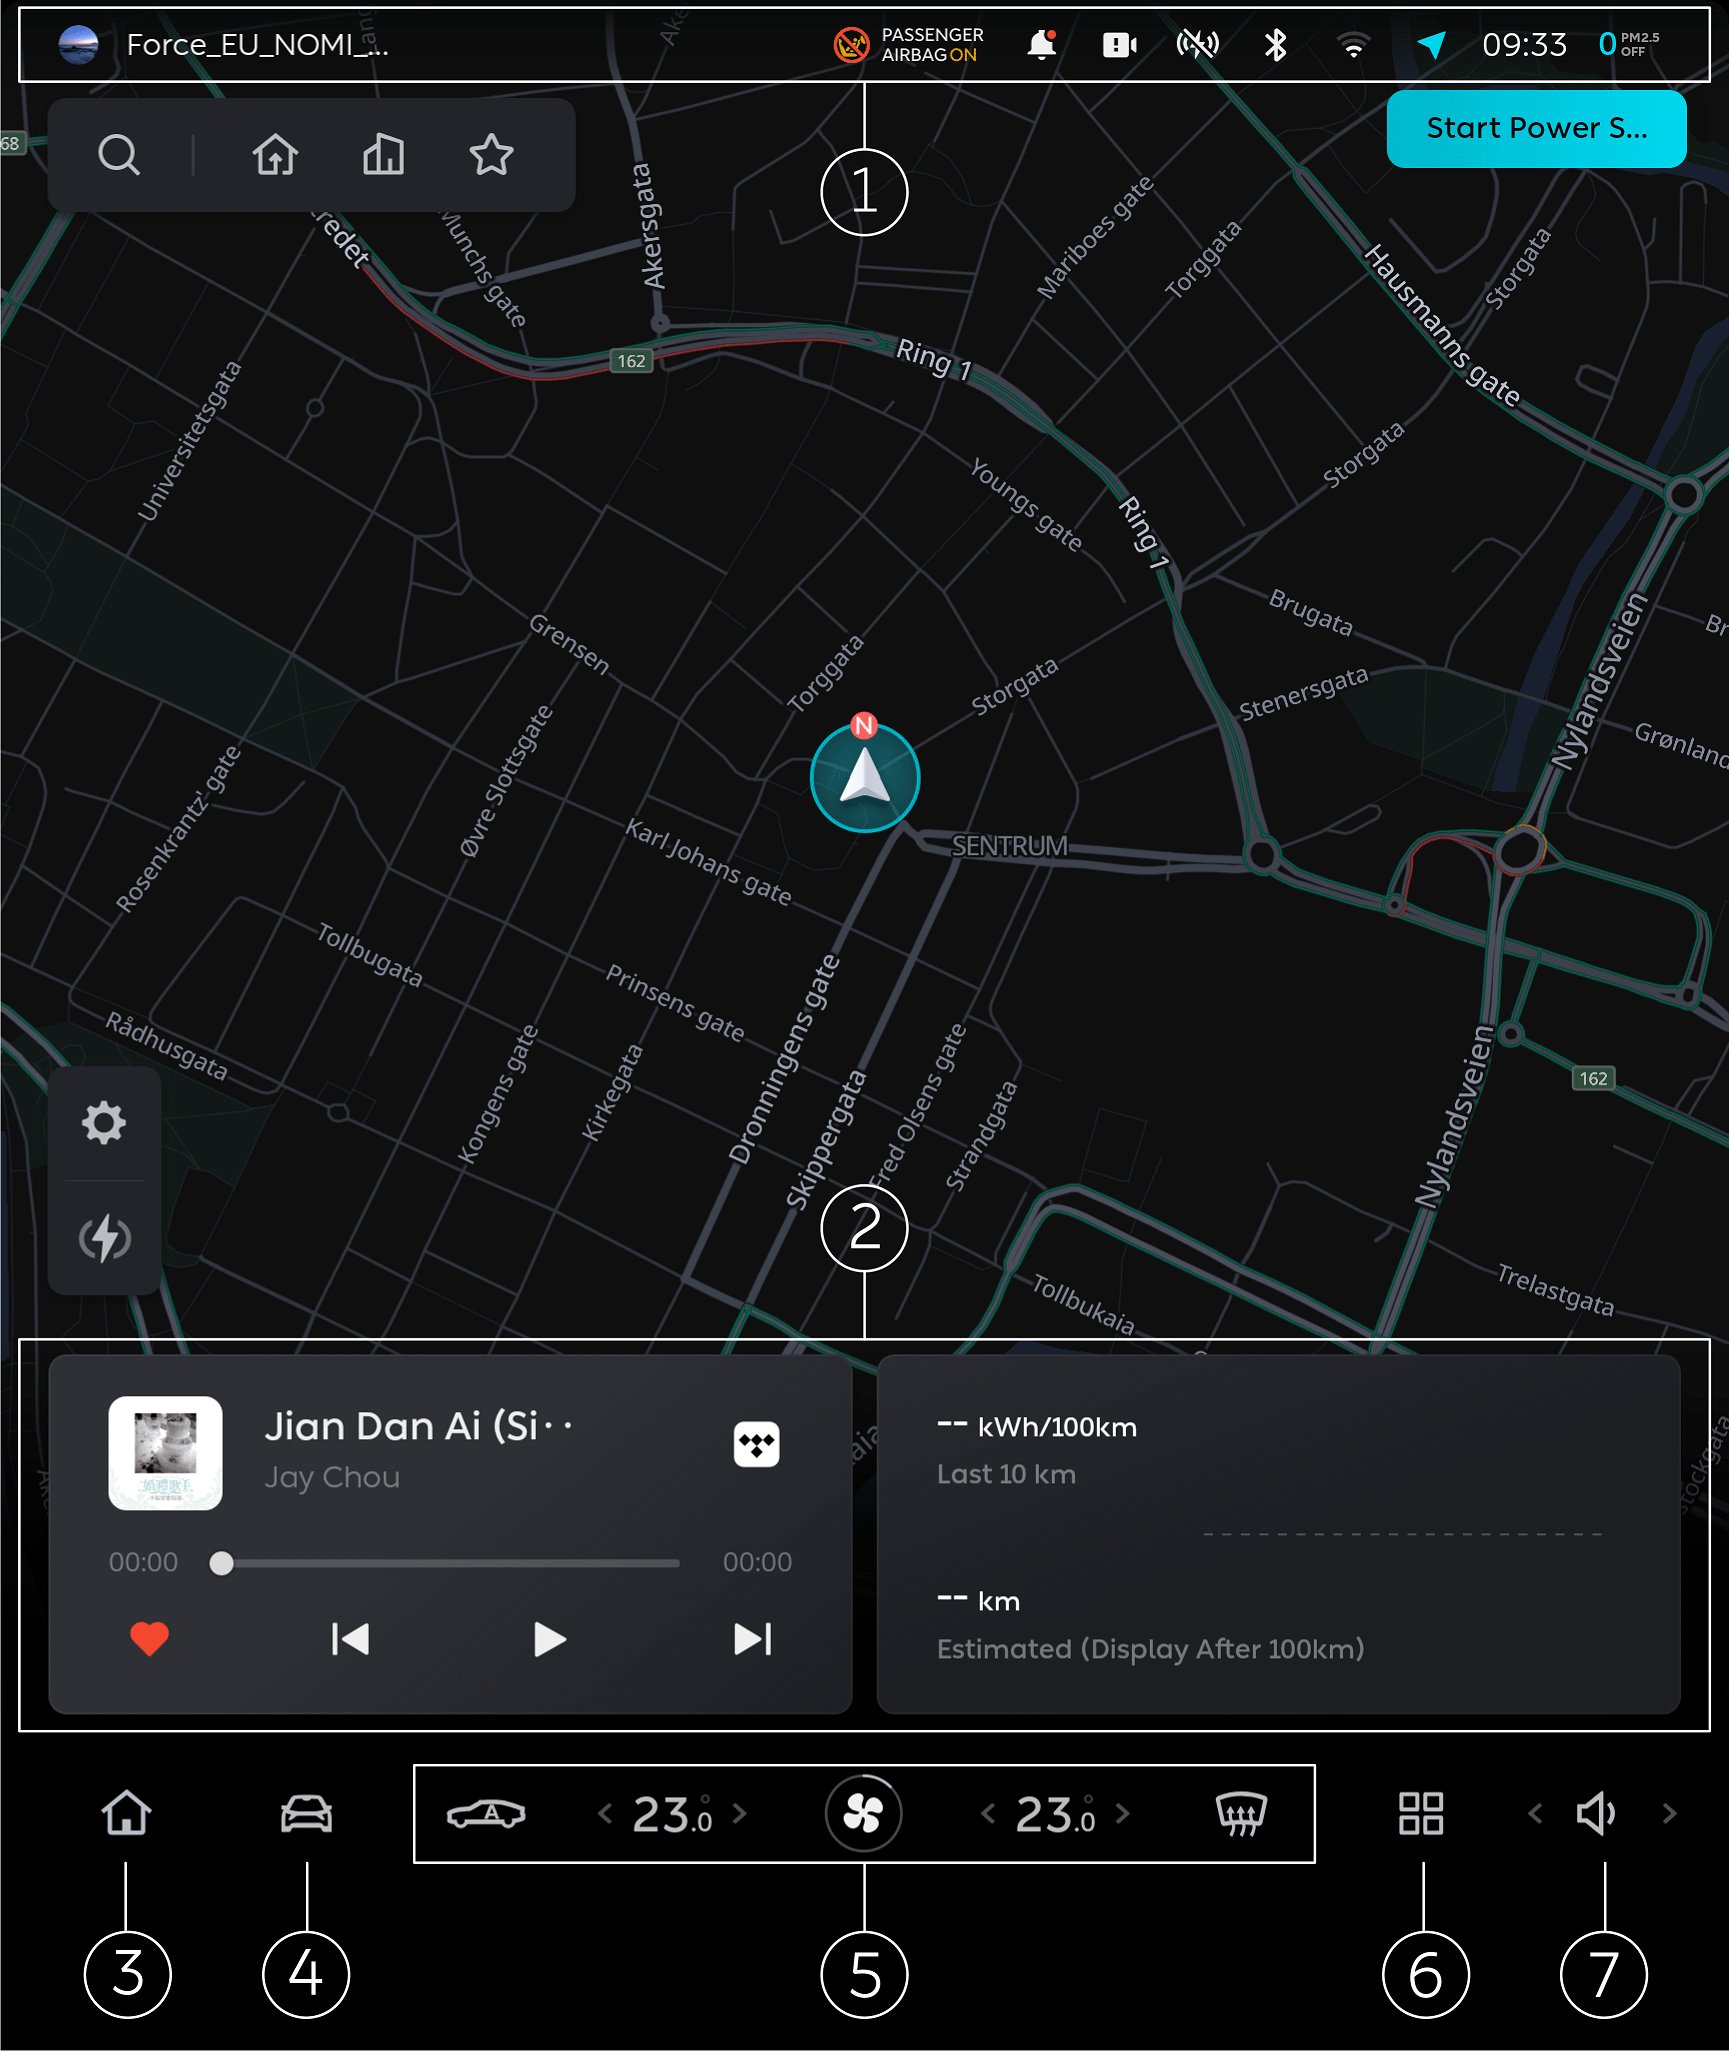
 , indicating that power output is ready. After shifting the gear, the digital instrument
cluster will display the real-time gear position of the vehicle. If the shifting fails, the digital
instrument cluster will prompt you to confirm the current gear.
, indicating that power output is ready. After shifting the gear, the digital instrument
cluster will display the real-time gear position of the vehicle. If the shifting fails, the digital
instrument cluster will prompt you to confirm the current gear.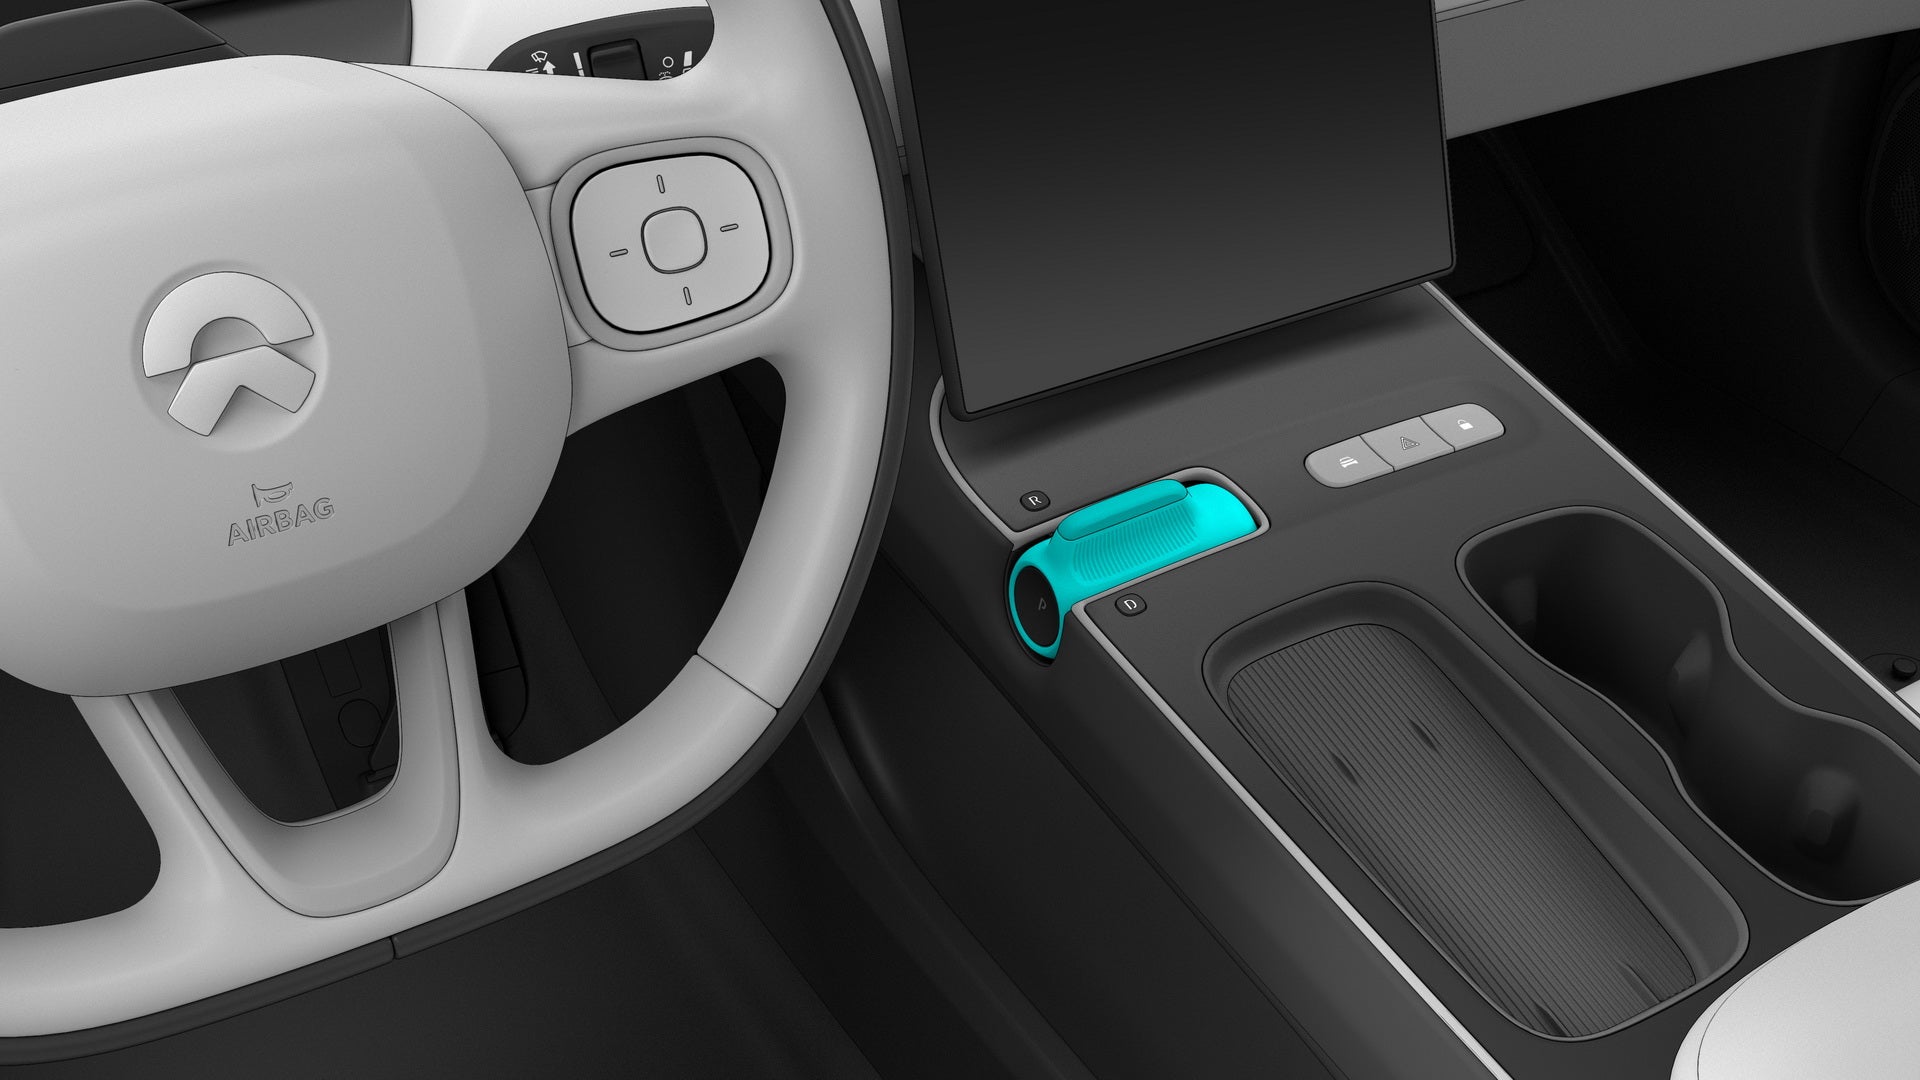
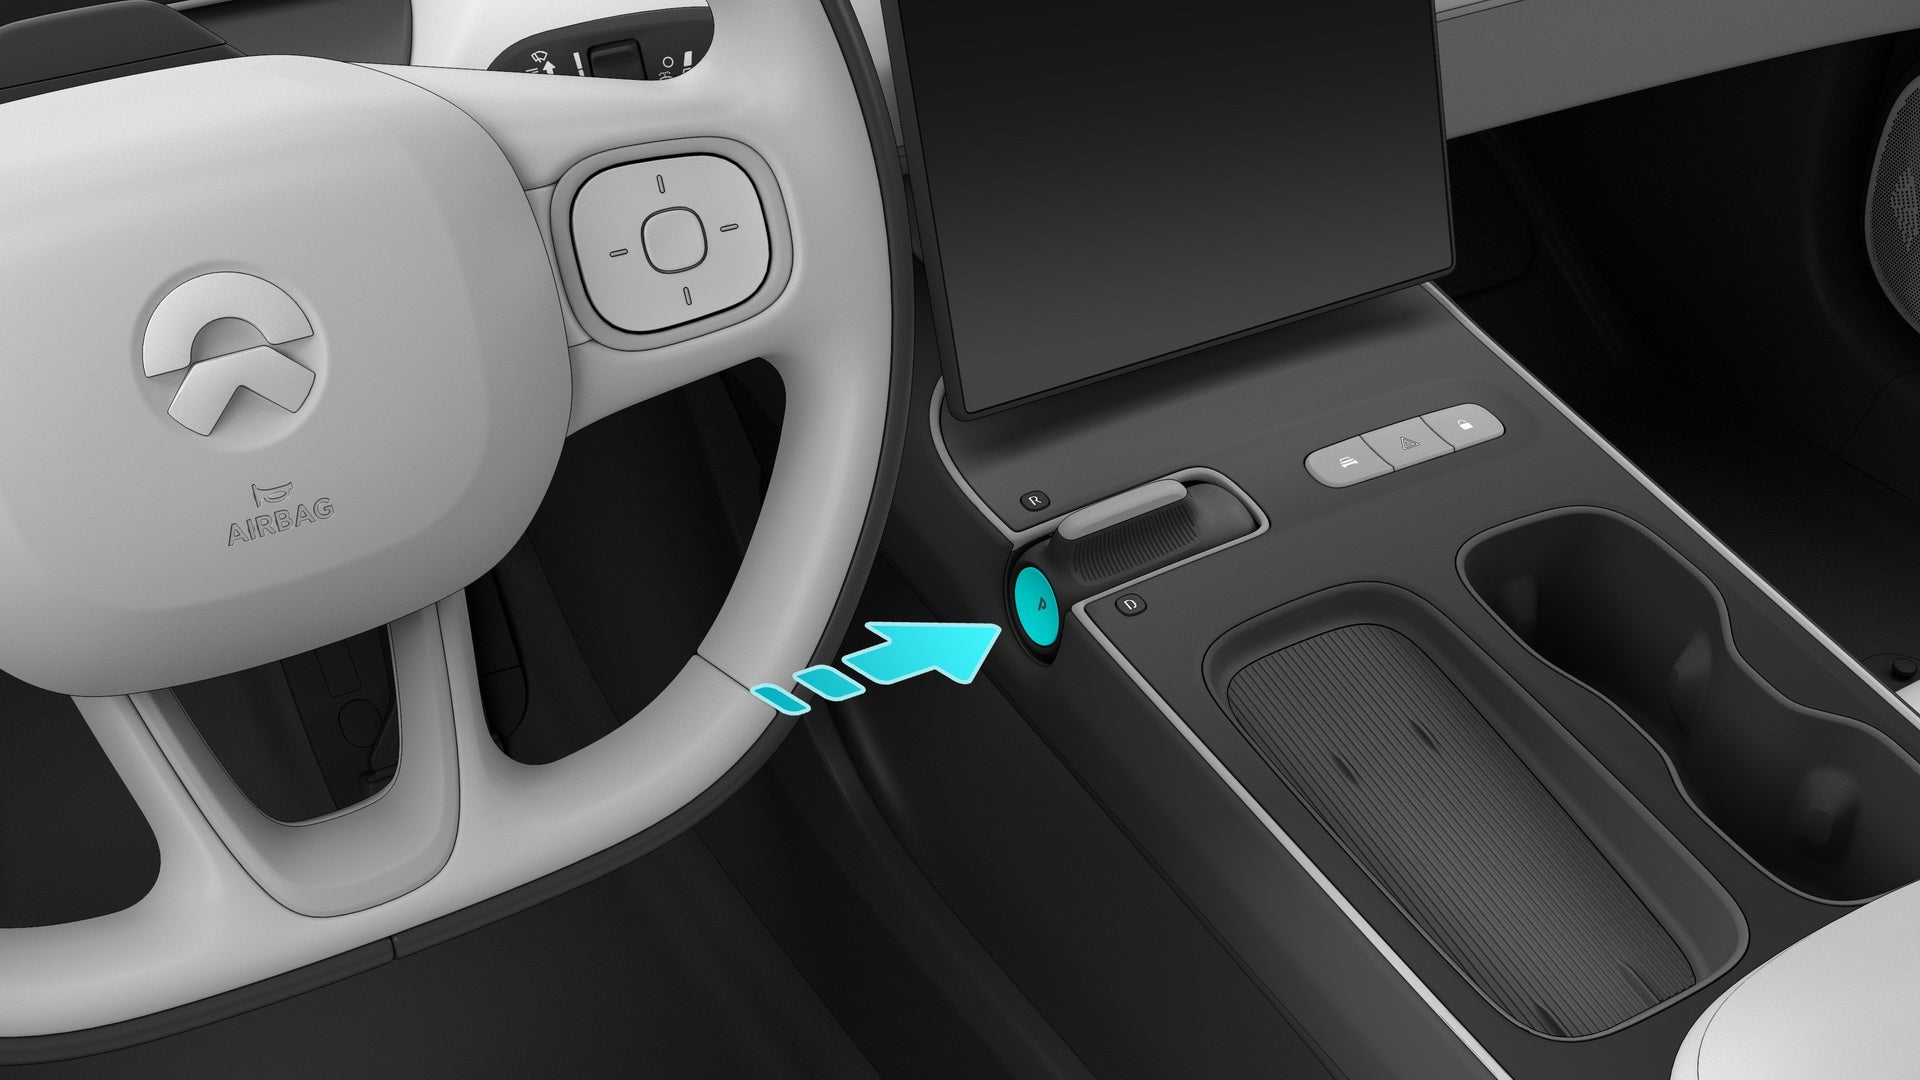
 icon is
displayed on the digital instrument cluster when the Autohold feature is activated. When it is activated,
you can step on the accelerator pedal or the brake pedal to deactivate Autohold.
icon is
displayed on the digital instrument cluster when the Autohold feature is activated. When it is activated,
you can step on the accelerator pedal or the brake pedal to deactivate Autohold.